Owners Manual
Page 2
...Part names and functions 5 Front panel 5 Rear panel 6 Front panel display 7 Remote control 8 CONNECTIONS Connecting speakers 9 Speaker channels and functions 9 Speaker layout 10 Connecting speakers 10 Connecting external devices 13 Cable plugs and jacks 13 Connecting a TV monitor 14 Connecting BD/DVD players and... Setup menu 53 Displaying/Setting the Advanced Setup menu 53 Setting the impedance of speakers 53 Avoiding crossing remote control signals when using multiple Yamaha receivers 54 Initializing various settings for this unit 54 APPENDIX Troubleshooting 55 General 55 ...
...Part names and functions 5 Front panel 5 Rear panel 6 Front panel display 7 Remote control 8 CONNECTIONS Connecting speakers 9 Speaker channels and functions 9 Speaker layout 10 Connecting speakers 10 Connecting external devices 13 Cable plugs and jacks 13 Connecting a TV monitor 14 Connecting BD/DVD players and... Setup menu 53 Displaying/Setting the Advanced Setup menu 53 Setting the impedance of speakers 53 Avoiding crossing remote control signals when using multiple Yamaha receivers 54 Initializing various settings for this unit 54 APPENDIX Troubleshooting 55 General 55 ...
Owners Manual
Page 3
... ■ 1-button input/sound field program switching (SCENE function 26 ■ Speaker connections for each speaker...42 - Speaker impedance configuration...10 - Sound quality control with the equalizer Volume control for speaker acoustic parameters 22 - Speaker distance settings ...42 - Speaker layout...10 - Setting for each speaker 41 - Speaker channels and functions ...9 - Subwoofer cable connection ...12 ■ Acoustic parameter adjustment...
... ■ 1-button input/sound field program switching (SCENE function 26 ■ Speaker connections for each speaker...42 - Speaker impedance configuration...10 - Sound quality control with the equalizer Volume control for speaker acoustic parameters 22 - Speaker distance settings ...42 - Speaker layout...10 - Setting for each speaker 41 - Speaker channels and functions ...9 - Subwoofer cable connection ...12 ■ Acoustic parameter adjustment...
Owners Manual
Page 5
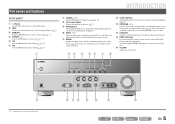
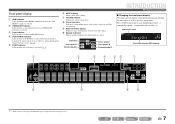
... Switches the input source and the sound field program with a single button (☞p. 26). bc d ef g h l TONE CONTROL Adjusts high-frequency/low-frequency output of speakers/headphones (☞p. 25). n STRAIGHT Changes a sound field program to AM (☞p. 30). j INPUT l / h Selects an input source from which to this unit temporarily. Press this...
... Switches the input source and the sound field program with a single button (☞p. 26). bc d ef g h l TONE CONTROL Adjusts high-frequency/low-frequency output of speakers/headphones (☞p. 25). n STRAIGHT Changes a sound field program to AM (☞p. 30). j INPUT l / h Selects an input source from which to this unit temporarily. Press this...
Owners Manual
Page 6
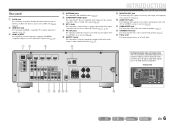
... PR HDMI OUT PR (BD/DVD) HDMI 1 HDMI 2 PB PB Y MONITOR OUT Y COMPONENT VIDEO VIDEO HDMI 3 HDMI 4 MONITOR OUT ANTENNA FM GND AM SURROUND CENTER SPEAKERS FRONT OPTICAL AV 1 COAXIAL AV 2 COAXIAL (CD) AV 3 OPTICAL ( TV ) AV 4 AV 5 AV OUT AUDIO 1 AUDIO 2 AUDIO OUT SUBWOOFER Distinguishing the input and output jacks... The area around the audio/video output jacks is marked in amplifier (☞p. 12). Rear panel a DOCK jack For connecting an optional Yamaha iPod universal dock (such as the AV5 or AUDIO1-2 jacks are selected (☞p. 20).
... PR HDMI OUT PR (BD/DVD) HDMI 1 HDMI 2 PB PB Y MONITOR OUT Y COMPONENT VIDEO VIDEO HDMI 3 HDMI 4 MONITOR OUT ANTENNA FM GND AM SURROUND CENTER SPEAKERS FRONT OPTICAL AV 1 COAXIAL AV 2 COAXIAL (CD) AV 3 OPTICAL ( TV ) AV 4 AV 5 AV OUT AUDIO 1 AUDIO 2 AUDIO OUT SUBWOOFER Distinguishing the input and output jacks... The area around the audio/video output jacks is marked in amplifier (☞p. 12). Rear panel a DOCK jack For connecting an optional Yamaha iPod universal dock (such as the AV5 or AUDIO1-2 jacks are selected (☞p. 20).
Owners Manual
Page 7
... iPod/iPhone is connected through input source → sound field program → surround decoder in order. Subwoofer Front speaker L Surround speaker L SW L CR SL SR Center speaker Front speaker R Surround speaker R INTRODUCTION Part names and functions ■ Changing the front panel display The front panel can display sound field programs...instead of the input source. g VOLUME indicator Displays the current volume level. Press fINFO repeatedly to cycle through an optional Yamaha iPod universal dock (such as the active input source. J1 Input source name HDMI1 Straight VOL.
... iPod/iPhone is connected through input source → sound field program → surround decoder in order. Subwoofer Front speaker L Surround speaker L SW L CR SL SR Center speaker Front speaker R Surround speaker R INTRODUCTION Part names and functions ■ Changing the front panel display The front panel can display sound field programs...instead of the input source. g VOLUME indicator Displays the current volume level. Press fINFO repeatedly to cycle through an optional Yamaha iPod universal dock (such as the active input source. J1 Input source name HDMI1 Straight VOL.

Owners Manual
Page 9
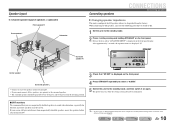
...included in Dolby Digital and DTS. When using a TV, place the speaker just above or just under the center of the TV and the speaker aligned. Speaker channels and functions ■ Front left and right speakers The front speakers are for the front channel sounds (stereo sound) and effect sounds.... ■ Surround left and right speakers. Front speaker layout: Place these speakers at the rear of the TV with ideal speaker positioning and connections in the front of a real movie theater or concert hall. Ex. Ex. ...
...included in Dolby Digital and DTS. When using a TV, place the speaker just above or just under the center of the TV and the speaker aligned. Speaker channels and functions ■ Front left and right speakers The front speakers are for the front channel sounds (stereo sound) and effect sounds.... ■ Surround left and right speakers. Front speaker layout: Place these speakers at the rear of the TV with ideal speaker positioning and connections in the front of a real movie theater or concert hall. Ex. Ex. ...
Owners Manual
Page 10
...has been configured. ■ CRT monitors We recommend that you cannot connect all five speakers, give priority to the surround speakers. • The surround speakers should be configured as needed (Advanced Setup menu)" for details on the Advanced Setup ...degrees and 80 degrees from the listening position. Speaker layout 5.1-channel speaker layout (5 speakers + subwoofer) Front speaker R Front speaker L Subwoofer Connecting speakers CONNECTIONS Connecting speakers ■ Changing speaker impedance This unit is configured for 8Ω speakers when it is displayed on the front panel....
...has been configured. ■ CRT monitors We recommend that you cannot connect all five speakers, give priority to the surround speakers. • The surround speakers should be configured as needed (Advanced Setup menu)" for details on the Advanced Setup ...degrees and 80 degrees from the listening position. Speaker layout 5.1-channel speaker layout (5 speakers + subwoofer) Front speaker R Front speaker L Subwoofer Connecting speakers CONNECTIONS Connecting speakers ■ Changing speaker impedance This unit is configured for 8Ω speakers when it is displayed on the front panel....
Owners Manual
Page 11
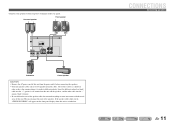
... may damage this unit from the power outlet before connecting the speakers. • Generally speaker cables consist of these cables is switched on. Surround speaker R L Front speaker R L HDMI 4 OR OUT ANTENNA FM GND AM SURROUND CENTER SPEAKERS FRONT AUDIO 2 AUDIO OUT SUBWOOFER Subwoofer Center speaker CAUTION • Remove the AC power cord of this unit. If...
... may damage this unit from the power outlet before connecting the speakers. • Generally speaker cables consist of these cables is switched on. Surround speaker R L Front speaker R L HDMI 4 OR OUT ANTENNA FM GND AM SURROUND CENTER SPEAKERS FRONT AUDIO 2 AUDIO OUT SUBWOOFER Subwoofer Center speaker CAUTION • Remove the AC power cord of this unit. If...

Owners Manual
Page 12
...the cables together firmly so that they will not cause short circuits. 2 Loosen the speaker terminals. 3 Insert the bare wire of the speaker cable into the gap on the speaker terminal down. 2 Insert the speaker cable end into the end of the terminal. 4 Tighten the terminal. Banana plug... Volume: Set to the SUBWOOFER jack on this unit with an audio pin cable. 2 Set the subwoofer volume as follows. CONNECTIONS Connecting speakers ■ Connecting the subwoofer 1 Connect the subwoofer input jack to approximately half volume (or slightly less than half). Crossover frequency (if available...
...the cables together firmly so that they will not cause short circuits. 2 Loosen the speaker terminals. 3 Insert the bare wire of the speaker cable into the gap on the speaker terminal down. 2 Insert the speaker cable end into the end of the terminal. 4 Tighten the terminal. Banana plug... Volume: Set to the SUBWOOFER jack on this unit with an audio pin cable. 2 Set the subwoofer volume as follows. CONNECTIONS Connecting speakers ■ Connecting the subwoofer 1 Connect the subwoofer input jack to approximately half volume (or slightly less than half). Crossover frequency (if available...
Owners Manual
Page 21
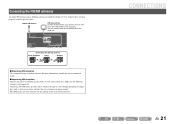
... loop antenna are included with a vinyl-covered wire and bury this new attachment in moist ground. HDMI 3 HDMI 4 FM GND AM MONITOR OUT SURROUND CENTER SPEAKERS FRONT Connecting the AM loop antenna Press and hold Insert Release ■ Improving FM reception We recommend using an outdoor antenna. For more information, consult...
... loop antenna are included with a vinyl-covered wire and bury this new attachment in moist ground. HDMI 3 HDMI 4 FM GND AM MONITOR OUT SURROUND CENTER SPEAKERS FRONT Connecting the AM loop antenna Press and hold Insert Release ■ Improving FM reception We recommend using an outdoor antenna. For more information, consult...
Owners Manual
Page 22
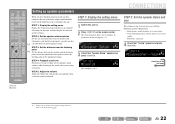
...menu (☞p. 40). J1 SETUP VOL. VOL. SW L CR SL SR CONNECTIONS STEP 2: Set the speaker status and size The settings in step 2 are having. Subwoofer: connected 4 Check that "Speaker Setup" appears and press jENTER. STEP 4: Playback a test tone Playback a test tone to allow you ...to the next page i SETUP j ENTER J 1 : See the section "Setting various functions (Setup menu)" for low-frequency sound. Center/surround speakers: woofer diameter is 16 cm or larger - Subwoofer;;Yes SW L CR SL SR Continues to configure this unit, and then display the menu ...
...menu (☞p. 40). J1 SETUP VOL. VOL. SW L CR SL SR CONNECTIONS STEP 2: Set the speaker status and size The settings in step 2 are having. Subwoofer: connected 4 Check that "Speaker Setup" appears and press jENTER. STEP 4: Playback a test tone Playback a test tone to allow you ...to the next page i SETUP j ENTER J 1 : See the section "Setting various functions (Setup menu)" for low-frequency sound. Center/surround speakers: woofer diameter is 16 cm or larger - Subwoofer;;Yes SW L CR SL SR Continues to configure this unit, and then display the menu ...
Owners Manual
Page 23
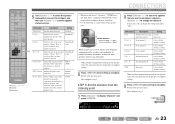
... Press jRETURN when setting is optional. Information Description Setting Unit Switches between setting feet (ft) / units (feet / meters). This completes step 3. R Surround speaker R 1.0 ft to 80.0 ft (0.30 m to 24.0 m) SWFR Subwoofer 1.0 ft to 80.0 ft (0.30 m to 24.0 m) When you want ...to configure, and press jCursor D / E to "Small," low-frequency components of the surround speakers. Yes/None Front Selects the size (sound reproduction capacity) of the subwoofer. When you configured are produced from the subwoofer (or from ...
... Press jRETURN when setting is optional. Information Description Setting Unit Switches between setting feet (ft) / units (feet / meters). This completes step 3. R Surround speaker R 1.0 ft to 80.0 ft (0.30 m to 24.0 m) SWFR Subwoofer 1.0 ft to 80.0 ft (0.30 m to 24.0 m) When you want ...to configure, and press jCursor D / E to "Small," low-frequency components of the surround speakers. Yes/None Front Selects the size (sound reproduction capacity) of the subwoofer. When you configured are produced from the subwoofer (or from ...
Owners Manual
Page 24
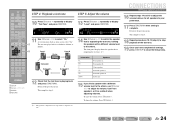
...step 4) to stop playback of the test tone. 19 Once you have completed all speakers to the previous menu. Information FL FR C SL SR SWFR Speakers Front speaker L Front speaker R Center speaker Surround speaker L Surround speaker R Subwoofer 15 If you select "On." En 24 This completes step 4. J1... E. To lower the volume: Press jCursor D. A test tone plays back as soon as follows. SW L CR SL SR 14 Use jCursor B / C to switch the speaker that is complete. SOURCE 1 1 5 TRANSMIT CODE SET SLEEP RECEIVER HDMI 2 3 4 AV 2 3 4 AUDIO 1 2 V-AUX [ A ] [ B ] DOCK TUNER...
...step 4) to stop playback of the test tone. 19 Once you have completed all speakers to the previous menu. Information FL FR C SL SR SWFR Speakers Front speaker L Front speaker R Center speaker Surround speaker L Surround speaker R Subwoofer 15 If you select "On." En 24 This completes step 4. J1... E. To lower the volume: Press jCursor D. A test tone plays back as soon as follows. SW L CR SL SR 14 Use jCursor B / C to switch the speaker that is complete. SOURCE 1 1 5 TRANSMIT CODE SET SLEEP RECEIVER HDMI 2 3 4 AV 2 3 4 AUDIO 1 2 V-AUX [ A ] [ B ] DOCK TUNER...
Owners Manual
Page 25
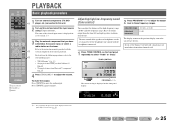
...adjust the volume. Set the headphone tone control with the r external component for a few seconds. TONE Treble VOL. The name of the speakers or headphones can be set the balance extremely off, sounds may not match those frequency ranges. If you set separately. J1 3 Play the ... on the front panel display as necessary (☞p. 46). Press sMUTE again to adjust the output level in those from the front left and right speakers to the s corresponding pages: • "FM/AM tuning" (☞p. 30) • "Playing back tunes from your iPod™/iPhone™" (☞p....
...adjust the volume. Set the headphone tone control with the r external component for a few seconds. TONE Treble VOL. The name of the speakers or headphones can be set the balance extremely off, sounds may not match those frequency ranges. If you set separately. J1 3 Play the ... on the front panel display as necessary (☞p. 46). Press sMUTE again to adjust the output level in those from the front left and right speakers to the s corresponding pages: • "FM/AM tuning" (☞p. 30) • "Playing back tunes from your iPod™/iPhone™" (☞p....
Owners Manual
Page 26
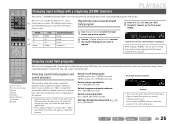
... 50). When you to register. 3 Press the hSCENE key until "SET Complete" appears on the front panel display to check what speakers are available for movies, music and other uses. SW L CR SL SR Program • You can use switch between the external ...a sound field program that allows you change input sources and sound field programs with a Yamaha digital sound field processing (DSP) chip. Four scenes are currently outputting sound (☞p. 7). • You can also use the speaker indicators on the front panel display. PLAYBACK SOURCE 1 1 5 TRANSMIT CODE SET SLEEP ...
... 50). When you to register. 3 Press the hSCENE key until "SET Complete" appears on the front panel display to check what speakers are available for movies, music and other uses. SW L CR SL SR Program • You can use switch between the external ...a sound field program that allows you change input sources and sound field programs with a Yamaha digital sound field processing (DSP) chip. Four scenes are currently outputting sound (☞p. 7). • You can also use the speaker indicators on the front panel display. PLAYBACK SOURCE 1 1 5 TRANSMIT CODE SET SLEEP ...
Owners Manual
Page 27
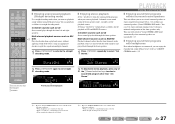
... CR SL SR PLAYBACK Enjoying sound field programs ■ Enjoying sound field programs without surround sound speakers This unit allows you to use virtual surround speakers to enjoy sound field surround effects, even without applying sound field effects, using an appropriate decoder to... Stereo" sound field program is selected. • When straight decoding mode is selected. This unit will playback as follows for the playback of the front speakers only. SOURCE 1 1 5 TRANSMIT CODE SET SLEEP RECEIVER HDMI 2 3 4 AV 2 3 4 AUDIO 1 2 V-AUX [ A ] [ B ] DOCK TUNER FM...
... CR SL SR PLAYBACK Enjoying sound field programs ■ Enjoying sound field programs without surround sound speakers This unit allows you to use virtual surround speakers to enjoy sound field surround effects, even without applying sound field effects, using an appropriate decoder to... Stereo" sound field program is selected. • When straight decoding mode is selected. This unit will playback as follows for the playback of the front speakers only. SOURCE 1 1 5 TRANSMIT CODE SET SLEEP RECEIVER HDMI 2 3 4 AV 2 3 4 AUDIO 1 2 V-AUX [ A ] [ B ] DOCK TUNER FM...

Owners Manual
Page 29
... they are down multi-channel sources to 2 channels. PLAYBACK Enjoying sound field programs En 29 Use this program to output sound from all speakers. A Dolby Pro Logic II decoder. When you play back compression artifacts in 5-channel stereo. ■ Category: SUR.DEC (Surround decode ...mode) Select this program to mix down mixed to 2 channels and output from all speakers. Suitable for playing games. Suitable for any movie. q Pro Logic q PLII Movie q PLII Music q PLII Game A Dolby Pro Logic decoder. &#...
... they are down multi-channel sources to 2 channels. PLAYBACK Enjoying sound field programs En 29 Use this program to output sound from all speakers. A Dolby Pro Logic II decoder. When you play back compression artifacts in 5-channel stereo. ■ Category: SUR.DEC (Surround decode ...mode) Select this program to mix down mixed to 2 channels and output from all speakers. Suitable for playing games. Suitable for any movie. q Pro Logic q PLII Movie q PLII Music q PLII Game A Dolby Pro Logic decoder. &#...
Owners Manual
Page 40
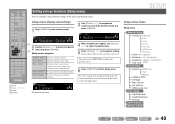
... easier, such as input source labeling and auto-standby functions. LR Crossover SWFR Phase Extra Bass Level (speakers) Distance (unit and speakers) Equalizer (speakers and frequency Test Tone bands) Sound Setup Lipsync HDMI Auto Auto Manual Adaptive DRC D.Range Max Volume Init....Volume HDMI Audio Out Func. Manages settings to change other items by repeating step 4 and 5. j Setup menu categories Speaker Setup Sound Setup Func. SETUP VOL. SOURCE 1 1 5 TRANSMIT CODE SET SLEEP RECEIVER HDMI 2 3 4 AV 2 3 4 AUDIO 1 2 V-AUX...
... easier, such as input source labeling and auto-standby functions. LR Crossover SWFR Phase Extra Bass Level (speakers) Distance (unit and speakers) Equalizer (speakers and frequency Test Tone bands) Sound Setup Lipsync HDMI Auto Auto Manual Adaptive DRC D.Range Max Volume Init....Volume HDMI Audio Out Func. Manages settings to change other items by repeating step 4 and 5. j Setup menu categories Speaker Setup Sound Setup Func. SETUP VOL. SOURCE 1 1 5 TRANSMIT CODE SET SLEEP RECEIVER HDMI 2 3 4 AV 2 3 4 AUDIO 1 2 V-AUX...
Owners Manual
Page 41
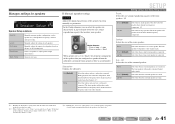
... produce surround channel audio signals. J3 Select this when you do not have a subwoofer connected. Sur. If the front speaker setting is connected. In the Config submenu, you change "Subwoofer" to "None," it will automatically change to "Large."... from other channels. The front speakers will produce front channel low-frequency components. Manages settings for speakers SETUP VOL. SW Speaker Setup L CR SL SR Speaker Setup submenu Config Level Distance Equalizer Test Tone Manually manages speaker configuration, such as speaker size (sound production capacity), and...
... produce surround channel audio signals. J3 Select this when you do not have a subwoofer connected. Sur. If the front speaker setting is connected. In the Config submenu, you change "Subwoofer" to "None," it will automatically change to "Large."... from other channels. The front speakers will produce front channel low-frequency components. Manages settings for speakers SETUP VOL. SW Speaker Setup L CR SL SR Speaker Setup submenu Config Level Distance Equalizer Test Tone Manually manages speaker configuration, such as speaker size (sound production capacity), and...
Owners Manual
Page 42
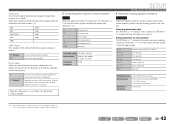
...functions (Setup menu) ■ Manually setting speaker distance Distance Adjusts the timing at the same time. Front speaker L Front speaker R Center speaker Surround speaker L Surround speaker R Subwoofer Adjustable range 1.0 ft to 80.0 ft (0.30 m to select the desired speaker and adjust the volume with a frequency below ...120Hz 160Hz 200Hz SWFR Phase Sets the phase of length (feet or meters). On Off (Default) The subwoofer and the front speakers produce the front channel low-frequency components. Selecting adjustment units Use jCursor B / C to display "Unit," and then use jCursor ...
...functions (Setup menu) ■ Manually setting speaker distance Distance Adjusts the timing at the same time. Front speaker L Front speaker R Center speaker Surround speaker L Surround speaker R Subwoofer Adjustable range 1.0 ft to 80.0 ft (0.30 m to select the desired speaker and adjust the volume with a frequency below ...120Hz 160Hz 200Hz SWFR Phase Sets the phase of length (feet or meters). On Off (Default) The subwoofer and the front speakers produce the front channel low-frequency components. Selecting adjustment units Use jCursor B / C to display "Unit," and then use jCursor ...


