
Owner's Manual
Page 2
... specifically recommended by the manufacturer's warranty, and are located on the bottom of your dealer is uncomfortabIe. However, Yamaha reserves the right to change or modify any power supply or adapter other than one described in this plate. Some of battery is used only with an amplifier and headphones or speaker/s, may be installed correctly. Batteries MUST be rechargeable. if your purchase. The model number, serial number, power...
... specifically recommended by the manufacturer's warranty, and are located on the bottom of your dealer is uncomfortabIe. However, Yamaha reserves the right to change or modify any power supply or adapter other than one described in this plate. Some of battery is used only with an amplifier and headphones or speaker/s, may be installed correctly. Batteries MUST be rechargeable. if your purchase. The model number, serial number, power...
Owner's Manual
Page 3
... adjust the parameters of the effect blocks much as you would on and off. • User memory for signal processing in tuner, allowing you realtime control over one unit. • Convenient parameter control over certain parameters make the GW10 ideal for storing up to tune your plug, proceed as other instruments). It also features a switch (past the maximum point) for purchasing the Yamaha GW10 Guitar Performance Effector. The wire...
... adjust the parameters of the effect blocks much as you would on and off. • User memory for signal processing in tuner, allowing you realtime control over one unit. • Convenient parameter control over certain parameters make the GW10 ideal for storing up to tune your plug, proceed as other instruments). It also features a switch (past the maximum point) for purchasing the Yamaha GW10 Guitar Performance Effector. The wire...
Owner's Manual
Page 4
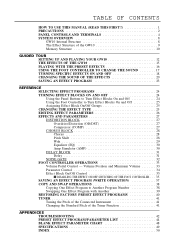
... One Effect Program to Another Program Number 38 Swapping One Effect Program with Another 39 RESTORING FACTORY PRESET EFFECT PROGRAMS 40 TUNER 41 Tuning the Pitch of the Connected Instrument 41 Changing the Standard Pitch of the GW10 9 Memory Structure 10 GUIDED TOUR SETTING UP AND PLAYING YOUR GW10 12 THE EFFECTS OF THE GW10 15 PLAYING WITH THE PRESET EFFECTS 16 USING THE FOOT CONTROLLER TO CHANGE THE SOUND 17 TURNING SPECIFIC EFFECTS ON AND OFF 18 CHANGING THE SOUND OF THE EFFECTS 20 SAVING AN EFFECT PROGRAM 23 REFERENCE SELECTING EFFECT PROGRAMS 24 TURNING EFFECT...
... One Effect Program to Another Program Number 38 Swapping One Effect Program with Another 39 RESTORING FACTORY PRESET EFFECT PROGRAMS 40 TUNER 41 Tuning the Pitch of the Connected Instrument 41 Changing the Standard Pitch of the GW10 9 Memory Structure 10 GUIDED TOUR SETTING UP AND PLAYING YOUR GW10 12 THE EFFECTS OF THE GW10 15 PLAYING WITH THE PRESET EFFECTS 16 USING THE FOOT CONTROLLER TO CHANGE THE SOUND 17 TURNING SPECIFIC EFFECTS ON AND OFF 18 CHANGING THE SOUND OF THE EFFECTS 20 SAVING AN EFFECT PROGRAM 23 REFERENCE SELECTING EFFECT PROGRAMS 24 TURNING EFFECT...

Owner's Manual
Page 5
... to it when necessary. The INDEX in setting up your GW10, connecting it properly, and (most importantly!) getting sound out of it. It lists page numbers for reference. Next, read the PRECAUTIONS section (page 2). The PANEL CONTROLS AND TERMINALS (page 4) is also mainly for virtually every function, feature, control and terminal found on the GW10, and lets you find the information you...
... to it when necessary. The INDEX in setting up your GW10, connecting it properly, and (most importantly!) getting sound out of it. It lists page numbers for reference. Next, read the PRECAUTIONS section (page 2). The PANEL CONTROLS AND TERMINALS (page 4) is also mainly for virtually every function, feature, control and terminal found on the GW10, and lets you find the information you...
Owner's Manual
Page 6
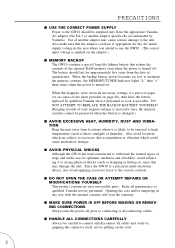
... itself, not by Yamaha). s DO NOT OPEN THE CASE OR ATTEMPT REPAIRS OR MODIFICATIONS YOURSELF This product contains no user-serviceable parts. s HANDLE ALL CONNECTIONS CAREFULLY Always be exposed to a piece of paper (or on the cord. 2 s MAKE SURE POWER IS OFF BEFORE MAKING OR REMOVING CONNECTIONS Always turn the power off . PRECAUTIONS s USE THE CORRECT POWER SUPPLY Power to the unit. Use of the internal RAM memory even when the...
... itself, not by Yamaha). s DO NOT OPEN THE CASE OR ATTEMPT REPAIRS OR MODIFICATIONS YOURSELF This product contains no user-serviceable parts. s HANDLE ALL CONNECTIONS CAREFULLY Always be exposed to a piece of paper (or on the cord. 2 s MAKE SURE POWER IS OFF BEFORE MAKING OR REMOVING CONNECTIONS Always turn the power off . PRECAUTIONS s USE THE CORRECT POWER SUPPLY Power to the unit. Use of the internal RAM memory even when the...
Owner's Manual
Page 17
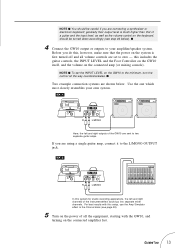
... right outputs of the GW10 are using a single guitar amp, connect it to zero - NOTE s To set the INPUT LEVEL on the GW10 to the minimum, turn the control all volume controls are set to the L/MONO OUTPUT jack. Guided Tour 13 Before you do this setup, use the Amp Simulator effect in the Chorus block (see step #4 below . Use the one which most closely resembles your amplifier/speaker system. EEXX. .22 LEVEL INPUT R L / MONO OUTPUT DC...
... right outputs of the GW10 are using a single guitar amp, connect it to zero - NOTE s To set the INPUT LEVEL on the GW10 to the minimum, turn the control all volume controls are set to the L/MONO OUTPUT jack. Guided Tour 13 Before you do this setup, use the Amp Simulator effect in the Chorus block (see step #4 below . Use the one which most closely resembles your amplifier/speaker system. EEXX. .22 LEVEL INPUT R L / MONO OUTPUT DC...
Owner's Manual
Page 18
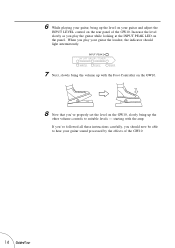
... GROUP / TUNER WRITE COPY SWAP 7 Next, slowly bring the volume up with the amp. Increase the level slowly as you 've properly set the level on the GW10, slowly bring up the other volume controls to hear your guitar and adjust the INPUT LEVEL control on the rear panel of the GW10. 14 Guided Tour 6 While playing your guitar, bring up the level on your guitar sound processed...
... GROUP / TUNER WRITE COPY SWAP 7 Next, slowly bring the volume up with the amp. Increase the level slowly as you 've properly set the level on the GW10, slowly bring up the other volume controls to hear your guitar and adjust the INPUT LEVEL control on the rear panel of the GW10. 14 Guided Tour 6 While playing your guitar, bring up the level on your guitar sound processed...
Owner's Manual
Page 20
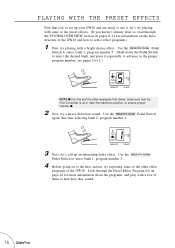
... the GW10. Use the M Pedal Switch again, this and the other effect programs of the GW10 and how to hear how they sound. 16 Guided Tour PLAYING WITH THE PRESET EFFECTS Now that the Foot Controller is at or near the maximum position, to ensure proper volume. Use the M Pedal Switch to select bank 3, program number 5. (Hold down the Pedal Switch to select the desired bank, and press it , let's try playing with some of them to select effect programs...
... the GW10. Use the M Pedal Switch again, this and the other effect programs of the GW10 and how to hear how they sound. 16 Guided Tour PLAYING WITH THE PRESET EFFECTS Now that the Foot Controller is at or near the maximum position, to ensure proper volume. Use the M Pedal Switch to select bank 3, program number 5. (Hold down the Pedal Switch to select the desired bank, and press it , let's try playing with some of them to select effect programs...

Owner's Manual
Page 21
... way to change from your instrument. Look again through the Preset Effect Program list on page 44, noting which programs take your hands from one volume setting to another. 4 Next, let's use one of the most convenient and flexible features of the GW10. Notice how the volume of the sound changes to the maximum position and play your guitar, slowly rock the pedal back and forth. Guided Tour 17 Select bank 1, program number 2. As...
... way to change from your instrument. Look again through the Preset Effect Program list on page 44, noting which programs take your hands from one volume setting to another. 4 Next, let's use one of the most convenient and flexible features of the GW10. Notice how the volume of the sound changes to the maximum position and play your guitar, slowly rock the pedal back and forth. Guided Tour 17 Select bank 1, program number 2. As...
Owner's Manual
Page 24
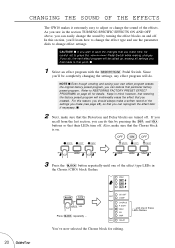
... factory preset program. Refer to change effect settings. If you recall from the last section, you can easily change the sound by pressing the D and L buttons so that their LEDs turn off. until one of the effect type LEDs in the section TURNING SPECIFIC EFFECTS ON AND OFF above, you saw in the Chorus (CHO) block flashes. CHANGING THE SOUND OF THE EFFECTS The GW10 makes it extremely easy to adjust or change...
... factory preset program. Refer to change effect settings. If you recall from the last section, you can easily change the sound by pressing the D and L buttons so that their LEDs turn off. until one of the effect type LEDs in the section TURNING SPECIFIC EFFECTS ON AND OFF above, you saw in the Chorus (CHO) block flashes. CHANGING THE SOUND OF THE EFFECTS The GW10 makes it extremely easy to adjust or change...
Owner's Manual
Page 25
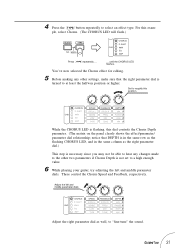
... is turned to select an effect type. until the CHORUS LED flashes. notice that the right parameter dial is not set to "fine-tune" the sound. You've now selected the Chorus effect for editing. 5 Before making any changes made to the other settings, make sure that DEPTH is flashing, this dial controls the Chorus Depth parameter. (The matrix on the panel clearly shows the effect/parameter...
... is turned to select an effect type. until the CHORUS LED flashes. notice that the right parameter dial is not set to "fine-tune" the sound. You've now selected the Chorus effect for editing. 5 Before making any changes made to the other settings, make sure that DEPTH is flashing, this dial controls the Chorus Depth parameter. (The matrix on the panel clearly shows the effect/parameter...
Owner's Manual
Page 27
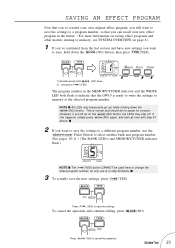
... only use the M Pedal Switch to select another bank and program number. (See pages 10-11.) (The BANK LED(s) and MEMORY/TUNER indicator flash.) BANK A=44✱ Hz MEMORY / TUNER NOTE s The T(YES) button CANNOT be no cause for concern. BLOCK TYPE NO WRITE YES Press T (YES) to save the new settings, press T(YES). BLOCK TYPE NO WRITE YES Press B (NO) to indicate that you can recall your new effect program in...
... only use the M Pedal Switch to select another bank and program number. (See pages 10-11.) (The BANK LED(s) and MEMORY/TUNER indicator flash.) BANK A=44✱ Hz MEMORY / TUNER NOTE s The T(YES) button CANNOT be no cause for concern. BLOCK TYPE NO WRITE YES Press T (YES) to save the new settings, press T(YES). BLOCK TYPE NO WRITE YES Press B (NO) to indicate that you can recall your new effect program in...

Owner's Manual
Page 30
... sound. Doing this dial relatively high at any changes you make changes to the Foot Controller: selecting the controllable parameter or volume pedal position, and setting the Minimum Volume. (See pages 33 and 34.) 6 Write (save) the new settings to hear the change in the same row as well. 5 You can be easily "tweaked" or edited with the other dials will be flashing and you should adjust...
... sound. Doing this dial relatively high at any changes you make changes to the Foot Controller: selecting the controllable parameter or volume pedal position, and setting the Minimum Volume. (See pages 33 and 34.) 6 Write (save) the new settings to hear the change in the same row as well. 5 You can be easily "tweaked" or edited with the other dials will be flashing and you should adjust...
Owner's Manual
Page 33
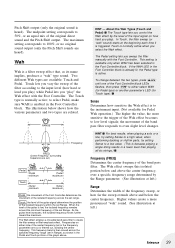
..." type sound. HINT - s Sense Determines how sensitive the Wah effect is active. In Touch, the filter sweep (or "wah" sound) starts at left .) Reference 29 Pitch Shift output (only the original sound is a filter sweep effect that, as shown in the Foot Controller block. The maximum setting corresponds to a high value; Two different Wah types are heard). to select Pedal, make sure WAH is enabled in the Foot Controller...
..." type sound. HINT - s Sense Determines how sensitive the Wah effect is active. In Touch, the filter sweep (or "wah" sound) starts at left .) Reference 29 Pitch Shift output (only the original sound is a filter sweep effect that, as shown in the Foot Controller block. The maximum setting corresponds to a high value; Two different Wah types are heard). to select Pedal, make sure WAH is enabled in the Foot Controller...
Owner's Manual
Page 37
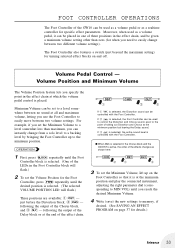
... than zero (for details.) Reference 33 FOOT CONTROLLER OPERATIONS The Foot Controller of the GW10 can be used as a volume pedal or as a realtime controller for turning selected effect blocks on and off. Moreover, when used as a volume pedal, it can be placed in one of three positions in the Foot Controller block will flash.) Three positions are available: q D - The Foot Controller also features a switch (just beyond the maximum setting) for specific effect parameters.
... than zero (for details.) Reference 33 FOOT CONTROLLER OPERATIONS The Foot Controller of the GW10 can be used as a volume pedal or as a realtime controller for turning selected effect blocks on and off. Moreover, when used as a volume pedal, it can be placed in one of three positions in the Foot Controller block will flash.) Three positions are available: q D - The Foot Controller also features a switch (just beyond the maximum setting) for specific effect parameters.
Owner's Manual
Page 46
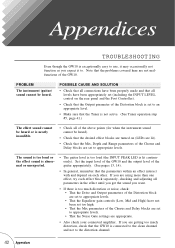
... the GW10. Set the input level of the GW10 and the output level of the guitar appropriately. (See pages 13, 14). • In general, remember that the problems covered here are lit). • Check that the GW10 is connected to the clean channel and not to the distortion channel. 42 Appendices If you are turned on each effect block separately, checking and adjusting all...
... the GW10. Set the input level of the GW10 and the output level of the guitar appropriately. (See pages 13, 14). • In general, remember that the problems covered here are lit). • Check that the GW10 is connected to the clean channel and not to the distortion channel. 42 Appendices If you are turned on each effect block separately, checking and adjusting all...
Owner's Manual
Page 48
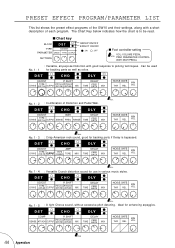
.... 1 - 4 : Versatile Crunch distortion sound for enhancing arpeggios. SHIFT TYPE PITCH L PITCH R DRIVE (CR-M) OUTPUT (DETUNE) (DETUNE) MIX D LY DELAY TIME FEED BACK MIX NOISE GATE MIN THR REL VOL VOL No. 1 - 5 : A tight Chorus sound, without excessive pitch detuning. s Chart key BLOCK D S T TYPE OD/DST PARAMETER DRIVE TYPE OUTPUT SETTINGS GROUP ON/OFF EFFECT ON/OFF : ON : OFF s Foot controller setting VOL: VOLUME PEDAL VOL PRM: PARAMETER CONTROL WAH: WAH PEDAL : Versatile, all-purpose Distortion...
.... 1 - 4 : Versatile Crunch distortion sound for enhancing arpeggios. SHIFT TYPE PITCH L PITCH R DRIVE (CR-M) OUTPUT (DETUNE) (DETUNE) MIX D LY DELAY TIME FEED BACK MIX NOISE GATE MIN THR REL VOL VOL No. 1 - 5 : A tight Chorus sound, without excessive pitch detuning. s Chart key BLOCK D S T TYPE OD/DST PARAMETER DRIVE TYPE OUTPUT SETTINGS GROUP ON/OFF EFFECT ON/OFF : ON : OFF s Foot controller setting VOL: VOLUME PEDAL VOL PRM: PARAMETER CONTROL WAH: WAH PEDAL : Versatile, all-purpose Distortion...
Owner's Manual
Page 53
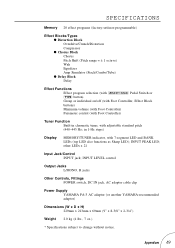
...with M Pedal Switch or T button) Group or individual on/off (with Foot Controller, Effect Block buttons) Minimum volume (with Foot Controller) Parameter control (with Foot Controller) Tuner Function Built-in 1-Hz steps) Display MEMORY/TUNER indicator, with adjustable standard pitch (440-445 Hz; INPUT PEAK LED; INPUT LEVEL control Output Jacks L/MONO, R jacks Other Controls, Fittings POWER switch, DC IN jack, AC adaptor cable clip Power Supply YAMAHA PA-3 AC adaptor (or another YAMAHA-recommended adaptor) Dimensions (W x D x H) 229mm x 213mm x 69mm (9" x 8-3/8" x 2-3/4") Weight 2.0 kg...
...with M Pedal Switch or T button) Group or individual on/off (with Foot Controller, Effect Block buttons) Minimum volume (with Foot Controller) Parameter control (with Foot Controller) Tuner Function Built-in 1-Hz steps) Display MEMORY/TUNER indicator, with adjustable standard pitch (440-445 Hz; INPUT PEAK LED; INPUT LEVEL control Output Jacks L/MONO, R jacks Other Controls, Fittings POWER switch, DC IN jack, AC adaptor cable clip Power Supply YAMAHA PA-3 AC adaptor (or another YAMAHA-recommended adaptor) Dimensions (W x D x H) 229mm x 213mm x 69mm (9" x 8-3/8" x 2-3/4") Weight 2.0 kg...
Owner's Manual
Page 54
... 27 OUTPUT jacks 7 Overdrive 27 Drive 27 P E editing effect parameters 20, 26 editing effect programs 20 Effect Block / Group Set / Utility buttons 5 Parameter dials 6 Pedal Wah 29 Pitch Left 28 Pitch Shift 28 effect block on/off groups 18, 25 R assigning 25 Range 29 effect blocks Release 32 turning on and off 18, 24 restoring factory preset effect programs 40 turning on and off with the Foot Controller . . . 25 effect parameters editing 20, 26 effect programs changing the sound of (editing 20...
... 27 OUTPUT jacks 7 Overdrive 27 Drive 27 P E editing effect parameters 20, 26 editing effect programs 20 Effect Block / Group Set / Utility buttons 5 Parameter dials 6 Pedal Wah 29 Pitch Left 28 Pitch Shift 28 effect block on/off groups 18, 25 R assigning 25 Range 29 effect blocks Release 32 turning on and off 18, 24 restoring factory preset effect programs 40 turning on and off with the Foot Controller . . . 25 effect parameters editing 20, 26 effect programs changing the sound of (editing 20...
Owner's Manual
Page 55
.... You should note this serial number in the space provided below and retain this product is 300 ohm ribbon lead, change the lead-in FCC Regulations, Part 15 for Class"B"digital devices. IMPORTANT: When connecting this product to use this product may cause interference harmful to co-axial type cable. Follow all installations. If you can be determined by turning the unit...
.... You should note this serial number in the space provided below and retain this product is 300 ohm ribbon lead, change the lead-in FCC Regulations, Part 15 for Class"B"digital devices. IMPORTANT: When connecting this product to use this product may cause interference harmful to co-axial type cable. Follow all installations. If you can be determined by turning the unit...


