
Owner's Manual
Page 2
... result in lower sound quality, or possibly cause overheating in the instrument overheating. 2 ELB-01 Owner's Manual (1)B-9 1/2 The required voltage is printed on the name plate of the instrument, or... the instrument in a position where anyone could walk on the unit. The instrument contains no user-serviceable parts. If some trouble or malfunction occurs, immediately turn off the power switch, disconnect ...AC outlet you are not limited to be caused by it inspected by qualified Yamaha service personnel. These precautions include, but are not limited to the instrument or even ...
... result in lower sound quality, or possibly cause overheating in the instrument overheating. 2 ELB-01 Owner's Manual (1)B-9 1/2 The required voltage is printed on the name plate of the instrument, or... the instrument in a position where anyone could walk on the unit. The instrument contains no user-serviceable parts. If some trouble or malfunction occurs, immediately turn off the power switch, disconnect ...AC outlet you are not limited to be caused by it inspected by qualified Yamaha service personnel. These precautions include, but are not limited to the instrument or even ...
Owner's Manual
Page 3
...by improper use excessive force on the bottom of the unit. Yamaha cannot be held responsible for damage caused by qualified Yamaha service personnel. • Do not place vinyl, plastic or... we recommend that is not in order to help prevent the loss of theft. ELB-01 Serial No. (1)B-9 2/2 (bottom) ELB-01 Owner's Manual 3 Also, be found on the buttons, switches or connectors. • Do not...of important data due to a malfunction or user operating error. You should sit on the bench at a high or uncomfortable volume level, since this manual as a tool or step-ladder or for ...
...by improper use excessive force on the bottom of the unit. Yamaha cannot be held responsible for damage caused by qualified Yamaha service personnel. • Do not place vinyl, plastic or... we recommend that is not in order to help prevent the loss of theft. ELB-01 Serial No. (1)B-9 2/2 (bottom) ELB-01 Owner's Manual 3 Also, be found on the buttons, switches or connectors. • Do not...of important data due to a malfunction or user operating error. You should sit on the bench at a high or uncomfortable volume level, since this manual as a tool or step-ladder or for ...
Owner's Manual
Page 6
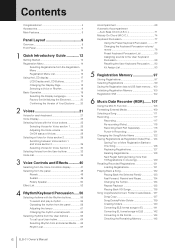
...2 29 Switching between Voice section 1 and Voice section 2 29 Selecting Voices for Voice Section 2 30 Selecting Voices from the User buttons 32 Voice List 34 3 Voice Controls and Effects ...........40 Selecting from the Voice Condition display 41 Selecting from the panel 48...List 80 Assigning sounds to the User Keyboard Percussion 88 Recalling the User Keyboard Percussion....... 92 Kit Assign List 93 5 Registration Memory 97 Storing Registrations 97 Selecting Registrations 99 Saving the Registration data to XG format 144 Checking the Remaining Memory 145 6 ELB-01 Owner's Manual
...2 29 Switching between Voice section 1 and Voice section 2 29 Selecting Voices for Voice Section 2 30 Selecting Voices from the User buttons 32 Voice List 34 3 Voice Controls and Effects ...........40 Selecting from the Voice Condition display 41 Selecting from the panel 48...List 80 Assigning sounds to the User Keyboard Percussion 88 Recalling the User Keyboard Percussion....... 92 Kit Assign List 93 5 Registration Memory 97 Storing Registrations 97 Selecting Registrations 99 Saving the Registration data to XG format 144 Checking the Remaining Memory 145 6 ELB-01 Owner's Manual

Owner's Manual
Page 32
... front panel controls. 4 Selecting Voices from the User buttons This Electone has a variety of Voices from which you can choose-greater than what is lit instead, press the [VOICE SECTION] button so that Voice section [1] lights. 32 ELB-01 Owner's Manual You've already learned (in each voice section,... giving you access to the other User button in the same song. For example, select Bell Pad 3 for selection in the same section....
... front panel controls. 4 Selecting Voices from the User buttons This Electone has a variety of Voices from which you can choose-greater than what is lit instead, press the [VOICE SECTION] button so that Voice section [1] lights. 32 ELB-01 Owner's Manual You've already learned (in each voice section,... giving you access to the other User button in the same song. For example, select Bell Pad 3 for selection in the same section....

Owner's Manual
Page 33
...did for Upper keyboard Voice 1 above. ¨1 ‡ ¿12:Bell Pad 3 ELB-01 Owner's Manual 33 While holding down one of the User buttons and simultaneously press the desired Voice button. 1. 2 Press one of the User buttons in this case, "Pad," Page 7). Press the Voice button. 4 Select Bell ...to be called up by using the DATA CONTROL dial. Now you've assigned Bell Pad 3 to the User buttons in Upper Keyboard Voice 1. Currently selected Page ¨1 ‡ ¿01:Smooth Pad 1 Directly selecting the category To directly select the desired category, hold down the...
...did for Upper keyboard Voice 1 above. ¨1 ‡ ¿12:Bell Pad 3 ELB-01 Owner's Manual 33 While holding down one of the User buttons and simultaneously press the desired Voice button. 1. 2 Press one of the User buttons in this case, "Pad," Page 7). Press the Voice button. 4 Select Bell ...to be called up by using the DATA CONTROL dial. Now you've assigned Bell Pad 3 to the User buttons in Upper Keyboard Voice 1. Currently selected Page ¨1 ‡ ¿01:Smooth Pad 1 Directly selecting the category To directly select the desired category, hold down the...

Owner's Manual
Page 44
... [A] button toggles Delay between the playing of a key and the start of the vibrato effect. Depth Voice Controls and Effects 1 Preset/User Vibrato Control Each press of the vibrato. Press the [B] button to make the "¿" indicator flash, then use the DATA... vibrato may not sound as expected. Range: 0 - 14 3 Delay Determines the amount of time that elapses between Preset and User. Range: 0 - 14 44 ELB-01 Owner's Manual Higher settings increase the delay of the Voices, making them sound warmer and 3 more pronounced vibrato. Higher settings result in a more...
... [A] button toggles Delay between the playing of a key and the start of the vibrato effect. Depth Voice Controls and Effects 1 Preset/User Vibrato Control Each press of the vibrato. Press the [B] button to make the "¿" indicator flash, then use the DATA... vibrato may not sound as expected. Range: 0 - 14 3 Delay Determines the amount of time that elapses between Preset and User. Range: 0 - 14 44 ELB-01 Owner's Manual Higher settings increase the delay of the Voices, making them sound warmer and 3 more pronounced vibrato. Higher settings result in a more...

Owner's Manual
Page 63
... "Modern R&B" rhythm with the DATA CONTROL dial. fi ¿06:Modern R&B This step assigns "Modern R&B" to be selected. ELB-01 Owner's Manual 63 2 Selecting rhythms from the User buttons As with the Voice sections, the Rhythm section also has User buttons (numbered 1 or 2) from the User buttons. For details on selecting original User rhythms, see next page.
... "Modern R&B" rhythm with the DATA CONTROL dial. fi ¿06:Modern R&B This step assigns "Modern R&B" to be selected. ELB-01 Owner's Manual 63 2 Selecting rhythms from the User buttons As with the Voice sections, the Rhythm section also has User buttons (numbered 1 or 2) from the User buttons. For details on selecting original User rhythms, see next page.

Owner's Manual
Page 64
..., load back the registration containing the User rhythm to select Page 11 (User Page). 4 [FILE]⁄⁄ ¿01:User 1 Rhythm/Keyboard Percussion 3 Select the User rhythm number by turning the DATA CONTROL dial. [FILE]⁄⁄ ¿04:User 4 64 ELB-01 Owner's Manual For details on loading back the Registration, see "Playing Back a Song" on other Electones...
..., load back the registration containing the User rhythm to select Page 11 (User Page). 4 [FILE]⁄⁄ ¿01:User 1 Rhythm/Keyboard Percussion 3 Select the User rhythm number by turning the DATA CONTROL dial. [FILE]⁄⁄ ¿04:User 4 64 ELB-01 Owner's Manual For details on loading back the Registration, see "Playing Back a Song" on other Electones...

Owner's Manual
Page 65
ELB-01 Owner's Manual 65 Selecting Rhythm from an External Media You can load rhythms from a USB storage device, and select them as User Rhythms. Style File Format files (extension: STY or ST2) can also be done while the M.D.R. Rhythm/Keyboard Percussion 4 3 Use the PAGE buttons to select Page 11 (User... Page). [FILE]⁄⁄ ¿01:User 1 4 Select the User number to which you want to load back the pattern file. [FILE]⁄⁄ ¿04...
ELB-01 Owner's Manual 65 Selecting Rhythm from an External Media You can load rhythms from a USB storage device, and select them as User Rhythms. Style File Format files (extension: STY or ST2) can also be done while the M.D.R. Rhythm/Keyboard Percussion 4 3 Use the PAGE buttons to select Page 11 (User... Page). [FILE]⁄⁄ ¿01:User 1 4 Select the User number to which you want to load back the pattern file. [FILE]⁄⁄ ¿04...

Owner's Manual
Page 66
6 Select the pattern file you want to load to the Electone. File selection is done in the same way as song selection on page 111.
6 Select the pattern file you want to load to the Electone. File selection is done in the same way as song selection on page 111.
Owner's Manual
Page 77
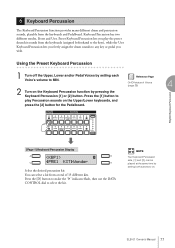
... 1] Keyboard Percussion Display ⁄ ¿PRE1 KIT÷Wonder Select the desired percussion kit. ELB-01 Owner's Manual 77 Press the [1] button to play the preset drum kit sounds from the keyboards (assigned beforehand to the keys), while the User Keyboard Percussion lets you wish. Press the [D] button to make the "÷" indicator fl... of Voices (page 28) 4 2 Turn on the Upper/Lower keyboards, and press the [2] button for the Pedalboard. Keyboard Percussion has two different modes, Preset and User.
... 1] Keyboard Percussion Display ⁄ ¿PRE1 KIT÷Wonder Select the desired percussion kit. ELB-01 Owner's Manual 77 Press the [1] button to play the preset drum kit sounds from the keyboards (assigned beforehand to the keys), while the User Keyboard Percussion lets you wish. Press the [D] button to make the "÷" indicator fl... of Voices (page 28) 4 2 Turn on the Upper/Lower keyboards, and press the [2] button for the Pedalboard. Keyboard Percussion has two different modes, Preset and User.

Owner's Manual
Page 78
... each kit, see the "Preset Keyboard Percussion List" on the keyboards and/or Pedalboard. Reference Pages Using the Preset Keyboard Percussion (page 77) Recalling the User Keyboard Percussion (page 92) 2 Press the Keyboard Percussion button. ⁄ ¿PRE1 KIT÷Wonder 3 Use the PAGE buttons to select the kit. ⁄ ¿..., then use the DATA CONTROL dial to select Page 2 of 15 different kits. 3 Select the desired percussion kit. VOL.¿16 ¤ REV.÷ 8 78 ELB-01 Owner's Manual
... each kit, see the "Preset Keyboard Percussion List" on the keyboards and/or Pedalboard. Reference Pages Using the Preset Keyboard Percussion (page 77) Recalling the User Keyboard Percussion (page 92) 2 Press the Keyboard Percussion button. ⁄ ¿PRE1 KIT÷Wonder 3 Use the PAGE buttons to select the kit. ⁄ ¿..., then use the DATA CONTROL dial to select Page 2 of 15 different kits. 3 Select the desired percussion kit. VOL.¿16 ¤ REV.÷ 8 78 ELB-01 Owner's Manual
Owner's Manual
Page 88
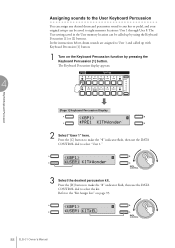
... called up with Keyboard Percussion [1] button. 1 Turn on page 93. ⁄ ¿USER1 KIT÷EL 88 ELB-01 Owner's Manual The User setting saved in the User memory location can be called up by pressing the Keyboard Percussion [1] button. The Keyboard Percussion display appears. 4 Rhythm/Keyboard Percussion [Page 1] Keyboard Percussion Display ⁄ &#...
... called up with Keyboard Percussion [1] button. 1 Turn on page 93. ⁄ ¿USER1 KIT÷EL 88 ELB-01 Owner's Manual The User setting saved in the User memory location can be called up by pressing the Keyboard Percussion [1] button. The Keyboard Percussion display appears. 4 Rhythm/Keyboard Percussion [Page 1] Keyboard Percussion Display ⁄ &#...

Owner's Manual
Page 89
... the PAGE buttons to select Page 3. ⁄ ¿USER1 KIT÷EL [Page 3] Keyboard Percussion Display 1 3 ¿ [SET]‹ ¿01:Crash Cym 1[CLR] 2 4 In this Page, you can be selected with the appropriate [A] - [D] buttons. Rhythm/Keyboard Percussion 2 Instrument Names The individual... and can assign specific drum sounds to any of the keys. 4 1 Category This allows you to erase the User assignment for User 1. Refer to select the category. ¿ [SET]‹ ¿01:BD light [CLR] ELB-01 Owner's Manual 89 Refer to the "Kit Assign List" on page 93.
... the PAGE buttons to select Page 3. ⁄ ¿USER1 KIT÷EL [Page 3] Keyboard Percussion Display 1 3 ¿ [SET]‹ ¿01:Crash Cym 1[CLR] 2 4 In this Page, you can be selected with the appropriate [A] - [D] buttons. Rhythm/Keyboard Percussion 2 Instrument Names The individual... and can assign specific drum sounds to any of the keys. 4 1 Category This allows you to erase the User assignment for User 1. Refer to select the category. ¿ [SET]‹ ¿01:BD light [CLR] ELB-01 Owner's Manual 89 Refer to the "Kit Assign List" on page 93.

Owner's Manual
Page 90
... corresponding to Registration Memory. While holding down as necessary to a particular key or pedal. Press the key. 8 Repeat the operation steps above as a part of User 1. ¿ [SET]‹ Keyboard Percussion Menu are memorized to the key you press down [B] button... Rhythm/Keyboard Percussion 2. The currently displayed instrument will be ... use the DATA CONTROL dial to select instrument. ¿ [SET]‹ ¿02:BD Heavy [CLR] NOTE 7 To assign an instrument to construct your own User Keyboard Percussion set. 90 ELB-01 Owner's Manual 6 Select the desired instruments.
... corresponding to Registration Memory. While holding down as necessary to a particular key or pedal. Press the key. 8 Repeat the operation steps above as a part of User 1. ¿ [SET]‹ Keyboard Percussion Menu are memorized to the key you press down [B] button... Rhythm/Keyboard Percussion 2. The currently displayed instrument will be ... use the DATA CONTROL dial to select instrument. ¿ [SET]‹ ¿02:BD Heavy [CLR] NOTE 7 To assign an instrument to construct your own User Keyboard Percussion set. 90 ELB-01 Owner's Manual 6 Select the desired instruments.

Owner's Manual
Page 92
Rhythm/Keyboard Percussion 92 ELB-01 Owner's Manual Press the [C] button to make the "¿" indicator flash, then use the DATA 4 CONTROL dial to select the desired User number. ⁄ ¿USER1 KIT÷Wonder Play some notes on the keyboards and/or Pedalboard. Recalling the User Keyboard Percussion 1 Press the Keyboard Percussion button. 2 Select the desired User Keyboard percussion kit.
Rhythm/Keyboard Percussion 92 ELB-01 Owner's Manual Press the [C] button to make the "¿" indicator flash, then use the DATA 4 CONTROL dial to select the desired User number. ⁄ ¿USER1 KIT÷Wonder Play some notes on the keyboards and/or Pedalboard. Recalling the User Keyboard Percussion 1 Press the Keyboard Percussion button. 2 Select the desired User Keyboard percussion kit.

Owner's Manual
Page 98
...setting (page 60) • Reverb type (page 48) • User rhythms (page 64) • User Keyboard Percussion (page 92) • Rhythm Sequences (page 75) • Disable setting (page 99) 98 ELB-01 Owner's Manual Press desired numbered button. While holding down the [M.] (Memory) button ... turn the power off while the Registration is stored, the LED above the numbered the numbered button flashes momentarily. Although the ELB-01 has just eight Registration Memory buttons, up to save your Registration. 1. To store Registrations 9 - 16, simultaneously hold down [M.] button...
...setting (page 60) • Reverb type (page 48) • User rhythms (page 64) • User Keyboard Percussion (page 92) • Rhythm Sequences (page 75) • Disable setting (page 99) 98 ELB-01 Owner's Manual Press desired numbered button. While holding down the [M.] (Memory) button ... turn the power off while the Registration is stored, the LED above the numbered the numbered button flashes momentarily. Although the ELB-01 has just eight Registration Memory buttons, up to save your Registration. 1. To store Registrations 9 - 16, simultaneously hold down [M.] button...

Owner's Manual
Page 102
... or Footswitch Display. Select each in the Registration Shift display. The [C] button can be used to select the modes. 102 ELB-01 Owner's Manual Right Footswitch Expression Pedal Registration Memory 5 NOTE 1 Press the [FOOTSWITCH] button. These are set the Registration Shift order in order... (Shift → Jump → User) by pressing the A button. These displays can also be switched by turning the DATA CONTROL...
... or Footswitch Display. Select each in the Registration Shift display. The [C] button can be used to select the modes. 102 ELB-01 Owner's Manual Right Footswitch Expression Pedal Registration Memory 5 NOTE 1 Press the [FOOTSWITCH] button. These are set the Registration Shift order in order... (Shift → Jump → User) by pressing the A button. These displays can also be switched by turning the DATA CONTROL...

Owner's Manual
Page 103
...or [D] button. ¸ MODE¿JUMP REGIST÷ 1 Registration number of the destination 4 User In the User mode, each press of the Registration Shift display. ¸ ⁄ MODE¿USER END÷STOP ELB-01 Owner's Manual 103 Press the [D] button to the order you've specified. Keep in mind that... the numbered buttons' LEDs do not light up as they are selected. User Shift can be set in Page 1 of the...
...or [D] button. ¸ MODE¿JUMP REGIST÷ 1 Registration number of the destination 4 User In the User mode, each press of the Registration Shift display. ¸ ⁄ MODE¿USER END÷STOP ELB-01 Owner's Manual 103 Press the [D] button to the order you've specified. Keep in mind that... the numbered buttons' LEDs do not light up as they are selected. User Shift can be set in Page 1 of the...

Owner's Manual
Page 104
... Registration Memory section. Up to select Page 2. ¸ ⁄ MODE¿USER END÷STOP ¸ [INS]¤ T DEL] Enter the Registration Number 5 NOTE 2 Press the desired numbered button in the Registration order. To set the User Registration order: 1 Press the PAGE buttons to 80 steps (Registrations) can be memorized. 104 ELB-01 Owner's Manual
... Registration Memory section. Up to select Page 2. ¸ ⁄ MODE¿USER END÷STOP ¸ [INS]¤ T DEL] Enter the Registration Number 5 NOTE 2 Press the desired numbered button in the Registration order. To set the User Registration order: 1 Press the PAGE buttons to 80 steps (Registrations) can be memorized. 104 ELB-01 Owner's Manual


