

Owner's Manual
Page 2
... apparatus has been exposed to rain or moisture, does not operate normally, or has been dropped. 15 Be sure to the presence of the DVR-S150. 16 Do not place the following objects on this Owner's Manual in the space below. IMPORTANT SAFETY INSTRUCTIONS CAUTION RISK OF ELECTRIC SHOCK DO NOT...
... apparatus has been exposed to rain or moisture, does not operate normally, or has been dropped. 15 Be sure to the presence of the DVR-S150. 16 Do not place the following objects on this Owner's Manual in the space below. IMPORTANT SAFETY INSTRUCTIONS CAUTION RISK OF ELECTRIC SHOCK DO NOT...
Owner's Manual
Page 3
... Group recommend you to coaxial type cable. and, most out of interference, which can not locate the appropriate retailer, please contact Yamaha Electronics Corp., U.S.A. 6660 Orangethorpe Ave, Buena Park, CA 90620. This equipment generates/uses radio frequencies and, if not installed and...level of assurance that your use the product. 2. IMPORTANT NOTICE : DO NOT MODIFY THIS UNIT! Modifications not expressly approved by Yamaha may cause interference harmful to eliminate the problem by using one of the following measures: Relocate either this type of this product ...
... Group recommend you to coaxial type cable. and, most out of interference, which can not locate the appropriate retailer, please contact Yamaha Electronics Corp., U.S.A. 6660 Orangethorpe Ave, Buena Park, CA 90620. This equipment generates/uses radio frequencies and, if not installed and...level of assurance that your use the product. 2. IMPORTANT NOTICE : DO NOT MODIFY THIS UNIT! Modifications not expressly approved by Yamaha may cause interference harmful to eliminate the problem by using one of the following measures: Relocate either this type of this product ...
Owner's Manual
Page 4
...limit for a long time, the unit may cause electrical shock to the user and/or damage to consume a very small quantity of DVR-S150 - DANGER When this unit is capable of this unit. iii CAUTION in the home are complete. 8 Do not operate this unit is... personal injury. It may overheat, possibly causing damage. 9 Do not use this unit away from other openings to obstruct heat radiation. Contact qualified YAMAHA service personnel when any reasons. 15 When not planning to the terminal which is needed. away from direct sunlight, heat sources, vibration, dust,...
...limit for a long time, the unit may cause electrical shock to the user and/or damage to consume a very small quantity of DVR-S150 - DANGER When this unit is capable of this unit. iii CAUTION in the home are complete. 8 Do not operate this unit is... personal injury. It may overheat, possibly causing damage. 9 Do not use this unit away from other openings to obstruct heat radiation. Contact qualified YAMAHA service personnel when any reasons. 15 When not planning to the terminal which is needed. away from direct sunlight, heat sources, vibration, dust,...
Owner's Manual
Page 5
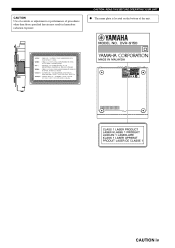
CAUTION Use of controls or adjustments or performance of the unit. CAUTION: READ THIS BEFORE OPERATING YOUR UNIT. ¶ The name plate is located on the bottom of procedures other than those specified herein may result in hazardous radiation exposure. CAUTION iv
CAUTION Use of controls or adjustments or performance of the unit. CAUTION: READ THIS BEFORE OPERATING YOUR UNIT. ¶ The name plate is located on the bottom of procedures other than those specified herein may result in hazardous radiation exposure. CAUTION iv
Owner's Manual
Page 6
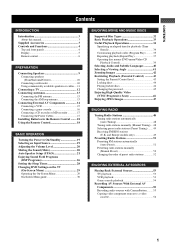
CONTENTS Contents INTRODUCTION Introduction 3 About this manual 3 Supplied Accessories 3 Controls and Functions 4 Top and front panels 4 Display 5 Remote control 6 PREPARATION Connecting Speakers 9 Connecting speakers (Front/Surround/Center 10 Connecting a subwoofer 10 Using commercially available speakers or cables ... 11 Connecting a TV 12 Connecting Antennas 13 Connecting the FM antenna 13 Connecting the AM loop antenna 13 Connecting External AV Components 14 Connecting a VCR 15 Connecting a game console 16 Connecting a CD recorder or MD recorder 17 Connecting the Power ...
CONTENTS Contents INTRODUCTION Introduction 3 About this manual 3 Supplied Accessories 3 Controls and Functions 4 Top and front panels 4 Display 5 Remote control 6 PREPARATION Connecting Speakers 9 Connecting speakers (Front/Surround/Center 10 Connecting a subwoofer 10 Using commercially available speakers or cables ... 11 Connecting a TV 12 Connecting Antennas 13 Connecting the FM antenna 13 Connecting the AM loop antenna 13 Connecting External AV Components 14 Connecting a VCR 15 Connecting a game console 16 Connecting a CD recorder or MD recorder 17 Connecting the Power ...
Owner's Manual
Page 7
Contents SOUND OPTIONS Enjoying Sound with Specific Speakers 57 Enjoying 6.1/5.1ch sources with all speakers including a virtual speaker (Matrix 6.1 57 Enjoying 2ch sources with all speakers (Dolby Pro Logic II 58 Enjoying DSP programs with the front speakers only (Virtual CINEMA DSP 59 Enjoying DSP Programs in a Variety of Ways 60 Listening with headphones ("SILENT CINEMA 60 Listening at low volume (Night Listening 61 Enjoying High-Quality Sound 62 Enjoying original Dolby and DTS sounds 62 Enjoying original 2ch sound (Stereo 63 ADVANCED CONFIGURATION Adjusting the Speaker Balance ...
Contents SOUND OPTIONS Enjoying Sound with Specific Speakers 57 Enjoying 6.1/5.1ch sources with all speakers including a virtual speaker (Matrix 6.1 57 Enjoying 2ch sources with all speakers (Dolby Pro Logic II 58 Enjoying DSP programs with the front speakers only (Virtual CINEMA DSP 59 Enjoying DSP Programs in a Variety of Ways 60 Listening with headphones ("SILENT CINEMA 60 Listening at low volume (Night Listening 61 Enjoying High-Quality Sound 62 Enjoying original Dolby and DTS sounds 62 Enjoying original 2ch sound (Stereo 63 ADVANCED CONFIGURATION Adjusting the Speaker Balance ...
Owner's Manual
Page 8
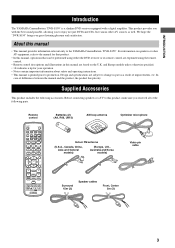
...Before connecting speakers or a TV to this manual • This manual provides information relevant only to the YAMAHA CinemaStation "DVR-S150". We hope the "DVR-S150" brings you received all of differences between the manual and the product, the product has priority. Remote control...Center 5m (3) 3 About this product, make sure you great listening pleasure and satisfaction. INTRODUCTION Introduction The YAMAHA CinemaStation "DVR-S150" is printed prior to production. Supplied Accessories This product includes the following parts. In case of the following accessories.
...Before connecting speakers or a TV to this manual • This manual provides information relevant only to the YAMAHA CinemaStation "DVR-S150". We hope the "DVR-S150" brings you received all of differences between the manual and the product, the product has priority. Remote control...Center 5m (3) 3 About this product, make sure you great listening pleasure and satisfaction. INTRODUCTION Introduction The YAMAHA CinemaStation "DVR-S150" is printed prior to production. Supplied Accessories This product includes the following parts. In case of the following accessories.

Owner's Manual
Page 9
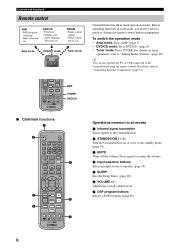
Press and hold to be played. 0 Display Displays playback information or settings. (page 5) A (AUTO/MAN'L) (DVD/CD mode) Starts disc playback. (Tuner mode) Switches between progressive scan and interlace outputs. (page 46) (Tuner mode) Stores the current radio station for Preset Tuning. (page 52) 4 b/w, f/a (d PRESET/TUNING u) (DVD/CD mode) Selects the previous/next track or chapter. Press and hold to fast forward or fast reverse. (Tuner mode) Selects a preset number or adjusts the frequency. (page 51) 5 (A/B/C/D/E) (DVD/CD mode) Stops disc playback. (Tuner mode) Selects a preset ...
Press and hold to be played. 0 Display Displays playback information or settings. (page 5) A (AUTO/MAN'L) (DVD/CD mode) Starts disc playback. (Tuner mode) Switches between progressive scan and interlace outputs. (page 46) (Tuner mode) Stores the current radio station for Preset Tuning. (page 52) 4 b/w, f/a (d PRESET/TUNING u) (DVD/CD mode) Selects the previous/next track or chapter. Press and hold to fast forward or fast reverse. (Tuner mode) Selects a preset number or adjusts the frequency. (page 51) 5 (A/B/C/D/E) (DVD/CD mode) Stops disc playback. (Tuner mode) Selects a preset ...

Owner's Manual
Page 10
and Europe models only) B Playback icon Lights up when the PTY SEEK mode is activated. (page 50) 5 F Display Displays various information such as CDs. "PTY HOLD" lights up during disc playback. INTRODUCTION Display 1 2 3 DIGITAL PL DSP MATRIX PCM TITLE TRACK CHAP 0 PROGRESSIVE A DVD VCD CD Controls and Functions 45 VIRTUAL SILENT 6 78 9 PROG SLEEP REP A-B ALL AUTO ST MEMORY PS TUNED PTY RT CT PTY HOLD BC D E 1 Decoder indicator Displays the icon for the selected internal decoder. 2 DSP Lights up when a DSP program is selected. 3 DSP program indicator Displays...
and Europe models only) B Playback icon Lights up when the PTY SEEK mode is activated. (page 50) 5 F Display Displays various information such as CDs. "PTY HOLD" lights up during disc playback. INTRODUCTION Display 1 2 3 DIGITAL PL DSP MATRIX PCM TITLE TRACK CHAP 0 PROGRESSIVE A DVD VCD CD Controls and Functions 45 VIRTUAL SILENT 6 78 9 PROG SLEEP REP A-B ALL AUTO ST MEMORY PS TUNED PTY RT CT PTY HOLD BC D E 1 Decoder indicator Displays the icon for the selected internal decoder. 2 DSP Lights up when a DSP program is selected. 3 DSP program indicator Displays...
Owner's Manual
Page 11
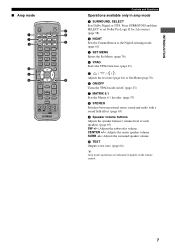
To switch the operation mode • Amp mode: Press AMP. (page 7) • DVD/CD mode: Press DVD/CD. (page 8) • Tuner mode: Press TUNER. Amp mode DVD/CD mode DVR-S120 WB56650 POWER POWER TV AUDIO ANGLE SUBTITLE SURROUND SELECT MATRIX 6.1 STEREO REPEAT A-B NIGHT SW CENTER SURR Tuner mode CinemaStation has three main operation modes. Press again to resume the volume. 4 Input selection buttons Select an input source to the CinemaStation using the remote control. Controls and Functions Remote control AMP • DSP program selection • Input selection, etc....
To switch the operation mode • Amp mode: Press AMP. (page 7) • DVD/CD mode: Press DVD/CD. (page 8) • Tuner mode: Press TUNER. Amp mode DVD/CD mode DVR-S120 WB56650 POWER POWER TV AUDIO ANGLE SUBTITLE SURROUND SELECT MATRIX 6.1 STEREO REPEAT A-B NIGHT SW CENTER SURR Tuner mode CinemaStation has three main operation modes. Press again to resume the volume. 4 Input selection buttons Select an input source to the CinemaStation using the remote control. Controls and Functions Remote control AMP • DSP program selection • Input selection, etc....
Owner's Manual
Page 12
Press SURROUND and then SELECT to set Dolby Pro Logic II for 2ch sources. (page 58) 2 NIGHT Sets the CinemaStation to the Night Listening mode. (page 61) 3 SET MENU Enters the Set Menu. (page 76) 4 YPAO Starts the YPAO function. (page 21) 5 / // Adjusts the test tone (page 64) or Set Menu (page 76). 6 ON/OFF Turns the YPAO mode on the remote control. 7 INTRODUCTION ■ Amp mode 1 2 3 4 5 6 STANDBY/ON POWER TV AUDIO ANGLE SUBTITLE SURROUND SELECT MATRIX 6.1 STEREO REPEAT A-B NIGHT SW CENTER SURR SET MENU TV CH PRESET TV INPUT A B C D E SHIFT SLEEP PRESET FREQ/RDS MODE PTY ...
Press SURROUND and then SELECT to set Dolby Pro Logic II for 2ch sources. (page 58) 2 NIGHT Sets the CinemaStation to the Night Listening mode. (page 61) 3 SET MENU Enters the Set Menu. (page 76) 4 YPAO Starts the YPAO function. (page 21) 5 / // Adjusts the test tone (page 64) or Set Menu (page 76). 6 ON/OFF Turns the YPAO mode on the remote control. 7 INTRODUCTION ■ Amp mode 1 2 3 4 5 6 STANDBY/ON POWER TV AUDIO ANGLE SUBTITLE SURROUND SELECT MATRIX 6.1 STEREO REPEAT A-B NIGHT SW CENTER SURR SET MENU TV CH PRESET TV INPUT A B C D E SHIFT SLEEP PRESET FREQ/RDS MODE PTY ...
Owner's Manual
Page 13
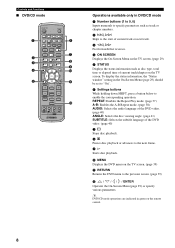
y DVD/CD mode operations are indicated in the On-Screen Menu (page 29) should be set to "On". 6 Settings buttons While holding down SHIFT, press a button below to the previous screen. (page 39) B / / / / ENTER Operates the On-Screen Menu (page 29) or specify various parameters. To display the status information, the "Status window" setting in green on the remote control. 8 Controls and Functions ■ DVD/CD mode 1 2 3 4 5 STANDBY/ON POWER TV AUDIO ANGLE SUBTITLE SURROUND SELECT MATRIX 6.1 STEREO REPEAT A-B NIGHT SW CENTER SURR SET MENU TV CH PRESET TV INPUT A B C D E ...
y DVD/CD mode operations are indicated in the On-Screen Menu (page 29) should be set to "On". 6 Settings buttons While holding down SHIFT, press a button below to the previous screen. (page 39) B / / / / ENTER Operates the On-Screen Menu (page 29) or specify various parameters. To display the status information, the "Status window" setting in green on the remote control. 8 Controls and Functions ■ DVD/CD mode 1 2 3 4 5 STANDBY/ON POWER TV AUDIO ANGLE SUBTITLE SURROUND SELECT MATRIX 6.1 STEREO REPEAT A-B NIGHT SW CENTER SURR SET MENU TV CH PRESET TV INPUT A B C D E ...
Owner's Manual
Page 14
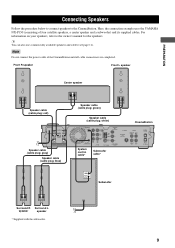
...* Subwoofer cable* DIGITAL AUDIO IN OUT OPTICAL INPUT SYSTEM CONNECTOR Subwoofer Surround R Surround L speaker speaker * Supplied with the subwoofer. 9 Here, the connection example uses the YAMAHA NX-P150 (consisting of the CinemaStation until all cable connections are completed. y You can also use commercially available speakers and cables (see page 11). PREPARATION...
...* Subwoofer cable* DIGITAL AUDIO IN OUT OPTICAL INPUT SYSTEM CONNECTOR Subwoofer Surround R Surround L speaker speaker * Supplied with the subwoofer. 9 Here, the connection example uses the YAMAHA NX-P150 (consisting of the CinemaStation until all cable connections are completed. y You can also use commercially available speakers and cables (see page 11). PREPARATION...
Owner's Manual
Page 15
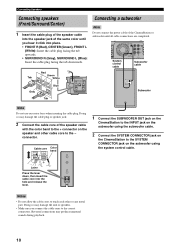
connector. Doing so may damage the unit or speakers. • Make sure you hear it click into place. • FRONT R (Red), CENTER (Green), FRONT L (White): Insert the cable plug facing the tub upwards. • SURROUND R (Gray), SURROUND L (Blue): Insert the cable plug facing the tub downwards. Connecting a subwoofer Note Do not connect the power cable of the CinemaStation or subwoofer until you connect the cable cores to the + connector on the speaker and other or any metal part. Doing so may produce unnatural sounds during playback. 10 Lever Press the lever down, then ...
connector. Doing so may damage the unit or speakers. • Make sure you hear it click into place. • FRONT R (Red), CENTER (Green), FRONT L (White): Insert the cable plug facing the tub upwards. • SURROUND R (Gray), SURROUND L (Blue): Insert the cable plug facing the tub downwards. Connecting a subwoofer Note Do not connect the power cable of the CinemaStation or subwoofer until you connect the cable cores to the + connector on the speaker and other or any metal part. Doing so may produce unnatural sounds during playback. 10 Lever Press the lever down, then ...

Owner's Manual
Page 16
... available speakers or cables When using commercially available speakers • Use speakers with 6-ohm impedance or more. If a speaker with less than those of the YAMAHA NX-P150 (consisting of the following.
... available speakers or cables When using commercially available speakers • Use speakers with 6-ohm impedance or more. If a speaker with less than those of the YAMAHA NX-P150 (consisting of the following.
Owner's Manual
Page 17
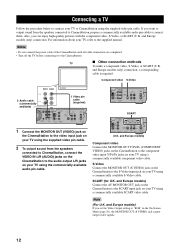
and Europe models) Component video Connect the MONITOR OUT Y/PB/PR (COMPONENT VIDEO) jacks on the CinemaStation to the component video input Y/PB/PR jacks on your TV using the supplied video pin cable. 2 To output sound from the speakers connected to CinemaStation, prepare a commercially available audio pin cable to connect them. and Europe models) If you want to output sound from the speakers connected to CinemaStation, connect the VIDEO IN L/R (AUDIO) jacks on the CinemaStation to the audio output L/R jacks on your TV using the commercially available audio pin cable. and ...
and Europe models) Component video Connect the MONITOR OUT Y/PB/PR (COMPONENT VIDEO) jacks on the CinemaStation to the component video input Y/PB/PR jacks on your TV using the supplied video pin cable. 2 To output sound from the speakers connected to CinemaStation, prepare a commercially available audio pin cable to connect them. and Europe models) If you want to output sound from the speakers connected to CinemaStation, connect the VIDEO IN L/R (AUDIO) jacks on the CinemaStation to the audio output L/R jacks on your TV using the commercially available audio pin cable. and ...
Owner's Manual
Page 18
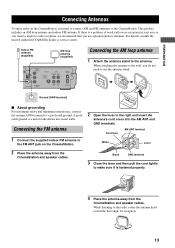
For details, consult the nearest authorized YAMAHA dealer or service center. While listening to the radio, rotate the antenna head to the antenna. When attaching the antenna to the wall, you do ...
For details, consult the nearest authorized YAMAHA dealer or service center. While listening to the radio, rotate the antenna head to the antenna. When attaching the antenna to the wall, you do ...
Owner's Manual
Page 19
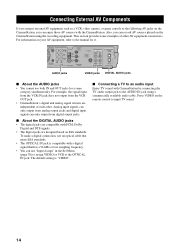
SUBWOOFER OUT SYSTEM CONNECTOR VCR OUT VCR IN VIDEO IN R L AM ANT GND FM ANT MONITOR OUT (DVD ONLY) Y PB PR S VIDEO MONITOR OUT (DVD ONLY) AUDIO 75 UNBAL COMPONENT VIDEO VIDEO MONITOR VCR OUT OUT VIDEO VCR IN IN DIGITAL AUDIO IN OUT OPTICAL AUDIO jacks VIDEO jacks DIGITAL AUDIO jacks ■ About the AUDIO jacks • You cannot use "Input Assign" in the Set Menu (page 78) to assign VIDEO or VCR to the OPTICAL IN jack. The default setting is compatible with a digital signal that meets EIA standards. • The OPTICAL IN jack is "VIDEO". ■ Connecting a TV to ...
SUBWOOFER OUT SYSTEM CONNECTOR VCR OUT VCR IN VIDEO IN R L AM ANT GND FM ANT MONITOR OUT (DVD ONLY) Y PB PR S VIDEO MONITOR OUT (DVD ONLY) AUDIO 75 UNBAL COMPONENT VIDEO VIDEO MONITOR VCR OUT OUT VIDEO VCR IN IN DIGITAL AUDIO IN OUT OPTICAL AUDIO jacks VIDEO jacks DIGITAL AUDIO jacks ■ About the AUDIO jacks • You cannot use "Input Assign" in the Set Menu (page 78) to assign VIDEO or VCR to the OPTICAL IN jack. The default setting is compatible with a digital signal that meets EIA standards. • The OPTICAL IN jack is "VIDEO". ■ Connecting a TV to ...

Owner's Manual
Page 20
To make all cable connections are required. Audio/Video cable SCART cable • For U.K. TV CinemaStation TV VCR IN VIDEO L AUDIO R OUT VIDEO 5 L AUDIO R 4 IN VIDEO L L AUDIO R R 13 2 VCR OUT VCR IN VIDEO IN R L AM ANT GND FM ANT MONITOR OUT (DVD ONLY) Y PB PR S VIDEO MONITOR OUT (DVD ONLY) AUDIO 75 UNBAL COMPONENT VIDEO VIDEO MONITOR VCR OUT OUT VIDEO VCR IN IN DIGITAL AUDIO IN OUT OPTICAL 1 Connect the VCR OUT L/R (AUDIO) jacks on the CinemaStation to the audio input L/R jacks on your VCR using a commercially available audio/video cable. 2 Connect the VCR...
To make all cable connections are required. Audio/Video cable SCART cable • For U.K. TV CinemaStation TV VCR IN VIDEO L AUDIO R OUT VIDEO 5 L AUDIO R 4 IN VIDEO L L AUDIO R R 13 2 VCR OUT VCR IN VIDEO IN R L AM ANT GND FM ANT MONITOR OUT (DVD ONLY) Y PB PR S VIDEO MONITOR OUT (DVD ONLY) AUDIO 75 UNBAL COMPONENT VIDEO VIDEO MONITOR VCR OUT OUT VIDEO VCR IN IN DIGITAL AUDIO IN OUT OPTICAL 1 Connect the VCR OUT L/R (AUDIO) jacks on the CinemaStation to the audio input L/R jacks on your VCR using a commercially available audio/video cable. 2 Connect the VCR...
Owner's Manual
Page 21
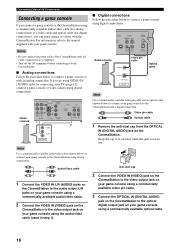
Anti-dust cap 2 Connect the VIDEO IN (VIDEO) jack on the CinemaStation to the video output jack on your game console using a commercially available video pin cable. 3 Connect the OPTICAL IN (DIGITAL AUDIO) jack on the CinemaStation to the optical digital output jack on the CinemaStation. If you are completed. • Turn off the AV equipment before connecting it when the jack is not in step 1). ■ Digital connections Follow the procedure below ) to connect your game console to the CinemaStation using analog connections. Keep the cap to re-attach it to the CinemaStation. ...
Anti-dust cap 2 Connect the VIDEO IN (VIDEO) jack on the CinemaStation to the video output jack on your game console using a commercially available video pin cable. 3 Connect the OPTICAL IN (DIGITAL AUDIO) jack on the CinemaStation to the optical digital output jack on the CinemaStation. If you are completed. • Turn off the AV equipment before connecting it when the jack is not in step 1). ■ Digital connections Follow the procedure below ) to connect your game console to the CinemaStation using analog connections. Keep the cap to re-attach it to the CinemaStation. ...