

Owners Manual
Page 1
UA DVD CHANGER LECTEUR DE DVD CHANGEUR DV-C6660 OWNER'S MANUAL MODE D'EMPLOI NATURAL SOUND DVD PLAYER STANDBY ON DISC PROGRESSIVE 1 2 3 4 5 REPEAT PLAY CHANGE
UA DVD CHANGER LECTEUR DE DVD CHANGEUR DV-C6660 OWNER'S MANUAL MODE D'EMPLOI NATURAL SOUND DVD PLAYER STANDBY ON DISC PROGRESSIVE 1 2 3 4 5 REPEAT PLAY CHANGE

Owners Manual
Page 4
... voltage than those specified herein may cause fire, damage to this unit, and/or personal injury.YAMAHA will fail to work normlly at the PLAYXCHANGE operation and cause damage to read this manual carefully. CAUTION VISIBLE AND INVISIBLE LASER RADIATION WHEN OPEN. in this unit to consume a very ... When disconnecting the power cord from the wall outlet. LASER Type Wave length Output Power Beam divergence Semiconductor laser GaAlAs 650 nm (DVD) 780 nm (VCD/CD) 7 mW (DVD) 10 mW (VCD/CD) 60 degree Using this unit, and/or personal injury. - Burning objects (i.e., candles), as they ...
... voltage than those specified herein may cause fire, damage to this unit, and/or personal injury.YAMAHA will fail to work normlly at the PLAYXCHANGE operation and cause damage to read this manual carefully. CAUTION VISIBLE AND INVISIBLE LASER RADIATION WHEN OPEN. in this unit to consume a very ... When disconnecting the power cord from the wall outlet. LASER Type Wave length Output Power Beam divergence Semiconductor laser GaAlAs 650 nm (DVD) 780 nm (VCD/CD) 7 mW (DVD) 10 mW (VCD/CD) 60 degree Using this unit, and/or personal injury. - Burning objects (i.e., candles), as they ...

Owners Manual
Page 5
Introduction Supplied accessories 2 Notes about discs 2 Cleaning discs 2 Symbols Used in this Manual 2 Functional Overview Front Panel 3 Rear Panel 4 Remote Control 5 Preparation General Notes on connections 6 Digital Connections 6 Analog Connections 6 Video Connections 6 S-Video jacks 7 ...Field Icons 9 User Preference Settings 9 General operation 9 Picture 10 Sound 11 Language 13 Features 13 Other Feature 13 Operation Basic Playback 14 Playing a DVD-Video 14 Playing a title 14 Resume 14 Video CD and Super Video CD 15 Playing a disc 15 Playing an Audio CD 15 Playing a ...
Introduction Supplied accessories 2 Notes about discs 2 Cleaning discs 2 Symbols Used in this Manual 2 Functional Overview Front Panel 3 Rear Panel 4 Remote Control 5 Preparation General Notes on connections 6 Digital Connections 6 Analog Connections 6 Video Connections 6 S-Video jacks 7 ...Field Icons 9 User Preference Settings 9 General operation 9 Picture 10 Sound 11 Language 13 Features 13 Other Feature 13 Operation Basic Playback 14 Playing a DVD-Video 14 Playing a title 14 Resume 14 Video CD and Super Video CD 15 Playing a disc 15 Playing an Audio CD 15 Playing a ...

Owners Manual
Page 6
...clean it , damage to the unit may appears on it with a cleaning cloth. Use of Dolby Laboratories. Supplied accessories - Owner's Manual Notes about discs - Be sure to playback of this copyright protection technology must be authorized by Macrovision Corporation, and is protected by ... on the disc characteristics or recording conditions. - This unit is designed for purchasing this Manual The below symbols appear in this YAMAHA DVD player. This Owner's Manual explains the basic operation of DVD-video discs VCD - Description refers to playback of Video CDs CD -
...clean it , damage to the unit may appears on it with a cleaning cloth. Use of Dolby Laboratories. Supplied accessories - Owner's Manual Notes about discs - Be sure to playback of this copyright protection technology must be authorized by Macrovision Corporation, and is protected by ... on the disc characteristics or recording conditions. - This unit is designed for purchasing this Manual The below symbols appear in this YAMAHA DVD player. This Owner's Manual explains the basic operation of DVD-video discs VCD - Description refers to playback of Video CDs CD -
Owners Manual
Page 10
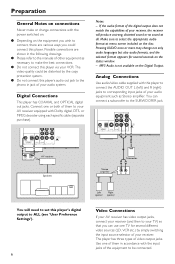
... OPTICAL PCM DIGITAL DTS MPEG DIGITAL OUT PR S VIDEO COMPONENT VIDEO OUT R 1 2 AUDIO OUT 480p 480i SCAN MODE R L Stereo amprifier Subwoofer R L 1 CD/DVD R L You will produce a strong, distorted sound or no sound at menu screen included on the disc. Use one TV for several different video sources (LD...the receiver will need to set this player's audio out jack to the phono in the following drawings. ● Please refer to the manuals of them to connect, there are shown in jack of your AV receiver equipped with the input jacks of your receiver. If the audio ...
... OPTICAL PCM DIGITAL DTS MPEG DIGITAL OUT PR S VIDEO COMPONENT VIDEO OUT R 1 2 AUDIO OUT 480p 480i SCAN MODE R L Stereo amprifier Subwoofer R L 1 CD/DVD R L You will produce a strong, distorted sound or no sound at menu screen included on the disc. Use one TV for several different video sources (LD...the receiver will need to set this player's audio out jack to the phono in the following drawings. ● Please refer to the manuals of them to connect, there are shown in jack of your AV receiver equipped with the input jacks of your receiver. If the audio ...

Owners Manual
Page 12
...or put anything wet on and select the appropriate input source that was used for detail. If you are not the same, the DVD may appear distorted. NTSC and PAL. Batteries contain chemical substances, so they are recorded according to the player output. audio system or... receiver), turn them on the remote control. symbols inside the battery compartment. 3 Close the cover. + NTSC/PAL Conversion DVD discs are exhausted or not to the equipment owner's manual for a long time. - Preparation Inserting batteries into the Remote Control 1 Open the battery cover. 2 Insert batteries (AA ...
...or put anything wet on and select the appropriate input source that was used for detail. If you are not the same, the DVD may appear distorted. NTSC and PAL. Batteries contain chemical substances, so they are recorded according to the player output. audio system or... receiver), turn them on the remote control. symbols inside the battery compartment. 3 Close the cover. + NTSC/PAL Conversion DVD discs are exhausted or not to the equipment owner's manual for a long time. - Preparation Inserting batteries into the Remote Control 1 Open the battery cover. 2 Insert batteries (AA ...


