
Owner's Manual
Page 2
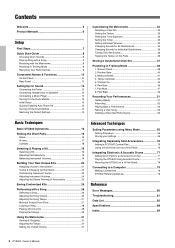
...Performances 51 Getting Ready 51 Recording 52 Playing Back a Performance 52 Naming a User Song 53 Deleting a Recorded Performance 54 Basic Techniques Basic DTX502 Operations 15 Striking the Drum Pads 16 Snare 16 Hi-hats 17 Cymbals 18 Selecting & Playing a Kit 19 Selecting a Kit 19 Adjusting...Power 12 Connecting Headphones or Speakers 12 Connecting a Music Player 12 Turning On the Drum Module 13 Initial Setup 13 Quickly Disabling Auto Power-Off 13 Turning Off the Drum Module 14 Restoring the Default Settings 14 Customizing the Metronome 32 Selecting a Click Set 32 Setting...
...Performances 51 Getting Ready 51 Recording 52 Playing Back a Performance 52 Naming a User Song 53 Deleting a Recorded Performance 54 Basic Techniques Basic DTX502 Operations 15 Striking the Drum Pads 16 Snare 16 Hi-hats 17 Cymbals 18 Selecting & Playing a Kit 19 Selecting a Kit 19 Adjusting...Power 12 Connecting Headphones or Speakers 12 Connecting a Music Player 12 Turning On the Drum Module 13 Initial Setup 13 Quickly Disabling Auto Power-Off 13 Turning Off the Drum Module 14 Restoring the Default Settings 14 Customizing the Metronome 32 Selecting a Click Set 32 Setting...
Owner's Manual
Page 3
... OF AMERICA. (class B) COMPLIANCE INFORMATION STATEMENT (DECLARATION OF CONFORMITY PROCEDURE) Responsible Party : Yamaha Corporation of America Address : 6600 Orangethorpe Ave., Buena Park, Calif. 90620 Telephone : 714-522-9011 Type of Equipment : DRUM TRIGGER MODULE Model Name : DTX502 This device complies with new ones, and never mix different types of producing sound levels that...
... OF AMERICA. (class B) COMPLIANCE INFORMATION STATEMENT (DECLARATION OF CONFORMITY PROCEDURE) Responsible Party : Yamaha Corporation of America Address : 6600 Orangethorpe Ave., Buena Park, Calif. 90620 Telephone : 714-522-9011 Type of Equipment : DRUM TRIGGER MODULE Model Name : DTX502 This device complies with new ones, and never mix different types of producing sound levels that...
Owner's Manual
Page 5
... malfunction/ damage to the product, damage to data, or damage to the instrument, or data that is lost or destroyed. http://www.yamaha.com/ DMI-5 2/2 DTX502 Owner's Manual 5 Always turn off for all components, set all volume levels to minimum. • Be sure to set the desired ...are not using the instrument for a long time, make sure you experience any subsequently released models will be connected to the drum module are the trademarks or registered trademarks of their minimum levels and gradually raise the volume controls while playing the instrument to the internal components...
... malfunction/ damage to the product, damage to data, or damage to the instrument, or data that is lost or destroyed. http://www.yamaha.com/ DMI-5 2/2 DTX502 Owner's Manual 5 Always turn off for all components, set all volume levels to minimum. • Be sure to set the desired ...are not using the instrument for a long time, make sure you experience any subsequently released models will be connected to the drum module are the trademarks or registered trademarks of their minimum levels and gradually raise the volume controls while playing the instrument to the internal components...
Owner's Manual
Page 6
... only with digital-type documents. Reference: Describes troubleshooting techniques and contains other more details. See page 79 for purchasing a Yamaha DTX502 Electronic Drum Module. And after doing so, be used when operating and playing the DTX502. The most out of parameters and other reference materials. Reference Manual *: The Reference Manual is made available...
... only with digital-type documents. Reference: Describes troubleshooting techniques and contains other more details. See page 79 for purchasing a Yamaha DTX502 Electronic Drum Module. And after doing so, be used when operating and playing the DTX502. The most out of parameters and other reference materials. Reference Manual *: The Reference Manual is made available...
Owner's Manual
Page 7
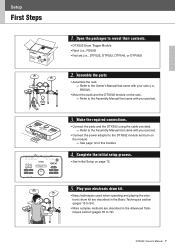
...• Assemble the rack. Refer to the Owner's Manual that came with your rack (i.e., RS502). • Mount the pads and the DTX502 module on the rack. Refer to the Assembly Manual that came with your pad set. 3. Complete the initial setup process. • See Initial... Setup on the module. See page 12 of this booklet. 4. DTX502 Owner's Manual 7 Make the required connections. • Connect the pads and the DTX502 using the cable provided. Refer to the Assembly Manual that came with...
...• Assemble the rack. Refer to the Owner's Manual that came with your rack (i.e., RS502). • Mount the pads and the DTX502 module on the rack. Refer to the Assembly Manual that came with your pad set. 3. Complete the initial setup process. • See Initial... Setup on the module. See page 12 of this booklet. 4. DTX502 Owner's Manual 7 Make the required connections. • Connect the pads and the DTX502 using the cable provided. Refer to the Assembly Manual that came with...
Owner's Manual
Page 9
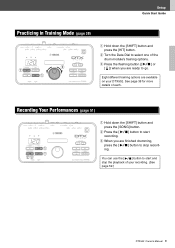
... [SHIFT] button and press the [KIT] button. e When you are available on your recording. (See page 52.) DTX502 Owner's Manual 9 w Press the [ ] button to stop the playback of your DTX502. e Press the flashing button ([ ] or [ ]) when you are finished drumming, press the [ ] button to ...start and stop record- ing. You can use the [ ] button to go. See page 38 for more details of the drum module's training options. w Turn ...
... [SHIFT] button and press the [KIT] button. e When you are available on your recording. (See page 52.) DTX502 Owner's Manual 9 w Press the [ ] button to stop the playback of your DTX502. e Press the flashing button ([ ] or [ ]) when you are finished drumming, press the [ ] button to ...start and stop record- ing. You can use the [ ] button to go. See page 38 for more details of the drum module's training options. w Turn ...
Owner's Manual
Page 10
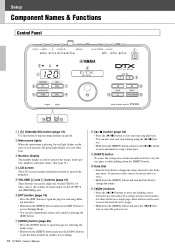
... buttons to move the flashing cursor between the area's pages. • Hold down the [SHIFT] button and press the [KIT] button to operate the DTX502. the green light flashes on the start and stop song playback. • You can also immediately silence all sounds by the flashing cursor. o [SHIFT] ... is used to start and stop training using the [ ] but- To increase values, turn it while holding down the [SHIFT] button and turn the drum module on -screen items. If a setting area has more parame- t VOLUME [+] and [-] buttons (page 15) These buttons are used to indicate the tempo, ...
... buttons to move the flashing cursor between the area's pages. • Hold down the [SHIFT] button and press the [KIT] button to operate the DTX502. the green light flashes on the start and stop song playback. • You can also immediately silence all sounds by the flashing cursor. o [SHIFT] ... is used to start and stop training using the [ ] but- To increase values, turn it while holding down the [SHIFT] button and turn the drum module on -screen items. If a setting area has more parame- t VOLUME [+] and [-] buttons (page 15) These buttons are used to indicate the tempo, ...
Owner's Manual
Page 11
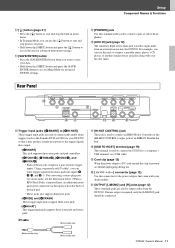
... trigger input jacks are used to connect pads and/or drum triggers (such as the Yamaha DT10 or DT20) to your DTX502 so that it may produce sounds in metronome. • In Training Mode, you can... route trigger signals from mono pads into inputs i, !0, !1, and !2. (*: For converting a stereo plug into the DTX502. Setup Component Names & Functions !2 [ ] button (page 31) • Press the [ ] button to start and... player, or another similar device and play along with your drum module. @1 OUTPUT [L/MONO] and [R] jacks (page 12) These standard jacks are used to output audio from the...
... trigger input jacks are used to connect pads and/or drum triggers (such as the Yamaha DT10 or DT20) to your DTX502 so that it may produce sounds in metronome. • In Training Mode, you can... route trigger signals from mono pads into inputs i, !0, !1, and !2. (*: For converting a stereo plug into the DTX502. Setup Component Names & Functions !2 [ ] button (page 31) • Press the [ ] button to start and... player, or another similar device and play along with your drum module. @1 OUTPUT [L/MONO] and [R] jacks (page 12) These standard jacks are used to output audio from the...

Owner's Manual
Page 12
...hazard. When you are not using the instrument for standard mono audio). Connecting Headphones or Speakers Your DTX502 does not feature built-in irreparable damage to your drum module is turned off (i.e., nothing is not bent at an extreme angle when wrapped around the cord ...8226; Before making connections, furthermore, you unplug the power adaptor from being accidentally pulled out. Standard 1/4" mono-audio jack Powered speakers 12 DTX502 Owner's Manual WARNING Use only the specified adaptor. The use of other devices fully down. • When all connections have been made...
...hazard. When you are not using the instrument for standard mono audio). Connecting Headphones or Speakers Your DTX502 does not feature built-in irreparable damage to your drum module is turned off (i.e., nothing is not bent at an extreme angle when wrapped around the cord ...8226; Before making connections, furthermore, you unplug the power adaptor from being accidentally pulled out. Standard 1/4" mono-audio jack Powered speakers 12 DTX502 Owner's Manual WARNING Use only the specified adaptor. The use of other devices fully down. • When all connections have been made...

Owner's Manual
Page 13
... and press the [SAVE/ENTER] button. If you turn on the drum module while holding down the [ ] button. Auto Power Off timer= 30min Initial Setup When you have connected your drum kit using it. • If you expect your DTX502 for the first time, the Initial Setup page will not turn on... your DTX502 to be some variation. • By default, the Auto Power-Off time is turned off the drum module when the set to 30 minutes. • You can change...
... and press the [SAVE/ENTER] button. If you turn on the drum module while holding down the [ ] button. Auto Power Off timer= 30min Initial Setup When you have connected your drum kit using it. • If you expect your DTX502 for the first time, the Initial Setup page will not turn on... your DTX502 to be some variation. • By default, the Auto Power-Off time is turned off the drum module when the set to 30 minutes. • You can change...
Owner's Manual
Page 14
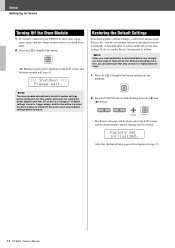
ment, ensure that the volume on the LCD screen, and the drum module will be displayed on those devices is turned down fully. 2. The Shutdown page will turn off. >>> Shutdown Press the [ ] (Standby/On) button. Setup Setting Up for Sound Turning Off the Drum Module 1. If you have connected your DTX502 to other audio equip-
ment, ensure that the volume on the LCD screen, and the drum module will be displayed on those devices is turned down fully. 2. The Shutdown page will turn off. >>> Shutdown Press the [ ] (Standby/On) button. Setup Setting Up for Sound Turning Off the Drum Module 1. If you have connected your DTX502 to other audio equip-
Owner's Manual
Page 19
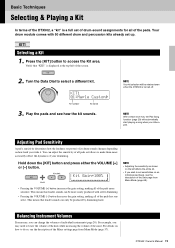
... of the Gain page from Menu Mode (page 57). Hold down the [KIT] button and press either the VOLUME [+] or [-] button. DTX502 Owner's Manual 19 Your drum module comes with softer drumming. • Pressing the VOLUME [-] button decreases the gain setting, making all of the pads. Verify that louder sounds ... sensitive. NOTE • Adjusting the sensitivity as follows to do so, see how the kit sounds. You can be retained even when the DTX502 is a full set up. For details on the left of the screen. 2. Basic Techniques Selecting & Playing a Kit In terms of the...
... of the Gain page from Menu Mode (page 57). Hold down the [KIT] button and press either the VOLUME [+] or [-] button. DTX502 Owner's Manual 19 Your drum module comes with softer drumming. • Pressing the VOLUME [-] button decreases the gain setting, making all of the pads. Verify that louder sounds ... sensitive. NOTE • Adjusting the sensitivity as follows to do so, see how the kit sounds. You can be retained even when the DTX502 is a full set up. For details on the left of the screen. 2. Basic Techniques Selecting & Playing a Kit In terms of the...
Owner's Manual
Page 25
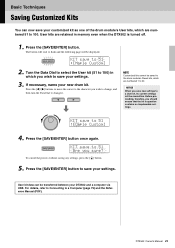
...cancel the process without saving any settings, press the [ ] button. 5. The button will be overwritten. NOTE Customized kits cannot be saved to the drum module's Preset kits, which are numbered 51 to a User kit, its current settings will start to 51 :[Maple Custom] 2. Before proceeding, therefore, you wish... the cursor to 51 Are you save your settings. KIt saVe to the character you should ensure that the kit in memory even when the DTX502 is turned off. 1. For details, refer to Connecting to 51 :[Oaple Custom] 4. KIt saVe to a Computer (page 79) and the Reference ...
...cancel the process without saving any settings, press the [ ] button. 5. The button will be overwritten. NOTE Customized kits cannot be saved to the drum module's Preset kits, which are numbered 51 to a User kit, its current settings will start to 51 :[Maple Custom] 2. Before proceeding, therefore, you wish... the cursor to 51 Are you save your settings. KIt saVe to the character you should ensure that the kit in memory even when the DTX502 is turned off. 1. For details, refer to Connecting to 51 :[Oaple Custom] 4. KIt saVe to a Computer (page 79) and the Reference ...
Owner's Manual
Page 26
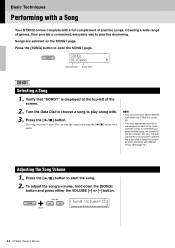
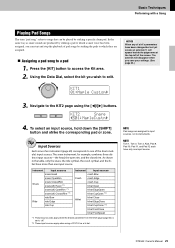
.... (See page 73.) Adjusting the Song Volume 1. Turn the Data Dial to choose a song to play along with a full complement of the drum module's songs, so whenever you wish to open the SONG1 page. You can , however, use the Kit Lock function to prevent this if you select another... song, the current kit will start the song. 2. Basic Techniques Performing with a Song Your DTX502 comes complete with . 3. The song will also change. To adjust the song's volume, hold down the [SONG] button and press either the VOLUME [+] or ...
.... (See page 73.) Adjusting the Song Volume 1. Turn the Data Dial to choose a song to play along with a full complement of the drum module's songs, so whenever you wish to open the SONG1 page. You can , however, use the Kit Lock function to prevent this if you select another... song, the current kit will start the song. 2. Basic Techniques Performing with a Song Your DTX502 comes complete with . 3. The song will also change. To adjust the song's volume, hold down the [SONG] button and press either the VOLUME [+] or ...
Owner's Manual
Page 29
..., the crash cymbal, and the hihat have been changed but not yet saved, an asterisk (*) will disappear when you wish to one of the drum module's input sources. Using the Data Dial, select the kit you save your settings. (See page 25.) KIt1 01:Maple Custom, 3. To select an input ...source, hold down the [SHIFT] button and strike the corresponding pad or zone. DTX502 Owner's Manual 29 NOTICE When any of a kit's parameters have more than one input source. Navigate to the KIT2 page using a PCY100 as snare sounds...
..., the crash cymbal, and the hihat have been changed but not yet saved, an asterisk (*) will disappear when you wish to one of the drum module's input sources. Using the Data Dial, select the kit you save your settings. (See page 25.) KIt1 01:Maple Custom, 3. To select an input ...source, hold down the [SHIFT] button and strike the corresponding pad or zone. DTX502 Owner's Manual 29 NOTICE When any of a kit's parameters have more than one input source. Navigate to the KIT2 page using a PCY100 as snare sounds...
Owner's Manual
Page 38
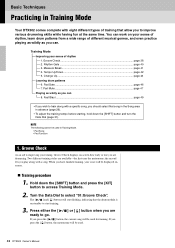
...to train along with a specific song, you play along with eight different types of rhythm 1. the second lets you should select that the drum module is on -screen how early or late you to start flashing, indicating that song in the Song area in advance (page 26). • ...used for training. NOTE The following cannot be used in Training Mode. • Pad Song • Pad Function 1. Basic Techniques Practicing in Training Mode Your DTX502 comes complete with a song. Groove Check As an aid to go. ] or [ ] button when you are available-the first uses the metronome; Turn...
...to train along with a specific song, you play along with eight different types of rhythm 1. the second lets you should select that the drum module is on -screen how early or late you to start flashing, indicating that song in the Song area in advance (page 26). • ...used for training. NOTE The following cannot be used in Training Mode. • Pad Song • Pad Function 1. Basic Techniques Practicing in Training Mode Your DTX502 comes complete with a song. Groove Check As an aid to go. ] or [ ] button when you are available-the first uses the metronome; Turn...
Owner's Manual
Page 40
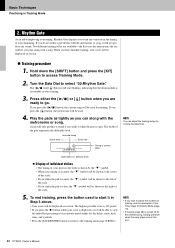
...the [ ] button, the current song will be shown to improving your timing, Rhythm Gate displays on standby to start flashing, indicating that the drum module is open. NOTE • If you wish to adjust the duration of training, see the description of the Timer page from Menu Mode (page 72... shown at the center of accurately timed strikes for training. Hold down the [SHIFT] button and press the [KIT] button to the end. 40 DTX502 Owner's Manual Accurate timing Struck early Struck late Timing of the scale. 5. Rhythm Gate As an aid to the right of current strike NOTE You...
...the [ ] button, the current song will be shown to improving your timing, Rhythm Gate displays on standby to start flashing, indicating that the drum module is open. NOTE • If you wish to adjust the duration of training, see the description of the Timer page from Menu Mode (page 72... shown at the center of accurately timed strikes for training. Hold down the [SHIFT] button and press the [KIT] button to the end. 40 DTX502 Owner's Manual Accurate timing Struck early Struck late Timing of the scale. 5. Rhythm Gate As an aid to the right of current strike NOTE You...
Owner's Manual
Page 41
... page. Press the [] button to move to adjust the width of the gate to produce a sound by striking the pads and viceversa. 3. tRNG2 " Meas=3 Brk=1 DTX502 Owner's Manual 41 The TRNG2 page will be adjusted while training. 2. The wider the gate, the easier it is to make training more difficult and...
... page. Press the [] button to move to adjust the width of the gate to produce a sound by striking the pads and viceversa. 3. tRNG2 " Meas=3 Brk=1 DTX502 Owner's Manual 41 The TRNG2 page will be adjusted while training. 2. The wider the gate, the easier it is to make training more difficult and...
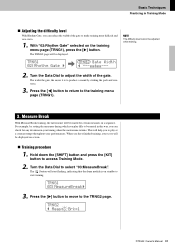
Owner's Manual
Page 42
... Data Dial. Basic Techniques Practicing in Training Mode 4. As you play along with a metronome, the drum module will start flashing, indicating that the drum module is not played • Using the [] buttons, move the cursor to the parameter you have finished training..., your timing is 100 points. • Press the [SAVE/ENTER] button to return to start training. Measure:ƒ LLLK NOTE You can adjust the training tempo by turning the Data Dial. 42 DTX502...
... Data Dial. Basic Techniques Practicing in Training Mode 4. As you play along with a metronome, the drum module will start flashing, indicating that the drum module is not played • Using the [] buttons, move the cursor to the parameter you have finished training..., your timing is 100 points. • Press the [SAVE/ENTER] button to return to start training. Measure:ƒ LLLK NOTE You can adjust the training tempo by turning the Data Dial. 42 DTX502...
Owner's Manual
Page 43
... 4. To end training, press the [ ] button once again. • Your score will be raised. DTX502 Owner's Manual 43 NOTE • If you wish to adjust the difficulty level for increasing or decreasing the tempo The drum module evaluates your timing was not accurate, however, the tempo will be shown to the left...
... 4. To end training, press the [ ] button once again. • Your score will be raised. DTX502 Owner's Manual 43 NOTE • If you wish to adjust the difficulty level for increasing or decreasing the tempo The drum module evaluates your timing was not accurate, however, the tempo will be shown to the left...


