
Owner's Manual
Page 7
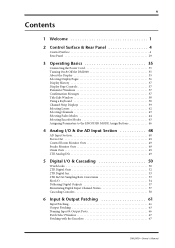
...Surface & Rear Panel 4 Control Surface 4 Rear Panel 29 3 Operating Basics 35 Connecting the Power Cord 35 Turning On & Off the DM2000 35 About the Display 35 Selecting Display Pages 36 Display History 37 Display Page Controls 37 Parameter Windows 37 Confirmation Messages 37 Title Edit Window... 38 Using a Keyboard 38 Channel Strip Displays 39 Selecting Layers 42 Selecting Channels 43 Selecting Fader Modes 44 Selecting Encoder Modes 45 Assigning Parameters to the ENCODER MODE Assign Buttons 46 4 Analog I/O & the AD Input Section ...
...Surface & Rear Panel 4 Control Surface 4 Rear Panel 29 3 Operating Basics 35 Connecting the Power Cord 35 Turning On & Off the DM2000 35 About the Display 35 Selecting Display Pages 36 Display History 37 Display Page Controls 37 Parameter Windows 37 Confirmation Messages 37 Title Edit Window... 38 Using a Keyboard 38 Channel Strip Displays 39 Selecting Layers 42 Selecting Channels 43 Selecting Fader Modes 44 Selecting Encoder Modes 45 Assigning Parameters to the ENCODER MODE Assign Buttons 46 4 Analog I/O & the AD Input Section ...
Owner's Manual
Page 8
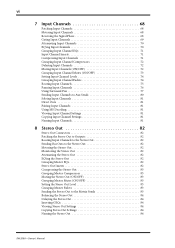
... Input Channels 72 Muting Input Channels (ON/OFF 72 Grouping Input Channel Mutes (ON/OFF 73 Setting Input Channel Levels 74 Grouping Input Channel Faders 74 Routing Input Channels 75 Panning Input Channels 76 Using Surround Pan 77 Sending Input Channels to Aux Sends 80 Soloing Input Channels 81 Direct...Master Compressors 83 Muting the Stereo Out (ON/OFF 83 Grouping Master Mutes (ON/OFF 83 Setting the Stereo Out Level 83 Grouping Master Faders 83 Sending the Stereo Out to the Matrix Sends 83 Balancing the Stereo Out 84 Delaying the Stereo Out 84 Inserting GEQs 84 Viewing Stereo...
... Input Channels 72 Muting Input Channels (ON/OFF 72 Grouping Input Channel Mutes (ON/OFF 73 Setting Input Channel Levels 74 Grouping Input Channel Faders 74 Routing Input Channels 75 Panning Input Channels 76 Using Surround Pan 77 Sending Input Channels to Aux Sends 80 Soloing Input Channels 81 Direct...Master Compressors 83 Muting the Stereo Out (ON/OFF 83 Grouping Master Mutes (ON/OFF 83 Setting the Stereo Out Level 83 Grouping Master Faders 83 Sending the Stereo Out to the Matrix Sends 83 Balancing the Stereo Out 84 Delaying the Stereo Out 84 Inserting GEQs 84 Viewing Stereo...

Owner's Manual
Page 9
... Outs (ON/OFF 86 Grouping Master Mutes (ON/OFF 86 Setting Bus Out Levels 86 Grouping Master Faders 86 Sending Bus Outs to Matrix Sends 86 Delaying Bus Outs 86 Inserting GEQs 86 Soloing Bus Outs...Aux Sends 88 Patching Aux Send Masters to Outputs 88 Setting the Aux Send Mode 88 Pre-Fader or Post-Fader Aux Sends 88 Setting Aux Send Levels 89 Muting Aux Sends (ON/OFF 90 Aux Send ... (ON/OFF 95 Grouping Master Mutes (ON/OFF 95 Settings Aux Send Master Levels 96 Grouping Master Faders 96 Sending Aux Sends to Matrix Sends 96 Delaying Aux Send Masters 96 Inserting GEQs 96 Soloing Aux...
... Outs (ON/OFF 86 Grouping Master Mutes (ON/OFF 86 Setting Bus Out Levels 86 Grouping Master Faders 86 Sending Bus Outs to Matrix Sends 86 Delaying Bus Outs 86 Inserting GEQs 86 Soloing Bus Outs...Aux Sends 88 Patching Aux Send Masters to Outputs 88 Setting the Aux Send Mode 88 Pre-Fader or Post-Fader Aux Sends 88 Setting Aux Send Levels 89 Muting Aux Sends (ON/OFF 90 Aux Send ... (ON/OFF 95 Grouping Master Mutes (ON/OFF 95 Settings Aux Send Master Levels 96 Grouping Master Faders 96 Sending Aux Sends to Matrix Sends 96 Delaying Aux Send Masters 96 Inserting GEQs 96 Soloing Aux...

Owner's Manual
Page 10
...Sends 97 Patching Matrix Send Masters to Outputs 97 Pre-Fader or Post-Fader Matrix Sends 97 Setting Matrix Send Levels 97 Muting Matrix...OFF 101 Grouping Master Mutes (ON/OFF 101 Setting Matrix Send Master Levels 101 Grouping Master Faders 101 Balancing Matrix Send Masters 101 Delaying Matrix Send Masters 102 Soloing Matrix Sends 102 Inserting...Soloing Channels 118 Pairing Channels 120 Grouping Output Channel Faders 122 Grouping Output Channel Mutes (ON/OFF 123 Viewing Channel Parameter Settings 124 Viewing Channel Fader Settings 125 Copying Channel Settings 129 Naming Channels ...
...Sends 97 Patching Matrix Send Masters to Outputs 97 Pre-Fader or Post-Fader Matrix Sends 97 Setting Matrix Send Levels 97 Muting Matrix...OFF 101 Grouping Master Mutes (ON/OFF 101 Setting Matrix Send Master Levels 101 Grouping Master Faders 101 Balancing Matrix Send Masters 101 Delaying Matrix Send Masters 102 Soloing Matrix Sends 102 Inserting...Soloing Channels 118 Pairing Channels 120 Grouping Output Channel Faders 122 Grouping Output Channel Mutes (ON/OFF 123 Viewing Channel Parameter Settings 124 Viewing Channel Fader Settings 125 Copying Channel Settings 129 Naming Channels ...

Owner's Manual
Page 11
... About Automix 164 What's Recorded in an Automix 164 Automix Main Page 165 AUTOMIX Section 168 Channel Strip [AUTO] Buttons 169 Automix Memory Page 169 Fader Edit Pages 170 Selecting the Timecode Source & Frame Rate 171 Creating a Time Signature Map 172 Recording an Automix 172 Rerecording Events 173 Parameter Recording 174...
... About Automix 164 What's Recorded in an Automix 164 Automix Main Page 165 AUTOMIX Section 168 Channel Strip [AUTO] Buttons 169 Automix Memory Page 169 Fader Edit Pages 170 Selecting the Timecode Source & Frame Rate 171 Creating a Time Signature Map 172 Recording an Automix 172 Rerecording Events 173 Parameter Recording 174...

Owner's Manual
Page 12
... Changes 186 Using Bulk Dump 187 19 Pro Tools Remote Layer 188 Configuring Windows Computers 188 Configuring Macintosh Computers 188 Configuring the DM2000 188 Configuring Pro Tools 189 Control Surface Operation with the Pro Tools Remote Layer 190 Scrolling Windows 203 Selecting Channels 203 Assigning...207 Flip Mode 208 Assigning Inserts/Plug-ins 209 Editing Plug-ins 210 Bypassing Individual Plug-ins 211 Bypassing all Plug-ins 211 Resetting Faders, Sends, Panpots & Plug-ins 212 Navigating the Edit Window 212 Zooming 213 Making Fine Adjustments to the Selected Region 213 Scrub ...
... Changes 186 Using Bulk Dump 187 19 Pro Tools Remote Layer 188 Configuring Windows Computers 188 Configuring Macintosh Computers 188 Configuring the DM2000 188 Configuring Pro Tools 189 Control Surface Operation with the Pro Tools Remote Layer 190 Scrolling Windows 203 Selecting Channels 203 Assigning...207 Flip Mode 208 Assigning Inserts/Plug-ins 209 Editing Plug-ins 210 Bypassing Individual Plug-ins 211 Bypassing all Plug-ins 211 Resetting Faders, Sends, Panpots & Plug-ins 212 Navigating the Edit Window 212 Zooming 213 Making Fine Adjustments to the Selected Region 213 Scrub ...

Owner's Manual
Page 16
...Pairs • Horizontal and vertical pairing of Input Channels • Horizontal pairing of Bus Outs, Aux Sends, and Surround Pan • 8 Input Channel, 4 Output Channel Fader groups • 8 Input Channel, 4 Output Channel Mute groups • 4 Input Channel, 4 Output Channel EQ groups • 4 Input Channel, 4 Output Channel ... 99 Scene memories, recallable via MIDI or Automix • Individual fade time settings for all Input and Output faders • Scene and library recalls • Punch in/out entire channels with dedicated [AUTO] buttons, or individual parameters • Editing...
...Pairs • Horizontal and vertical pairing of Input Channels • Horizontal pairing of Bus Outs, Aux Sends, and Surround Pan • 8 Input Channel, 4 Output Channel Fader groups • 8 Input Channel, 4 Output Channel Mute groups • 4 Input Channel, 4 Output Channel EQ groups • 4 Input Channel, 4 Output Channel ... 99 Scene memories, recallable via MIDI or Automix • Individual fade time settings for all Input and Output faders • Scene and library recalls • Punch in/out entire channels with dedicated [AUTO] buttons, or individual parameters • Editing...

Owner's Manual
Page 17
... or punch faders in locator with independent control of master and MTR machines • Assignable GPI (General Purpose Interface) port for external control and "Recording" light • Remote control of repetitive tasks • Display History buttons for quick access to 12 Yamaha AD824 A/D ...; Surround monitor speaker alignment functions • Surround monitor library with 32 user memories Remote Control • Control and manage your DM2000 from your Mac or PC by using the bundled Studio Manager software • Remote Layers for external equipment control, including predefi...
... or punch faders in locator with independent control of master and MTR machines • Assignable GPI (General Purpose Interface) port for external control and "Recording" light • Remote control of repetitive tasks • Display History buttons for quick access to 12 Yamaha AD824 A/D ...; Surround monitor speaker alignment functions • Surround monitor library with 32 user memories Remote Control • Control and manage your DM2000 from your Mac or PC by using the bundled Studio Manager software • Remote Layers for external equipment control, including predefi...

Owner's Manual
Page 18
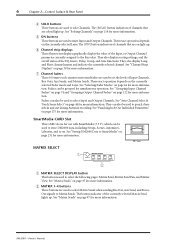
... STEREO ENTER STEREO (p. 18) Data Entry & Transport (p. 23) 4 Chapter 2-Control Surface & Rear Panel 2 Control Surface & Rear Panel Control Surface DM2000-Owner's Manual AD Input Section (p. 5) DISPLAY ACCESS (p. 8) Display Section (p. 11) SELECTED CHANNEL Section (p. 12) Monitor, Phones & Talkback Section (p. ...25) SmartMedia CARD Slot (p. 6) MATRIX SELECT (p. 6) AUX SELECT (p. 7) FADER MODE (p. 8) ENCODER MODE (p. 7) EFFECTS/PLUG-INS (p. 9) +48V ON OFF +48V ON OFF +48V ON OFF +48V ON OFF +48V ON...
... STEREO ENTER STEREO (p. 18) Data Entry & Transport (p. 23) 4 Chapter 2-Control Surface & Rear Panel 2 Control Surface & Rear Panel Control Surface DM2000-Owner's Manual AD Input Section (p. 5) DISPLAY ACCESS (p. 8) Display Section (p. 11) SELECTED CHANNEL Section (p. 12) Monitor, Phones & Talkback Section (p. ...25) SmartMedia CARD Slot (p. 6) MATRIX SELECT (p. 6) AUX SELECT (p. 7) FADER MODE (p. 8) ENCODER MODE (p. 7) EFFECTS/PLUG-INS (p. 9) +48V ON OFF +48V ON OFF +48V ON OFF +48V ON OFF +48V ON...

Owner's Manual
Page 19
... parameters to each channel. B PAD switches These switches turn on and off the +48 V phantom power feed to choose from the EQ, Comp, Fader, and Mute groups. D PEAK indicators These indicators light up orange in and out during playback. Channel strips Channel strip #1 is shown here. 1 The...signal level is typically used to set Automix recording and playback for more information. See "Channel Names" on and off the AD Input inserts. DM2000-Owner's Manual See "AD Inserts" on page 49 for turning on page 41 for more information. See "Channel Strip [AUTO] Buttons" ...
... parameters to each channel. B PAD switches These switches turn on and off the +48 V phantom power feed to choose from the EQ, Comp, Fader, and Mute groups. D PEAK indicators These indicators light up orange in and out during playback. Channel strips Channel strip #1 is shown here. 1 The...signal level is typically used to set Automix recording and playback for more information. See "Channel Names" on and off the AD Input inserts. DM2000-Owner's Manual See "AD Inserts" on page 49 for turning on page 41 for more information. See "Channel Strip [AUTO] Buttons" ...
Owner's Manual
Page 20
... and Layer. G Channel faders These 100 mm touch-sensitive motorized faders are used to select Input and Output Channels. Faders can also be grouped for more information. See "Auto Channel Select & Touch Sense Select" on . See "Saving DM2000 Data to store DM2000 data, including Setups, Scenes, Automixes, ... and Gate functions. They can be used to the Encoders. See "Matrix Sends" on page 44 for more information. See "Selecting Fader Modes" on page 97 for more information. See "Matrix Sends" on page 231 for more information. Their exact operation depends on the ...
... and Layer. G Channel faders These 100 mm touch-sensitive motorized faders are used to select Input and Output Channels. Faders can also be grouped for more information. See "Auto Channel Select & Touch Sense Select" on . See "Saving DM2000 Data to store DM2000 data, including Setups, Scenes, Automixes, ... and Gate functions. They can be used to the Encoders. See "Matrix Sends" on page 44 for more information. See "Selecting Fader Modes" on page 97 for more information. See "Matrix Sends" on page 231 for more information. Their exact operation depends on the ...
Owner's Manual
Page 22
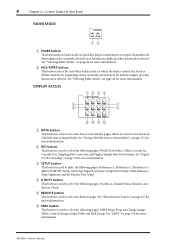
...Its indicator lights up when this mode is used to select the Save, Load, and File pages, which are used to SmartMedia. See "Selecting Fader Modes" on page 44 for more information. DISPLAY ACCESS 1234 DISPLAY ACCESS 5 6 DATA DIO SETUP UTILITY MIDI REMOTE METER VIEW 7 8 PAIR GROUP...used to select the following pages: Oscillator, Channel Status Monitor, and Battery Check. F MIDI button This button is used to save and load DM2000 data to select the following pages: MIDI Setup, Program Change Assign Table, Control Change Assign Table, and Bulk Dump. B DIO button This ...
...Its indicator lights up when this mode is used to select the Save, Load, and File pages, which are used to SmartMedia. See "Selecting Fader Modes" on page 44 for more information. DISPLAY ACCESS 1234 DISPLAY ACCESS 5 6 DATA DIO SETUP UTILITY MIDI REMOTE METER VIEW 7 8 PAIR GROUP...used to select the following pages: Oscillator, Channel Status Monitor, and Battery Check. F MIDI button This button is used to save and load DM2000 data to select the following pages: MIDI Setup, Program Change Assign Table, Control Change Assign Table, and Bulk Dump. B DIO button This ...

Owner's Manual
Page 23
... and the Output Comp Link. J GROUP button This button is used to select the following pages: Parameter View, Fader View, and Channel Library. C GRAPHIC EQUALIZERS button This button is used to select the Input and Output Pair pages....Ins & GEQs" on page 140 for more information. See "Viewing Channel Parameter Settings" on page 124, "Viewing Channel Fader Settings" on page 125, and "Channel Library" on page 148 for more information. K INPUT PATCH button This button is... the internal effects processors in conjunction with the EFFECTS/PLUG-INS [1-8] buttons. DM2000-Owner's Manual
... and the Output Comp Link. J GROUP button This button is used to select the following pages: Parameter View, Fader View, and Channel Library. C GRAPHIC EQUALIZERS button This button is used to select the Input and Output Pair pages....Ins & GEQs" on page 140 for more information. See "Viewing Channel Parameter Settings" on page 124, "Viewing Channel Fader Settings" on page 125, and "Channel Library" on page 148 for more information. K INPUT PATCH button This button is... the internal effects processors in conjunction with the EFFECTS/PLUG-INS [1-8] buttons. DM2000-Owner's Manual

Owner's Manual
Page 32
... See "Muting the Stereo Out (ON/OFF)" on page 42 for more information. B MASTER button This button selects the Master Layer, from EQ, Comp, Fader, and Mute 5 groups. 10 15 4 20 C ON button This button is used exclusively to select the Stereo Out, see "Auto Channel Select & Touch... channels. It can be used exclusively to punch the Stereo Out in Record-Ready mode, red while recording, and 2 green during Automix recording. DM2000-Owner's Manual Its indicator lights up when the Stereo Out is used to adjust the level of the Stereo Out. C REMOTE 1-4 buttons These ...
... See "Muting the Stereo Out (ON/OFF)" on page 42 for more information. B MASTER button This button selects the Master Layer, from EQ, Comp, Fader, and Mute 5 groups. 10 15 4 20 C ON button This button is used exclusively to select the Stereo Out, see "Auto Channel Select & Touch... channels. It can be used exclusively to punch the Stereo Out in Record-Ready mode, red while recording, and 2 green during Automix recording. DM2000-Owner's Manual Its indicator lights up when the Stereo Out is used to adjust the level of the Stereo Out. C REMOTE 1-4 buttons These ...

Owner's Manual
Page 34
...more information. Pressing the Scene Up [ ] button increments the selection; RETURN RELATIVE TOUCH UNDO REC SENSE TOUCH LATCH READ TRIM OFF OVERWRITE FADER ON PAN SURROUND AUX AUX EQ ON 9 The small text labels below the AUTOMIX buttons apply to increment/decrement continuously. B ENABLE button... It works in unison with the SCENE MEMORY Buttons" on the Automix Main page. See "UNDO" on the Automix Main page. DM2000-Owner's Manual It works in unison with the SCENE MEMORY Buttons" on the Automix Main page. It works in unison with the EDIT...
...more information. Pressing the Scene Up [ ] button increments the selection; RETURN RELATIVE TOUCH UNDO REC SENSE TOUCH LATCH READ TRIM OFF OVERWRITE FADER ON PAN SURROUND AUX AUX EQ ON 9 The small text labels below the AUTOMIX buttons apply to increment/decrement continuously. B ENABLE button... It works in unison with the SCENE MEMORY Buttons" on the Automix Main page. See "UNDO" on the Automix Main page. DM2000-Owner's Manual It works in unison with the SCENE MEMORY Buttons" on the Automix Main page. It works in unison with the EDIT...

Owner's Manual
Page 35
.... See "Using the Locator" on page 230 for more information. It works in unison with the FADER EDIT buttons on the Automix Main and Memory pages. See "About Remote Layers" on the Fader Edit pages. DM2000-Owner's Manual They work in unison with the TOUCH SENSE buttons on page 217 for more information...
.... See "Using the Locator" on page 230 for more information. It works in unison with the FADER EDIT buttons on the Automix Main and Memory pages. See "About Remote Layers" on the Fader Edit pages. DM2000-Owner's Manual They work in unison with the TOUCH SENSE buttons on page 217 for more information...
Owner's Manual
Page 47
... can be patched Input Channels or Insert Ins. The DM2000 can be patched to turn on page 52 for more information. N METER port This 15-pin D-sub connector is typically used to connect an optional Yamaha AD824 AD Converter, providing remote and recallable control of ...25-pin D-sub connector provides access to the GPI (General Purpose Interface) through which external equipment can be triggered when specified DM2000 faders or USER DEFINE KEYS are typically connected to connect the digital stereo output of 2-track recorders. See "Controlling AD824 A/D Converters" on page...
... can be patched Input Channels or Insert Ins. The DM2000 can be patched to turn on page 52 for more information. N METER port This 15-pin D-sub connector is typically used to connect an optional Yamaha AD824 AD Converter, providing remote and recallable control of ...25-pin D-sub connector provides access to the GPI (General Purpose Interface) through which external equipment can be triggered when specified DM2000 faders or USER DEFINE KEYS are typically connected to connect the digital stereo output of 2-track recorders. See "Controlling AD824 A/D Converters" on page...

Owner's Manual
Page 48
... information. B Grounding screw For electrical safety reasons, and correct operation of the touch-sensitive faders, it's important that the DM2000 is not blocked. If the airflow is restricted, the DM2000 may overheat, so make sure this outlet is grounded properly. The following signals can be ... "Output Patching" on page 35 for more information. Grounding is grounded, then the unit will be patched to Input Channels or Insert Ins. DM2000-Owner's Manual The supplied power cord has a three-pin plug, and if the ground terminal of analog and digital I /O" on page 61...
... information. B Grounding screw For electrical safety reasons, and correct operation of the touch-sensitive faders, it's important that the DM2000 is not blocked. If the airflow is restricted, the DM2000 may overheat, so make sure this outlet is grounded properly. The following signals can be ... "Output Patching" on page 35 for more information. Grounding is grounded, then the unit will be patched to Input Channels or Insert Ins. DM2000-Owner's Manual The supplied power cord has a three-pin plug, and if the ground terminal of analog and digital I /O" on page 61...

Owner's Manual
Page 51
...64257;rmation before executing them, as the GEQ Insert parameter box shown here. Confirmation Messages For certain functions, the DM2000 prompts you return to eight recently displayed pages. The currently selected page in a group, and the parameter selected on the ...remembered when you select another group of the various buttons, rotary controls, and faders that certain pages appear automatically when a corresponding control is taken for awhile, the window closes automatically. DM2000-Owner's Manual The Auto Display preferences can clear the Display History buffer by pressing...
...64257;rmation before executing them, as the GEQ Insert parameter box shown here. Confirmation Messages For certain functions, the DM2000 prompts you return to eight recently displayed pages. The currently selected page in a group, and the parameter selected on the ...remembered when you select another group of the various buttons, rotary controls, and faders that certain pages appear automatically when a corresponding control is taken for awhile, the window closes automatically. DM2000-Owner's Manual The Auto Display preferences can clear the Display History buffer by pressing...

Owner's Manual
Page 53
...) Other position Nominal ( indicates at nominal) Attenuator Parameter & Surr LFE Level Maximum Minimum (-96 dB) ( indicates nominal position) Other position Nominal ( indicates at nominal) Maximum DM2000-Owner's Manual EQ, Insert, Delay, Comp & Gate Indicators These indicators show to the Encoders, as follows. They also display the Long and Short channel names... parameter assigned to which Output Channels an Input Channel is being routed: 1 through 8 being the Bus Outs, "S" being the Stereo Out, and "D," the Direct Out. Fader Touch Sense When fader knobs are on page 236.
...) Other position Nominal ( indicates at nominal) Attenuator Parameter & Surr LFE Level Maximum Minimum (-96 dB) ( indicates nominal position) Other position Nominal ( indicates at nominal) Maximum DM2000-Owner's Manual EQ, Insert, Delay, Comp & Gate Indicators These indicators show to the Encoders, as follows. They also display the Long and Short channel names... parameter assigned to which Output Channels an Input Channel is being routed: 1 through 8 being the Bus Outs, "S" being the Stereo Out, and "D," the Direct Out. Fader Touch Sense When fader knobs are on page 236.

