
Owner's Manual
Page 4
... Expression (EXP) Pedal ......... 11 s Connecting MIDI Devices 11 Using the DG-Stomp 12 s Produce Sound 12 s Try Changing the Settings 13 s Try Selecting Another Patch 15 s Create and Store a Patch 17 s Convenient Functions 17 Effect Functions and Parameters 19 External Control Settings... 21 Tuner Mode 22 s How to obtain maximum life of this device, please read this manual, please keep it and the warranty in a safe place for purchasing the YAMAHA DG-Stomp...
... Expression (EXP) Pedal ......... 11 s Connecting MIDI Devices 11 Using the DG-Stomp 12 s Produce Sound 12 s Try Changing the Settings 13 s Try Selecting Another Patch 15 s Create and Store a Patch 17 s Convenient Functions 17 Effect Functions and Parameters 19 External Control Settings... 21 Tuner Mode 22 s How to obtain maximum life of this device, please read this manual, please keep it and the warranty in a safe place for purchasing the YAMAHA DG-Stomp...

Owner's Manual
Page 6
...; page 23) Press the w Down Button (DOWN) [UTILITY] and [STORE] buttons simultaneously to Press to t Store Button (STORE) switch between the patch data value and the knob's position. neously press the [UP] and [DOWN] buttons to change the Group Number by +1/-1. Enters the Store Mode. (&#...8594; page 17) Also, their flashing lamps are used to change the Patch Number by +1/-1. y Display Displays memory numbers, parameter setting val- ues, etc. 6 Hold enter the Tuner Mode. (→ page 22) to ...
...; page 23) Press the w Down Button (DOWN) [UTILITY] and [STORE] buttons simultaneously to Press to t Store Button (STORE) switch between the patch data value and the knob's position. neously press the [UP] and [DOWN] buttons to change the Group Number by +1/-1. Enters the Store Mode. (&#...8594; page 17) Also, their flashing lamps are used to change the Patch Number by +1/-1. y Display Displays memory numbers, parameter setting val- ues, etc. 6 Hold enter the Tuner Mode. (→ page 22) to ...

Owner's Manual
Page 8
.... The selected effect's lamp will light. @3 Reverb Knob (REVERB) Sets the amount of Modulation Effect to be used as for the following functions. • Selects a patch (1/2/3) from the currently selected bank. • Switches the effect blocks ON/OFF (1: Modulation Block, 2: Delay Block, 3: Reverb) @5 Bank Switch (TAP/BANK/TUNER) • Tap the...
.... The selected effect's lamp will light. @3 Reverb Knob (REVERB) Sets the amount of Modulation Effect to be used as for the following functions. • Selects a patch (1/2/3) from the currently selected bank. • Switches the effect blocks ON/OFF (1: Modulation Block, 2: Delay Block, 3: Reverb) @5 Bank Switch (TAP/BANK/TUNER) • Tap the...

Owner's Manual
Page 9
... the power ON/OFF. @7 Power Adaptor Jack (AC IN 12V 700mA) Connect the supplied power adaptor to this jack. * Never use the device as the YAMAHA FC-7, etc. Connect these jacks to the input jack on a power amplifier + speaker set the OUTPUT knob !1 to "0" before connecting a guitar. 9 s Rear Panel Nomenclature @6 ... either LOW/HIGH to a monaural device. #4 Input Jack (INPUT) #5 Input Level Switch (LOW/HIGH) The DG-Stomp's input jack. Use of the effects and select patches in the DG-Stomp's memory, etc. (→ page 24). @9 MIDI IN Jack Jack used for receiving MIDI data from the OUTPUT...
... the power ON/OFF. @7 Power Adaptor Jack (AC IN 12V 700mA) Connect the supplied power adaptor to this jack. * Never use the device as the YAMAHA FC-7, etc. Connect these jacks to the input jack on a power amplifier + speaker set the OUTPUT knob !1 to "0" before connecting a guitar. 9 s Rear Panel Nomenclature @6 ... either LOW/HIGH to a monaural device. #4 Input Jack (INPUT) #5 Input Level Switch (LOW/HIGH) The DG-Stomp's input jack. Use of the effects and select patches in the DG-Stomp's memory, etc. (→ page 24). @9 MIDI IN Jack Jack used for receiving MIDI data from the OUTPUT...

Owner's Manual
Page 11
... the DG-Stomp to select patches in the DG-Stomp, control individual parameters, set individual effects, etc. PEDAL jack on the DG-Stomp allows control of the DG-Stomp's individual parameters or use as a wah pedal. (See pages 21, 25) When using headphones, use at a comfortable volume so as the YAMAHA FC-7,... connected to the DIGITAL INPUT jack on MIDI functions. MD recorder, etc. 11 The volume of MIDI information between the DG-Stomp and an external MIDI Device. s Connecting MIDI Devices Using the MIDI...
... the DG-Stomp to select patches in the DG-Stomp, control individual parameters, set individual effects, etc. PEDAL jack on the DG-Stomp allows control of the DG-Stomp's individual parameters or use as a wah pedal. (See pages 21, 25) When using headphones, use at a comfortable volume so as the YAMAHA FC-7,... connected to the DIGITAL INPUT jack on MIDI functions. MD recorder, etc. 11 The volume of MIDI information between the DG-Stomp and an external MIDI Device. s Connecting MIDI Devices Using the MIDI...

Owner's Manual
Page 12
...the POWER switch ON when the OUTPUT knob is possible to select a patch and use this patch to the INPUT jack on the display the device is currently selected. 12 Using the DG-Stomp First, connect a guitar to the DG-Stomp and try and produce some sounds. play . When connecting a high impedance... MODE, it is turned up may result in a condition called the PLAY MODE. s Produce Sound 1. The numbers (Group number: 0, Bank number: 1, Patch number: 1) refer to ON ( ). After rotating the OUTPUT knob to the "0" position, turn off the power on the dis- Before connecting, turn the...
...the POWER switch ON when the OUTPUT knob is possible to select a patch and use this patch to the INPUT jack on the display the device is currently selected. 12 Using the DG-Stomp First, connect a guitar to the DG-Stomp and try and produce some sounds. play . When connecting a high impedance... MODE, it is turned up may result in a condition called the PLAY MODE. s Produce Sound 1. The numbers (Group number: 0, Bank number: 1, Patch number: 1) refer to ON ( ). After rotating the OUTPUT knob to the "0" position, turn off the power on the dis- Before connecting, turn the...

Owner's Manual
Page 13
...change the volume. However, the MASTER knob setting is included with its setting value (editable condition) in the tone. Also, try changing the effect. The DG-Stomp's effects section is divided into the following rules apply when a knob is moved. • Rotate a knob, if the [UP] lamp flashes, rotate...knob, the value will be displayed for more seconds after which the setting's value can be aligned with the patch data while the OUTPUT knob setting is not. Using the DG-Stomp s Try Changing the Settings Use the knobs or buttons on the display, the tone and value will not...
...change the volume. However, the MASTER knob setting is included with its setting value (editable condition) in the tone. Also, try changing the effect. The DG-Stomp's effects section is divided into the following rules apply when a knob is moved. • Rotate a knob, if the [UP] lamp flashes, rotate...knob, the value will be displayed for more seconds after which the setting's value can be aligned with the patch data while the OUTPUT knob setting is not. Using the DG-Stomp s Try Changing the Settings Use the knobs or buttons on the display, the tone and value will not...
Owner's Manual
Page 14
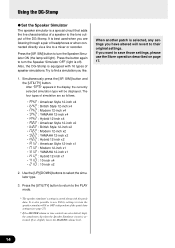
...follows. • A42 : American Style 12-inch x4 • b42 : British Style 12-inch x4 • m42 : Modern 12-inch x4 • Y42 : YAMAHA 12-inch x4 • H42 : Hybrid 12-inch x4 • A22 : American Style 12-inch x2 • b22 : British Style 12-inch x2 •...If so, slightly lower the MASTER volume level. Also, the DG-Stomp is stored along with 16 types of the DG-Stomp. " appears in the display, the currently selected simulation type will light). If you like. 1. Press the [SP. When another patch is activated. SIM] button to their original settings. Try to ...
...follows. • A42 : American Style 12-inch x4 • b42 : British Style 12-inch x4 • m42 : Modern 12-inch x4 • Y42 : YAMAHA 12-inch x4 • H42 : Hybrid 12-inch x4 • A22 : American Style 12-inch x2 • b22 : British Style 12-inch x2 •...If so, slightly lower the MASTER volume level. Also, the DG-Stomp is stored along with 16 types of the DG-Stomp. " appears in the display, the currently selected simulation type will light). If you like. 1. Press the [SP. When another patch is activated. SIM] button to their original settings. Try to ...
Owner's Manual
Page 15
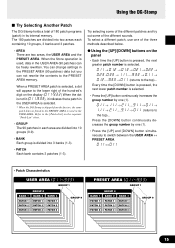
.... 011 ↔ 0.11 • Patch Characteristics USER AREA GROUP 1 GROUP 0 BANK 1 BANK 2 BANK 3 PATCH 1 PATCH 2 PATCH 3 PATCH 1 PATCH 2 PATCH 3 PATCH 1 PATCH 2 PATCH 3 GROUP 9 PRESET AREA GROUP 1 GROUP 0 BANK 1 BANK 2 BANK 3 PATCH 1 PATCH 2 PATCH 3 PATCH 1 PATCH 2 PATCH 3 PATCH 1 PATCH 2 PATCH 3 GROUP 9 15 q Using the [UP]/[DOWN] buttons on the separate "Patch List" sheet. • GROUP The 90 patches in its internal memory. Using the DG-Stomp s Try Selecting Another Patch The DG-Stomp holds a total of the...
.... 011 ↔ 0.11 • Patch Characteristics USER AREA GROUP 1 GROUP 0 BANK 1 BANK 2 BANK 3 PATCH 1 PATCH 2 PATCH 3 PATCH 1 PATCH 2 PATCH 3 PATCH 1 PATCH 2 PATCH 3 GROUP 9 PRESET AREA GROUP 1 GROUP 0 BANK 1 BANK 2 BANK 3 PATCH 1 PATCH 2 PATCH 3 PATCH 1 PATCH 2 PATCH 3 PATCH 1 PATCH 2 PATCH 3 GROUP 9 15 q Using the [UP]/[DOWN] buttons on the separate "Patch List" sheet. • GROUP The 90 patches in its internal memory. Using the DG-Stomp s Try Selecting Another Patch The DG-Stomp holds a total of the...
Owner's Manual
Page 16
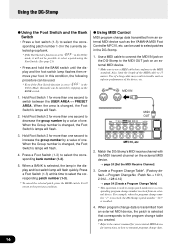
...a long cable may result in trouble such as the YAMAHA MIDI Foot Controller MFC10, etc. When program change data transmitted from an external MIDI device, the patch is recalled. 4. Use a MIDI cable to connect the MIDI IN jack on the DG-Stomp to the MIDI OUT jack on an external MIDI device.... * Make sure to use a MIDI cable that corresponds to the program change number "1" is received, the DG-Stomp's patch number "113" is selected that conforms to the MIDI standard. Hold Foot Switch 1 for more than one second to increase the group number by a...
...a long cable may result in trouble such as the YAMAHA MIDI Foot Controller MFC10, etc. When program change data transmitted from an external MIDI device, the patch is recalled. 4. Use a MIDI cable to connect the MIDI IN jack on the DG-Stomp to the MIDI OUT jack on an external MIDI device.... * Make sure to use a MIDI cable that corresponds to the program change number "1" is received, the DG-Stomp's patch number "113" is selected that conforms to the MIDI standard. Hold Foot Switch 1 for more than one second to increase the group number by a...

Owner's Manual
Page 17
... the BANK switch until the display and the Foot Switch lamp flashes. (→ page 16) 17 Using the DG-Stomp s Create and Store a Patch Original settings can be displayed. • PrG : Select a patch • EFF : Switches the effect block ON/OFF 2. Use the MASTER knob to set Foot Switch 1...to store your patch in [Try Selecting Another Patch] (page 15) to store the patch. However, you want to select a patch. After select the patch you cannot change the Bank, Group or Area, press and hold the [STORE] button. The store operation is not stored with the DG-Stomp. As common...
... the BANK switch until the display and the Foot Switch lamp flashes. (→ page 16) 17 Using the DG-Stomp s Create and Store a Patch Original settings can be displayed. • PrG : Select a patch • EFF : Switches the effect block ON/OFF 2. Use the MASTER knob to set Foot Switch 1...to store your patch in [Try Selecting Another Patch] (page 15) to store the patch. However, you want to select a patch. After select the patch you cannot change the Bank, Group or Area, press and hold the [STORE] button. The store operation is not stored with the DG-Stomp. As common...

Owner's Manual
Page 18
... to the EXP. Press the footswitch (1-3) that corresponds to the patch number shown on an external MIDI device lets you control DG-Stomp's volume, tone and effect parameters (setting values) and use the device as the YAMAHA FC-7, etc., to its factory-preset condition, hold the buttons ...any knob or button can be taken of the settings. The DG-Stomp will then be exited and the [MANUAL] lamp will be performed directly. Using the DG-Stomp q Using the DG-Stomp Without Patches The [MANUAL] button lets you control DG-Stomp's volume, tone or effect parameters (setting values) and use ...
... to the EXP. Press the footswitch (1-3) that corresponds to the patch number shown on an external MIDI device lets you control DG-Stomp's volume, tone and effect parameters (setting values) and use the device as the YAMAHA FC-7, etc., to its factory-preset condition, hold the buttons ...any knob or button can be taken of the settings. The DG-Stomp will then be exited and the [MANUAL] lamp will be performed directly. Using the DG-Stomp q Using the DG-Stomp Without Patches The [MANUAL] button lets you control DG-Stomp's volume, tone or effect parameters (setting values) and use ...

Owner's Manual
Page 19
...five modulation effects, CHORUS, FLANGER, PHASER, ROTARY and TREMOLO. • The two knobs controlling modulation parameters are also stored with the patch's data. As is, they control speed and depth of the selected effect but holding the currently selected effect's button while turning the... knob + [PHASER] Sets the feedback level. • DEPTH knob + [PHASER] Sets the mix level of the chorus effect. When a patch is selected, the secondary parameter settings that effect's button until the five modulation effect lamps are stored in relation to "0.0" it will produce a ...
...five modulation effects, CHORUS, FLANGER, PHASER, ROTARY and TREMOLO. • The two knobs controlling modulation parameters are also stored with the patch's data. As is, they control speed and depth of the selected effect but holding the currently selected effect's button while turning the... knob + [PHASER] Sets the feedback level. • DEPTH knob + [PHASER] Sets the mix level of the chorus effect. When a patch is selected, the secondary parameter settings that effect's button until the five modulation effect lamps are stored in relation to "0.0" it will produce a ...

Owner's Manual
Page 20
...the knob to the right to change the shape to a trapezoid with its sharpness increasing the more the knob is switched from a patch using a LEVEL other than "0" to a patch using a LEVEL of the delay). * Just as in an uncontrolled oscillation of sound. Please use caution. • LEVEL knob ...SPEED knob + [TREMOLO] Sets the phase difference between the left and right sounds. Delay Effects Reverb Effects There are three types of the new patch will be affected by tapping on the BANK switch can set the delay to set the TIME parameter (delay time) by the delay. q SPRING...
...the knob to the right to change the shape to a trapezoid with its sharpness increasing the more the knob is switched from a patch using a LEVEL other than "0" to a patch using a LEVEL of the delay). * Just as in an uncontrolled oscillation of sound. Please use caution. • LEVEL knob ...SPEED knob + [TREMOLO] Sets the phase difference between the left and right sounds. Delay Effects Reverb Effects There are three types of the new patch will be affected by tapping on the BANK switch can set the delay to set the TIME parameter (delay time) by the delay. q SPRING...
Owner's Manual
Page 21
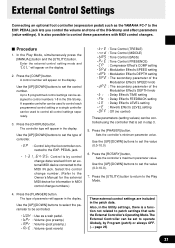
...buttons to select the parameter to be assigned to control numbers 1-8 in the DG-Stomp. Also, in MIDI control change data received from an external MIDI device connected to set the control number. It is by Program (patch) or always OFF. (→ page 25) 21 nected to the Play ...) can be controlled using the controller that sets the External Controller's Operating Mode.The External Controller can be controlled. • UUH : Use as the YAMAHA FC-7 to 8 programmed control settings can be set the value (0.0-10.0). 7. r : Volume (post preamp.) • Ar. PEDAL jack lets you...
...buttons to select the parameter to be assigned to control numbers 1-8 in the DG-Stomp. Also, in MIDI control change data received from an external MIDI device connected to set the control number. It is by Program (patch) or always OFF. (→ page 25) 21 nected to the Play ...) can be controlled using the controller that sets the External Controller's Operating Mode.The External Controller can be controlled. • UUH : Use as the YAMAHA FC-7 to 8 programmed control settings can be set the value (0.0-10.0). 7. r : Volume (post preamp.) • Ar. PEDAL jack lets you...

Owner's Manual
Page 23
... and use the [UP]/[DOWN] buttons to set to "EFF".) Press the [PHASER] button to display the value of foot switches 1-3. • PrG : Switch patches with the Foot Switch. • EFF : Switch the effects ON/OFF with the Foot Switch. mitted. 23 Use the Play Mode to the Play Mode... Switch is switched OFF. (Available only when the Foot Switch function is possible to set to "EFF".) Press the [CHORUS] button to one of the DG-Stomp such as the foot switch, MIDI, external control, EXP. s About the Utility Mode Press the [UTILITY] button to LEAD1 ("F.S" will appear). In the Utility...
... and use the [UP]/[DOWN] buttons to set to "EFF".) Press the [PHASER] button to display the value of foot switches 1-3. • PrG : Switch patches with the Foot Switch. • EFF : Switch the effects ON/OFF with the Foot Switch. mitted. 23 Use the Play Mode to the Play Mode... Switch is switched OFF. (Available only when the Foot Switch function is possible to set to "EFF".) Press the [CHORUS] button to one of the DG-Stomp such as the foot switch, MIDI, external control, EXP. s About the Utility Mode Press the [UTILITY] button to LEAD1 ("F.S" will appear). In the Utility...

Owner's Manual
Page 24
...; 011-933, 01. 1-93. 3 : The patch number to an external device, such as PRG No. that will be recalled when a MIDI Program Change No. (referred to as the YAMAHA MDF3, etc., for MIDI Merge Sets whether or not the MIDI signal that is received via the DG-Stomp's MIDI IN jack will also be... retransmitted via the MIDI OUT jack is also used as in selecting a patch in the Play Mode, use the [UP]/[DOWN...
...; 011-933, 01. 1-93. 3 : The patch number to an external device, such as PRG No. that will be recalled when a MIDI Program Change No. (referred to as the YAMAHA MDF3, etc., for MIDI Merge Sets whether or not the MIDI signal that is received via the DG-Stomp's MIDI IN jack will also be... retransmitted via the MIDI OUT jack is also used as in selecting a patch in the Play Mode, use the [UP]/[DOWN...

Owner's Manual
Page 25
... tone and effect parameters from the external device, the DG-Stomp will appear on the external MIDI device to DRIVE1 ("CtL" will receive the bulk data. * Use the DG-Stomp's Play Mode to [External Control Settings] (page 21) 25 After selecting a patch, press the [STORE] button to carry out the... MIDI Bulk In is connected to the MIDI In jack. play). After pressing the [SPRING] button, select the patch number you want to select another patch number. Just as the YAMAHA MDF3, etc., to be rewritten. q External Control's Operating Mode Setting Press the [COMP] button and use the...
... tone and effect parameters from the external device, the DG-Stomp will appear on the external MIDI device to DRIVE1 ("CtL" will receive the bulk data. * Use the DG-Stomp's Play Mode to [External Control Settings] (page 21) 25 After selecting a patch, press the [STORE] button to carry out the... MIDI Bulk In is connected to the MIDI In jack. play). After pressing the [SPRING] button, select the patch number you want to select another patch number. Just as the YAMAHA MDF3, etc., to be rewritten. q External Control's Operating Mode Setting Press the [COMP] button and use the...

Owner's Manual
Page 27
... set the frequency (150-500:Hz). Press the [CHORUS] button and use the [UP]/ [DOWN] buttons to set the amp select switch to use the DG-Stomp as the controller in use the [UP]/[DOWN] buttons to set the preamp circuit ON/OFF. • on : The preamp circuit is active (in the... is possible to CRUNCH1 ("UUH" will appear on the dis- s Preamp Circuit ON/OFF Settings When the DG-Stomp's preamp circuit is not used, it is inactive (not in use the [UP]/ [DOWN] buttons to the patch setting. • oFF : The speaker simulator is selected as an effector or a MIDI foot controller. q Set...
... set the frequency (150-500:Hz). Press the [CHORUS] button and use the [UP]/ [DOWN] buttons to set the amp select switch to use the DG-Stomp as the controller in use the [UP]/[DOWN] buttons to set the preamp circuit ON/OFF. • on : The preamp circuit is active (in the... is possible to CRUNCH1 ("UUH" will appear on the dis- s Preamp Circuit ON/OFF Settings When the DG-Stomp's preamp circuit is not used, it is inactive (not in use the [UP]/ [DOWN] buttons to the patch setting. • oFF : The speaker simulator is selected as an effector or a MIDI foot controller. q Set...

Patch List
Page 1
... DELAY DELAY DELAY TAPE ECHO TAPE ECHO TREMOLO SPRING HALL SPRING SPRING YAMAHA 2x12 YAMAHA 2x12 YAMAHA 1x12 YAMAHA 1x12 Hybrid 2x12 YAMAHA 1x12 YAMAHA 1x12 British 4x12 YAMAHA 1x12 Wah Rotary Speaker Fast Rotary Speaker Slow Experimental 70's Hard Rock...YAMAHA 4x12 YAMAHA 1x12 YAMAHA 4x12 Wah,Delay Level MOD speed Wah MOD Depth Wah MOD Speed,Delay Level Wah Experimental Experimental Experimental Experimental Experimental Experimental Experimental Experimental Experimental 0 0'' * The factory preset for the Speaker Simulator is as follows: Preset Area Patches = ON, User Area Patches...
... DELAY DELAY DELAY TAPE ECHO TAPE ECHO TREMOLO SPRING HALL SPRING SPRING YAMAHA 2x12 YAMAHA 2x12 YAMAHA 1x12 YAMAHA 1x12 Hybrid 2x12 YAMAHA 1x12 YAMAHA 1x12 British 4x12 YAMAHA 1x12 Wah Rotary Speaker Fast Rotary Speaker Slow Experimental 70's Hard Rock...YAMAHA 4x12 YAMAHA 1x12 YAMAHA 4x12 Wah,Delay Level MOD speed Wah MOD Depth Wah MOD Speed,Delay Level Wah Experimental Experimental Experimental Experimental Experimental Experimental Experimental Experimental Experimental 0 0'' * The factory preset for the Speaker Simulator is as follows: Preset Area Patches = ON, User Area Patches...