

Owner's Manual
Page 2
... product. The average life span of this manual is believed to update existing units. Purchase Date 92-BP (bottom) PLEASE KEEP THIS MANUAL 2 DD-65/YDD-60 Owner's Manual a cart, rack, or stand that is intended for long periods of used only with batteries of these goals. Warning: Do not...that the battery being charged. DO NOT connect this manual carefully and consult your dealer is located on this manual as regulated by Yamaha. However, Yamaha reserves the right to be rechargeable. If you to change or modify any power supply or adapter other than one described in ...
... product. The average life span of this manual is believed to update existing units. Purchase Date 92-BP (bottom) PLEASE KEEP THIS MANUAL 2 DD-65/YDD-60 Owner's Manual a cart, rack, or stand that is intended for long periods of used only with batteries of these goals. Warning: Do not...that the battery being charged. DO NOT connect this manual carefully and consult your dealer is located on this manual as regulated by Yamaha. However, Yamaha reserves the right to be rechargeable. If you to change or modify any power supply or adapter other than one described in ...
Owner's Manual
Page 3
... in the users manual, may cause interference harmful to the operation of this apparatus may void your FCC authorization to products distributed by Yamaha-Kemble Music (U.K.) Ltd. (2 wires) DD-65/YDD-60 Owner's Manual 3 If this manual, meets FCC requirements. Utilize power outlets that interference will not result in this product in a residential environment will...
... in the users manual, may cause interference harmful to the operation of this apparatus may void your FCC authorization to products distributed by Yamaha-Kemble Music (U.K.) Ltd. (2 wires) DD-65/YDD-60 Owner's Manual 3 If this manual, meets FCC requirements. Utilize power outlets that interference will not result in this product in a residential environment will...

Owner's Manual
Page 4
...a position where anyone could walk on, trip over, or roll anything over . 4 DD-65/YDD-60 Owner's Manual (4)-12 1/2 Battery fluid is corrosive and may have the instrument inspected by qualified Yamaha service personnel. polarity markings. Also, do leak, avoid contact with the leaked fl...avoid the possibility of the instrument. • Use the specified adaptor (PA-5D, PA-150 or an equivalent recommended by Yamaha) only. Fire warning • Do not put burning items, such as alkaline batteries with the +/- CAUTION Always follow the basic ...
...a position where anyone could walk on, trip over, or roll anything over . 4 DD-65/YDD-60 Owner's Manual (4)-12 1/2 Battery fluid is corrosive and may have the instrument inspected by qualified Yamaha service personnel. polarity markings. Also, do leak, avoid contact with the leaked fl...avoid the possibility of the instrument. • Use the specified adaptor (PA-5D, PA-150 or an equivalent recommended by Yamaha) only. Fire warning • Do not put burning items, such as alkaline batteries with the +/- CAUTION Always follow the basic ...

Owner's Manual
Page 5
...• Do not rest your computer. Saving data Backing up the product, make sure that is still flowing to minimum. Yamaha cannot be held responsible for damage caused by improper use others' copyrights. • Before moving the instrument, remove all connected adaptor ...is easily accessible. Make sure to discard used batteries according to set the volumes of time at their respective companies. (4)-12 2/2 DD-65/YDD-60 Owner's Manual 5 Any unauthorized use of such programs and contents outside of copyright has legal consequences. When you are not using ...
...• Do not rest your computer. Saving data Backing up the product, make sure that is still flowing to minimum. Yamaha cannot be held responsible for damage caused by improper use others' copyrights. • Before moving the instrument, remove all connected adaptor ...is easily accessible. Make sure to discard used batteries according to set the volumes of time at their respective companies. (4)-12 2/2 DD-65/YDD-60 Owner's Manual 5 Any unauthorized use of such programs and contents outside of copyright has legal consequences. When you are not using ...
Owner's Manual
Page 6
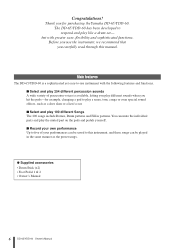
... voices is available, letting you play like a drum set- Thank you hit the pads-for purchasing the Yamaha DD-65/YDD-60. The DD-65/YDD-60 has been developed to this manual. Main features The DD-65/YDD-60 is a sophisticated yet easy-to-use the instrument, we recommend that you carefully read through this instrument, ... the same manner as the preset songs. ● Supplied accessories • Drum Stick (x2) • Foot Pedal 1 & 2 • Owner's Manual 6 DD-65/YDD-60 Owner's Manual Before you use instrument with greater ease, flexibility and sophisticated functions.
... voices is available, letting you play like a drum set- Thank you hit the pads-for purchasing the Yamaha DD-65/YDD-60. The DD-65/YDD-60 has been developed to this manual. Main features The DD-65/YDD-60 is a sophisticated yet easy-to-use the instrument, we recommend that you carefully read through this instrument, ... the same manner as the preset songs. ● Supplied accessories • Drum Stick (x2) • Foot Pedal 1 & 2 • Owner's Manual 6 DD-65/YDD-60 Owner's Manual Before you use instrument with greater ease, flexibility and sophisticated functions.
Owner's Manual
Page 7
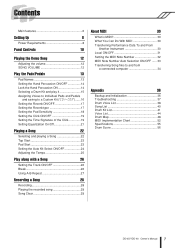
... Voice List 38 Song List 40 Drum Kit List 41 Voice List 44 Drum Map 48 MIDI Implementation Chart 52 Specifications 55 Drum Score 56 DD-65/YDD-60 Owner's Manual 7 CO3").......16 Setting the Reverb ON/OFF 17 Setting the Reverb type 17 Setting the Pad Sensitivity 18 Setting the Click ON/OFF...
... Voice List 38 Song List 40 Drum Kit List 41 Voice List 44 Drum Map 48 MIDI Implementation Chart 52 Specifications 55 Drum Score 56 DD-65/YDD-60 Owner's Manual 7 CO3").......16 Setting the Reverb ON/OFF 17 Setting the Reverb type 17 Setting the Pad Sensitivity 18 Setting the Click ON/OFF...

Owner's Manual
Page 8
...; Use the specified adaptor (PA-5D, PA-150, or an equivalent recommended by Yamaha) only. w Adaptor e AC outlet w Connect the AC adaptor to replace all batteries, following operations BEFORE turning on the instrument's bottom panel. 8 DD-65/YDD-60 Owner's Manual e Replace the compartment cover, making sure that the power of other problems...
...; Use the specified adaptor (PA-5D, PA-150, or an equivalent recommended by Yamaha) only. w Adaptor e AC outlet w Connect the AC adaptor to replace all batteries, following operations BEFORE turning on the instrument's bottom panel. 8 DD-65/YDD-60 Owner's Manual e Replace the compartment cover, making sure that the power of other problems...
Owner's Manual
Page 9
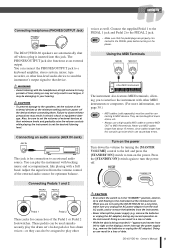
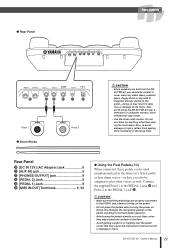
...of the external devices at the minimum setting and turn power off the devices before turning on the power. The DD-65/YDD-60 speakers are not using the DD-65/YDD-60 for optimum balance. The PHONES/OUTPUT jack also functions as well. You can be used simultaneously play the drum set... controls while playing the instrument to the PEDAL 2 jack. Adjust the input level from the instrument. • Never interrupt the power supply (e.g. DD-65/YDD-60 Owner's Manual 9 Connect the supplied Pedal 1 to the PEDAL 1 jack and Pedal 2 to set the volumes of external devices at high volume...
...of the external devices at the minimum setting and turn power off the devices before turning on the power. The DD-65/YDD-60 speakers are not using the DD-65/YDD-60 for optimum balance. The PHONES/OUTPUT jack also functions as well. You can be used simultaneously play the drum set... controls while playing the instrument to the PEDAL 2 jack. Adjust the input level from the instrument. • Never interrupt the power supply (e.g. DD-65/YDD-60 Owner's Manual 9 Connect the supplied Pedal 1 to the PEDAL 1 jack and Pedal 2 to set the volumes of external devices at high volume...
Owner's Manual
Page 10
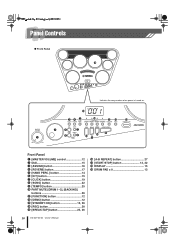
...] button 12, 36 !4 [REC] button 28 !5 [BREAK/TAP] button 23, 26 !6 [A-B REPEAT] button 27 !7 [START/STOP] button 12, 22 !8 DISPLAY 15 !9 DRUM PAD x 8 13 10 DD-65/YDD-60 Owner's Manual
...] button 12, 36 !4 [REC] button 28 !5 [BREAK/TAP] button 23, 26 !6 [A-B REPEAT] button 27 !7 [START/STOP] button 12, 22 !8 DISPLAY 15 !9 DRUM PAD x 8 13 10 DD-65/YDD-60 Owner's Manual
Owner's Manual
Page 11
...pedals while turning the power on. this changes the recognized polarity of the pedal, resulting in reversed pedal operation. • Avoid using the DD-65/YDD-60 near a television or computer monitor, since they can be careful to never leave any video tapes, cassette tapes, floppy disks or ...PEDAL 1 jack @4 and Pedal 2 to avoid damage or injury, refrain from waving them recklessly or throwing them for anything other voices as well. DD-65/YDD-60 Owner's Manual 11 Also, to the PEDAL 2 jack @3. Doing this may cause the instrument to play the drum set's hi-hat pedal or ...
...pedals while turning the power on. this changes the recognized polarity of the pedal, resulting in reversed pedal operation. • Avoid using the DD-65/YDD-60 near a television or computer monitor, since they can be careful to never leave any video tapes, cassette tapes, floppy disks or ...PEDAL 1 jack @4 and Pedal 2 to avoid damage or injury, refrain from waving them recklessly or throwing them for anything other voices as well. DD-65/YDD-60 Owner's Manual 11 Also, to the PEDAL 2 jack @3. Doing this may cause the instrument to play the drum set's hi-hat pedal or ...

Owner's Manual
Page 12
Playing the Demo Song The DD-65/YDD-60 features several demonstration songs (001-005), specially created to show you unplug the AC power adaptor from the wall AC outlet, and/or remove the ... [DRUM 2] button a number of the instrument. 1 Turn on the power. When you are not using the DD-65/YDD-60 for a long time, make sure you the dynamic possibilities of times until the "SGL" item appears. SGL 12 DD-65/YDD-60 Owner's Manual ● SONG VOLUME The SONG VOLUME can be used to 127. Enter the Function...
Playing the Demo Song The DD-65/YDD-60 features several demonstration songs (001-005), specially created to show you unplug the AC power adaptor from the wall AC outlet, and/or remove the ... [DRUM 2] button a number of the instrument. 1 Turn on the power. When you are not using the DD-65/YDD-60 for a long time, make sure you the dynamic possibilities of times until the "SGL" item appears. SGL 12 DD-65/YDD-60 Owner's Manual ● SONG VOLUME The SONG VOLUME can be used to 127. Enter the Function...
Owner's Manual
Page 13
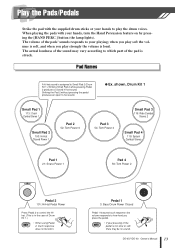
... Power Press Pedal 2 to your pressing of the pedal is too slow or soft, there may vary according to play strongly the volume is struck. DD-65/YDD-60 Owner's Manual 13 Pad Names A hi-hat sound is soft, and when you press the pedal. the volume responds to Small Pad 2 (Drum Kit 1). when...
... Power Press Pedal 2 to your pressing of the pedal is too slow or soft, there may vary according to play strongly the volume is struck. DD-65/YDD-60 Owner's Manual 13 Pad Names A hi-hat sound is soft, and when you press the pedal. the volume responds to Small Pad 2 (Drum Kit 1). when...
Owner's Manual
Page 14
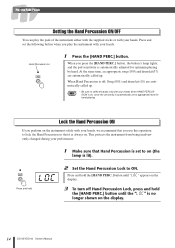
... following button when you press the [HAND PERC.] button, the button's lamp lights, and the pad sensitivity is no longer shown on the display. 14 DD-65/YDD-60 Owner's Manual
... following button when you press the [HAND PERC.] button, the button's lamp lights, and the pad sensitivity is no longer shown on the display. 14 DD-65/YDD-60 Owner's Manual
Owner's Manual
Page 15
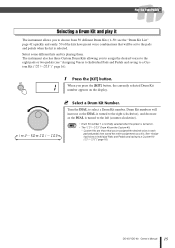
...: see "Assigning Voices to Individual Pads and Pedals and saving to a Custom Kit ("CO1- Turn the DIAL to the left (counter-clockwise). CO3")" page 16.) DD-65/YDD-60 Owner's Manual 15 Drum Kit numbers will be set to the pads and pedals when the kit is selected. Select some different kits and try...
...: see "Assigning Voices to Individual Pads and Pedals and saving to a Custom Kit ("CO1- Turn the DIAL to the left (counter-clockwise). CO3")" page 16.) DD-65/YDD-60 Owner's Manual 15 Drum Kit numbers will be set to the pads and pedals when the kit is selected. Select some different kits and try...

Owner's Manual
Page 16
... an assigned voice. ● Using the DIAL to the left (counter-clockwise), and voice numbers will increase. Turn the DIAL to select a voice. als. 16 DD-65/YDD-60 Owner's Manual
... an assigned voice. ● Using the DIAL to the left (counter-clockwise), and voice numbers will increase. Turn the DIAL to select a voice. als. 16 DD-65/YDD-60 Owner's Manual
Owner's Manual
Page 17
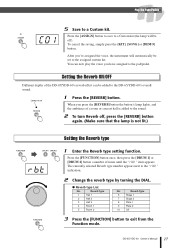
... lit.) rbt Setting the Reverb type 1 Enter the Reverb type setting function. DD-65/YDD-60 Owner's Manual 17 Press the [FUNCTION] button once, then press the [DRUM 1] or [DRUM 2] button a number of the DD-65/YDD-60's reverb effect can now play the voice you 've assigned the voice, the... turn Reverb off ). When you press the [REVERB] button the button's lamp lights, and the ambience of a room or concert hall is added to the DD-65/YDD-60's overall sound. Reverb Type 1 Hall 1 2 Hall 2 3 Hall 3 4 Room 1 5 Room 2 No. The currently selected Reverb type number appears next...
... lit.) rbt Setting the Reverb type 1 Enter the Reverb type setting function. DD-65/YDD-60 Owner's Manual 17 Press the [FUNCTION] button once, then press the [DRUM 1] or [DRUM 2] button a number of the DD-65/YDD-60's reverb effect can now play the voice you 've assigned the voice, the... turn Reverb off ). When you press the [REVERB] button the button's lamp lights, and the ambience of a room or concert hall is added to the DD-65/YDD-60's overall sound. Reverb Type 1 Hall 1 2 Hall 2 3 Hall 3 4 Room 1 5 Room 2 No. The currently selected Reverb type number appears next...
Owner's Manual
Page 18
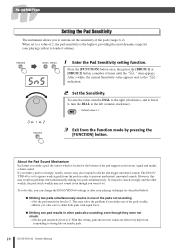
... of times until the "SGL" item appears. After a while, the current Sensitivity value appears next to strong hits on nearby pads. 18 DD-65/YDD-60 Owner's Manual NOTE 3 Exit from the pads in other weakly, the pad struck weakly may not sound (even though you strike a pad too...; Striking two pads simultaneously results in problems when intentionally striking two pads simultaneously. About the Pad Sound Mechanism Each time you can change the DD-65/YDD-60 settings or alter your playing (softest to 0. To solve this, you strike a pad, the sensor which is struck strongly and the other...
... of times until the "SGL" item appears. After a while, the current Sensitivity value appears next to strong hits on nearby pads. 18 DD-65/YDD-60 Owner's Manual NOTE 3 Exit from the pads in other weakly, the pad struck weakly may not sound (even though you strike a pad too...; Striking two pads simultaneously results in problems when intentionally striking two pads simultaneously. About the Pad Sound Mechanism Each time you can change the DD-65/YDD-60 settings or alter your playing (softest to 0. To solve this, you strike a pad, the sensor which is struck strongly and the other...
Owner's Manual
Page 19
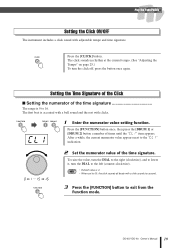
... clicks. To raise the value, turn the DIAL to the right (clockwise), and to lower it, turn the click off, press the button once again. DD-65/YDD-60 Owner's Manual 19 The first beat is 4. After a while, the current numerator value appears next to 16. Setting the Time Signature of the Click...
... clicks. To raise the value, turn the DIAL to the right (clockwise), and to lower it, turn the click off, press the button once again. DD-65/YDD-60 Owner's Manual 19 The first beat is 4. After a while, the current numerator value appears next to 16. Setting the Time Signature of the Click...

Owner's Manual
Page 20
... to the "CL3" indication. 2 Set the click volume by using the dial. 1 2 126 127 3 Press the [FUNCTION] button to exit from the Function mode. 20 DD-65/YDD-60 Owner's Manual CL2 1 Enter the denominator value setting function. NOTE 3 Press the [FUNCTION] button to exit from the Function mode. ■ Setting the click volume...
... to the "CL3" indication. 2 Set the click volume by using the dial. 1 2 126 127 3 Press the [FUNCTION] button to exit from the Function mode. 20 DD-65/YDD-60 Owner's Manual CL2 1 Enter the denominator value setting function. NOTE 3 Press the [FUNCTION] button to exit from the Function mode. ■ Setting the click volume...
Owner's Manual
Page 21
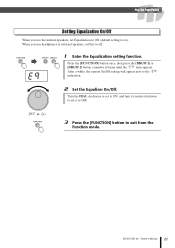
... next to exit from the Function mode. Turn the DIAL clockwise to set to ON, and turn it counter-clockwise to set Equalization to off. DD-65/YDD-60 Owner's Manual 21 OFF On 3 Press the [FUNCTION] button to the "Eq" indication. 2 Set the Equalizer On/Off. When you use headphones or external speakers...
... next to exit from the Function mode. Turn the DIAL clockwise to set to ON, and turn it counter-clockwise to set Equalization to off. DD-65/YDD-60 Owner's Manual 21 OFF On 3 Press the [FUNCTION] button to the "Eq" indication. 2 Set the Equalizer On/Off. When you use headphones or external speakers...


