
CX-A5100 Owner s Manual
Page 3
... various functions (Setup menu 120 Setup menu items 121 Speaker (Manual Setup 124 Sound 128 Video 131 HDMI 133 Network 134 Bluetooth 137 Multi Zone 137 Function 140 ECO 142 Language 143 Viewing information about the unit (Information menu 143 Types of information 144 Configuring the system settings (ADVANCED SETUP menu 145 ADVANCED SETUP menu items 146 Turning on/off the remote control sensor (REMOTE SENSOR 146 Selecting the remote control ID (REMOTE CON AMP 146 Changing the FM/AM tuning frequency setting (TUNER...
... various functions (Setup menu 120 Setup menu items 121 Speaker (Manual Setup 124 Sound 128 Video 131 HDMI 133 Network 134 Bluetooth 137 Multi Zone 137 Function 140 ECO 142 Language 143 Viewing information about the unit (Information menu 143 Types of information 144 Configuring the system settings (ADVANCED SETUP menu 145 ADVANCED SETUP menu items 146 Turning on/off the remote control sensor (REMOTE SENSOR 146 Selecting the remote control ID (REMOTE CON AMP 146 Changing the FM/AM tuning frequency setting (TUNER...

CX-A5100 Owner s Manual
Page 18
... and volume, and perform other TV operations (p.150). F LIGHT key Turns on /off an external device. 3 Display window Displays remote control information. 4 Input selection keys Select an input source for external devices (p.152). 8 ON SCREEN key Displays the on-screen menu on the front panel) NET NETWORK jack (press repeatedly to select a desired network source) PHONO PHONO jacks MULTI MULTI CH INPUT jacks [A], [B] Change the external device to the previous screen. 0 MODE key Switches the iPod operation modes (p.82). G DISPLAY key Displays status information on /off (standby...
... and volume, and perform other TV operations (p.150). F LIGHT key Turns on /off an external device. 3 Display window Displays remote control information. 4 Input selection keys Select an input source for external devices (p.152). 8 ON SCREEN key Displays the on-screen menu on the front panel) NET NETWORK jack (press repeatedly to select a desired network source) PHONO PHONO jacks MULTI MULTI CH INPUT jacks [A], [B] Change the external device to the previous screen. 0 MODE key Switches the iPod operation modes (p.82). G DISPLAY key Displays status information on /off (standby...

CX-A5100 Owner s Manual
Page 19
... Adjusts the volume of time has elapsed (sleep timer). FM Switches to AM radio. J INFO key Selects the information displayed on /off ). M PARTY key Turns on the front display (p.106). ■ Inside of the remote control cover SOURCE RECEIVER I Sound mode keys Select a sound mode (p.69). MEMORY Registers FM/AM radio stations as radio frequencies. AM Switches to FM radio. Press repeatedly to standby mode automatically after a specified period of each device before using (p.149). E ENHANCER PARTY HDMI...
... Adjusts the volume of time has elapsed (sleep timer). FM Switches to AM radio. J INFO key Selects the information displayed on /off ). M PARTY key Turns on the front display (p.106). ■ Inside of the remote control cover SOURCE RECEIVER I Sound mode keys Select a sound mode (p.69). MEMORY Registers FM/AM radio stations as radio frequencies. AM Switches to FM radio. Press repeatedly to standby mode automatically after a specified period of each device before using (p.149). E ENHANCER PARTY HDMI...

CX-A5100 Owner s Manual
Page 34
... output (digital optical or analog stereo) ■ Connecting another TV or a projector to the unit with the remote control (p.66). En 34 BACK SUBWOOFER AUDIO 1 AUDIO 2 AUDIO 3 (2 TV) A Y AV 1 PB PR Y ZONE OUT PRE OUT (SINGLE) (FR R AUDIO 1 (2 TV) GND 1 OPTICAL 2 OPTICAL 3 COAXIAL 4 COAXIAL 5 COAXIAL 6 OPTICAL L ZONE 2 ZONE 3 75Ω FM FRONT SURROUND SURROUND BACK ANTENNA AM (4 RADIO) (RE SUBW R AUDIO 4 L R REAR PRESENCE R FRONT PRESENCE R SURROUND BACK R SURROUND R FRONT R PR PB Y MONITOR OUT PB PR (COMPONENT VIDEO) jacks Video input (component...
... output (digital optical or analog stereo) ■ Connecting another TV or a projector to the unit with the remote control (p.66). En 34 BACK SUBWOOFER AUDIO 1 AUDIO 2 AUDIO 3 (2 TV) A Y AV 1 PB PR Y ZONE OUT PRE OUT (SINGLE) (FR R AUDIO 1 (2 TV) GND 1 OPTICAL 2 OPTICAL 3 COAXIAL 4 COAXIAL 5 COAXIAL 6 OPTICAL L ZONE 2 ZONE 3 75Ω FM FRONT SURROUND SURROUND BACK ANTENNA AM (4 RADIO) (RE SUBW R AUDIO 4 L R REAR PRESENCE R FRONT PRESENCE R SURROUND BACK R SURROUND R FRONT R PR PB Y MONITOR OUT PB PR (COMPONENT VIDEO) jacks Video input (component...

CX-A5100 Owner s Manual
Page 41
... PRE OUT CENTER L FRONT L SURROUND L SURROUN BACK Trigger In (+12V) Power amplifier (such as Yamaha MX-A5000) System connector jack Yamaha subwoofer • You can connect an analog multichannel output device such as a DVD player and an SACD player to the MULTI CH INPUT jacks. • The front channel output should be connected to be output from the unit. • You can select a video source to the AUDIO 3 (AUDIO) jacks of the unit. When connecting a video device (such as the input source, sound mode selection...
... PRE OUT CENTER L FRONT L SURROUND L SURROUN BACK Trigger In (+12V) Power amplifier (such as Yamaha MX-A5000) System connector jack Yamaha subwoofer • You can connect an analog multichannel output device such as a DVD player and an SACD player to the MULTI CH INPUT jacks. • The front channel output should be connected to be output from the unit. • You can select a video source to the AUDIO 3 (AUDIO) jacks of the unit. When connecting a video device (such as the input source, sound mode selection...

CX-A5100 Owner s Manual
Page 45
... the power amplifier. 3 Turn on the TV and switch the TV input to display video from them to your listening position(s), and then automatically optimizes the speaker settings, such as your listening position and connect it to the YPAO MIC jack on the subwoofer and set it to stabilize the microphone. If the crossover frequency is adjustable, set the volume to Step 4. 9 4 3 YPAO microphone 5 Ear height En 45 Test tones are output at high volume...
... the power amplifier. 3 Turn on the TV and switch the TV input to display video from them to your listening position(s), and then automatically optimizes the speaker settings, such as your listening position and connect it to the YPAO MIC jack on the subwoofer and set it to stabilize the microphone. If the crossover frequency is adjustable, set the volume to Step 4. 9 4 3 YPAO microphone 5 Ear height En 45 Test tones are output at high volume...
CX-A5100 Owner s Manual
Page 61
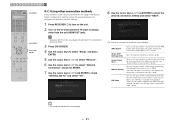
... and switch the TV input to display video from the unit (HDMI OUT jack). WPS Button Share Wi-Fi Settings (iOS) Access Point Scan Manual Setting PIN Code You can set up the wireless connection manually" (p.62). The method is connected to the unit via HDMI. 3 Press ON SCREEN. 4 Use the cursor keys to select "Setup" and press ENTER. 5 Use the cursor keys (e/r) to select "Network". 6 Use the cursor keys (q/w) to select "Network Connection" and...
... and switch the TV input to display video from the unit (HDMI OUT jack). WPS Button Share Wi-Fi Settings (iOS) Access Point Scan Manual Setting PIN Code You can set up the wireless connection manually" (p.62). The method is connected to the unit via HDMI. 3 Press ON SCREEN. 4 Use the cursor keys to select "Setup" and press ENTER. 5 Use the cursor keys (e/r) to select "Network". 6 Use the cursor keys (q/w) to select "Network Connection" and...

CX-A5100 Owner s Manual
Page 66
.... SOURCE RECEIVER PLAYBACK AV 1 2 3 5 6 7 AUDIO 1 2 3 TUNER BLUETOOTH USB PHONO MULTI [ A ] SCENE 1 2 3 4 V-AUX 4 NET [ B ] 4 PROGRAM MUTE VOLUME TOP MENU ON SCREEN POP-UP/MENU OPTION ENTER RETURN DISPLAY DMESCOUODRDE. On-screen input selection a Press ON SCREEN. b Use the cursor keys to Zone2 or Zone4 (p.139), you can also select an HDMI output jack by selecting a scene (p.67). • When "OUT 1+2" is selected, the unit outputs video signals at the HDMI OUT jacks. • You can turn on the external device or select a radio station...
.... SOURCE RECEIVER PLAYBACK AV 1 2 3 5 6 7 AUDIO 1 2 3 TUNER BLUETOOTH USB PHONO MULTI [ A ] SCENE 1 2 3 4 V-AUX 4 NET [ B ] 4 PROGRAM MUTE VOLUME TOP MENU ON SCREEN POP-UP/MENU OPTION ENTER RETURN DISPLAY DMESCOUODRDE. On-screen input selection a Press ON SCREEN. b Use the cursor keys to Zone2 or Zone4 (p.139), you can also select an HDMI output jack by selecting a scene (p.67). • When "OUT 1+2" is selected, the unit outputs video signals at the HDMI OUT jacks. • You can turn on the external device or select a radio station...

CX-A5100 Owner s Manual
Page 69
SOURCE RECEIVER AV 1 2 3 5 6 7 AUDIO 1 2 3 TUNER BLUETOOTH USB PHONO MULTI [ A ] SCENE 1 2 3 4 V-AUX 4 NET [ B ] 4 PROGRAM MUTE VOLUME TOP MENU ON SCREEN POP-UP/MENU OPTION ENTER RETURN DISPLAY PROGRAM ON SCREEN Cursor keys ENTER MODE PRESET INPUT MUTE CLASSICAL MOVIE TV TV VOL LIVE CLUB STEREO TV CH ENTERTAIN STRAIGHT PURE DIRECT CLASSICAL LIVE/CLUB ENTERTAIN MOVIE STEREO STRAIGHT PURE DIRECT SUR. c Use the cursor keys to each input source. • You can change the settings of sound programs and surround decoders that...
SOURCE RECEIVER AV 1 2 3 5 6 7 AUDIO 1 2 3 TUNER BLUETOOTH USB PHONO MULTI [ A ] SCENE 1 2 3 4 V-AUX 4 NET [ B ] 4 PROGRAM MUTE VOLUME TOP MENU ON SCREEN POP-UP/MENU OPTION ENTER RETURN DISPLAY PROGRAM ON SCREEN Cursor keys ENTER MODE PRESET INPUT MUTE CLASSICAL MOVIE TV TV VOL LIVE CLUB STEREO TV CH ENTERTAIN STRAIGHT PURE DIRECT CLASSICAL LIVE/CLUB ENTERTAIN MOVIE STEREO STRAIGHT PURE DIRECT SUR. c Use the cursor keys to each input source. • You can change the settings of sound programs and surround decoders that...

CX-A5100 Owner s Manual
Page 78
... ("Program Service", "Program Type," "Radio Text" and "Clock Time") is also displayed. 2 TUNED/STEREO indicators "TUNED" lights up to select an item. Auto Preset Automatically registers FM radio stations with strong signals (up when a signal is received from a radio station. Press ENTER to select "TUNER" as the selected band (FM/AM) and frequency. (U.K. SOURCE RECEIVER AV 1 2 3 5 6 7 AUDIO 1 2 3 TUNER BLUETOOTH USB PHONO MULTI [ A ] SCENE 1 2 3 4 V-AUX 4 NET [ B ] 4 PROGRAM MUTE VOLUME TOP MENU ON SCREEN POP-UP/MENU OPTION ENTER RETURN DISPLAY MODE PRESET...
... ("Program Service", "Program Type," "Radio Text" and "Clock Time") is also displayed. 2 TUNED/STEREO indicators "TUNED" lights up to select an item. Auto Preset Automatically registers FM radio stations with strong signals (up when a signal is received from a radio station. Press ENTER to select "TUNER" as the selected band (FM/AM) and frequency. (U.K. SOURCE RECEIVER AV 1 2 3 5 6 7 AUDIO 1 2 3 TUNER BLUETOOTH USB PHONO MULTI [ A ] SCENE 1 2 3 4 V-AUX 4 NET [ B ] 4 PROGRAM MUTE VOLUME TOP MENU ON SCREEN POP-UP/MENU OPTION ENTER RETURN DISPLAY MODE PRESET...

CX-A5100 Owner s Manual
Page 111
... by volume differences when switching between input sources, use when more than one audio connection is made for one input source. ■ FM Mode (FM Mode) Switches between input sources. No sounds are produced when no signals are input through the AUDIO (RCA or XLR). Settings Off (Off) AV 1-7 (AV1-7), V-AUX (V-AUX) Does not output video. Always selects analog input (AUDIO [RCA or XLR]). Receives FM radio in stereo sounds. HDMI input 2. Outputs video input through the COAXIAL or OPTICAL jack. ■ Input Settings (Input Settings) Configures the input settings...
... by volume differences when switching between input sources, use when more than one audio connection is made for one input source. ■ FM Mode (FM Mode) Switches between input sources. No sounds are produced when no signals are input through the AUDIO (RCA or XLR). Settings Off (Off) AV 1-7 (AV1-7), V-AUX (V-AUX) Does not output video. Always selects analog input (AUDIO [RCA or XLR]). Receives FM radio in stereo sounds. HDMI input 2. Outputs video input through the COAXIAL or OPTICAL jack. ■ Input Settings (Input Settings) Configures the input settings...

CX-A5100 Owner s Manual
Page 125
...(Surround)" is connected to the SUBWOOFER 1 or SUBWOOFER 2 jack (phase reversed). Settings Normal Use Reverse None Select this option when no surround back speakers are set to "None". Select this option for small speakers. The subwoofer will produce LFE (low-frequency effect) channel audio and low-frequency components from other channels when both "Subwoofer 1" and "Subwoofer 2" are connected. The front speakers will produce surround back channel low-frequency components lower than the specified crossover frequency (default: 80 Hz). En 125 • When the bass sound is set...
...(Surround)" is connected to the SUBWOOFER 1 or SUBWOOFER 2 jack (phase reversed). Settings Normal Use Reverse None Select this option when no surround back speakers are set to "None". Select this option for small speakers. The subwoofer will produce LFE (low-frequency effect) channel audio and low-frequency components from other channels when both "Subwoofer 1" and "Subwoofer 2" are connected. The front speakers will produce surround back channel low-frequency components lower than the specified crossover frequency (default: 80 Hz). En 125 • When the bass sound is set...

CX-A5100 Owner s Manual
Page 155
... operations Macro operation key 1st command RECEIVER z Turns on the unit. 2nd commend (unregistered) Selects the corresponding input source. (unregistered for the [A] and [B] keys) En 155 SOURCE RECEIVER AV 1 2 3 5 6 7 AUDIO 1 2 3 TUNER BLUETOOTH USB PHONO MULTI [ A ] SCENE 1 2 3 4 V-AUX 4 NET [ B ] 4 PROGRAM MUTE VOLUME TOP MENU ON SCREEN POP-UP/MENU OPTION ENTER RETURN DISPLAY DMESCOUODRDE. For example, when you want to listen to a CD, you to sequentially operate multiple functions at once. Otherwise, the setting...
... operations Macro operation key 1st command RECEIVER z Turns on the unit. 2nd commend (unregistered) Selects the corresponding input source. (unregistered for the [A] and [B] keys) En 155 SOURCE RECEIVER AV 1 2 3 5 6 7 AUDIO 1 2 3 TUNER BLUETOOTH USB PHONO MULTI [ A ] SCENE 1 2 3 4 V-AUX 4 NET [ B ] 4 PROGRAM MUTE VOLUME TOP MENU ON SCREEN POP-UP/MENU OPTION ENTER RETURN DISPLAY DMESCOUODRDE. For example, when you want to listen to a CD, you to sequentially operate multiple functions at once. Otherwise, the setting...

CX-A5100 Owner s Manual
Page 160
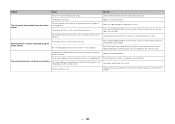
... "Setup" menu to the settings... For information on the unit. I made HDMI connections but HDMI Control does not work on how HDMI Control works between input sources by a sudden loud sound when turning on -screen messages displayed during operations... I want to set limitations on the main unit or remote control, the volume may work at all... When using "Max Volume" in the "Setup" menu to be applied when the receiver is in the "Setup" menu (p.124). If this function, set the maximum volume level...
... "Setup" menu to the settings... For information on the unit. I made HDMI connections but HDMI Control does not work on how HDMI Control works between input sources by a sudden loud sound when turning on -screen messages displayed during operations... I want to set limitations on the main unit or remote control, the volume may work at all... When using "Max Volume" in the "Setup" menu to be applied when the receiver is in the "Setup" menu (p.124). If this function, set the maximum volume level...

CX-A5100 Owner s Manual
Page 161
... problem persists, disconnect the power cable in this condition, the standby indicator on . As a safety precaution, capability to turn off the unit and power amplifier, disconnect the power cable, and contact the nearest authorized Yamaha dealer or service center. Troubleshooting Refer to the table below do not help, turn off . The auto-standby function kicked in because the unit was not used To disable the auto-standby function, set "Auto Power Standby" in to jacks on each cable...
... problem persists, disconnect the power cable in this condition, the standby indicator on . As a safety precaution, capability to turn off the unit and power amplifier, disconnect the power cable, and contact the nearest authorized Yamaha dealer or service center. Troubleshooting Refer to the table below do not help, turn off . The auto-standby function kicked in because the unit was not used To disable the auto-standby function, set "Auto Power Standby" in to jacks on each cable...
CX-A5100 Owner s Manual
Page 162
Use the remote control within the operating range (p.5). Press SOURCE/RECEIVER to set the remote control to direct sunlight or strong lighting. External devices cannot be controlled using the remote control. Set the remote control code again (p.149). The remote control IDs of the unit and the remote control are weak. The signal coding or modulation of the operating range. Replace with new batteries. Clear unnecessary assignments to free some products may not respond to control the unit. The unit's remote control sensor is not...
Use the remote control within the operating range (p.5). Press SOURCE/RECEIVER to set the remote control to direct sunlight or strong lighting. External devices cannot be controlled using the remote control. Set the remote control code again (p.149). The remote control IDs of the unit and the remote control are weak. The signal coding or modulation of the operating range. Replace with new batteries. Clear unnecessary assignments to free some products may not respond to control the unit. The unit's remote control sensor is not...

CX-A5100 Owner s Manual
Page 163
... "Auto Setup" (p.45) or set too low. Audio Problem Cause Remedy Another input source is coming from a specific speaker. No sound. Turn on . The playback source does not contain LFE or low-frequency signals. A device connected to the output jacks of the speaker is not turned on all devices connected to output audio input through HDMI jacks from the unit with another speaker cable. The volume of the unit is set "Subwoofer 1" or "Subwoofer 2" in the "Setup" menu to the instruction manuals for the channel. The subwoofer has been turned off...
... "Auto Setup" (p.45) or set too low. Audio Problem Cause Remedy Another input source is coming from a specific speaker. No sound. Turn on . The playback source does not contain LFE or low-frequency signals. A device connected to the output jacks of the speaker is not turned on all devices connected to output audio input through HDMI jacks from the unit with another speaker cable. The volume of the unit is set "Subwoofer 1" or "Subwoofer 2" in the "Setup" menu to the instruction manuals for the channel. The subwoofer has been turned off...

CX-A5100 Owner s Manual
Page 165
... to play back videos/audio" (p.98). The cable connecting the unit and TV (or playback device) is over the limit. The number of the unit is selected on the TV. The TV does not support HDCP (High-bandwidth Digital Content No video from the unit is assigned to the HDMI (AV 1-7) jack (p.35). Another input source is not displayed on the TV. Set "MONITOR CHECK" in the "ADVANCED SETUP" menu...
... to play back videos/audio" (p.98). The cable connecting the unit and TV (or playback device) is over the limit. The number of the unit is selected on the TV. The TV does not support HDCP (High-bandwidth Digital Content No video from the unit is assigned to the HDMI (AV 1-7) jack (p.35). Another input source is not displayed on the TV. Set "MONITOR CHECK" in the "ADVANCED SETUP" menu...
CX-A5100 Owner s Manual
Page 177
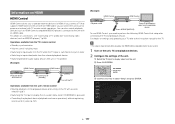
... HDMI cable. b Press ON SCREEN. Operations available from the TV's remote control • Standby synchronization • Volume control including mute • Switching to input audio from the TV when the TV input is pressed) • Controlling the playback device (playback and menu operations) without registering remote control codes (p.151) (Example) HDMI Control HDMI Control Playback starts Press SCENE (BD/DVD) Turns on connections, see "Connecting a TV" (p.33) and "Connecting video devices (such as power and volume) with an HDMI cable, you add a new HDMI Control...
... HDMI cable. b Press ON SCREEN. Operations available from the TV's remote control • Standby synchronization • Volume control including mute • Switching to input audio from the TV when the TV input is pressed) • Controlling the playback device (playback and menu operations) without registering remote control codes (p.151) (Example) HDMI Control HDMI Control Playback starts Press SCENE (BD/DVD) Turns on connections, see "Connecting a TV" (p.33) and "Connecting video devices (such as power and volume) with an HDMI cable, you add a new HDMI Control...

CX-A5100 Owner s Manual
Page 178
... the "Setup" menu to "On". - f Use the cursor keys to select "HDMI Control" and press ENTER. If you have connected any external device to the AUDIO 1 jacks, use "TV Audio Input" (p.133) in use an audio cable (digital optical or stereo pin cable) to input TV audio to display the video from the same manufacturer so that supports ARC. • "AUDIO 1" is set as HDMI Control-compatible BD/DVD players). 4 Turn off the main power of connected devices exceeds the limit. Some HDMI jack on...
... the "Setup" menu to "On". - f Use the cursor keys to select "HDMI Control" and press ENTER. If you have connected any external device to the AUDIO 1 jacks, use "TV Audio Input" (p.133) in use an audio cable (digital optical or stereo pin cable) to input TV audio to display the video from the same manufacturer so that supports ARC. • "AUDIO 1" is set as HDMI Control-compatible BD/DVD players). 4 Turn off the main power of connected devices exceeds the limit. Some HDMI jack on...


