Owner's Manual
Page 1
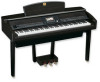
... voltage matches the voltage specified on the name plate on the bottom panel. EN CVP-405 / 403 /401 OWNER'S MANUAL Make sure that your area. In some areas a voltage selector may be provided on the panel. To change the setting use a "minus" screwdriver to rotate the selector dial so that the voltage selector is...
... voltage matches the voltage specified on the name plate on the bottom panel. EN CVP-405 / 403 /401 OWNER'S MANUAL Make sure that your area. In some areas a voltage selector may be provided on the panel. To change the setting use a "minus" screwdriver to rotate the selector dial so that the voltage selector is...
Owner's Manual
Page 2
... to be denied if the unit is intended to alert the user to produce products that our products and the production methods used batteries promptly and as a permanent record of your dealer before requesting service. In keeping with arrowhead symbol, within the product... and are tested and approved by law to update existing units. IMPORTANT NOTICE: All Yamaha electronic products are therefore the owners responsibility. The average life span of this plate. CVP-405 CVP-403 CVP-401 Model Serial No. REFER SERVICING TO QUALIFIED SERVICE PERSONNEL. Keep all cautions indicated on...
... to be denied if the unit is intended to alert the user to produce products that our products and the production methods used batteries promptly and as a permanent record of your dealer before requesting service. In keeping with arrowhead symbol, within the product... and are tested and approved by law to update existing units. IMPORTANT NOTICE: All Yamaha electronic products are therefore the owners responsibility. The average life span of this plate. CVP-405 CVP-403 CVP-401 Model Serial No. REFER SERVICING TO QUALIFIED SERVICE PERSONNEL. Keep all cautions indicated on...
Owner's Manual
Page 5
... oud, pan flute, pungi, rabab, shanai, sitar, steel drum, and tambra. • (CVP-405/403) This product is not permitted under license of personal use of such programs and contents outside of U.S. CVP-405/403/401 Owner's Manual 5 based controls. Reference (page 79 This section explains how to as the...(page 23 This section explains how to MIDI data and/or audio data is strictly prohibited except for your personal use with the device in this Yamaha Clavinova! Trademarks: • All other trademarks are on your instrument. • The panel illustrations and LCD displays...
... oud, pan flute, pungi, rabab, shanai, sitar, steel drum, and tambra. • (CVP-405/403) This product is not permitted under license of personal use of such programs and contents outside of U.S. CVP-405/403/401 Owner's Manual 5 based controls. Reference (page 79 This section explains how to as the...(page 23 This section explains how to MIDI data and/or audio data is strictly prohibited except for your personal use with the device in this Yamaha Clavinova! Trademarks: • All other trademarks are on your instrument. • The panel illustrations and LCD displays...
Owner's Manual
Page 7
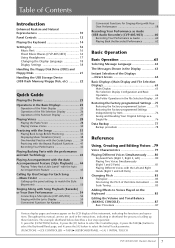
...Along with Your Own Performance 58 Recording Your Performance as Audio (USB Audio Recorder) (CVP-405/403 60 Recording Your Performance as a Single File 76 Data Backup 77 Backup procedure 78 Reference Using, Creating and Editing Voices ..79 Voice Characteristics 79 Playing Different Voices Simultaneously ........ 80 ... and Natural Expressiveness 10 Panel Controls 12 Playing the Keyboard 14 Setting Up 16 Music Rest 16 Sheet Music Braces (CVP-405/403 16 Using Headphones 17 Changing the Display Language 18 Display Settings 18 Handling the Floppy Disk Drive (FDD) and Floppy Disks 21...
...Along with Your Own Performance 58 Recording Your Performance as Audio (USB Audio Recorder) (CVP-405/403 60 Recording Your Performance as a Single File 76 Data Backup 77 Backup procedure 78 Reference Using, Creating and Editing Voices ..79 Voice Characteristics 79 Playing Different Voices Simultaneously ........ 80 ... and Natural Expressiveness 10 Panel Controls 12 Playing the Keyboard 14 Setting Up 16 Music Rest 16 Sheet Music Braces (CVP-405/403 16 Using Headphones 17 Changing the Display Language 18 Display Settings 18 Handling the Floppy Disk Drive (FDD) and Floppy Disks 21...
Owner's Manual
Page 8
... Selecting the Guide Function Type 137 Recording Your Performance 139 Recording Methods 139 Editing a Recorded Song 154 Using a Microphone (CVP-405/403 163 Editing Vocal Harmony Parameters 163 Adjusting the Microphone and Harmony Sound 166 Talk Setting 170 Connecting the... Settings 183 Glossary of Internet Terms 184 Using Your Instrument with Other Devices 185 Using Headphones (1 [PHONES] jacks 185 Connecting a Microphone or Guitar (2 [MIC./LINE IN] jack) (CVP-405/403) ....... 185 Connecting Audio & Video Devices (345) .. 185 Using External Audio Devices for playback and Recording ...
... Selecting the Guide Function Type 137 Recording Your Performance 139 Recording Methods 139 Editing a Recorded Song 154 Using a Microphone (CVP-405/403 163 Editing Vocal Harmony Parameters 163 Adjusting the Microphone and Harmony Sound 166 Talk Setting 170 Connecting the... Settings 183 Glossary of Internet Terms 184 Using Your Instrument with Other Devices 185 Using Headphones (1 [PHONES] jacks 185 Connecting a Microphone or Guitar (2 [MIC./LINE IN] jack) (CVP-405/403) ....... 185 Connecting Audio & Video Devices (345) .. 185 Using External Audio Devices for playback and Recording ...
Owner's Manual
Page 9
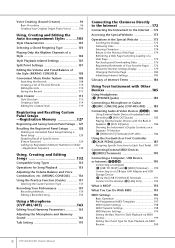
... with Other Devices Appendix Troubleshooting 201 CVP-405: Keyboard Stand Assembly 206 CVP-403: Keyboard Stand Assembly 208 CVP-401: Keyboard Stand Assembly 210 Installing the Floppy Disk Drive (Optional) (CVP-405 212 Specifications 213 Index 215 Panel Button Chart 218 Introduction Quick Guide Basic Operation Reference Using, Creating and Editing Voices Using, Creating and Editing the Auto Accompaniment...
... with Other Devices Appendix Troubleshooting 201 CVP-405: Keyboard Stand Assembly 206 CVP-403: Keyboard Stand Assembly 208 CVP-401: Keyboard Stand Assembly 210 Installing the Floppy Disk Drive (Optional) (CVP-405 212 Specifications 213 Index 215 Panel Button Chart 218 Introduction Quick Guide Basic Operation Reference Using, Creating and Editing Voices Using, Creating and Editing the Auto Accompaniment...
Owner's Manual
Page 10
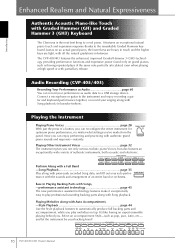
...playing behind you play professional-sounding backing parts along with previously recorded Song data, and fill out your backing band! 10 CVP-405/403/401 Owner's Manual Audio Recording (CVP-405/403) Recording Your Performance as Audio page 60 You can enjoy performing and practicing with authentic grand piano sounds and response-instantly. Playing ... the entire instrument for optimum piano performance, no matter what settings you can record your singing along with Auto Accompaniment, -Style Playback page 44 Use the Style playback features to a USB storage device.
...playing behind you play professional-sounding backing parts along with previously recorded Song data, and fill out your backing band! 10 CVP-405/403/401 Owner's Manual Audio Recording (CVP-405/403) Recording Your Performance as Audio page 60 You can enjoy performing and practicing with authentic grand piano sounds and response-instantly. Playing ... the entire instrument for optimum piano performance, no matter what settings you can record your singing along with Auto Accompaniment, -Style Playback page 44 Use the Style playback features to a USB storage device.
Owner's Manual
Page 14
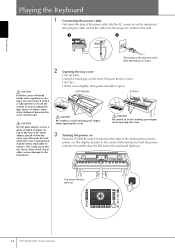
...keyboard lights up . 14 CVP-405/403/401 Owner's Manual This could cause electric shock, short circuit, fire or other end of the cable into the AC connector on the instrument, then plug the other serious damage to the instrument. 2 Opening the key cover CVP-405/403: Using the hand grip on ...the front, lift open . CVP-401: Lift the cover slightly, then push and slide it is opened or closed. CAUTION Do not place objects such...
...keyboard lights up . 14 CVP-405/403/401 Owner's Manual This could cause electric shock, short circuit, fire or other end of the cable into the AC connector on the instrument, then plug the other serious damage to the instrument. 2 Opening the key cover CVP-405/403: Using the hand grip on ...the front, lift open . CVP-401: Lift the cover slightly, then push and slide it is opened or closed. CAUTION Do not place objects such...

Owner's Manual
Page 15
... turn off . CAUTION Be careful to avoid catching your fingers when closing the cover. CVP-405/403 CVP-401 CAUTION Be careful to avoid catching your fingers when closing the cover. CVP-401: Slide the cover toward you and gently lower the cover over the keys. Adjusting the ...volume While playing the keyboard, adjust the volume level by using the [MASTER VOLUME] located at the top of the panel....
... turn off . CAUTION Be careful to avoid catching your fingers when closing the cover. CVP-405/403 CVP-401 CAUTION Be careful to avoid catching your fingers when closing the cover. CVP-401: Slide the cover toward you and gently lower the cover over the keys. Adjusting the ...volume While playing the keyboard, adjust the volume level by using the [MASTER VOLUME] located at the top of the panel....
Owner's Manual
Page 16
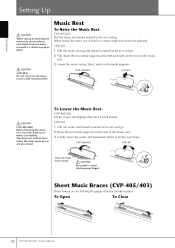
... Be careful to use the music rest in place. The music rest will go . 2 Flip down . To Lower the Music Rest: CVP-405/403: Lift the music rest slightly, then turn it rests on the metal supports. To Open To Close 16 CVP-405/403/401 Owner's Manual CVP-405/403 CVP-401 Close the ...as it will go . Introduction Setting Up CAUTION When raising or lowering the music rest, do not release your fingers. CVP-405/403 CVP-401 CAUTION (CVP-405/403) Before lowering the music rest, close unless the sheet music braces are for holding the pages of the music rest. 3 Lower...
... Be careful to use the music rest in place. The music rest will go . 2 Flip down . To Lower the Music Rest: CVP-405/403: Lift the music rest slightly, then turn it rests on the metal supports. To Open To Close 16 CVP-405/403/401 Owner's Manual CVP-405/403 CVP-401 Close the ...as it will go . Introduction Setting Up CAUTION When raising or lowering the music rest, do not release your fingers. CVP-405/403 CVP-401 CAUTION (CVP-405/403) Before lowering the music rest, close unless the sheet music braces are for holding the pages of the music rest. 3 Lower...
Owner's Manual
Page 17
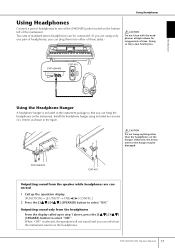
...damaged. CAUTION Do not hang anything other than the headphones on the hanger. CVP-405/403 INPUT VOLUME MIC. Introduction Using Headphones Using Headphones Connect a pair of headphones to one pair of the instrument. CVP-405/403/401 Owner's Manual 17 Two sets of standard stereo headphones can plug them... into either of these jacks.) CAUTION Do not listen with the headphones at high volume for long periods of time. Install the headphone hanger using only one of...
...damaged. CAUTION Do not hang anything other than the headphones on the hanger. CVP-405/403 INPUT VOLUME MIC. Introduction Using Headphones Using Headphones Connect a pair of headphones to one pair of the instrument. CVP-405/403/401 Owner's Manual 17 Two sets of standard stereo headphones can plug them... into either of these jacks.) CAUTION Do not listen with the headphones at high volume for long periods of time. Install the headphone hanger using only one of...

Owner's Manual
Page 18
Introduction Changing the Display Language Changing the Display Language This determines the language used in the display for messages, file names, and character input. 1 Call up the operation display. [FUNCTION] → [J] UTILITY → TAB[√][®] OWNER 2 Press the [4π†]/[5π†] button to the left of the display by turning the [LCD CONTRAST] knob located to select a language. Display Settings Adjusting the Contrast of the Display You can adjust the contrast of the display. 18 CVP-405/403/401 Owner's Manual
Introduction Changing the Display Language Changing the Display Language This determines the language used in the display for messages, file names, and character input. 1 Call up the operation display. [FUNCTION] → [J] UTILITY → TAB[√][®] OWNER 2 Press the [4π†]/[5π†] button to the left of the display by turning the [LCD CONTRAST] knob located to select a language. Display Settings Adjusting the Contrast of the Display You can adjust the contrast of the display. 18 CVP-405/403/401 Owner's Manual

Owner's Manual
Page 21
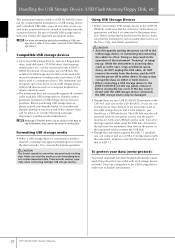
...power is on the disk will eventually cause read /write head regularly. This instrument employs a precision magnetic read and -write errors. Ask your Yamaha dealer about once a month. Always keep floppy disks in their protective cases when they are not in . Floppy Disk Compatibility •...the availability of magnetic particles from the disks used that will be useable as is ejected, pull it all the way in use a commercially-available dry-type head cleaning disk to the "protect" position (tab open (protect position) CVP-405/403/401 Owner's Manual 21 Be sure to handle...
...power is on the disk will eventually cause read /write head regularly. This instrument employs a precision magnetic read and -write errors. Ask your Yamaha dealer about once a month. Always keep floppy disks in their protective cases when they are not in . Floppy Disk Compatibility •...the availability of magnetic particles from the disks used that will be useable as is ejected, pull it all the way in use a commercially-available dry-type head cleaning disk to the "protect" position (tab open (protect position) CVP-405/403/401 Owner's Manual 21 Be sure to handle...
Owner's Manual
Page 22
...off to either or both devices. • When connecting a USB storage device to disable write-protect. 22 CVP-405/403/401 Owner's Manual If an error message appears while using the USB hub, disconnect the hub from being inadvertently erased, apply the write-protect provided with the instrument. ...To protect your Yamaha dealer, or an authorized Yamaha distributor (see list at the same time (such as a computer keyboard or mouse cannot be used for advice, or visit the following web page: http://music.yamaha.com/homekeyboard n Although CD-R/RW drives can be used is that the media...
...off to either or both devices. • When connecting a USB storage device to disable write-protect. 22 CVP-405/403/401 Owner's Manual If an error message appears while using the USB hub, disconnect the hub from being inadvertently erased, apply the write-protect provided with the instrument. ...To protect your Yamaha dealer, or an authorized Yamaha distributor (see list at the same time (such as a computer keyboard or mouse cannot be used for advice, or visit the following web page: http://music.yamaha.com/homekeyboard n Although CD-R/RW drives can be used is that the media...
Owner's Manual
Page 26
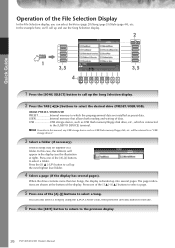
...] dial, then press the [ENTER] button to execute. 6 Press the [EXIT] button to return to call up and use the Song Selection display. 2 1 3, 5 3, 5 4 1 Press the [SONG SELECT] button to the previous display. 26 CVP-405/403/401 Owner's Manual Press the [8 π] (UP) button to call up into several pages). In the example here...
...] dial, then press the [ENTER] button to execute. 6 Press the [EXIT] button to return to call up and use the Song Selection display. 2 1 3, 5 3, 5 4 1 Press the [SONG SELECT] button to the previous display. 26 CVP-405/403/401 Owner's Manual Press the [8 π] (UP) button to call up into several pages). In the example here...

Owner's Manual
Page 30
...in the "PERCUSSION & DRUM KIT," "GM&XG" and "GM2" groups may sound continuously or have a long decay after releasing the keys. CVP-405 CVP-403/401 Left Pedal Damper Pedal Sostenuto Pedal Left Pedal Damper Pedal Sostenuto Pedal ● Damper Pedal (Right) The damper pedal performs the same function...9679; Foot Controller/Footswitch An optional Yamaha foot controller (FC7) or footswitch (FC4 or FC5) can be connected to the AUX PEDAL jack and used to start the metronome. 2 To stop the metronome, press the METRONOME [ON/OFF] button again. 30 CVP-405/403/401 Owner's Manual n The depth...
...in the "PERCUSSION & DRUM KIT," "GM&XG" and "GM2" groups may sound continuously or have a long decay after releasing the keys. CVP-405 CVP-403/401 Left Pedal Damper Pedal Sostenuto Pedal Left Pedal Damper Pedal Sostenuto Pedal ● Damper Pedal (Right) The damper pedal performs the same function...9679; Foot Controller/Footswitch An optional Yamaha foot controller (FC7) or footswitch (FC4 or FC5) can be connected to the AUX PEDAL jack and used to start the metronome. 2 To stop the metronome, press the METRONOME [ON/OFF] button again. 30 CVP-405/403/401 Owner's Manual n The depth...

Owner's Manual
Page 55
... the BACKGROUND setting cannot be saved to call up the Text selection display. 4 Press the TAB [√][®] buttons to display the text. CVP-405/403/401 Owner's Manual 55 When the Text display appears, press the [1†] (LYRICS) button to display the lyrics. 3 Press the SONG [PLAY...), if the lyrics shown are available in the display of the Song data (page 158). • Changing the Lyrics Background Picture (CVP-405) You can be used to select other pages. n • When the lyrics are unreadable You may need to change the background picture of the [A]-[J] buttons...
... the BACKGROUND setting cannot be saved to call up the Text selection display. 4 Press the TAB [√][®] buttons to display the text. CVP-405/403/401 Owner's Manual 55 When the Text display appears, press the [1†] (LYRICS) button to display the lyrics. 3 Press the SONG [PLAY...), if the lyrics shown are available in the display of the Song data (page 158). • Changing the Lyrics Background Picture (CVP-405) You can be used to select other pages. n • When the lyrics are unreadable You may need to change the background picture of the [A]-[J] buttons...

Owner's Manual
Page 185
... a pair of the instrument. Also, before turning any components on the leftward underside of the instrument (near the lower keys) CVP-405/403 CVP-401 INPUT VOLUME MIC. Using Your Instrument with your own performance. CVP-403/401 The right side of the instrument (near the higher keys) P. 185 3 P. 186 4 The left side of the instrument. LINE...
... a pair of the instrument. Also, before turning any components on the leftward underside of the instrument (near the lower keys) CVP-405/403 CVP-401 INPUT VOLUME MIC. Using Your Instrument with your own performance. CVP-403/401 The right side of the instrument (near the higher keys) P. 185 3 P. 186 4 The left side of the instrument. LINE...

Owner's Manual
Page 188
... the song is selected. Same as the [TAP TEMPO] button. proper operation cannot be done with Other Devices 188 CVP-405/403/401 Owner's Manual Allows you can turn this display. Applies a vibrato effect to the previous score page. Moreover, ...STOP] button. Using Your Instrument with a footswitch. Assignable Pedal Functions VOLUME* SUSTAIN SOSTENUTO SOFT GLIDE PORTAMENTO PITCH BEND* MOD/S.ART1* (CVP-405) MODULATION (CVP-403/401) MOD/S.ART2 (ALT) (CVP-405) S.ART SW (CVP-405) DSP VARIATION VIBE ROTOR ON/OFF HARMONY/ECHO VOCAL HARMONY (CVP-405/403) TALK (CVP-405/403) SCORE PAGE+...
... the song is selected. Same as the [TAP TEMPO] button. proper operation cannot be done with Other Devices 188 CVP-405/403/401 Owner's Manual Allows you can turn this display. Applies a vibrato effect to the previous score page. Moreover, ...STOP] button. Using Your Instrument with a footswitch. Assignable Pedal Functions VOLUME* SUSTAIN SOSTENUTO SOFT GLIDE PORTAMENTO PITCH BEND* MOD/S.ART1* (CVP-405) MODULATION (CVP-403/401) MOD/S.ART2 (ALT) (CVP-405) S.ART SW (CVP-405) DSP VARIATION VIBE ROTOR ON/OFF HARMONY/ECHO VOCAL HARMONY (CVP-405/403) TALK (CVP-405/403) SCORE PAGE+...

Owner's Manual
Page 208
...20mm) into the other side. A At least 10 cm E C 2 Use the four 6 ✕ 25 mm long screws to drop A. • Do not hold the keyboard in any position other side panel. 208 CVP-405/403/401 Owner's Manual Appendix CVP-403: Keyboard Stand Assembly CAUTION • Be careful not to confuse parts, ...by at least 10 cm from either end of one side panel, then attach the other than the position shown in place. D 4 Mount A. Use of incorrect screws can become pinched between A and C/D/E, be sure to install all screws upon completing assembly of the pads. First attach one side...
...20mm) into the other side. A At least 10 cm E C 2 Use the four 6 ✕ 25 mm long screws to drop A. • Do not hold the keyboard in any position other side panel. 208 CVP-405/403/401 Owner's Manual Appendix CVP-403: Keyboard Stand Assembly CAUTION • Be careful not to confuse parts, ...by at least 10 cm from either end of one side panel, then attach the other than the position shown in place. D 4 Mount A. Use of incorrect screws can become pinched between A and C/D/E, be sure to install all screws upon completing assembly of the pads. First attach one side...


