
Owner's Manual
Page 6
... editing menu. About This Manual I About this manual • This manual is printed prior to production. GETTING STARTED This section explains necessary preparations such as remote control and connection. Please read this before using this unit. See "EDITING MENU ITEMS" for "album", "track", and "disc" respectively. COPYING AND RECORDING ONTO A CD...
... editing menu. About This Manual I About this manual • This manual is printed prior to production. GETTING STARTED This section explains necessary preparations such as remote control and connection. Please read this before using this unit. See "EDITING MENU ITEMS" for "album", "track", and "disc" respectively. COPYING AND RECORDING ONTO A CD...
Owner's Manual
Page 7
... OF DIGITAL RECORDING AND NOTES ON SYSTEM 5 Rules of Digital Recording 5 Notes on System 5 Data on the HDD 6 NAMES OF BUTTONS AND CONTROLS 7 Front Panel 7 Remote Control 8 Display 10 Display Information 11 Rear Panel 12 CONNECTIONS 12 COPYING AND RECORDING ONTO THE HDD COPYING FROM A CD ONTO THE HDD 14 Copying...
... OF DIGITAL RECORDING AND NOTES ON SYSTEM 5 Rules of Digital Recording 5 Notes on System 5 Data on the HDD 6 NAMES OF BUTTONS AND CONTROLS 7 Front Panel 7 Remote Control 8 Display 10 Display Information 11 Rear Panel 12 CONNECTIONS 12 COPYING AND RECORDING ONTO THE HDD COPYING FROM A CD ONTO THE HDD 14 Copying...

Owner's Manual
Page 8
TEXT/TIME INPUT WRITE MODE MENU COMPLETE CLEAR ENTER 1 ABC 2 DEF 3 GHI 4 JKL 5 MNO 6 PQR 7 STU 8 VWX 9 YZ 0 SPACE +10 SYMBOL BOOKMARK REPEAT RANDOM INTRO GROUP SKIP • Batteries (size AA, UM-3, or R6) (2) • Audio Pin Cables (2) • Optical Cable HDD CDR • Video Pin Cable • Power Cable (for U.S.A. model) • Coaxial Cable (for U.S.A. model) E-2 SUPPLIED ACCESSORIES Make sure the following items are included in your package. • Remote Control OPEN/CLOSE COPY TIMER REC REC A.M.Q.R. FINALIZE ERASE TRACK NO.
TEXT/TIME INPUT WRITE MODE MENU COMPLETE CLEAR ENTER 1 ABC 2 DEF 3 GHI 4 JKL 5 MNO 6 PQR 7 STU 8 VWX 9 YZ 0 SPACE +10 SYMBOL BOOKMARK REPEAT RANDOM INTRO GROUP SKIP • Batteries (size AA, UM-3, or R6) (2) • Audio Pin Cables (2) • Optical Cable HDD CDR • Video Pin Cable • Power Cable (for U.S.A. model) • Coaxial Cable (for U.S.A. model) E-2 SUPPLIED ACCESSORIES Make sure the following items are included in your package. • Remote Control OPEN/CLOSE COPY TIMER REC REC A.M.Q.R. FINALIZE ERASE TRACK NO.

Owner's Manual
Page 14
w (Play) z CDR x a (Stop) E-8 FINALIZE ERASE TRACK NO. f ENTER g BOOKMARK h INTRO j GROUP SKIP w k y (Track Skip) l r (Search) ; WRITE a INPUT s MENU d +/- z x 1 OPEN/CLOSE 2 COPY 3 TIMER REC 4 A.M.Q.R. 5 FINALIZE 6 TEXT/TIME 7 MODE 8 COMPLETE 9 CLEAR 0 Alphabetical/numeric buttons q REPEAT w RANDOM e GROUP SKIP q r t (Track Skip) t d (Pause) y e (Search) u HDD i REC o ERASE p TRACK NO. NAMES OF BUTTONS AND CONTROLS Remote Control 1 OPEN...
w (Play) z CDR x a (Stop) E-8 FINALIZE ERASE TRACK NO. f ENTER g BOOKMARK h INTRO j GROUP SKIP w k y (Track Skip) l r (Search) ; WRITE a INPUT s MENU d +/- z x 1 OPEN/CLOSE 2 COPY 3 TIMER REC 4 A.M.Q.R. 5 FINALIZE 6 TEXT/TIME 7 MODE 8 COMPLETE 9 CLEAR 0 Alphabetical/numeric buttons q REPEAT w RANDOM e GROUP SKIP q r t (Track Skip) t d (Pause) y e (Search) u HDD i REC o ERASE p TRACK NO. NAMES OF BUTTONS AND CONTROLS Remote Control 1 OPEN...

Owner's Manual
Page 15
... compartment. 3. GETTING STARTED I Loading the batteries in the bathroom where the temperature and humidity become high. • Make sure the remote control sensor is , it may not function correctly. English E-9 Replace both batteries with a piece of this unit than usual, the ...ones. Do not place it snaps into place. 1 3 2 NAMES OF BUTTONS AND CONTROLS I Remote control operation range NATURAL SOUND HDD/CD RECORDER POWER PHONES LEVEL MIN MAX HDD CDR COPY A.M.Q.R. Clean the battery compartment thoroughly before installing new batteries. TEXT/TIME MODE MULTI JOG PUSH...
... compartment. 3. GETTING STARTED I Loading the batteries in the bathroom where the temperature and humidity become high. • Make sure the remote control sensor is , it may not function correctly. English E-9 Replace both batteries with a piece of this unit than usual, the ...ones. Do not place it snaps into place. 1 3 2 NAMES OF BUTTONS AND CONTROLS I Remote control operation range NATURAL SOUND HDD/CD RECORDER POWER PHONES LEVEL MIN MAX HDD CDR COPY A.M.Q.R. Clean the battery compartment thoroughly before installing new batteries. TEXT/TIME MODE MULTI JOG PUSH...

Owner's Manual
Page 20
.../TIME INPUT WRITE MODE MENU COMPLETE CLEAR ENTER 1 ABC 2 DEF 3 GHI 7 STU 8 VWX 9 YZ 0 SPACE +10 SYMBOL BOOKMARK REPEAT RANDOM INTRO GROUP SKIP 6 HDD CDR 1 6 4 JKL 5 MNO 6 PQR 7 STU 8 VWX 9 YZ 0 SPACE +10 SYMBOL BOOKMARK 1. Place a CD correctly aligned in this way, this unit by pressing...REC LEVEL MIN MAX 2,4 5 OPEN/CLOSE COPY TIMER REC REC A.M.Q.R. If the disc tray is loaded. The message "WELCOME TO YAMAHA HDD/CD SYSTEM" appears on the remote control) to close the disc tray. Press v (OPEN/CLOSE on the display. COPYING FROM A CD ONTO THE HDD Copying ...
.../TIME INPUT WRITE MODE MENU COMPLETE CLEAR ENTER 1 ABC 2 DEF 3 GHI 7 STU 8 VWX 9 YZ 0 SPACE +10 SYMBOL BOOKMARK REPEAT RANDOM INTRO GROUP SKIP 6 HDD CDR 1 6 4 JKL 5 MNO 6 PQR 7 STU 8 VWX 9 YZ 0 SPACE +10 SYMBOL BOOKMARK 1. Place a CD correctly aligned in this way, this unit by pressing...REC LEVEL MIN MAX 2,4 5 OPEN/CLOSE COPY TIMER REC REC A.M.Q.R. If the disc tray is loaded. The message "WELCOME TO YAMAHA HDD/CD SYSTEM" appears on the remote control) to close the disc tray. Press v (OPEN/CLOSE on the display. COPYING FROM A CD ONTO THE HDD Copying ...

Owner's Manual
Page 21
...8226; During copying at this problem occurs, lower the copying speed to decrease the vibration and rotation noise. (See "Copy Speed" on the remote control) to be copied contains CD TEXT that can be copied, CD TEXT is automatically copied when the CD is copied onto the HDD. ... • During copying at high speed. Press w/d (w on page 19.) To cancel copying, press a. Start copying. The following message appears on the remote control) has been pressed. • This unit may create some vibration and rotation noise while performing the copying process by rotating a CD at 2x speed...
...8226; During copying at this problem occurs, lower the copying speed to decrease the vibration and rotation noise. (See "Copy Speed" on the remote control) to be copied contains CD TEXT that can be copied, CD TEXT is automatically copied when the CD is copied onto the HDD. ... • During copying at high speed. Press w/d (w on page 19.) To cancel copying, press a. Start copying. The following message appears on the remote control) has been pressed. • This unit may create some vibration and rotation noise while performing the copying process by rotating a CD at 2x speed...

Owner's Manual
Page 22
...is started yet at high speed. Press w/d (w on a CD onto the HDD. 5 NATURAL SOUND HDD/CD RECORDER POWER PHONES LEVEL MIN MAX HDD CDR COPY A.M.Q.R. 1 1 3,6 TEXT/TIME MODE MULTI JOG PUSH ENTER MENU TRACK NO. Press COPY once. Start copying. The MARK indicator turns off ....INPUT OPTICAL COAXIAL ANALOG ANALOG REC LEVEL MIN MAX 1 5 OPEN/CLOSE COPY TIMER REC REC A.M.Q.R. Press TRACK NO./BOOKMARK (BOOKMARK on the remote control) has been pressed. • This unit may create some vibration and rotation noise while performing the copying process by rotating a CD ...
...is started yet at high speed. Press w/d (w on a CD onto the HDD. 5 NATURAL SOUND HDD/CD RECORDER POWER PHONES LEVEL MIN MAX HDD CDR COPY A.M.Q.R. 1 1 3,6 TEXT/TIME MODE MULTI JOG PUSH ENTER MENU TRACK NO. Press COPY once. Start copying. The MARK indicator turns off ....INPUT OPTICAL COAXIAL ANALOG ANALOG REC LEVEL MIN MAX 1 5 OPEN/CLOSE COPY TIMER REC REC A.M.Q.R. Press TRACK NO./BOOKMARK (BOOKMARK on the remote control) has been pressed. • This unit may create some vibration and rotation noise while performing the copying process by rotating a CD ...

Owner's Manual
Page 23
...SPACE +10 SYMBOL BOOKMARK REPEAT RANDOM INTRO GROUP SKIP q GROUP SKIP GROUP SKIP w HDD CDR When the copying onto the HDD, you can select the disc on the HDD to make copy on the remote control) to select the copying mode. Rotate the MULTI JOG knob (press GROUP SKIP q/... mode. Initial setting: All Synchro MODE MULTI JOG ER COPY A.M.Q.R. FINALIZE ERASE TRACK NO. ENTER MODE MENU COMPLETE CLEAR ENTER 1 ABC 2 DEF 3 GHI t, y HDD CDR 4 JKL 5 MNO 6 PQR 7 STU 8 VWX 9 YZ 0 SPACE +10 SYMBOL BOOKMARK REPEAT RANDOM NTRO 1. on . Multi Synchro (Multi-synchronized copying mode) This...
...SPACE +10 SYMBOL BOOKMARK REPEAT RANDOM INTRO GROUP SKIP q GROUP SKIP GROUP SKIP w HDD CDR When the copying onto the HDD, you can select the disc on the HDD to make copy on the remote control) to select the copying mode. Rotate the MULTI JOG knob (press GROUP SKIP q/... mode. Initial setting: All Synchro MODE MULTI JOG ER COPY A.M.Q.R. FINALIZE ERASE TRACK NO. ENTER MODE MENU COMPLETE CLEAR ENTER 1 ABC 2 DEF 3 GHI t, y HDD CDR 4 JKL 5 MNO 6 PQR 7 STU 8 VWX 9 YZ 0 SPACE +10 SYMBOL BOOKMARK REPEAT RANDOM NTRO 1. on . Multi Synchro (Multi-synchronized copying mode) This...

Owner's Manual
Page 24
... the copy standby mode. Press MENU to the copy standby mode. E-18 If "Multi Synchro" is confirmed, the following message appears on the remote control) to confirm the menu item to confirm the setting when adjustment has been completed. 6. MULTI JOG MENU ER COPY A.M.Q.R. You can make... detailed settings on the remote control) to the copy standby mode. Press the MULTI JOG knob (ENTER on the display. This unit returns to close the menu. Press...
... the copy standby mode. Press MENU to the copy standby mode. E-18 If "Multi Synchro" is confirmed, the following message appears on the remote control) to confirm the menu item to confirm the setting when adjustment has been completed. 6. MULTI JOG MENU ER COPY A.M.Q.R. You can make... detailed settings on the remote control) to the copy standby mode. Press the MULTI JOG knob (ENTER on the display. This unit returns to close the menu. Press...

Owner's Manual
Page 25
... made at the loudest sound levels, stop copying to suit you needs. Auto Dig/Anlg Digital and analog copying are automatically switched depending on the remote control). Notes • In analog copying, the data may fail if the setting for "Copying menu setting" on the... remote control) to +12dB range by the SCMS standard (see page 5), an analog copy is made at a lower sound level. • The setting is stored in ...
... made at the loudest sound levels, stop copying to suit you needs. Auto Dig/Anlg Digital and analog copying are automatically switched depending on the remote control). Notes • In analog copying, the data may fail if the setting for "Copying menu setting" on the... remote control) to +12dB range by the SCMS standard (see page 5), an analog copy is made at a lower sound level. • The setting is stored in ...

Owner's Manual
Page 26
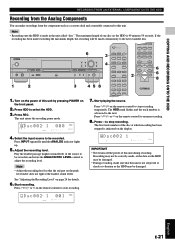
... 5. Play the loudest passage (highest sound level) of one disc on the remote control) to be recorded. Turn on the front panel. The message "WELCOME TO YAMAHA HDD/CD SYSTEM" appears on the remote control) to stop recording. Press w/d (w or d on the display. Rotate... INPUT WRITE MODE MENU COMPLETE CLEAR ENTER 1 ABC 2 DEF 3 GHI 7 STU 8 VWX 9 YZ 0 SPACE +10 SYMBOL BOOKMARK REPEAT RANDOM INTRO GROUP SKIP 5 2 HDD 6 CDR 6 8 1 2 3 48 4 JKL 5 MNO 6 PQR 7 STU 8 VWX 9 YZ 0 SPACE +10 SYMBOL BOOKMARK 1. Select the input source to the next available disc....
... 5. Play the loudest passage (highest sound level) of one disc on the remote control) to be recorded. Turn on the front panel. The message "WELCOME TO YAMAHA HDD/CD SYSTEM" appears on the remote control) to stop recording. Press w/d (w or d on the display. Rotate... INPUT WRITE MODE MENU COMPLETE CLEAR ENTER 1 ABC 2 DEF 3 GHI 7 STU 8 VWX 9 YZ 0 SPACE +10 SYMBOL BOOKMARK REPEAT RANDOM INTRO GROUP SKIP 5 2 HDD 6 CDR 6 8 1 2 3 48 4 JKL 5 MNO 6 PQR 7 STU 8 VWX 9 YZ 0 SPACE +10 SYMBOL BOOKMARK 1. Select the input source to the next available disc....
Owner's Manual
Page 27
...". TEXT/TIME INPUT WRITE MODE MENU COMPLETE CLEAR ENTER 1 ABC 2 DEF 3 GHI 7 STU 8 VWX 9 YZ 0 SPACE +10 SYMBOL BOOKMARK REPEAT RANDOM INTRO GROUP SKIP 2 HDD 6 CDR 6 8 1 2 3 45 8 4 JKL 5 MNO 6 PQR 7 STU 8 VWX 9 YZ 0 SPACE +10 SYMBOL BOOKMARK 1. Press w/d (w or d on the HDD may be damaged.... • During recording, make recordings from the Analog Components You can make sure that the red part on the remote control) to start recording. Dsc002 1 SYNC 000 L dB -30 -10 -6 -2 0 R REC GROUP 4. Play the loudest passage (highest sound ...
...". TEXT/TIME INPUT WRITE MODE MENU COMPLETE CLEAR ENTER 1 ABC 2 DEF 3 GHI 7 STU 8 VWX 9 YZ 0 SPACE +10 SYMBOL BOOKMARK REPEAT RANDOM INTRO GROUP SKIP 2 HDD 6 CDR 6 8 1 2 3 45 8 4 JKL 5 MNO 6 PQR 7 STU 8 VWX 9 YZ 0 SPACE +10 SYMBOL BOOKMARK 1. Press w/d (w or d on the HDD may be damaged.... • During recording, make recordings from the Analog Components You can make sure that the red part on the remote control) to start recording. Dsc002 1 SYNC 000 L dB -30 -10 -6 -2 0 R REC GROUP 4. Play the loudest passage (highest sound ...

Owner's Manual
Page 29
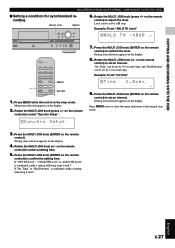
...TIME INPUT WRITE MODE MENU COMPLETE CLEAR ENTER 1 ABC 2 DEF 3 GHI 7 STU 8 VWX 9 YZ 0 SPACE +10 SYMBOL BOOKMARK REPEAT RANDOM INTRO GROUP SKIP 2 HDD CDR 1 2 3,7 4 5 4 JKL 5 MNO 6 PQR 7 STU 8 VWX 9 YZ 0 SPACE +10 SYMBOL BOOKMARK 1. Notes • A timer recording cannot be ...Synchro" (track-synchronized recording) or "Auto Period" (auto-period recording). Adjust the recording level. See "Adjusting the Recording Level" on the remote control) to confirm the total time of this unit by 1-minute step. 9. Then set , recording starts every time the power of timer ...
...TIME INPUT WRITE MODE MENU COMPLETE CLEAR ENTER 1 ABC 2 DEF 3 GHI 7 STU 8 VWX 9 YZ 0 SPACE +10 SYMBOL BOOKMARK REPEAT RANDOM INTRO GROUP SKIP 2 HDD CDR 1 2 3,7 4 5 4 JKL 5 MNO 6 PQR 7 STU 8 VWX 9 YZ 0 SPACE +10 SYMBOL BOOKMARK 1. Notes • A timer recording cannot be ...Synchro" (track-synchronized recording) or "Auto Period" (auto-period recording). Adjust the recording level. See "Adjusting the Recording Level" on the remote control) to confirm the total time of this unit by 1-minute step. 9. Then set , recording starts every time the power of timer ...

Owner's Manual
Page 30
... sound level) of the source to be recorded. 3. MULTI JOG MENU TEXT/TIME MODE MULTI JOG PUSH ENTER MENU TRACK NO. on the remote control) to return to the previous display. Rotate the control clockwise to increase the level and counterclockwise to decrease the level. Press the MULTI JOG... knob (ENTER on the remote control) to adjust the recording level. Choose the one for each input source to be adjusted while this unit is in either the recording...
... sound level) of the source to be recorded. 3. MULTI JOG MENU TEXT/TIME MODE MULTI JOG PUSH ENTER MENU TRACK NO. on the remote control) to return to the previous display. Rotate the control clockwise to increase the level and counterclockwise to decrease the level. Press the MULTI JOG... knob (ENTER on the remote control) to adjust the recording level. Choose the one for each input source to be adjusted while this unit is in either the recording...

Owner's Manual
Page 31
...JKL 5 MNO 6 PQR 7 STU 8 VWX 9 YZ 0 SPACE +10 SYMBOL BOOKMARK REPEAT RANDOM INTRO GROUP SKIP q GROUP SKIP GROUP SKIP w HDD CDR I Making an additional recording onto an already recorded disc MULTI JOG ER COPY A.M.Q.R. Rotate the MULTI JOG knob (press GROUP SKIP q/GROUP SKIP w on the... markers are automatically placed between the tracks being recorded. Track markers are automatically placed between track markers can select the disc on the remote control) to the end of the modes listed below. The length between the tracks being recorded. Choose the one of the previous ...
...JKL 5 MNO 6 PQR 7 STU 8 VWX 9 YZ 0 SPACE +10 SYMBOL BOOKMARK REPEAT RANDOM INTRO GROUP SKIP q GROUP SKIP GROUP SKIP w HDD CDR I Making an additional recording onto an already recorded disc MULTI JOG ER COPY A.M.Q.R. Rotate the MULTI JOG knob (press GROUP SKIP q/GROUP SKIP w on the... markers are automatically placed between the tracks being recorded. Track markers are automatically placed between track markers can select the disc on the remote control) to the end of the modes listed below. The length between the tracks being recorded. Choose the one of the previous ...

Owner's Manual
Page 32
...: -60 to confirm the recording mode selected. Select the total recording time by 10-seconds steps. 7. Press the MULTI JOG knob (ENTER on the remote control) to 9. If "Manual", "Track Synchro" or "All Synchro" is made in the all -synchronized recording mode. If "Multi Synchro" is confirmed... to be stopped. Select the time length between the selected track markers. on the display. Press the MULTI JOG knob (ENTER on the remote control) to confirm the number of silence continues, this unit returns the recording pause mode. The following steps 4 and 5. You can be...
...: -60 to confirm the recording mode selected. Select the total recording time by 10-seconds steps. 7. Press the MULTI JOG knob (ENTER on the remote control) to 9. If "Manual", "Track Synchro" or "All Synchro" is made in the all -synchronized recording mode. If "Multi Synchro" is confirmed... to be stopped. Select the time length between the selected track markers. on the display. Press the MULTI JOG knob (ENTER on the remote control) to confirm the number of silence continues, this unit returns the recording pause mode. The following steps 4 and 5. You can be...
Owner's Manual
Page 33
... return to select "Synchro Setup". Press the MULTI JOG knob (ENTER on the display. 4. Setting item selection appears on the remote control). Rotate the MULTI JOG knob (+/- If "Int. on the remote control) to adjust the level. Example: To set "ANLG TH Level" A N L G T H - 4 0 d B LEVEL L dB -30 -10 ... or "End Duration" is confirmed, make a setting following 8 and 9. Example: To set "Int.Time" +, - Setting item selection appears on the remote control) to the normal stop mode. Time" can be set by 0.5-second steps, and "End Duration" can be set by 1.0-second steps. TEXT/TIME...
... return to select "Synchro Setup". Press the MULTI JOG knob (ENTER on the display. 4. Setting item selection appears on the remote control). Rotate the MULTI JOG knob (+/- If "Int. on the remote control) to adjust the level. Example: To set "ANLG TH Level" A N L G T H - 4 0 d B LEVEL L dB -30 -10 ... or "End Duration" is confirmed, make a setting following 8 and 9. Example: To set "Int.Time" +, - Setting item selection appears on the remote control) to the normal stop mode. Time" can be set by 0.5-second steps, and "End Duration" can be set by 1.0-second steps. TEXT/TIME...

Owner's Manual
Page 34
WRITE on the remote control) is pressed. • Manual track marking is possible even during synchronized recording. • You can place the track markers to the time TRACK NO./... been performed in the synchronized recording according to the type of the track, and a disc cannot contain more than 99 tracks. E-28 WRITE on the remote control) during your recording. • A new track number is impossible once 99 track markers have been recorded on page 46. TEXT/TIME INPUT WRITE MODE...
WRITE on the remote control) is pressed. • Manual track marking is possible even during synchronized recording. • You can place the track markers to the time TRACK NO./... been performed in the synchronized recording according to the type of the track, and a disc cannot contain more than 99 tracks. E-28 WRITE on the remote control) during your recording. • A new track number is impossible once 99 track markers have been recorded on page 46. TEXT/TIME INPUT WRITE MODE...
Owner's Manual
Page 36
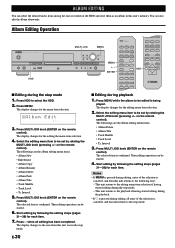
... be started editing during playback 1. The display changes for the editing the menu item selection. 4. Press MULTI JOG knob (ENTER on the remote control). Notes • If MENU is pressed during editing, all editing has been completed. The display changes for the editing menu item selection...if having started . 4. Album Editing Operation 4 JKL 5 MNO 6 PQR NATURAL SOUND HDD/CD RECORDER POWER PHONES LEVEL MIN MAX HDD CDR COPY A.M.Q.R. The selected item is confirmed. ALBUM EDITING You can select the desired tracks from among the ones recorded on the HDD and store...
... be started editing during playback 1. The display changes for the editing the menu item selection. 4. Press MULTI JOG knob (ENTER on the remote control). Notes • If MENU is pressed during editing, all editing has been completed. The display changes for the editing menu item selection...if having started . 4. Album Editing Operation 4 JKL 5 MNO 6 PQR NATURAL SOUND HDD/CD RECORDER POWER PHONES LEVEL MIN MAX HDD CDR COPY A.M.Q.R. The selected item is confirmed. ALBUM EDITING You can select the desired tracks from among the ones recorded on the HDD and store...