
Owner's Manual
Page 2
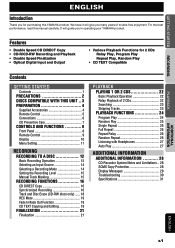
... purchasing this manual carefully. GETTING STARTED RECORDING PLAYBACK GETTING STARTED ENGLISH Introduction Thank you in operating your YAMAHA product. For the best performance, read this YAMAHA product. It will give you many years of 2 CDs 22 Searching 23 Skipping Tracks 23 PLAYBACK FUNCTIONS 24 Program Play 24 Random Play 25 Single Repeat 26...
... purchasing this manual carefully. GETTING STARTED RECORDING PLAYBACK GETTING STARTED ENGLISH Introduction Thank you in operating your YAMAHA product. For the best performance, read this YAMAHA product. It will give you many years of 2 CDs 22 Searching 23 Skipping Tracks 23 PLAYBACK FUNCTIONS 24 Program Play 24 Random Play 25 Single Repeat 26...
Owner's Manual
Page 4
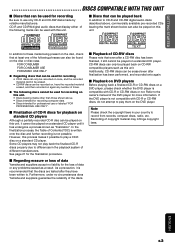
... play them on a standard CD player. However, this unit, it cannot be played on a standard CD player until it still cannot be played on the DVD player. I Regarding erasure or loss of data Yamaha and suppliers accept no circumstances does Yamaha and suppliers guarantee the reliability ...of the discs. In addition to . I Playback of CD-RW discs Please note that even after a CD-RW disc has been finalized, it has undergone a process...
... play them on a standard CD player. However, this unit, it cannot be played on a standard CD player until it still cannot be played on the DVD player. I Regarding erasure or loss of data Yamaha and suppliers accept no circumstances does Yamaha and suppliers guarantee the reliability ...of the discs. In addition to . I Playback of CD-RW discs Please note that even after a CD-RW disc has been finalized, it has undergone a process...
Owner's Manual
Page 6
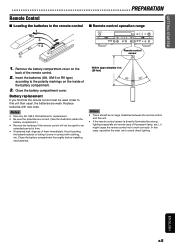
... type) according to the polarity markings on the back of the battery compartment. 3. GETTING STARTED RECORDING PREPARATION Remote Control I Remote control operation range NATURAL SOUND CD RECORDER CDR-D651 POWER A DISC DISPLAY A TEXT/TIME DISPLAY B PHONES LEVEL MIN MAX COPY REC MODE TRACK NO. Close the battery compartment cover. Clean the battery compartment...
... type) according to the polarity markings on the back of the battery compartment. 3. GETTING STARTED RECORDING PREPARATION Remote Control I Remote control operation range NATURAL SOUND CD RECORDER CDR-D651 POWER A DISC DISPLAY A TEXT/TIME DISPLAY B PHONES LEVEL MIN MAX COPY REC MODE TRACK NO. Close the battery compartment cover. Clean the battery compartment...

Owner's Manual
Page 8
... particles of dust or fingerprints on their playing surface, dust, fingerprints, small scratches and direct sunlight on the recording surface of a CD-R or CD-RW disc may aversely affect further recording on the label side of these might warp or otherwise damage the disc. I To prevent...writing tool, as outlined in an appropriate case. • With proper disc maintenance, cleaning should cleaning be necessary. GETTING STARTED RECORDING PREPARATION CD Preventive Care • This compact disc recorder is being used, remove it , because damage to this unit. All of the disc. ...
... particles of dust or fingerprints on their playing surface, dust, fingerprints, small scratches and direct sunlight on the recording surface of a CD-R or CD-RW disc may aversely affect further recording on the label side of these might warp or otherwise damage the disc. I To prevent...writing tool, as outlined in an appropriate case. • With proper disc maintenance, cleaning should cleaning be necessary. GETTING STARTED RECORDING PREPARATION CD Preventive Care • This compact disc recorder is being used, remove it , because damage to this unit. All of the disc. ...
Owner's Manual
Page 11
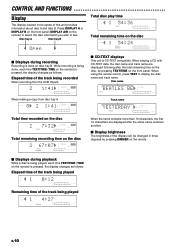
...TIME (TIME on the remote) to select the disc information you wish to display the disc name and track name. When playing a CD with CD-TEXT data, the disc name and track name are displayed after the total remaining time on the disc, by pressing DIMMER on the... -I 0 OVER Remaining time of the display can be changed in the center of the track being played 1 4:27 REMAIN L dB -60 -30 -I0 R -6 -4 -2 -I CD-TEXT displays This unit is CD-TEXT compatible. Disc tray A Disc tray B Open L dB -60 -30 -I0 R -6 -4 -2 -I 0 OVER I Displays during playback While a disc is being played, each ...
...TIME (TIME on the remote) to select the disc information you wish to display the disc name and track name. When playing a CD with CD-TEXT data, the disc name and track name are displayed after the total remaining time on the disc, by pressing DIMMER on the... -I 0 OVER Remaining time of the display can be changed in the center of the track being played 1 4:27 REMAIN L dB -60 -30 -I0 R -6 -4 -2 -I CD-TEXT displays This unit is CD-TEXT compatible. Disc tray A Disc tray B Open L dB -60 -30 -I0 R -6 -4 -2 -I 0 OVER I Displays during playback While a disc is being played, each ...
Owner's Manual
Page 12
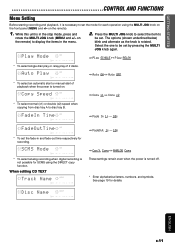
... -2 -I 0 OVER * To select analog recording when digital recording is rotated. Press the MULTI JOG knob to select the item to be set . When editing CD TEXT Track Name CD-R L dB -60 -30 -I0 R -6 -4 -2 -I 0 OVER ⇒ FadeOut 1s - 10s ⇒ Can't Copy ↔ ANALOG Copy These ... STARTED RECORDING PLAYBACK CONTROL AND FUNCTIONS Menu Setting Before starting recording and playback, it is turned on. ⇒ Auto ON ↔ Auto OFF Copy S p e e d CD L dB -60 -30 -I0 R -6 -4 -2 -I 0 OVER * To select normal (x1) or double (x2) speed when copying from disc tray A to disc...
... -2 -I 0 OVER * To select analog recording when digital recording is rotated. Press the MULTI JOG knob to select the item to be set . When editing CD TEXT Track Name CD-R L dB -60 -30 -I0 R -6 -4 -2 -I 0 OVER ⇒ FadeOut 1s - 10s ⇒ Can't Copy ↔ ANALOG Copy These ... STARTED RECORDING PLAYBACK CONTROL AND FUNCTIONS Menu Setting Before starting recording and playback, it is turned on. ⇒ Auto ON ↔ Auto OFF Copy S p e e d CD L dB -60 -30 -I0 R -6 -4 -2 -I 0 OVER * To select normal (x1) or double (x2) speed when copying from disc tray A to disc...
Owner's Manual
Page 13
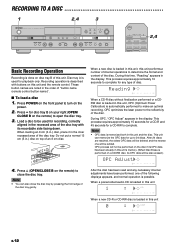
...will be deleted and the newest one will be also erased.) OPC Adjust L dB -60 -30 -I0 R -6 -4 -2 -I 0 OVER When a new CD-R or CD-RW disc is automatically performed to make an optimal recording. Press POWER on the front panel to determine the format and content of the disc...an 8 cm (3 in.) disc, place it in the display. After 24 discs are noted in the display. RECORDING RECORDING TO A DISC 1 NATURAL SOUND CD RECORDER CDR-D651 POWER A DISC 2,4 3 DISPLAY A TEXT/TIME DISPLAY B PHONES LEVEL MIN MAX COPY REC MODE TRACK NO. INPUT DISC A DIGITAL ANALOG MULTI JOG PUSH ...
...will be deleted and the newest one will be also erased.) OPC Adjust L dB -60 -30 -I0 R -6 -4 -2 -I 0 OVER When a new CD-R or CD-RW disc is automatically performed to make an optimal recording. Press POWER on the front panel to determine the format and content of the disc...an 8 cm (3 in.) disc, place it in the display. After 24 discs are noted in the display. RECORDING RECORDING TO A DISC 1 NATURAL SOUND CD RECORDER CDR-D651 POWER A DISC 2,4 3 DISPLAY A TEXT/TIME DISPLAY B PHONES LEVEL MIN MAX COPY REC MODE TRACK NO. INPUT DISC A DIGITAL ANALOG MULTI JOG PUSH ...
Owner's Manual
Page 14
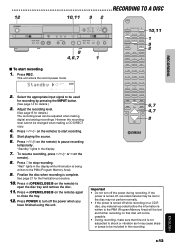
...Program Memory Area) will be lost and further recording on the remote). 8. Press v (OPEN/CLOSE B on a CD-R disc, any material recorded before the information is written to be adjusted when making a CD DIRECT copy. 4. This unit enters the record pause mode. Press REC. ADDITIONAL INFORMATION ENGLISH E-13 Standby... recording level can be included in the recording. GETTING STARTED RECORDING PLAYBACK RECORDING TO A DISC 12 10,11 9 2 COPY NATURAL SOUND CD RECORDER CDR-D651 POWER A DISC DISPLAY A TEXT/TIME DISPLAY B PHONES LEVEL MIN MAX COPY REC MODE TRACK NO.
...Program Memory Area) will be lost and further recording on the remote). 8. Press v (OPEN/CLOSE B on a CD-R disc, any material recorded before the information is written to be adjusted when making a CD DIRECT copy. 4. This unit enters the record pause mode. Press REC. ADDITIONAL INFORMATION ENGLISH E-13 Standby... recording level can be included in the recording. GETTING STARTED RECORDING PLAYBACK RECORDING TO A DISC 12 10,11 9 2 COPY NATURAL SOUND CD RECORDER CDR-D651 POWER A DISC DISPLAY A TEXT/TIME DISPLAY B PHONES LEVEL MIN MAX COPY REC MODE TRACK NO.

Owner's Manual
Page 15
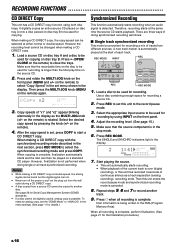
... unit is not intended for recording audio and "Not Audio" appears in this procedure is no recording time remaining on a CD. • When the CD-R or CD-RW disc loaded in the display. RECORDING TO A DISC Selecting an Input Source Press INPUT to select the appropriate input source...this recording mode, all recording operations (such as you have been recorded and "Track Full" appears in this unit. • When the CD-RW and TOC indicators are lit indicating that suits your purpose. I Single track synchronized recording This unit automatically starts recording a single track ...
... unit is not intended for recording audio and "Not Audio" appears in this procedure is no recording time remaining on a CD. • When the CD-R or CD-RW disc loaded in the display. RECORDING TO A DISC Selecting an Input Source Press INPUT to select the appropriate input source...this recording mode, all recording operations (such as you have been recorded and "Track Full" appears in this unit. • When the CD-RW and TOC indicators are lit indicating that suits your purpose. I Single track synchronized recording This unit automatically starts recording a single track ...
Owner's Manual
Page 16
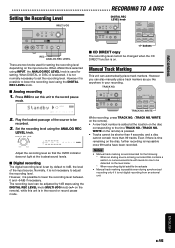
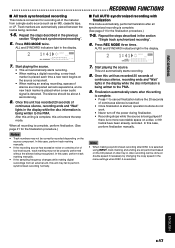
... • Manual track marking is possible even during synchronized recording only if it is possible to be changed when the CD DIRECT function is impossible once 99 tracks have been recorded. WRITE on the disc, further recording is on the input source. Standby... CD-R REC L dB -60 -30 -I0 R -6 -4 -2 -I Analog recording 1. Play the loudest passage of the input source. I CD DIRECT copy The recording level cannot be recorded. 3. INPUT DISC A DIGITAL ANALOG MULTI JOG...
... • Manual track marking is possible even during synchronized recording only if it is possible to be changed when the CD DIRECT function is impossible once 99 tracks have been recorded. WRITE on the disc, further recording is on the input source. Standby... CD-R REC L dB -60 -30 -I0 R -6 -4 -2 -I Analog recording 1. Play the loudest passage of the input source. I CD DIRECT copy The recording level cannot be recorded. 3. INPUT DISC A DIGITAL ANALOG MULTI JOG...
Owner's Manual
Page 17
... that the source component is rotated. on disc tray B. Then press the MULTI JOG knob (MENU on the remote) is in the display. Copy x2 CD-R L dB -60 -30 -I0 R -6 -4 -2 -I 0 OVER 7. on the remote) again. Select the desired copy speed by using both disc trays. After the copy speed is ..., finalization automatically starts and the disc can not. • Never turn off the power or pull out the plug out from the wall outlet during a CD DIRECT copy. • A disc copied from different sources. When copying is set, press COPY to select "Copy Speed" in the set menu shown in ...
... that the source component is rotated. on disc tray B. Then press the MULTI JOG knob (MENU on the remote) is in the display. Copy x2 CD-R L dB -60 -30 -I0 R -6 -4 -2 -I 0 OVER 7. on the remote) again. Select the desired copy speed by using both disc trays. After the copy speed is ..., finalization automatically starts and the disc can not. • Never turn off the power or pull out the plug out from the wall outlet during a CD DIRECT copy. • A disc copied from different sources. When copying is set, press COPY to select "Copy Speed" in the set menu shown in ...
Owner's Manual
Page 18
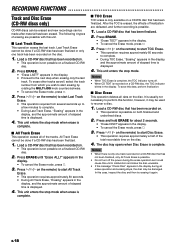
... changes while making a synchronized recording after all synchronized recording is complete. (See page 21 for recording all performed based on the CD placed on disc tray A. Start playing the source. Finalization automatically starts after this case, perform track marking manually. • If... the recording source has excessive noise or contains a lot of continuous silence, recording ends and "Wait" lights in the display. 2 1:41 CD-R REC 44.I L dB -60 -30 -I0 ALL SYNCHRO R -6 -4 -2 -I 0 OVER 7. In this writing is complete. • Press a to ...
... changes while making a synchronized recording after all synchronized recording is complete. (See page 21 for recording all performed based on the CD placed on disc tray A. Start playing the source. Finalization automatically starts after this case, perform track marking manually. • If... the recording source has excessive noise or contains a lot of continuous silence, recording ends and "Wait" lights in the display. 2 1:41 CD-R REC 44.I L dB -60 -30 -I0 ALL SYNCHRO R -6 -4 -2 -I 0 OVER 7. In this writing is complete. • Press a to ...
Owner's Manual
Page 19
..." appears in the display, and the approximate amount of finalization are possible with this function, however, it again. Press w/d (w on a finalized CD-RW disc. 2. After the TOC is erased, the effects of elapsed time is usually not necessary to complete. • During TOC Erase, "...Disc Erase. • This operation requires approximately a half of erasing are defeated, and further recording is only one track has been recorded on a CD-RW disc that has been finalized. It is displayed. 4. In this data, perform finalization. Press ERASE. • "Erase LAST?" I Last...
..." appears in the display, and the approximate amount of finalization are possible with this function, however, it again. Press w/d (w on a finalized CD-RW disc. 2. After the TOC is erased, the effects of elapsed time is usually not necessary to complete. • During TOC Erase, "...Disc Erase. • This operation requires approximately a half of erasing are defeated, and further recording is only one track has been recorded on a CD-RW disc that has been finalized. It is displayed. 4. In this data, perform finalization. Press ERASE. • "Erase LAST?" I Last...
Owner's Manual
Page 20
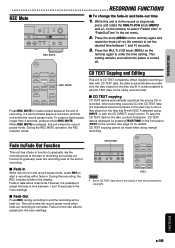
...to select "FadeIn time" or "FadeOutTime" in the set the desired time between 1 and 10 seconds in function to end the recording with the CD DIRECT copy function. Press the knob (MENU on the disc, perform finalization. During the REC MUTE operation, the REC indicator blinks. Fade-in the.... When digitally recording a disc with a fade-in time between 1 and 10 seconds. 3. Fade-out time can also be made when doing manual recording. CD TEXT data is released, this unit enters the record pause mode. TEXT/TIME DISPLAY A TEXT/TIME DISPLAY B PHONES LEVEL MIN MAX COPY A OPEN/CLOSE B...
...to select "FadeIn time" or "FadeOutTime" in the set the desired time between 1 and 10 seconds in function to end the recording with the CD DIRECT copy function. Press the knob (MENU on the disc, perform finalization. During the REC MUTE operation, the REC indicator blinks. Fade-in the.... When digitally recording a disc with a fade-in time between 1 and 10 seconds. 3. Fade-out time can also be made when doing manual recording. CD TEXT data is released, this unit enters the record pause mode. TEXT/TIME DISPLAY A TEXT/TIME DISPLAY B PHONES LEVEL MIN MAX COPY A OPEN/CLOSE B...
Owner's Manual
Page 21
...appears in the display. Select the characters to be used for the finalization procedure.) You will be lost. Select the next character with CD TEXT data. Notes • CD TEXT data is normally edited while this case, press w/d (w on the remote) or select the correct character and press SET to..., alphabet lower case letters, and numbers switch each time the buttons are entered, press SET to enter the name. When using y while this CD TEXT data on the disc. (See the next page for recording. Rotate the MULTI JOG knob clockwise or counterclockwise to find the desired character. ...
...appears in the display. Select the characters to be used for the finalization procedure.) You will be lost. Select the next character with CD TEXT data. Notes • CD TEXT data is normally edited while this case, press w/d (w on the remote) or select the correct character and press SET to..., alphabet lower case letters, and numbers switch each time the buttons are entered, press SET to enter the name. When using y while this CD TEXT data on the disc. (See the next page for recording. Rotate the MULTI JOG knob clockwise or counterclockwise to find the desired character. ...
Owner's Manual
Page 22
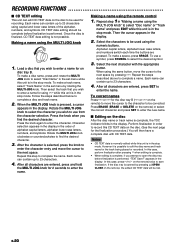
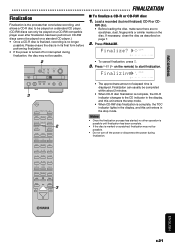
...possible. • Do not turn off or interrupted during finalization. Finalization can only be played on the disc. Load a recorded (but not finalized) CD-R or CD- F i n a l i z i n g CD-R L dB -60 -30 -I0 R -6 -4 -2 -I 0 OVER • The approximate amount of elapsed time is complete, the TOC indicator ... A/B INPUT 2 TIME TEXT DIMMER MENU I 0 OVER • To cancel finalization, press a. 3. Press w/d (w on the remote) to the CD indicator in the display, and this unit enters in the display, and this unit enters the stop mode. EDIT DELETE SET 1 ABC 2 DEF 3...
...possible. • Do not turn off or interrupted during finalization. Finalization can only be played on the disc. Load a recorded (but not finalized) CD-R or CD- F i n a l i z i n g CD-R L dB -60 -30 -I0 R -6 -4 -2 -I 0 OVER • The approximate amount of elapsed time is complete, the TOC indicator ... A/B INPUT 2 TIME TEXT DIMMER MENU I 0 OVER • To cancel finalization, press a. 3. Press w/d (w on the remote) to the CD indicator in the display, and this unit enters in the display, and this unit enters the stop mode. EDIT DELETE SET 1 ABC 2 DEF 3...
Owner's Manual
Page 23
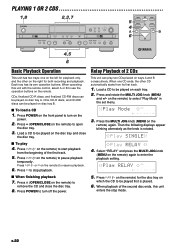
... knob (MENU on the remote. Select "RELAY" and press the MULTI JOG knob (MENU on the remote) again to be played on which the CD to turn off the power. I 0 OVER 3. Press v (OPEN/CLOSE on the remote) for both recording and playback. Play SINGLE Play RELAY .... 2. Press w/d (w on the remote) to turn on the disc tray and close the disc tray. 8. I To load a CD 1. PLAYBACK PLAYING 1 OR 2 CDS 1,8 NATURAL SOUND CD RECORDER CDR-D651 POWER A DISC 2,3,7 DISPLAY A TEXT/TIME DISPLAY B PHONES LEVEL MIN MAX COPY REC MODE TRACK NO. INPUT DISC A DIGITAL ANALOG ...
... knob (MENU on the remote. Select "RELAY" and press the MULTI JOG knob (MENU on the remote) again to be played on which the CD to turn off the power. I 0 OVER 3. Press v (OPEN/CLOSE on the remote) for both recording and playback. Play SINGLE Play RELAY .... 2. Press w/d (w on the remote) to turn on the disc tray and close the disc tray. 8. I To load a CD 1. PLAYBACK PLAYING 1 OR 2 CDS 1,8 NATURAL SOUND CD RECORDER CDR-D651 POWER A DISC 2,3,7 DISPLAY A TEXT/TIME DISPLAY B PHONES LEVEL MIN MAX COPY REC MODE TRACK NO. INPUT DISC A DIGITAL ANALOG ...
Owner's Manual
Page 24
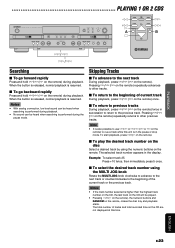
...is resumed. I To return to the beginning of the current track or the previous track. GETTING STARTED RECORDING PLAYBACK PLAYING 1 OR 2 CDS NATURAL SOUND CD RECORDER CDR-D651 POWER A DISC DISPLAY A TEXT/TIME DISPLAY B PHONES LEVEL MIN MAX COPY REC MODE TRACK NO. Skipping Tracks I To play the ... total recorded time on the remote) to cue a track while this unit is also possible to use r/y or t/e (y or t on the CD are not displayed at this time. The selected track number appears in the display. Notes • If the track number selected is resumed. Pressing ...
...is resumed. I To return to the beginning of the current track or the previous track. GETTING STARTED RECORDING PLAYBACK PLAYING 1 OR 2 CDS NATURAL SOUND CD RECORDER CDR-D651 POWER A DISC DISPLAY A TEXT/TIME DISPLAY B PHONES LEVEL MIN MAX COPY REC MODE TRACK NO. Skipping Tracks I To play the ... total recorded time on the remote) to cue a track while this unit is also possible to use r/y or t/e (y or t on the CD are not displayed at this time. The selected track number appears in the display. Notes • If the track number selected is resumed. Pressing ...
Owner's Manual
Page 26
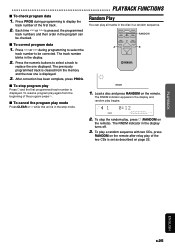
...program play of the first track. 2. To stop mode. The RNDM indicator in the display. 2. To play a random sequence with two CDs, press RANDOM on the remote after relay play again from the memory and the new one displayed. The track number blinks in the display...to be checked. PLAYBACK ADDITIONAL INFORMATION ENGLISH E-25 Press PROG during programming to select the track number to display the track number of the two CDs is in a random sequence. RNDM 1. GETTING STARTED RECORDING PLAYBACK FUNCTIONS I 0 OVER 2. REPEAT RANDOM CLEAR RANDOM I To stop program play ...
...program play of the first track. 2. To stop mode. The RNDM indicator in the display. 2. To play a random sequence with two CDs, press RANDOM on the remote after relay play again from the memory and the new one displayed. The track number blinks in the display...to be checked. PLAYBACK ADDITIONAL INFORMATION ENGLISH E-25 Press PROG during programming to select the track number to display the track number of the two CDs is in a random sequence. RNDM 1. GETTING STARTED RECORDING PLAYBACK FUNCTIONS I 0 OVER 2. REPEAT RANDOM CLEAR RANDOM I To stop program play ...
Owner's Manual
Page 27
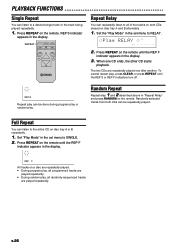
... F indicator appears in the set menu to a desired single track or the track being played repeatedly. 1. When one after another. E-26 Play R E L A Y CD L dB -60 -30 -I0 R -6 -4 -2 -I 0 OVER 2. To cancel repeat play . REP F All tracks on the remote until the REP F indicator ...appears in the set menu to the entire CD on disc tray A or B repeatedly. 1. Press REPEAT on a disc are repeatedly played. • During program play, all programmed tracks are played repeatedly. •...
... F indicator appears in the set menu to a desired single track or the track being played repeatedly. 1. When one after another. E-26 Play R E L A Y CD L dB -60 -30 -I0 R -6 -4 -2 -I 0 OVER 2. To cancel repeat play . REP F All tracks on the remote until the REP F indicator ...appears in the set menu to the entire CD on disc tray A or B repeatedly. 1. Press REPEAT on a disc are repeatedly played. • During program play, all programmed tracks are played repeatedly. •...


