
Additions And Changes In Version 1.2, 1.3
Page 2
...FILE CREATING ... FINALIZING ... Executing the finalize process. Please insert appropriate media. • If the newly inserted media is an already-written CD-RW, a message of each message is as follows. Waiting for the writing test to end. Additions and changes in version 1.2, 1.3 Messages displayed ... message will appear. • If the newly inserted media is an already-written CD-R, a message of "Change Media Please" will appear, and the tray will be displayed to inform you of the drive and media. TEST FINALIZING ... If you can continue mastering on the hard disk....
...FILE CREATING ... FINALIZING ... Executing the finalize process. Please insert appropriate media. • If the newly inserted media is an already-written CD-RW, a message of each message is as follows. Waiting for the writing test to end. Additions and changes in version 1.2, 1.3 Messages displayed ... message will appear. • If the newly inserted media is an already-written CD-R, a message of "Change Media Please" will appear, and the tray will be displayed to inform you of the drive and media. TEST FINALIZING ... If you can continue mastering on the hard disk....
Additions And Changes In Version 1.2, 1.3
Page 6
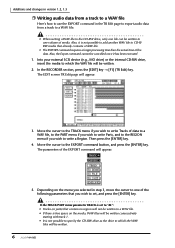
... a Region. Depending on the media, WAV files will be written consecutively starting with track 1. • It is not possible to specify the CD-RW drive as the drive to which the WAV file will appear. 5. If the TRACK/PART menu parameter TRACK is free space on the menu you selected in... the TR Edit page to export audio data from a track to a WAV file. • When writing a WAV file to the CD-RW drive, only one file can be written to one of the following parameters that you wish to the EXPORT command button, and press the [ENTER...
... a Region. Depending on the media, WAV files will be written consecutively starting with track 1. • It is not possible to specify the CD-RW drive as the drive to which the WAV file will appear. 5. If the TRACK/PART menu parameter TRACK is free space on the menu you selected in... the TR Edit page to export audio data from a track to a WAV file. • When writing a WAV file to the CD-RW drive, only one file can be written to one of the following parameters that you wish to the EXPORT command button, and press the [ENTER...
Additions And Changes In Version 1.2, 1.3
Page 8
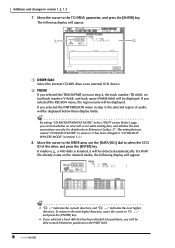
... field), virtual track number (V field), and track name (NAME field) will appear. 1 2 1 DRIVE field Select the internal CD-RW drive or an external SCSI device. Tip By setting "CD BACKUP/WAV-EXP MODE" in the UTILITY screen Prefer.3 page, you selected the REGION menu, the region name... will occur while writing data, and whether the data was named "CD BACKUP MODE" in version 1.0 ...
... field), virtual track number (V field), and track name (NAME field) will appear. 1 2 1 DRIVE field Select the internal CD-RW drive or an external SCSI device. Tip By setting "CD BACKUP/WAV-EXP MODE" in the UTILITY screen Prefer.3 page, you selected the REGION menu, the region name... will occur while writing data, and whether the data was named "CD BACKUP MODE" in version 1.0 ...
Additions And Changes In Version 1.2, 1.3
Page 9
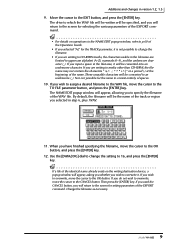
...Then press the [ENTER] key. If you used the CANCEL button, you input a space in the filename, it will return to media other than CD-R/RW, the filename may not contain the characters or a period (.) at the beginning of the EXPORT command. Use the [DATA/JOG] dial to ... Guide. • If you selected "AL" for the TRACK parameter, it is it . Move the cursor to 16, and press the [ENTER] key. The drive to uppercase alphabet (A-Z), numerals (0-9), and the underscore character (_). These unusable characters will be the name of the track or region you will be converted to...
...Then press the [ENTER] key. If you used the CANCEL button, you input a space in the filename, it will return to media other than CD-R/RW, the filename may not contain the characters or a period (.) at the beginning of the EXPORT command. Use the [DATA/JOG] dial to ... Guide. • If you selected "AL" for the TRACK parameter, it is it . Move the cursor to 16, and press the [ENTER] key. The drive to uppercase alphabet (A-Z), numerals (0-9), and the underscore character (_). These unusable characters will be the name of the track or region you will be converted to...
Owner's Manual
Page 5
Touching the leads can cause damage to fully discharge any static electric charge on CD-RW drive or external SCSI device before handling an I /O card or hard disk. The rate of the disk. • Do not wipe the disk with moving contacts, ... the CD-R/RW media Please observe the following points when handling the disk. face of deterioration depends on the operating environment and is a potential electrical shock hazard. • Use only the included power supply cable for this unit. We recommend that you turn on this unit may be lost , the drive to...
Touching the leads can cause damage to fully discharge any static electric charge on CD-RW drive or external SCSI device before handling an I /O card or hard disk. The rate of the disk. • Do not wipe the disk with moving contacts, ... the CD-R/RW media Please observe the following points when handling the disk. face of deterioration depends on the operating environment and is a potential electrical shock hazard. • Use only the included power supply cable for this unit. We recommend that you turn on this unit may be lost , the drive to...
Owner's Manual
Page 6
...then disconnect the cables connecting the main unit with a copyright specialist. If a dropped screw can be retrieved, consult your Yamaha dealer. • If the hard disk or CD-RW drive breaks down . When using this equipment, please consult with the peripherals before starting installation work. • Wear thick gloves...ttings or the like on the main unit, I/O card, hard disk, or CD-RW drive. • Always touch a well-grounded metal surface or the like to fully discharge any static electric charge on your Yamaha dealer. • Always switch off the power for the main unit and all...
...then disconnect the cables connecting the main unit with a copyright specialist. If a dropped screw can be retrieved, consult your Yamaha dealer. • If the hard disk or CD-RW drive breaks down . When using this equipment, please consult with the peripherals before starting installation work. • Wear thick gloves...ttings or the like on the main unit, I/O card, hard disk, or CD-RW drive. • Always touch a well-grounded metal surface or the like to fully discharge any static electric charge on your Yamaha dealer. • Always switch off the power for the main unit and all...
Owner's Manual
Page 8
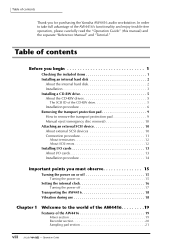
... items 1 Installing an internal hard disk 2 About the internal hard disk 2 Installation 3 Installing a CD-RW drive 5 About the CD-RW drives 5 The SCSI ID of the CD-RW drive 5 Installation procedure 6 Removing the transport protection pad 9 How to remove the transport protection pad 9 Manual...Installing I/O cards 13 About I/O cards 13 Installation procedure 14 Important points you for purchasing the Yamaha AW4416 audio workstation. In order to take full advantage of the AW4416's functionality and enjoy trouble-free operation, please carefully read the "Operation Guide" (this manual...
... items 1 Installing an internal hard disk 2 About the internal hard disk 2 Installation 3 Installing a CD-RW drive 5 About the CD-RW drives 5 The SCSI ID of the CD-RW drive 5 Installation procedure 6 Removing the transport protection pad 9 How to remove the transport protection pad 9 Manual...Installing I/O cards 13 About I/O cards 13 Installation procedure 14 Important points you for purchasing the Yamaha AW4416 audio workstation. In order to take full advantage of the AW4416's functionality and enjoy trouble-free operation, please carefully read the "Operation Guide" (this manual...

Owner's Manual
Page 9
Operation Guide Table of contents CD-RW drive (option 21 Other features 21 Signal flow within the AW4416 22 Input patch 23 Input channels 1-24 24 Return channels 1/2 25 Recorder input patching 26 Monitor channels 1-16 26 Digital cascade connections 27 Oscillator 27 ... & SHUTTLE section 42 Locate section 43 Transport section 44 SAMPLING PAD section 45 Rear panel 46 Front panel 50 Chapter 3 The user interface of the AW4416 51 Display 51 Level meters/counter 54 Basic operation of the AW4416 56 Accessing a screen/page 56 Using the controls of the top panel 56 ix -
Operation Guide Table of contents CD-RW drive (option 21 Other features 21 Signal flow within the AW4416 22 Input patch 23 Input channels 1-24 24 Return channels 1/2 25 Recorder input patching 26 Monitor channels 1-16 26 Digital cascade connections 27 Oscillator 27 ... & SHUTTLE section 42 Locate section 43 Transport section 44 SAMPLING PAD section 45 Rear panel 46 Front panel 50 Chapter 3 The user interface of the AW4416 51 Display 51 Level meters/counter 54 Basic operation of the AW4416 56 Accessing a screen/page 56 Using the controls of the top panel 56 ix -
Owner's Manual
Page 14
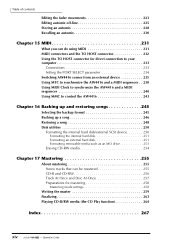
... 233 Setting the PORT SELECT parameter 234 Switching AW4416 scenes from an external device 235 Using MTC to synchronize the AW4416 and a MIDI sequencer . . 238 Using MIDI Clock to synchronize the AW4416 and a MIDI sequencer 240 Using MMC to control the AW4416 243 Chapter 16 Backing up and restoring songs... Formatting an external hard disk 251 Formatting removable media such as an MO drive 253 Erasing CD-RW media 254 Chapter 17 Mastering 255 About mastering 255 Stereo tracks that can be mastered 255 CD-R and CD-RW 256 Track At Once and Disc At Once 257 Preparations for mastering ...
... 233 Setting the PORT SELECT parameter 234 Switching AW4416 scenes from an external device 235 Using MTC to synchronize the AW4416 and a MIDI sequencer . . 238 Using MIDI Clock to synchronize the AW4416 and a MIDI sequencer 240 Using MMC to control the AW4416 243 Chapter 16 Backing up and restoring songs... Formatting an external hard disk 251 Formatting removable media such as an MO drive 253 Erasing CD-RW media 254 Chapter 17 Mastering 255 About mastering 255 Stereo tracks that can be mastered 255 CD-R and CD-RW 256 Track At Once and Disc At Once 257 Preparations for mastering ...
Owner's Manual
Page 15
...• AW4416 mixer/recorder unit: 1 • Operation guide (this document): 1 • Reference guide: 1 • Tutorial: 1 • Power supply cable: 1 • CD-ROM: 1 • Red and white cable for CD-RW drive (four conductor): 1 • Screws for installing 2.5 inch hard disk/CD-RW drive: 8 &#...8226; ADP25H 2.5 inch hard disk adapter: 1 (pre-installed in any form or by any items are registered trademarks of Microsoft Corporation. Operation Guide All rights reserved. ❍ Yamaha...
...• AW4416 mixer/recorder unit: 1 • Operation guide (this document): 1 • Reference guide: 1 • Tutorial: 1 • Power supply cable: 1 • CD-ROM: 1 • Red and white cable for CD-RW drive (four conductor): 1 • Screws for installing 2.5 inch hard disk/CD-RW drive: 8 &#...8226; ADP25H 2.5 inch hard disk adapter: 1 (pre-installed in any form or by any items are registered trademarks of Microsoft Corporation. Operation Guide All rights reserved. ❍ Yamaha...
Owner's Manual
Page 16
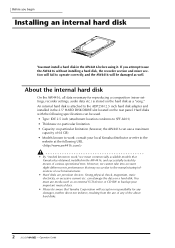
.... Operation Guide If you begin Installing an internal hard disk You must use media such as an external SCSI device or CD-RW to backup your local Yamaha distributor or refer to the website at the following specifications can be damaged as well. About the internal hard...disk On the AW4416, all data necessary for any damages, neither direct nor indirect, resulting from the use of any of the above hard disks. 2 - You must install a hard disk in the 2.5" HARD DISK DRIVE slot located on the rear panel. However, we mean commercially available models that Yamaha has obtained,...
.... Operation Guide If you begin Installing an internal hard disk You must use media such as an external SCSI device or CD-RW to backup your local Yamaha distributor or refer to the website at the following specifications can be damaged as well. About the internal hard...disk On the AW4416, all data necessary for any damages, neither direct nor indirect, resulting from the use of any of the above hard disks. 2 - You must install a hard disk in the 2.5" HARD DISK DRIVE slot located on the rear panel. However, we mean commercially available models that Yamaha has obtained,...
Owner's Manual
Page 17
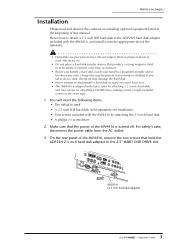
... body or clothing. Here's how to attach a 2.5 inch IDE hard disk to the 2.5" HARD DISK DRIVE slot. For safety's sake, disconnect the power cable from the AC outlet. 3. You will need the following items. • The AW4416 itself • A 2.5 inch IDE hard disk (sold separately) for installation • Four screws included... or apply excessive force to physical shock or static electricity, etc. • Do not place a hard disk nearby devices that the power of the AW4416 is shipped with the AW4416 for attaching a CD-RW drive, making a total of eight included screws of the same type. 1.
... body or clothing. Here's how to attach a 2.5 inch IDE hard disk to the 2.5" HARD DISK DRIVE slot. For safety's sake, disconnect the power cable from the AC outlet. 3. You will need the following items. • The AW4416 itself • A 2.5 inch IDE hard disk (sold separately) for installation • Four screws included... or apply excessive force to physical shock or static electricity, etc. • Do not place a hard disk nearby devices that the power of the AW4416 is shipped with the AW4416 for attaching a CD-RW drive, making a total of eight included screws of the same type. 1.

Owner's Manual
Page 19
... mean commercially available models that Yamaha has obtained, installed in performance that the cover panel of various operational tests. CD-RW drives with the following URL. • By "models known to read a CD-ROM. The AW4416's cover panel can be installed by means of the AW4416 cannot be attached to a CDRW drive with a lid-type tray. Maximum...
... mean commercially available models that Yamaha has obtained, installed in performance that the cover panel of various operational tests. CD-RW drives with the following URL. • By "models known to read a CD-ROM. The AW4416's cover panel can be installed by means of the AW4416 cannot be attached to a CDRW drive with a lid-type tray. Maximum...
Owner's Manual
Page 20
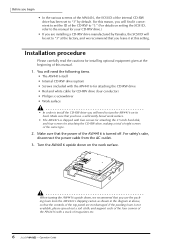
... you have a sufficiently broad work surface. Turn the AW4416 upside down , we recommend that the controls of the top panel are installing a CD-RW drive manufactured by Yamaha, the SCSI ID will need the following items. • The AW4416 itself • Internal CD-RW drive (option) • Screws (included with a stack of magazines etc. 6 - If...
... you have a sufficiently broad work surface. Turn the AW4416 upside down , we recommend that the controls of the top panel are installing a CD-RW drive manufactured by Yamaha, the SCSI ID will need the following items. • The AW4416 itself • Internal CD-RW drive (option) • Screws (included with a stack of magazines etc. 6 - If...

Owner's Manual
Page 21
Bottom panel CD-R/RW drive cover panel 5. Connect the red and white four-conductor cable included with the AW4416 to the connector of the CD-RW drive. 7 - Turn the CD-RW drive over, and insert it little by little, stopping when the connector end of the CD-RW drive enters the opening in the bottom of the AW4416 as shown in the diagram. Then connect the cable to the internal connector of the AW4416. 6. Remove the CD-RW drive cover from the front panel, and remove the bottom panel. Operation Guide Before you begin 4.
Bottom panel CD-R/RW drive cover panel 5. Connect the red and white four-conductor cable included with the AW4416 to the connector of the CD-RW drive. 7 - Turn the CD-RW drive over, and insert it little by little, stopping when the connector end of the CD-RW drive enters the opening in the bottom of the AW4416 as shown in the diagram. Then connect the cable to the internal connector of the AW4416. 6. Remove the CD-RW drive cover from the front panel, and remove the bottom panel. Operation Guide Before you begin 4.

Owner's Manual
Page 22
At this time, remove the inner cover from inside the AW4416) into the connector of the CD-RW drive. 8. Operation Guide Re-attach the CD-RW drive cover and the bottom panel that you begin 7. Before you removed in the bottom of the CD-RW drive with the screw holes of the flat cable (extending from the CD-RW drive cover. Align the screw holes in step 3. Bottom panel CD-R/RW drive cover panel Inner cover 8 - Plug the connector of the AW4416, and use a screwdriver to fasten the drive with the four included screws. 9.
At this time, remove the inner cover from inside the AW4416) into the connector of the CD-RW drive. 8. Operation Guide Re-attach the CD-RW drive cover and the bottom panel that you begin 7. Before you removed in the bottom of the CD-RW drive with the screw holes of the flat cable (extending from the CD-RW drive cover. Align the screw holes in step 3. Bottom panel CD-R/RW drive cover panel Inner cover 8 - Plug the connector of the AW4416, and use a screwdriver to fasten the drive with the four included screws. 9.
Owner's Manual
Page 23
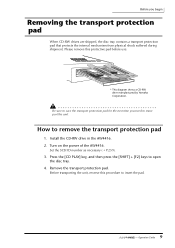
...;onpbvsroeeͩpprfrdoot͞oaerrautet͍ripvroaonIulnnlessbtteeet.urrtarsianegsbpeno.arhtme entfernen. * This diagram shows a CD-RW drive manufactured by Yamaha Corporation. How to open the disc tray. 4. Press the [CD PLAY] key, and then press the [SHIFT] + [F2] keys to remove the... transport protection pad 1. Remove the transport protection pad. Turn on the power of the AW4416. Install the CD-RW drive in the AW4416...
...;onpbvsroeeͩpprfrdoot͞oaerrautet͍ripvroaonIulnnlessbtteeet.urrtarsianegsbpeno.arhtme entfernen. * This diagram shows a CD-RW drive manufactured by Yamaha Corporation. How to open the disc tray. 4. Press the [CD PLAY] key, and then press the [SHIFT] + [F2] keys to remove the... transport protection pad 1. Remove the transport protection pad. Turn on the power of the AW4416. Install the CD-RW drive in the AW4416...

Owner's Manual
Page 24
...or play back audio signals in realtime on the rear panel of the AW4416. Please be aware that Yamaha Corporation will need a pin-like object 2 mm or less in diameter. * This diagram shows a CD-RW drive manufactured by means of various operational tests. It is not possible to ...the AW4416, and successfully tested by Yamaha Corporation. Attaching an external SCSI device About external SCSI devices The external SCSI devices referred...
...or play back audio signals in realtime on the rear panel of the AW4416. Please be aware that Yamaha Corporation will need a pin-like object 2 mm or less in diameter. * This diagram shows a CD-RW drive manufactured by means of various operational tests. It is not possible to ...the AW4416, and successfully tested by Yamaha Corporation. Attaching an external SCSI device About external SCSI devices The external SCSI devices referred...
Owner's Manual
Page 25
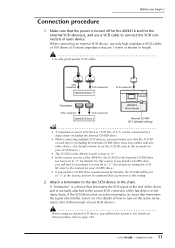
... connector SCSI connector AW4416 ID=6 (fixed) External SCSI device 2 Internal CD-RW ID-3 (...AW4416 itself is fixed at the end of the chain, and is normally attached to the vacant SCSI connector of 100 ohms (±10 ohms) impedance that the SCSI ID of each device (including the internal CD-RW drive... daisy-chain (including the internal CD-RW drive). • When connecting multiple SCSI devices...CD-RW drive.) • If you install a CD-RW drive manufactured by default. For this reason, if you install a CD-RW drive...screens of the AW4416, the SCSI ID of the internal CD-RW drive has been ...
... connector SCSI connector AW4416 ID=6 (fixed) External SCSI device 2 Internal CD-RW ID-3 (...AW4416 itself is fixed at the end of the chain, and is normally attached to the vacant SCSI connector of 100 ohms (±10 ohms) impedance that the SCSI ID of each device (including the internal CD-RW drive... daisy-chain (including the internal CD-RW drive). • When connecting multiple SCSI devices...CD-RW drive.) • If you install a CD-RW drive manufactured by default. For this reason, if you install a CD-RW drive...screens of the AW4416, the SCSI ID of the internal CD-RW drive has been ...

Reference Guide
Page 177
...The media is not Connected! No songs to write to Restore! The drive of the selected SCSI ID is no song to backup. The selected track is not a CD drive. Appendix-42 - Media Full! No Song to the CD have been selected. Selected Track is no song to restore. There is ...load. There is Effect2 Only! No songs can be loaded into this channel. Not WAV Drive! There is not CD Drive! The media has no WAV files. Selected Drive is no song to edit. The selected drive contains no free space. No Song to Write! Time compression/expansion cannot be found . ...
...The media is not Connected! No songs to write to Restore! The drive of the selected SCSI ID is no song to backup. The selected track is not a CD drive. Appendix-42 - Media Full! No Song to the CD have been selected. Selected Track is no song to restore. There is ...load. There is Effect2 Only! No songs can be loaded into this channel. Not WAV Drive! There is not CD Drive! The media has no WAV files. Selected Drive is no song to edit. The selected drive contains no free space. No Song to Write! Time compression/expansion cannot be found . ...


