
Additions And Changes In Version 1.2, 1.3
Page 1
Additions and changes in version 1.2, 1.3 This manual explains the functions and specifications that have been added or changed in AW4416 version 1.2 and 1.3. The functions added or changed in version 1.3 are additions or changes from a virtual track to a WAV fi... 17 Shortcut for saving the current song 17 Use the TRACK [CUE] key to monitor the stereo track 17 Cue/Review function 18 Automatic updating of Contents Messages displayed while mastering is being executed 2 Successive mastering operations 2 Defrag the internal hard disk 3 About the Defrag function 3 Executing...
Additions and changes in version 1.2, 1.3 This manual explains the functions and specifications that have been added or changed in AW4416 version 1.2 and 1.3. The functions added or changed in version 1.3 are additions or changes from a virtual track to a WAV fi... 17 Shortcut for saving the current song 17 Use the TRACK [CUE] key to monitor the stereo track 17 Cue/Review function 18 Automatic updating of Contents Messages displayed while mastering is being executed 2 Successive mastering operations 2 Defrag the internal hard disk 3 About the Defrag function 3 Executing...
Additions And Changes In Version 1.2, 1.3
Page 18
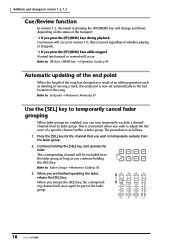
... fast-forward or rewind will occur (in the song. r If you are enabled, you wish to : [FF] key / [REW] key → Operation Guide p.44 Automatic updating of the end point When the length of the song has changed as you press the [FF]/[REW] keys during playback Cue/review will occur...
... fast-forward or rewind will occur (in the song. r If you are enabled, you wish to : [FF] key / [REW] key → Operation Guide p.44 Automatic updating of the end point When the length of the song has changed as you press the [FF]/[REW] keys during playback Cue/review will occur...

Owner's Manual
Page 217
... CANCEL button and press the [ENTER] key. 207 - Press the [SCENE] key ¡ [F1] key. The Scene Mem page of the SCENE screen will be updated. Operation Guide
... CANCEL button and press the [ENTER] key. 207 - Press the [SCENE] key ¡ [F1] key. The Scene Mem page of the SCENE screen will be updated. Operation Guide

Owner's Manual
Page 227
... wish to record. The REC button will blink, indicating that will be highlighted ( ). At this time, the [SEL] keys will blink. 8. When you wish to update the automix with the newly recorded content. 217 - Operation Guide Chapter14-Automix Scene and library recall operations can use the [SEL] keys to select the...
... wish to record. The REC button will blink, indicating that will be highlighted ( ). At this time, the [SEL] keys will blink. 8. When you wish to update the automix with the newly recorded content. 217 - Operation Guide Chapter14-Automix Scene and library recall operations can use the [SEL] keys to select the...

Owner's Manual
Page 228
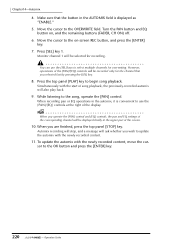
Chapter14-Automix 11. If you wish to update the automix with the newly recorded content, move the cursor to the button, and press the [...the automix to the OK button and press the [ENTER] key. The front panel [UNDO] key cannot be updated. If the button is displayed as "DISABLE," move the cursor to its previous state. The automix will continue playing. •...; Even after updating the automix content, you move the cursor to the UNDO button in the AUTOMIX field is displayed as...
Chapter14-Automix 11. If you wish to update the automix with the newly recorded content, move the cursor to the button, and press the [...the automix to the OK button and press the [ENTER] key. The front panel [UNDO] key cannot be updated. If the button is displayed as "DISABLE," move the cursor to its previous state. The automix will continue playing. •...; Even after updating the automix content, you move the cursor to the UNDO button in the AUTOMIX field is displayed as...

Owner's Manual
Page 229
... be overwritten onto an automix that already contains previously-recorded operations of a previously-recorded channel. The following explanation shows pan or EQ operations can be updated before playback begins). 5. Press the [AUTOMIX] key ¡ [F1] key. Operation Guide In this way, it will stop automix playback, move the cursor to begin...
... be overwritten onto an automix that already contains previously-recorded operations of a previously-recorded channel. The following explanation shows pan or EQ operations can be updated before playback begins). 5. Press the [AUTOMIX] key ¡ [F1] key. Operation Guide In this way, it will stop automix playback, move the cursor to begin...
Owner's Manual
Page 230
..., and press the [ENTER] key. 7. Press [SEL] key 1. Press the top panel [PLAY] key to the OK button and press the [ENTER] key. 220 - To update the automix with the newly recorded content, move the cursor to begin song playback. Move the cursor to the OVERWRITE field. Operation Guide However... [PAN] control and [EQ] controls, the pan and EQ settings of song playback, the previously-recorded automix will be selected for overwriting. While listening to update the automix with the start of the corresponding channel will also play back. 9.
..., and press the [ENTER] key. 7. Press [SEL] key 1. Press the top panel [PLAY] key to the OK button and press the [ENTER] key. 220 - To update the automix with the newly recorded content, move the cursor to begin song playback. Move the cursor to the OVERWRITE field. Operation Guide However... [PAN] control and [EQ] controls, the pan and EQ settings of song playback, the previously-recorded automix will be selected for overwriting. While listening to update the automix with the start of the corresponding channel will also play back. 9.

Owner's Manual
Page 232
... is started with the newly recorded content. When you press the [SEL] key (punch-in and punch-out locations will ask whether you wish to update the automix, move the cursor to the AUTO REC button, and press the [ENTER] key. 222 - When song playback is selected. At this time, ... pan operations on the corresponding channel will begin at the punch-in a recordable state, but recording will end (punch-out). However, recording will return to update the automix with the AUTO REC button on, the REC button will be in location, press [SEL] key 1 (monitor channel 1). When you can be ...
... is started with the newly recorded content. When you press the [SEL] key (punch-in and punch-out locations will ask whether you wish to update the automix, move the cursor to the AUTO REC button, and press the [ENTER] key. 222 - When song playback is selected. At this time, ... pan operations on the corresponding channel will begin at the punch-in a recordable state, but recording will end (punch-out). However, recording will return to update the automix with the AUTO REC button on, the REC button will be in location, press [SEL] key 1 (monitor channel 1). When you can be ...

Owner's Manual
Page 235
...will ask you whether you can be displayed. Operation Guide If you are always displayed as absolute song time. Editing automix off-line While the AW4416 is off -line. • Fader operations for each channel • [ON] key operations for each channel • Pan operations for each...6 7 Use the SCENE/LIB, CH ON, PAN, and FADER buttons in /out, press the top panel [STOP] key. When you wish to update the automix, move the cursor to update the automix with punch-in the upper part of previouslyrecorded events, or delete unwanted events. The following types of event can adjust...
...will ask you whether you can be displayed. Operation Guide If you are always displayed as absolute song time. Editing automix off-line While the AW4416 is off -line. • Fader operations for each channel • [ON] key operations for each channel • Pan operations for each...6 7 Use the SCENE/LIB, CH ON, PAN, and FADER buttons in /out, press the top panel [STOP] key. When you wish to update the automix, move the cursor to update the automix with punch-in the upper part of previouslyrecorded events, or delete unwanted events. The following types of event can adjust...

Reference Guide
Page 37
...key ¡ [F2] (Restore) key • Repeatedly press the [FILE] key until the screen shown at which the data was last saved on the AW4416's internal hard disk • SIZE Data size of the song • BIT/FS Quantization (word length)/ sampling frequency of the song • PRT Song ... when backing up. E SOURCE This selects the ID number of the CD-RW drive. • [F3] (RELOAD) key Reload the removable media and update the displayed list. 30 - Tip! Songs selected for restore. G EXECUTE button Execute the song restore. For details on the backup destination SCSI device. Do...
...key ¡ [F2] (Restore) key • Repeatedly press the [FILE] key until the screen shown at which the data was last saved on the AW4416's internal hard disk • SIZE Data size of the song • BIT/FS Quantization (word length)/ sampling frequency of the song • PRT Song ... when backing up. E SOURCE This selects the ID number of the CD-RW drive. • [F3] (RELOAD) key Reload the removable media and update the displayed list. 30 - Tip! Songs selected for restore. G EXECUTE button Execute the song restore. For details on the backup destination SCSI device. Do...
Reference Guide
Page 125
... press the [SHIFT] key to assign the following functions to the on (lit) and play back the recorder, automix recording will cause automix recording to update the data. While automix is playing, you can be turned on , this button in conjunction with the REC button to punch-in conjunction with the...
... press the [SHIFT] key to assign the following functions to the on (lit) and play back the recorder, automix recording will cause automix recording to update the data. While automix is playing, you can be turned on , this button in conjunction with the REC button to punch-in conjunction with the...
Version2.0 Manual Supplement
Page 13
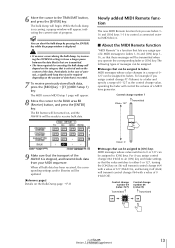
.... 8 Move the cursor to control a connected external MIDI device. The MIDI screen MIDI Setup 1 page will transmit control change #64 with a value of the AW4416 is recorded. 7 To receive previously-stored bulk data, press the [MIDI] key ¡ [F1] (MIDI Setup 1) key. When all bulk data has been... the data blocks that are transmitted. • The time required for executing the bulk dump will depend on the category that these messages will be updated. [Reference pages] Details on the Bulk Dump page ¡ P.31 Value= 0 q Messages that the value switches to faders 1-16 and [ON] keys 1-...
.... 8 Move the cursor to control a connected external MIDI device. The MIDI screen MIDI Setup 1 page will transmit control change #64 with a value of the AW4416 is recorded. 7 To receive previously-stored bulk data, press the [MIDI] key ¡ [F1] (MIDI Setup 1) key. When all bulk data has been... the data blocks that are transmitted. • The time required for executing the bulk dump will depend on the category that these messages will be updated. [Reference pages] Details on the Bulk Dump page ¡ P.31 Value= 0 q Messages that the value switches to faders 1-16 and [ON] keys 1-...