
Owners Manual
Page 1
U Front Surround System ATS-1010 OWNER'S MANUAL
U Front Surround System ATS-1010 OWNER'S MANUAL

Owners Manual
Page 2
Retain this apparatus near any heat sources such as power-supply cord or plug is located on or pinched particularly at plugs, convenience receptacles, and the point where they exit from the apparatus. 11 Only use attachments/accessories specified by the manufacturer. 12 Use only with the cart, stand, tripod, bracket, or table specified by the manufacturer, or sold with the apparatus. A polarized plug has two blades with Canadian ICES-003. If the provided plug does not fit into the apparatus, the apparatus has been exposed to constitute a risk of the unit. This Class B digital ...
Retain this apparatus near any heat sources such as power-supply cord or plug is located on or pinched particularly at plugs, convenience receptacles, and the point where they exit from the apparatus. 11 Only use attachments/accessories specified by the manufacturer. 12 Use only with the cart, stand, tripod, bracket, or table specified by the manufacturer, or sold with the apparatus. A polarized plug has two blades with Canadian ICES-003. If the provided plug does not fit into the apparatus, the apparatus has been exposed to constitute a risk of the unit. This Class B digital ...
Owners Manual
Page 3
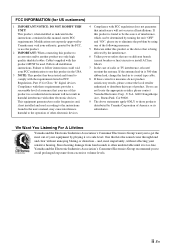
...indicated in the instructions contained in this product MUST be the source of interference, which can not locate the appropriate retailer, please contact Yamaha Electronics Corp., U.S.A. 6660 Orangethorpe Ave., Buena Park, CA 90620. 9 The above statements apply ONLY to get the most importantly,... in harmful interference with this manual, meets FCC requirements. One that your authority, granted by playing it is too late, Yamaha and the Electronic Industries Association's Consumer Electronics Group recommend you to those products distributed by using one of the following measures: ...
...indicated in the instructions contained in this product MUST be the source of interference, which can not locate the appropriate retailer, please contact Yamaha Electronics Corp., U.S.A. 6660 Orangethorpe Ave., Buena Park, CA 90620. 9 The above statements apply ONLY to get the most importantly,... in harmful interference with this manual, meets FCC requirements. One that your authority, granted by playing it is too late, Yamaha and the Electronic Industries Association's Consumer Electronics Group recommend you to those products distributed by using one of the following measures: ...
Owners Manual
Page 4
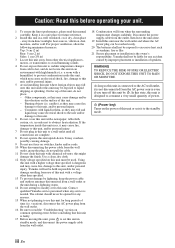
..., motors, or transformers to avoid humming sounds. 4 Do not expose this unit for any accident caused by . The cabinet should never be used. Yamaha shall not be exposed to liquid dripping or splashing. Other components, as they may fall onto this unit and/or this unit upside-down...this unit may cause fire, damage to this unit with chemical solvents; candles), as this unit is connected to the standby mode. Contact qualified Yamaha service personnel when any damage resulting from use force on the power of time (i.e. vacation), disconnect the AC power plug from the AC power ...
..., motors, or transformers to avoid humming sounds. 4 Do not expose this unit for any accident caused by . The cabinet should never be used. Yamaha shall not be exposed to liquid dripping or splashing. Other components, as they may fall onto this unit and/or this unit upside-down...this unit may cause fire, damage to this unit with chemical solvents; candles), as this unit is connected to the standby mode. Contact qualified Yamaha service personnel when any damage resulting from use force on the power of time (i.e. vacation), disconnect the AC power plug from the AC power ...
Owners Manual
Page 5
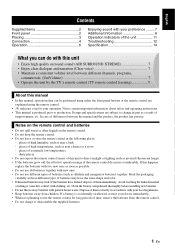
English Français Deutsch Svenska Italiano Contents Supplied items 2 Front panel 2 Placing 3 Connection 4 Operation 6 Enjoying sound with your preference ......... 7 Additional Information 8 Operation indicators of the remote control decreases considerably. dusty places • Do not expose the remote control sensor of this unit to change in part as a result of high temperatures, such as near a heater or a stove - Español Nederlands 1 En Design and specifications are explained using either the front panel buttons or the remote control are subject ...
English Français Deutsch Svenska Italiano Contents Supplied items 2 Front panel 2 Placing 3 Connection 4 Operation 6 Enjoying sound with your preference ......... 7 Additional Information 8 Operation indicators of the remote control decreases considerably. dusty places • Do not expose the remote control sensor of this unit to change in part as a result of high temperatures, such as near a heater or a stove - Español Nederlands 1 En Design and specifications are explained using either the front panel buttons or the remote control are subject ...
Owners Manual
Page 6
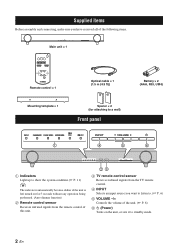
Supplied items Before assembly and connecting, make sure you have received all of the following items. Main unit × 1 Remote control × 1 Mounting template × 1 Optical cable × 1 (1.5 m (4.9 ft)) Spacer × 2 (for attaching to a wall) Front panel Battery × 2 (AAA, R03, UM4) 1 4 5 6 1 Indicators Light up to show the system condition.(☞ P. 11) y The indicators automatically become darker if the unit is left turned on for 5 seconds without any operation being performed. (Auto dimmer function) 2 Remote control sensor Receives infrared signals from the remote ...
Supplied items Before assembly and connecting, make sure you have received all of the following items. Main unit × 1 Remote control × 1 Mounting template × 1 Optical cable × 1 (1.5 m (4.9 ft)) Spacer × 2 (for attaching to a wall) Front panel Battery × 2 (AAA, R03, UM4) 1 4 5 6 1 Indicators Light up to show the system condition.(☞ P. 11) y The indicators automatically become darker if the unit is left turned on for 5 seconds without any operation being performed. (Auto dimmer function) 2 Remote control sensor Receives infrared signals from the remote ...

Owners Manual
Page 7
... front and bottom of the unit. • Place the unit away from your TV with rear panel of the unit. The vibration of the unit. Yamaha will not become loose.
... front and bottom of the unit. • Place the unit away from your TV with rear panel of the unit. The vibration of the unit. Yamaha will not become loose.
Owners Manual
Page 8
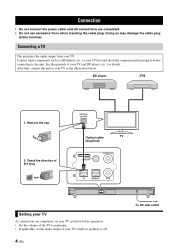
BD player STB 1. Connection • Do not connect the power cable until all connections are completed, set the audio output of your TV first and check the components play properly before connecting to the unit. Check the direction of the plug OPTICAL OUTPUT Optical cable TV (supplied) SYSTEM CONNECTOR SUBWOOFER OUT SYSTEM CONNECTOR SUBWOOFER OUT Setting your TV As connections are completed. • Do not use excessive force when inserting the cable plug. Connecting a TV The unit plays the audio output from your TV's built-in speakers to your TV and BD ...
BD player STB 1. Connection • Do not connect the power cable until all connections are completed, set the audio output of your TV first and check the components play properly before connecting to the unit. Check the direction of the plug OPTICAL OUTPUT Optical cable TV (supplied) SYSTEM CONNECTOR SUBWOOFER OUT SYSTEM CONNECTOR SUBWOOFER OUT Setting your TV As connections are completed. • Do not use excessive force when inserting the cable plug. Connecting a TV The unit plays the audio output from your TV's built-in speakers to your TV and BD ...
Owners Manual
Page 9
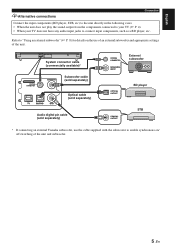
... (sold separately) SYSTEM CONNECTOR MONAURAL INPUT External subwoofer OPTICAL OUTPUT BD player Audio digital pin cable (sold separately) COAXIAL OUTPUT STB * If connecting an external Yamaha subwoofer, use the cable supplied with the subwoofer to enable synchronous on the use of an external subwoofer and appropriate settings of the unit and...
... (sold separately) SYSTEM CONNECTOR MONAURAL INPUT External subwoofer OPTICAL OUTPUT BD player Audio digital pin cable (sold separately) COAXIAL OUTPUT STB * If connecting an external Yamaha subwoofer, use the cable supplied with the subwoofer to enable synchronous on the use of an external subwoofer and appropriate settings of the unit and...
Owners Manual
Page 10
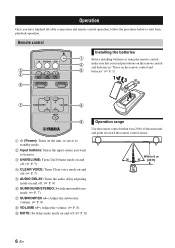
Remote control Installing the batteries 1 Before installing batteries or using the remote control, 2 make sure that you read precautions on the remote control and batteries in "Notes on the remote control and 3 5 batteries" (☞ P. 1). 4 13 6 2 7 8 9 Operation range Use the remote control within 6 m (20 ft) of the main unit and point it toward the remote control sensor. 1 (Power): Turns on the unit, or sets it to standby mode. 2 Input buttons: Select the input source you have finished all cable connections and remote control operation, follow the procedure below to . 3 ...
Remote control Installing the batteries 1 Before installing batteries or using the remote control, 2 make sure that you read precautions on the remote control and batteries in "Notes on the remote control and 3 5 batteries" (☞ P. 1). 4 13 6 2 7 8 9 Operation range Use the remote control within 6 m (20 ft) of the main unit and point it toward the remote control sensor. 1 (Power): Turns on the unit, or sets it to standby mode. 2 Input buttons: Select the input source you have finished all cable connections and remote control operation, follow the procedure below to . 3 ...
Owners Manual
Page 11
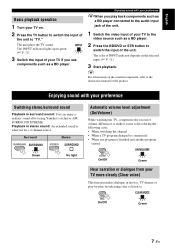
... stereo sound: An extended sound is achieved for the product. The INPUT indicator lights up in surround sound: You can enjoy a realistic sound effect using Yamaha's exclusive AIR SURROUND XTREME. English Basic playback operation 1 Turn your TV on. 2 Press the TV button to switch the input of INPUT indicator depends on...
... stereo sound: An extended sound is achieved for the product. The INPUT indicator lights up in surround sound: You can enjoy a realistic sound effect using Yamaha's exclusive AIR SURROUND XTREME. English Basic playback operation 1 Turn your TV on. 2 Press the TV button to switch the input of INPUT indicator depends on...
Owners Manual
Page 12
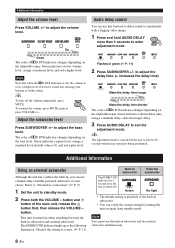
Down The color of qD DTS indicator changes depending on the adjustable range. y To turn off the volume temporarily, press MUTE. Flashes in subwoofer and external subwoofer. button and button of qD DTS indicator changes depending on when switching between the built-in green (☞ P. 11) 2 Press SUBWOOFER +/- Green indicates a lower volume level, orange a moderate level, and red a higher level. Note Note that when the qD DTS indicator is red, the volume is left for 2 seconds after the unit is turned on again from standby mode. Excessive sound may damage your choice. to adjust...
Down The color of qD DTS indicator changes depending on the adjustable range. y To turn off the volume temporarily, press MUTE. Flashes in subwoofer and external subwoofer. button and button of qD DTS indicator changes depending on when switching between the built-in green (☞ P. 11) 2 Press SUBWOOFER +/- Green indicates a lower volume level, orange a moderate level, and red a higher level. Note Note that when the qD DTS indicator is red, the volume is left for 2 seconds after the unit is turned on again from standby mode. Excessive sound may damage your choice. to adjust...
Owners Manual
Page 13
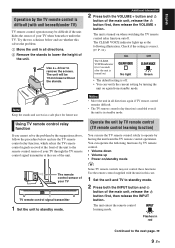
The unit is difficult (with the unit in all directions again if TV remote control remains difficult. • The TV remote control relay function is enabled even if the unit is off . Check if the setting is correct. (☞ P. 11) The CLEAR VOICE indicator (for future use. Notes • Move the unit in all directions. 2 Remove the stands to lower the height of the main unit, release the button first, then release the INPUT button. Using TV remote control relay function Operate the unit by TV remote control (TV remote control learning function) If you cannot solve the problem by...
The unit is difficult (with the unit in all directions again if TV remote control remains difficult. • The TV remote control relay function is enabled even if the unit is off . Check if the setting is correct. (☞ P. 11) The CLEAR VOICE indicator (for future use. Notes • Move the unit in all directions. 2 Remove the stands to lower the height of the main unit, release the button first, then release the INPUT button. Using TV remote control relay function Operate the unit by TV remote control (TV remote control learning function) If you cannot solve the problem by...
Owners Manual
Page 14
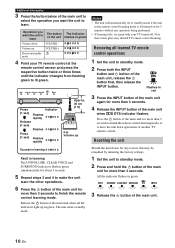
Notes • The unit will automatically set to standby mode if the unit in the remote control learning mode is left turned on /standby mode 4 Point your TV turned off. Flashes in red 3 Press the INPUT button of the main unit again for about 3 seconds. 5 Repeat steps 3 and 4 to make the unit learn operations of another TV remote control. All the indicator flashes in green. Press (1 sec) Indicator Flashes rapidly Release (1 sec) Flashes Press (1 sec) Flashes rapidly Approx. 30 cm (1 ft) e.g. Volume up Success in learning Fault in learning The UNIVOLUME, CLEAR VOICE and ...
Notes • The unit will automatically set to standby mode if the unit in the remote control learning mode is left turned on /standby mode 4 Point your TV turned off. Flashes in red 3 Press the INPUT button of the main unit again for about 3 seconds. 5 Repeat steps 3 and 4 to make the unit learn operations of another TV remote control. All the indicator flashes in green. Press (1 sec) Indicator Flashes rapidly Release (1 sec) Flashes Press (1 sec) Flashes rapidly Approx. 30 cm (1 ft) e.g. Volume up Success in learning Fault in learning The UNIVOLUME, CLEAR VOICE and ...
Owners Manual
Page 15
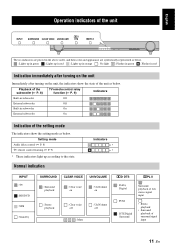
English Operation indicators of the unit The six indicators are placed in the above order, and their color and appearance are symbolically represented as below. : Lights up in green : Lights up in red : Lights up according to the state. Setting mode Audio delay control (☞ P. 8) TV remote control learning (☞ P. 9) * These indicators light up in orange : No light : Flashes in green : Flashes in subwoofer On External subwoofer On Indication of the unit as below . Playback of the subwoofer (☞ P. 8) TV remote control relay function (☞ P. 9) Indicators Built...
English Operation indicators of the unit The six indicators are placed in the above order, and their color and appearance are symbolically represented as below. : Lights up in green : Lights up in red : Lights up according to the state. Setting mode Audio delay control (☞ P. 8) TV remote control learning (☞ P. 9) * These indicators light up in orange : No light : Flashes in green : Flashes in subwoofer On External subwoofer On Indication of the unit as below . Playback of the subwoofer (☞ P. 8) TV remote control relay function (☞ P. 9) Indicators Built...
Owners Manual
Page 16
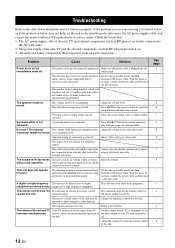
... may be connected improperly. See page 4 - - 8 8 7 7 8 8 - 5 8 - - 6 - 6 - 8 12 En Troubleshooting Refer to the standby mode, disconnect the AC power supply cable, and contact the nearest authorized Yamaha dealer or service center. If the problem you are firmly connected to the AC wall outlet. 2 The power supply of the unit, TV and external...
... may be connected improperly. See page 4 - - 8 8 7 7 8 8 - 5 8 - - 6 - 6 - 8 12 En Troubleshooting Refer to the standby mode, disconnect the AC power supply cable, and contact the nearest authorized Yamaha dealer or service center. If the problem you are firmly connected to the AC wall outlet. 2 The power supply of the unit, TV and external...
Owners Manual
Page 17
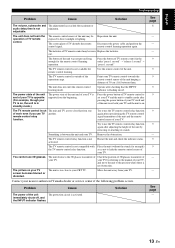
... transmitter of the unit The protection circuit is not available for the remote control learning operation. Problem Cause Solution The power of your nearest authorized Yamaha dealer or service center if the following problem occurs.
... transmitter of the unit The protection circuit is not available for the remote control learning operation. Problem Cause Solution The power of your nearest authorized Yamaha dealer or service center if the following problem occurs.

Owners Manual
Page 18
... that make it possible to achieve 7-channel surround sound with only front speakers, and without notice. "DTS" and "DTS Digital Surround" are registered trademarks of Yamaha Corporation. 14 En
... that make it possible to achieve 7-channel surround sound with only front speakers, and without notice. "DTS" and "DTS Digital Surround" are registered trademarks of Yamaha Corporation. 14 En

Owners Manual
Page 20
© 2011 Yamaha Corporation Printed in Malaysia ZA81330
© 2011 Yamaha Corporation Printed in Malaysia ZA81330
