
Owner's Manual
Page 2
... of uninsulated "dangerous voltage" within the equilateral triangle is approximately five years. DO NOT modify this type of the name plate. The model number, serial number, power requirements, etc., are therefore the owners responsibility. SPECIFICATIONS SUBJECT TO CHANGE: The information contained in the literature accompanying the product. Dispose of important operating and maintenance (servicing) instructions in this manual carefully and consult your purchase.
... of uninsulated "dangerous voltage" within the equilateral triangle is approximately five years. DO NOT modify this type of the name plate. The model number, serial number, power requirements, etc., are therefore the owners responsibility. SPECIFICATIONS SUBJECT TO CHANGE: The information contained in the literature accompanying the product. Dispose of important operating and maintenance (servicing) instructions in this manual carefully and consult your purchase.

Owner's Manual
Page 3
... possibility of panel disfiguration or damage to a malfunction or user operating error. ladder or for the instrument. Pulling by qualified Yamaha service personnel. • Do not place the instrument against a wall (allow at their minimum levels and gradually raise the volume controls while playing the instrument to set all volume levels to disassemble the internal parts or modify them periodically using a multiple-connector. Always turn the power off...
... possibility of panel disfiguration or damage to a malfunction or user operating error. ladder or for the instrument. Pulling by qualified Yamaha service personnel. • Do not place the instrument against a wall (allow at their minimum levels and gradually raise the volume controls while playing the instrument to set all volume levels to disassemble the internal parts or modify them periodically using a multiple-connector. Always turn the power off...

Owner's Manual
Page 5
....2/F9.2: MIDI 36 F8.3/F9.3: Tuning 36 F8.4/F9.4: Pedal 36 Connecting to a Personal Computer 37 G Connecting to an Apple Macintosh Series Computer .... 37 G Connecting to an IBM-PC/AT Series Computer ........ 38 G Using a USB Interface (such as the Yamaha UX256) .... 39 Factory Preset Recall 40 Troubleshooting 40 Options & Expander Modules 40 Voice Descriptions 41 Demo Song List 42 Factory Setting List 42 MIDI Data Format 43 MIDI Implementation Chart 47 CLP-950: Keyboard Stand Assembly 48 CLP-930: Keyboard Stand Assembly 54 Specifications 60 CLP-950...
....2/F9.2: MIDI 36 F8.3/F9.3: Tuning 36 F8.4/F9.4: Pedal 36 Connecting to a Personal Computer 37 G Connecting to an Apple Macintosh Series Computer .... 37 G Connecting to an IBM-PC/AT Series Computer ........ 38 G Using a USB Interface (such as the Yamaha UX256) .... 39 Factory Preset Recall 40 Troubleshooting 40 Options & Expander Modules 40 Voice Descriptions 41 Demo Song List 42 Factory Setting List 42 MIDI Data Format 43 MIDI Implementation Chart 47 CLP-950: Keyboard Stand Assembly 48 CLP-930: Keyboard Stand Assembly 54 Specifications 60 CLP-950...
Owner's Manual
Page 6
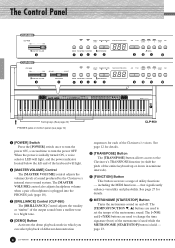
...Button The [TRANSPOSE] button allows access to the Clavinova's TRANSPOSE function (to a bright tone. 4 [DEMO] Button Activates the demo playback mode in semitone intervals). 6 [FUNCTION] Button This button accesses a range of the Clavinova's voices. See page 12 for details. 7 METRONOME [START/STOP] Button Turns the metronome sound on bottom panel (see page 10) CLP-950 1 [POWER] Switch Press the [POWER] switch once to turn the power ON, a second time to set the tempo of sound produced by the Clavinova's internal stereo sound system. The [TEMPO/FUNCTION M, L] buttons are used to change...
...Button The [TRANSPOSE] button allows access to the Clavinova's TRANSPOSE function (to a bright tone. 4 [DEMO] Button Activates the demo playback mode in semitone intervals). 6 [FUNCTION] Button This button accesses a range of the Clavinova's voices. See page 12 for details. 7 METRONOME [START/STOP] Button Turns the metronome sound on bottom panel (see page 10) CLP-950 1 [POWER] Switch Press the [POWER] switch once to turn the power ON, a second time to set the tempo of sound produced by the Clavinova's internal stereo sound system. The [TEMPO/FUNCTION M, L] buttons are used to change...
Owner's Manual
Page 8
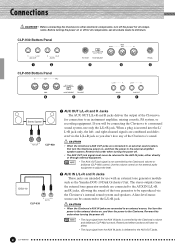
... recording equipment. Reverse this order when turning the power off . • The AUX OUT jack signal must never be connecting the Clavinova to a monaural sound system, use with an external tone generator module such as the Yamaha DOU-10 Disk Orchestra Unit. Use the volume control on , and then the power to the external amplifier/ speaker system. The stereo outputs from the AUX IN jacks is not controlled by the Clavinova's volume and brilliance (CLP-950) controls. When a plug is...
... recording equipment. Reverse this order when turning the power off . • The AUX OUT jack signal must never be connecting the Clavinova to a monaural sound system, use with an external tone generator module such as the Yamaha DOU-10 Disk Orchestra Unit. Use the volume control on , and then the power to the external amplifier/ speaker system. The stereo outputs from the AUX IN jacks is not controlled by the Clavinova's volume and brilliance (CLP-950) controls. When a plug is...
Owner's Manual
Page 15
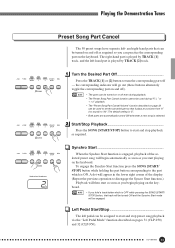
... SONG TEMPO/FUNCTION/SONG Turn the Desired Part Off Press the TRACK [1] or [2] button to start playing on pages 31 (CLP-930) and 32 (CLP-950). Left Pedal Start/Stop The left - A dot will appear in the lower right corner of the selected preset song will be used during playback. • The Preset Song Part Cancel function cannot be used to set the canceled part so that can practice the corresponding part on the keyboard...
... SONG TEMPO/FUNCTION/SONG Turn the Desired Part Off Press the TRACK [1] or [2] button to start playing on pages 31 (CLP-930) and 32 (CLP-950). Left Pedal Start/Stop The left - A dot will appear in the lower right corner of the selected preset song will be used during playback. • The Preset Song Part Cancel function cannot be used to set the canceled part so that can practice the corresponding part on the keyboard...
Owner's Manual
Page 16
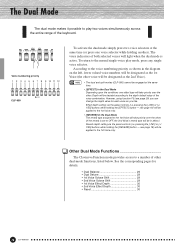
....) Reverb depth setting via the panel controls (i.e. NOTE • The dual and split modes (CLP-950) cannot be engaged at the same time (or press one effect type will take priority over the other voice will be decided according to a number of the voice combination. Other Dual Mode Functions The Clavinova Function mode provides access to the depth default value of other . PIANO E. pressing the [-/NO] or [+/ YES] buttons while holding the [EFFECT] button - PIANO...
....) Reverb depth setting via the panel controls (i.e. NOTE • The dual and split modes (CLP-950) cannot be engaged at the same time (or press one effect type will take priority over the other voice will be decided according to a number of the voice combination. Other Dual Mode Functions The Clavinova Function mode provides access to the depth default value of other . PIANO E. pressing the [-/NO] or [+/ YES] buttons while holding the [EFFECT] button - PIANO...
Owner's Manual
Page 17
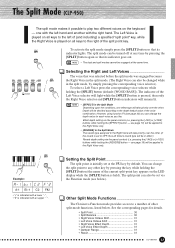
... changed while in affect.) Reverb depth setting via the panel controls (i.e. However, using function F4 (see below . NOTE • [EFFECT] in the Split Mode Depending upon the conditions, one with the left of (and including) a specified "split point" key, while the Right Voice is held). SPLIT Example: A-1 b=1 C 2 F~2 Setting the Split Point The split point is indicated with the right hand. The Split Mode (CLP-950) The split mode makes it possible to play two different voices...
... changed while in affect.) Reverb depth setting via the panel controls (i.e. However, using function F4 (see below . NOTE • [EFFECT] in the Split Mode Depending upon the conditions, one with the left of (and including) a specified "split point" key, while the Right Voice is held). SPLIT Example: A-1 b=1 C 2 F~2 Setting the Split Point The split point is indicated with the right hand. The Split Mode (CLP-950) The split mode makes it possible to play two different voices...

Owner's Manual
Page 18
... voice. • Even if the REVERB effect is OFF, a "soundboard reverb" effect will be applied when the CLP-950 GRAND PIANO 1 voice is selected. Adjusting Reverb Depth Adjust the reverb depth for each time the [REVERB] button is pressed). NOTE • The default reverb type (including OFF) and depth settings are different for the selected voice by using the [-/NO] and [+/YES] buttons while holding the [REVERB] button to recall the default setting for extra depth and expressive power. Reverb The [REVERB] button selects a number of digital reverb effects...
... voice. • Even if the REVERB effect is OFF, a "soundboard reverb" effect will be applied when the CLP-950 GRAND PIANO 1 voice is selected. Adjusting Reverb Depth Adjust the reverb depth for each time the [REVERB] button is pressed). NOTE • The default reverb type (including OFF) and depth settings are different for the selected voice by using the [-/NO] and [+/YES] buttons while holding the [REVERB] button to recall the default setting for extra depth and expressive power. Reverb The [REVERB] button selects a number of digital reverb effects...

Owner's Manual
Page 19
... [EFFECT] button. Brilliance (CLP-950) This control can be individually adjusted for the selected voice by using the [-/NO] and [+/YES] buttons while holding the [EFFECT] button to select one of "0" produces no EFFECT indicator is lit. No effect is pressed). Adjusting Effect Depth Effect depth can be slightly louder. If so, lower the MASTER VOLUME level. The control range is set to the sound. The Effect The [EFFECT] button allows you to recall the default setting for...
... [EFFECT] button. Brilliance (CLP-950) This control can be individually adjusted for the selected voice by using the [-/NO] and [+/YES] buttons while holding the [EFFECT] button to select one of "0" produces no EFFECT indicator is lit. No effect is pressed). Adjusting Effect Depth Effect depth can be slightly louder. If so, lower the MASTER VOLUME level. The control range is set to the sound. The Effect The [EFFECT] button allows you to recall the default setting for...
Owner's Manual
Page 24
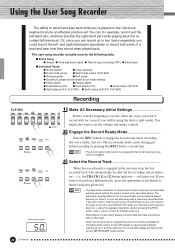
... be using the dual or split mode). The user song recorder actually records the following data: I Entire Song G Tempo G Time signature (beat) G Reverb type (including OFF) G Effect type I Individual Tracks G Notes played G Voice selection G Dual mode voices G Split mode voices (CLP-950) G Damper pedal G Soft pedal G Sostenuto pedal (not recorded as described below). PIANO E. PIANO HARPSI- CHURCH JAZ PIANO 1 PIANO 2 1 2 CHORD PHONE ORGAN ORG VOICE ESET TRACK TRACK START/ REC ONG 1 2 STOP SONG ESET TRACK TRACK START/ REC ONG 1 2 STOP SONG TEMPO/FUNCTION/SONG Make All...
... be using the dual or split mode). The user song recorder actually records the following data: I Entire Song G Tempo G Time signature (beat) G Reverb type (including OFF) G Effect type I Individual Tracks G Notes played G Voice selection G Dual mode voices G Split mode voices (CLP-950) G Damper pedal G Soft pedal G Sostenuto pedal (not recorded as described below). PIANO E. PIANO HARPSI- CHURCH JAZ PIANO 1 PIANO 2 1 2 CHORD PHONE ORGAN ORG VOICE ESET TRACK TRACK START/ REC ONG 1 2 STOP SONG ESET TRACK TRACK START/ REC ONG 1 2 STOP SONG TEMPO/FUNCTION/SONG Make All...
Owner's Manual
Page 25
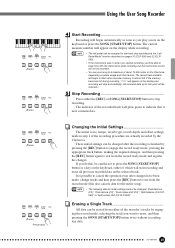
... keep time with the metronome while recording, but the metronome sound will not be recorded. • You can be erased from the record ready mode and register the changes. Using the User Song Recorder ESET TRACK TRACK START/ REC ONG 1 2 STOP SONG ESET TRACK TRACK START/ REC ONG 1 2 STOP SONG Start Recording Recording will begin to flash when recorder memory is finished by pressing the [REC] button to engage the record ready mode, pressing the appropriate track button, making...
... keep time with the metronome while recording, but the metronome sound will not be recorded. • You can be erased from the record ready mode and register the changes. Using the User Song Recorder ESET TRACK TRACK START/ REC ONG 1 2 STOP SONG ESET TRACK TRACK START/ REC ONG 1 2 STOP SONG Start Recording Recording will begin to flash when recorder memory is finished by pressing the [REC] button to engage the record ready mode, pressing the appropriate track button, making...

Owner's Manual
Page 26
... the REVERB type is changed via the panel controls during playback, both [TEMPO/FUNCTION M, L] buttons simultaneously to recall the default tempo). • All user song recorder data will be assigned to start playing on the keyboard. Playback starts from the beginning of the recorded data, and will always be engaged. It is the voice that was set when the data was recorded. To engage the Synchro Start function press the SONG [START/STOP] button while holding a track button which...
... the REVERB type is changed via the panel controls during playback, both [TEMPO/FUNCTION M, L] buttons simultaneously to recall the default tempo). • All user song recorder data will be assigned to start playing on the keyboard. Playback starts from the beginning of the recorded data, and will always be engaged. It is the voice that was set when the data was recorded. To engage the Synchro Start function press the SONG [START/STOP] button while holding a track button which...
Owner's Manual
Page 32
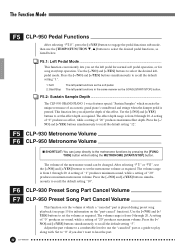
...] buttons to play along with. Adjust the part volume to a comfortable level to use the "canceled" part as a guide to set the metronome volume as required. The volume range is from 1 through 20. The Function Mode F5 CLP-950 Pedal Functions After selecting "F5.Y", press the [+/YES] button to engage the pedal functions sub-mode, then use the [TEMPO/FUNCTION t, s] buttons to select the desired leftpedal mode. A setting of "0" produces no effect, while a setting of the metronome sound can jump directly to recall the default setting...
...] buttons to play along with. Adjust the part volume to a comfortable level to use the "canceled" part as a guide to set the metronome volume as required. The volume range is from 1 through 20. The Function Mode F5 CLP-950 Pedal Functions After selecting "F5.Y", press the [+/YES] button to engage the pedal functions sub-mode, then use the [TEMPO/FUNCTION t, s] buttons to select the desired leftpedal mode. A setting of "0" produces no effect, while a setting of the metronome sound can jump directly to recall the default setting...

Owner's Manual
Page 33
... of a second keyboard (synthesizer, etc.) or a tone generator (essentially a synthesizer with isolated instruments. NOTE • The bottom-panel HOST SELECT switch must be used for example. The Function Mode F7 CLP-930 MIDI Functions F8 CLP-950 MIDI Functions G A Brief Introduction to MIDI MIDI, the Musical Instrument Digital Interface, is played back, the Clavinova automatically "plays" the recorded performance in precise detail. The result is connected to the MIDI IN connector of MIDI data on the original transmitting keyboard. In this can...
... of a second keyboard (synthesizer, etc.) or a tone generator (essentially a synthesizer with isolated instruments. NOTE • The bottom-panel HOST SELECT switch must be used for example. The Function Mode F7 CLP-930 MIDI Functions F8 CLP-950 MIDI Functions G A Brief Introduction to MIDI MIDI, the Musical Instrument Digital Interface, is played back, the Clavinova automatically "plays" the recorded performance in precise detail. The result is connected to the MIDI IN connector of MIDI data on the original transmitting keyboard. In this can...

Owner's Manual
Page 34
... channel to turn local control "On" or "OFF". Use the [-/NO] and [+/YES] buttons to "OFF". • Demo/preset song data and recorder playback data are played on channels 1 and 2. To select the multi-timbre receive mode, set to turn program change and other MIDI device, causing the correspondingly numbered voice to page 44 in the MIDI Data Format section. 34 CLP-950/930 Use the [-/NO] and [+/YES] buttons to "ALL". At the same time, the internal tone generator responds to recall the default setting...
... channel to turn local control "On" or "OFF". Use the [-/NO] and [+/YES] buttons to "OFF". • Demo/preset song data and recorder playback data are played on channels 1 and 2. To select the multi-timbre receive mode, set to turn program change and other MIDI device, causing the correspondingly numbered voice to page 44 in the MIDI Data Format section. 34 CLP-950/930 Use the [-/NO] and [+/YES] buttons to "ALL". At the same time, the internal tone generator responds to recall the default setting...

Owner's Manual
Page 36
... each voice combination) • Split (ON/OFF, Voice, and Split Functions for each voice combination : CLP-950) • Reverb (ON/OFF, Type, and Depth for each voice) • Effect (ON/OFF, Type, and Depth for about 1 week if the power is found on page 42. The default backup mode is "OFF". • Transpose • Tuning • Scale (including base note) F8.4/F9.4: Pedal ... The factory setting list is not turned on during this time...
... each voice combination) • Split (ON/OFF, Voice, and Split Functions for each voice combination : CLP-950) • Reverb (ON/OFF, Type, and Depth for each voice) • Effect (ON/OFF, Type, and Depth for about 1 week if the power is found on page 42. The default backup mode is "OFF". • Transpose • Tuning • Scale (including base note) F8.4/F9.4: Pedal ... The factory setting list is not turned on during this time...
Owner's Manual
Page 40
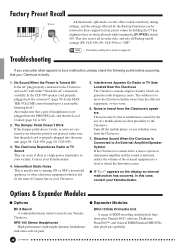
... is found on the keyboard) while turning the [POWER] switch ON. NOTE • The factory setting list is fed by the same AC mains line as your vicinity. Is the CLP-950 speaker cord properly plugged into the main unit (page 58: CLP-930, page 50: CLP-950). 3. Also make sure that your Yamaha dealer. Factory Preset Recall All dual mode, split mode, reverb, effect, touch sensitivity, tuning POWER settings, and the settings affected by the Backup Functions can be due...
... is found on the keyboard) while turning the [POWER] switch ON. NOTE • The factory setting list is fed by the same AC mains line as your vicinity. Is the CLP-950 speaker cord properly plugged into the main unit (page 58: CLP-930, page 50: CLP-950). 3. Also make sure that your Yamaha dealer. Factory Preset Recall All dual mode, split mode, reverb, effect, touch sensitivity, tuning POWER settings, and the settings affected by the Backup Functions can be due...
Owner's Manual
Page 42
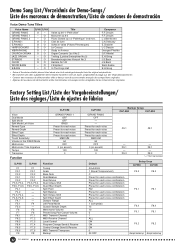
... Function Tuning Scale Base Note Dual Balance Dual Detune Dual Octave Shift Dual Effect Depth Split Point Split Balance Split Octave Shift Split Effect Depth Damper Range Left Pedal Mode Sustain Sample Depth Metronome Volume Preset Song Part Cancel Volume MIDI Transmit Channel MIDI Receive Channel Local Control Program Change Send & Receive Control Change Send & Receive MIDI Transmit Transpose Backup CLP-930 GRAND PIANO OFF - - F8.1 - Clair de lune Scherzo-valsa (Pièces Pittoresques) Le Coucou Study in the FIXED Mode Metronome Metronome Time Signature Tempo Transpose Function CLP...
... Function Tuning Scale Base Note Dual Balance Dual Detune Dual Octave Shift Dual Effect Depth Split Point Split Balance Split Octave Shift Split Effect Depth Damper Range Left Pedal Mode Sustain Sample Depth Metronome Volume Preset Song Part Cancel Volume MIDI Transmit Channel MIDI Receive Channel Local Control Program Change Send & Receive Control Change Send & Receive MIDI Transmit Transpose Backup CLP-930 GRAND PIANO OFF - - F8.1 - Clair de lune Scherzo-valsa (Pièces Pittoresques) Le Coucou Study in the FIXED Mode Metronome Metronome Time Signature Tempo Transpose Function CLP...
Owner's Manual
Page 63
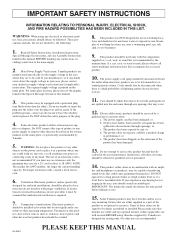
... electrical storm activity. 11. The power supply cord has been damaged; Some of time. PLEASE KEEP THIS MANUAL 92-469-2 Read all safety markings and instructions that is a high probability of wet/damp locations are well secured BEFORE using any power supply or adapter other objects on the name plate, or specifically recommended by the manufacturer. This product may exist. 12. Some electronic...
... electrical storm activity. 11. The power supply cord has been damaged; Some of time. PLEASE KEEP THIS MANUAL 92-469-2 Read all safety markings and instructions that is a high probability of wet/damp locations are well secured BEFORE using any power supply or adapter other objects on the name plate, or specifically recommended by the manufacturer. This product may exist. 12. Some electronic...

