
Owner's Manual
Page 2
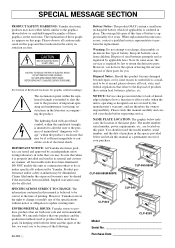
...PARTS INSIDE. ENVIRONMENTAL ISSUES: Yamaha strives to return the defective parts. Note: In some reason its normal and customary manner, all local, state, and federal regulations that our products and the production methods used batteries promptly and as regulated by applicable laws. Please study this plate. CLP-880/880M/880PE...its useful life is considered to be denied if the unit is/has been modified. However, Yamaha reserves the right to change or modify any of these parts for you to constitute a risk of these graphics on this manual carefully and consult your ...
...PARTS INSIDE. ENVIRONMENTAL ISSUES: Yamaha strives to return the defective parts. Note: In some reason its normal and customary manner, all local, state, and federal regulations that our products and the production methods used batteries promptly and as regulated by applicable laws. Please study this plate. CLP-880/880M/880PE...its useful life is considered to be denied if the unit is/has been modified. However, Yamaha reserves the right to change or modify any of these parts for you to constitute a risk of these graphics on this manual carefully and consult your ...
Owner's Manual
Page 3
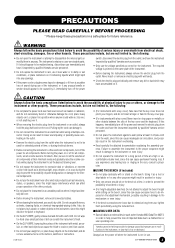
Pulling by qualified Yamaha service personnel. • Only use or modifications to disassemble the internal parts or modify them periodically using a multiple-connector. Do not wipe too hard since small particles of dirt can scratch the instrument's finish. • On the CLP-880PE, bumping the surface of ... result in the proper sequence might discolor the panel or keyboard. • On the CLP-880PE, gently remove dust and dirt with metal, porcelain, or other hazards. Yamaha cannot be held responsible for a long period of all components at their minimum levels and gradually...
Pulling by qualified Yamaha service personnel. • Only use or modifications to disassemble the internal parts or modify them periodically using a multiple-connector. Do not wipe too hard since small particles of dirt can scratch the instrument's finish. • On the CLP-880PE, bumping the surface of ... result in the proper sequence might discolor the panel or keyboard. • On the CLP-880PE, gently remove dust and dirt with metal, porcelain, or other hazards. Yamaha cannot be held responsible for a long period of all components at their minimum levels and gradually...
Owner's Manual
Page 5
... Music Stand 8 Connections 10 Selecting & Playing Voices 11 Playing the Demonstration Tunes 12 s Voice Demo 12 s Piano Song 13 s Piano Song A-B Repeat 14 s Piano Song Part Cancel 15 q Synchro Start 15 q Left Pedal Start/Stop 15 The Dual Mode 16 q Other Dual Mode Functions 16 The Split Mode (CLP-880/860...: CLP-840/820/820S Metronome Volume 33 s F6: CLP-880/860 Metronome Volume 33 s F6: CLP-840/820/820S Piano Song Part Cancel Volume .. 33 s F7: CLP-880/860 Piano Song Part Cancel Volume ....... 33 s F7: CLP-840/820/820S MIDI Functions 34 s F8: CLP-880/860 MIDI Functions 34 q A Brief...
... Music Stand 8 Connections 10 Selecting & Playing Voices 11 Playing the Demonstration Tunes 12 s Voice Demo 12 s Piano Song 13 s Piano Song A-B Repeat 14 s Piano Song Part Cancel 15 q Synchro Start 15 q Left Pedal Start/Stop 15 The Dual Mode 16 q Other Dual Mode Functions 16 The Split Mode (CLP-880/860...: CLP-840/820/820S Metronome Volume 33 s F6: CLP-880/860 Metronome Volume 33 s F6: CLP-840/820/820S Piano Song Part Cancel Volume .. 33 s F7: CLP-880/860 Piano Song Part Cancel Volume ....... 33 s F7: CLP-840/820/820S MIDI Functions 34 s F8: CLP-880/860 MIDI Functions 34 q A Brief...
Owner's Manual
Page 14
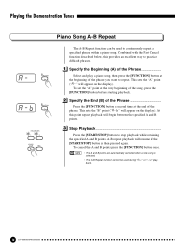
... again. Playing the Demonstration Tunes Piano Song A-B Repeat FUNCTION FUNCTION RECORDER 1 2 START/ STOP REC The A-B Repeat function can be used to repeat. Combined with the Part Cancel function described below, this point repeat playback will resume if the [START/STOP] button is selected. • The A-B Repeat function cannot be used during...
... again. Playing the Demonstration Tunes Piano Song A-B Repeat FUNCTION FUNCTION RECORDER 1 2 START/ STOP REC The A-B Repeat function can be used to repeat. Combined with the Part Cancel function described below, this point repeat playback will resume if the [START/STOP] button is selected. • The A-B Repeat function cannot be used during...

Owner's Manual
Page 15
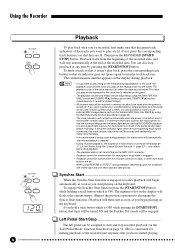
...; If you start and stop piano song playback via the "Left Pedal Mode" function described on page 33 can be used to set the canceled part so that it plays at a volume from "0" (no sound) to start as soon as you begin automatically as soon as you hold a track ...cannot be assigned to "20". To engage the Synchro Start function press the [START/STOP] button while holding the part button corresponding to start playing on and off - and right-hand parts that track will be engaged. Synchro Start ...When the Synchro Start function is OFF while pressing the [START/STOP]...
...; If you start and stop piano song playback via the "Left Pedal Mode" function described on page 33 can be used to set the canceled part so that it plays at a volume from "0" (no sound) to start as soon as you begin automatically as soon as you hold a track ...cannot be assigned to "20". To engage the Synchro Start function press the [START/STOP] button while holding the part button corresponding to start playing on and off - and right-hand parts that track will be engaged. Synchro Start ...When the Synchro Start function is OFF while pressing the [START/STOP]...
Owner's Manual
Page 20
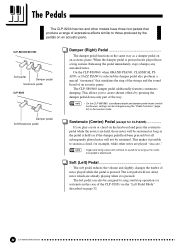
... while the note(s) are held (as the sostenuto pedal is pressed. This makes it is held , those produced by pressing the damper pedal down only part of an acoustic piano. The left pedal can be assigned to sound for as long as if the damper pedal had been pressed) but all...
... while the note(s) are held (as the sostenuto pedal is pressed. This makes it is held , those produced by pressing the damper pedal down only part of an acoustic piano. The left pedal can be assigned to sound for as long as if the damper pedal had been pressed) but all...
Owner's Manual
Page 24
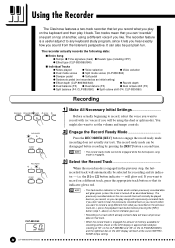
... indicator goes out. • Recording on a track which contain previously recorded data will normally be played back as described below). If you can "overdub" one part on the previous track etc.,), press the playback track button before recording by pressing the [REC] button a second time. • The record ready mode cannot...
... indicator goes out. • Recording on a track which contain previously recorded data will normally be played back as described below). If you can "overdub" one part on the previous track etc.,), press the playback track button before recording by pressing the [REC] button a second time. • The record ready mode cannot...
Owner's Manual
Page 26
..."Left Pedal Mode" function described on the display during playback. • It is possible to an external MIDI storage device such as the Yamaha MIDI Data Filer MDF3 by the newly-recorded data. • If the metronome is being used during playback, the metronome will automatically stop playback...820/820S It is also possible to store it doesn't play on the keyboard is selected on for starting RECORDER playback. the "Piano Song Part Cancel Volume" function - Synchro Start ...When the Synchro Start function is convenient for a few minutes at any time by using REVERB or ...
..."Left Pedal Mode" function described on the display during playback. • It is possible to an external MIDI storage device such as the Yamaha MIDI Data Filer MDF3 by the newly-recorded data. • If the metronome is being used during playback, the metronome will automatically stop playback...820/820S It is also possible to store it doesn't play on the keyboard is selected on for starting RECORDER playback. the "Piano Song Part Cancel Volume" function - Synchro Start ...When the Synchro Start function is convenient for a few minutes at any time by using REVERB or ...

Owner's Manual
Page 27
... while in operation. B Press the [FUNCTION] button so that its indicator lights. F5 Pedal Functions 32 F5 F6 Metronome Volume 33 F6 F7 Piano Song Part Cancel Volume 33 F7 F8 MIDI Functions 34 F8 F9 Backup Functions 37 FUNCTION TEMPO FUNCTION q Operation Example Press [+/YES] (sub-mode) Use FUNCTION [] Press...
... while in operation. B Press the [FUNCTION] button so that its indicator lights. F5 Pedal Functions 32 F5 F6 Metronome Volume 33 F6 F7 Piano Song Part Cancel Volume 33 F7 F8 MIDI Functions 34 F8 F9 Backup Functions 37 FUNCTION TEMPO FUNCTION q Operation Example Press [+/YES] (sub-mode) Use FUNCTION [] Press...

Owner's Manual
Page 33
... maximum volume. Set to "0" if you don't want to set the metronome volume as required. Use the [-/NO] and [+/ YES] buttons to hear the part. Adjust the part volume to a comfortable level to use the [-/NO] and [+/YES] buttons to set the volume as a guide to recall the default setting "10". Press... CLP-840/820/820S Metronome Volume F6 CLP-880/860 Metronome Volume s SHORTCUT: You can be changed. After selecting "F5" or "F6", use the "canceled" part as required. The volume range is played during piano song playback (see page 15 for information on the...
... maximum volume. Set to "0" if you don't want to set the metronome volume as required. Use the [-/NO] and [+/ YES] buttons to hear the part. Adjust the part volume to a comfortable level to use the [-/NO] and [+/YES] buttons to set the volume as a guide to recall the default setting "10". Press... CLP-840/820/820S Metronome Volume F6 CLP-880/860 Metronome Volume s SHORTCUT: You can be changed. After selecting "F5" or "F6", use the "canceled" part as required. The volume range is played during piano song playback (see page 15 for information on the...
Owner's Manual
Page 34
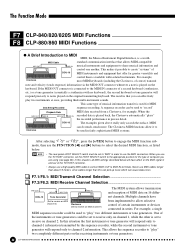
... back, the Clavinova automatically "plays" the recorded performance in and out of the instruments or tone generators could be used to "play " two completely different parts on 16 differ- In this situation the first instrument or tone generator will respond only to channel-1 information transmitted by the sequence recorder, while the...
... back, the Clavinova automatically "plays" the recorded performance in and out of the instruments or tone generators could be used to "play " two completely different parts on 16 differ- In this situation the first instrument or tone generator will respond only to channel-1 information transmitted by the sequence recorder, while the...
Owner's Manual
Page 35
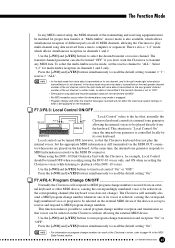
... AUX IN OUT PUT MIDI L R R L IN Clavinova keyboard controls its set to be matched for each of the Clavinova's voices, refer to playback of different parts on the Clavinova without affecting the external MIDI device. Use the [-/NO] and [+/YES] buttons to MIDI information received via the MIDI IN connector. There...
... AUX IN OUT PUT MIDI L R R L IN Clavinova keyboard controls its set to be matched for each of the Clavinova's voices, refer to playback of different parts on the Clavinova without affecting the external MIDI device. Use the [-/NO] and [+/YES] buttons to MIDI information received via the MIDI IN connector. There...

Owner's Manual
Page 37
... voice) • Effect (ON/OFF, Type, and Depth for each voice) • Touch Sensitivity (including the FIXED volume) • Metronome (Beat, Volume) • Piano Song Part Cancel Volume F8.2/F9.2: MIDI ...Turns backup of the functions described below on or off . Turns backup of the tuning functions listed below , the data...
... voice) • Effect (ON/OFF, Type, and Depth for each voice) • Touch Sensitivity (including the FIXED volume) • Metronome (Beat, Volume) • Piano Song Part Cancel Volume F8.2/F9.2: MIDI ...Turns backup of the functions described below on or off . Turns backup of the tuning functions listed below , the data...
Owner's Manual
Page 42
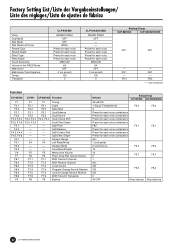
... Effect Depth Split Point Split Balance Split Octave Shift Split Effect Depth Damper Range Left Pedal Mode Damper Mode Soundboard Depth Metronome Volume Piano Song Part Cancel Volume MIDI Transmit Channel MIDI Receive Channel Local Control Program Change Send & Receive Control Change Send & Receive MIDI Transmit Transpose Backup Default Backup Group...
... Effect Depth Split Point Split Balance Split Octave Shift Split Effect Depth Damper Range Left Pedal Mode Damper Mode Soundboard Depth Metronome Volume Piano Song Part Cancel Volume MIDI Transmit Channel MIDI Receive Channel Local Control Program Change Send & Receive Control Change Send & Receive MIDI Transmit Transpose Backup Default Backup Group...

Owner's Manual
Page 46
... : basic type 00(=Effect off) (CLP-880/860/840) 00 (CLP-880/860/840) MIDI Parameter Change table ( MULTI PART ) Address (H) Size (H) Data (H) 08 nn 11 1 00 - 7F Parameter DRY LEVEL nn = Part Number Description 0 - 127 Default value (H) 7F (CLP-880/860/840) q Effect MIDI Map REVERB ROOM HALL 1 HALL 2 STAGE MSB...
... : basic type 00(=Effect off) (CLP-880/860/840) 00 (CLP-880/860/840) MIDI Parameter Change table ( MULTI PART ) Address (H) Size (H) Data (H) 08 nn 11 1 00 - 7F Parameter DRY LEVEL nn = Part Number Description 0 - 127 Default value (H) 7F (CLP-880/860/840) q Effect MIDI Map REVERB ROOM HALL 1 HALL 2 STAGE MSB...

Owner's Manual
Page 48
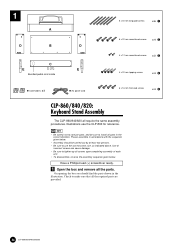
The 5 x 40 mm long gold screws are already attached on the CLP-880PE. x4 5 CLP-880: Keyboard Stand Assembly • Be careful not to confuse parts, and be carried out by at least two persons. • Be sure to use the correct screw size, as indicated above... remove all screws upon completing assembly of incorrect screws can cause damage. • Be sure to make sure that all parts in accordance with the CLP-880PE. Check to tighten up all the parts. Please assemble in the correct direction. 1 A E B F B D C C Bundled pedal cord inside 5 x 40 mm long gold screws x6 ...
The 5 x 40 mm long gold screws are already attached on the CLP-880PE. x4 5 CLP-880: Keyboard Stand Assembly • Be careful not to confuse parts, and be carried out by at least two persons. • Be sure to use the correct screw size, as indicated above... remove all screws upon completing assembly of incorrect screws can cause damage. • Be sure to make sure that all parts in accordance with the CLP-880PE. Check to tighten up all the parts. Please assemble in the correct direction. 1 A E B F B D C C Bundled pedal cord inside 5 x 40 mm long gold screws x6 ...

Owner's Manual
Page 55
... shake it? ➔ Tighten all screws. 55 CLP-880/860/840/820/820S s After completing the assembly, please check the following. • Are there any parts left over? ➔ Review the assembly procedure and correct any errors. • Is the Clavinova clear of the main unit, NEVER the top portion or...
... shake it? ➔ Tighten all screws. 55 CLP-880/860/840/820/820S s After completing the assembly, please check the following. • Are there any parts left over? ➔ Review the assembly procedure and correct any errors. • Is the Clavinova clear of the main unit, NEVER the top portion or...
Owner's Manual
Page 56
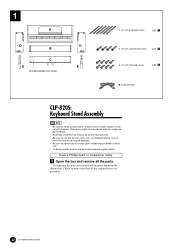
...with the sequence given below . Use of each unit. • To disassemble, reverse the assembly sequence given below . • Assembly should find the parts shown in the illustration. Have a Phillips-head (+) screwdriver ready. Z Open the box and remove all screws upon completing assembly of incorrect screws can cause... AC power cord 6 x 16 mm flat-head screws x4 5 CLP-860/840/820: Keyboard Stand Assembly The CLP-860/840/820 all the required parts are provided. 56 CLP-880/860/840/820/820S Please assemble in the correct direction. On opening the box you should be carried out by...
...with the sequence given below . Use of each unit. • To disassemble, reverse the assembly sequence given below . • Assembly should find the parts shown in the illustration. Have a Phillips-head (+) screwdriver ready. Z Open the box and remove all screws upon completing assembly of incorrect screws can cause... AC power cord 6 x 16 mm flat-head screws x4 5 CLP-860/840/820: Keyboard Stand Assembly The CLP-860/840/820 all the required parts are provided. 56 CLP-880/860/840/820/820S Please assemble in the correct direction. On opening the box you should be carried out by...

Owner's Manual
Page 61
... floor surface. The adjuster ensures stable pedal operation and facilitates pedal effect control. s After completing the assembly, please check the following. • Are there any parts left over? ➔ Review the assembly procedure and correct any errors. • Is the Clavinova clear of doors and other movable fixtures? ➔ Move the...
... floor surface. The adjuster ensures stable pedal operation and facilitates pedal effect control. s After completing the assembly, please check the following. • Are there any parts left over? ➔ Review the assembly procedure and correct any errors. • Is the Clavinova clear of doors and other movable fixtures? ➔ Move the...
Owner's Manual
Page 62
.../820/820S Use of each unit. • To disassemble, reverse the assembly sequence given below . • Assembly should find the parts shown in the correct direction. Check to tighten up all the parts. 1 A D D B C E E Bundled pedal cord inside 5 x 40 mm long gold screws x6 1 6 x 20 mm round-head screws x4 2... 6 x 16 mm flat-head screws x8 3 q AC power cord CLP-820S: Keyboard Stand Assembly • Be careful not to confuse parts, and be carried out by at least two persons. • Be sure to use the correct screw size, as indicated above. Please assemble in ...
.../820/820S Use of each unit. • To disassemble, reverse the assembly sequence given below . • Assembly should find the parts shown in the correct direction. Check to tighten up all the parts. 1 A D D B C E E Bundled pedal cord inside 5 x 40 mm long gold screws x6 1 6 x 20 mm round-head screws x4 2... 6 x 16 mm flat-head screws x8 3 q AC power cord CLP-820S: Keyboard Stand Assembly • Be careful not to confuse parts, and be carried out by at least two persons. • Be sure to use the correct screw size, as indicated above. Please assemble in ...

