

Owner's Manual
Page 1
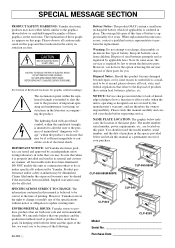
The voltage selector is set at 240V when the unit is set for the voltage in your area. To change the setting use a "minus" screwdriver to the pointer on the panel. R IMPORTANT Check your power supply Make sure that the correct voltage appears next to rotate the selector dial so that your local AC mains voltage matches the voltage specified on the name plate on the bottom panel. Make sure that the voltage selector is initially shipped. In some areas a voltage selector may be provided on the bottom panel of the main keyboard unit near the power cord.
The voltage selector is set at 240V when the unit is set for the voltage in your area. To change the setting use a "minus" screwdriver to the pointer on the panel. R IMPORTANT Check your power supply Make sure that the correct voltage appears next to rotate the selector dial so that your local AC mains voltage matches the voltage specified on the name plate on the bottom panel. Make sure that the voltage selector is initially shipped. In some areas a voltage selector may be provided on the bottom panel of the main keyboard unit near the power cord.
Owner's Manual
Page 2
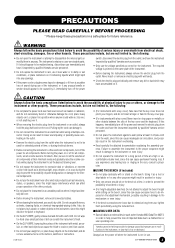
... commission others to do have either labels similar to the graphics shown below indicates the location of the name plate. See bottom of Keyboard enclosure for graphic symbol markings The exclamation point within the product's enclosure that may be of sufficient magnitude to constitute a risk of ...the manufacturer's warranty, and are located on this type of battery. CLP-880/880M/880PE CLP-860/860M CLP-840 CLP-820 CLP-820S Model Serial No Purchase Date IMPORTANT NOTICE: All Yamaha electronic products are both the letter and the spirit of these goals. Disposal Notice: Should...
... commission others to do have either labels similar to the graphics shown below indicates the location of the name plate. See bottom of Keyboard enclosure for graphic symbol markings The exclamation point within the product's enclosure that may be of sufficient magnitude to constitute a risk of ...the manufacturer's warranty, and are located on this type of battery. CLP-880/880M/880PE CLP-860/860M CLP-840 CLP-820 CLP-820S Model Serial No Purchase Date IMPORTANT NOTICE: All Yamaha electronic products are both the letter and the spirit of these goals. Disposal Notice: Should...
Owner's Manual
Page 3
... to avoid the possibility of physical injury to you experience any other objects between the slits of the key cover and the keyboard. Pulling by qualified Yamaha service personnel. • Only use , tighten them in any dirt or dust which can affect proper operation of the other... be sure to set all components at a high or uncomfortable volume level, since this can scratch the instrument's finish. • On the CLP-880PE, bumping the surface of all volume levels to the internal components. • Do not use paint thinners, solvents, cleaning fluids, or chemical-impregnated...
... to avoid the possibility of physical injury to you experience any other objects between the slits of the key cover and the keyboard. Pulling by qualified Yamaha service personnel. • Only use , tighten them in any dirt or dust which can affect proper operation of the other... be sure to set all components at a high or uncomfortable volume level, since this can scratch the instrument's finish. • On the CLP-880PE, bumping the surface of all volume levels to the internal components. • Do not use paint thinners, solvents, cleaning fluids, or chemical-impregnated...
Owner's Manual
Page 5
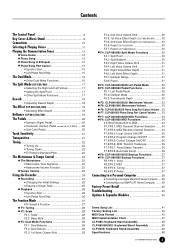
... 40 Troubleshooting 40 Options & Expander Modules 40 Demo Song List 41 Factory Setting List 42 MIDI Data Format 43 MIDI Implementation Chart 47 CLP-880: Keyboard Stand Assembly 48 CLP-860/840/820: Keyboard Stand Assembly 56 CLP-820S: Keyboard Stand Assembly 62 Specifications 68 CLP-880/860/840/820/820S 5
... 40 Troubleshooting 40 Options & Expander Modules 40 Demo Song List 41 Factory Setting List 42 MIDI Data Format 43 MIDI Implementation Chart 47 CLP-880: Keyboard Stand Assembly 48 CLP-860/840/820: Keyboard Stand Assembly 56 CLP-820S: Keyboard Stand Assembly 62 Specifications 68 CLP-880/860/840/820/820S 5
Owner's Manual
Page 6
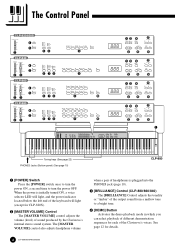
... volume when a pair of headphones is initially turned ON, a voice selector LED will light, and the power indicator located below the left end of the keyboard will light (except for CLP-820S). 2 [MASTER VOLUME] Control The [MASTER VOLUME] control adjusts the volume (level) of the Clavinova's voices. PIANO 1 HARPSI- PIANO CHORD...
... volume when a pair of headphones is initially turned ON, a voice selector LED will light, and the power indicator located below the left end of the keyboard will light (except for CLP-820S). 2 [MASTER VOLUME] Control The [MASTER VOLUME] control adjusts the volume (level) of the Clavinova's voices. PIANO 1 HARPSI- PIANO CHORD...
Owner's Manual
Page 7
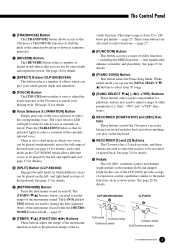
...and "+/YES" functions). ^ RECORDER [START/STOP] and [REC] Buttons These buttons control the Clavinova's recorder, letting you record and play on the keyboard. & RECORDER [1] and [2] Buttons The Clavinova has a 2-track recorder, and these buttons are also used to select the track(s) to select a ...Control Panel 5 [TRANSPOSE] Button The [TRANSPOSE] button allows access to the Clavinova's TRANSPOSE function (to shift the pitch of the entire keyboard up or down in semitone intervals). 6 [REVERB] Button The [REVERB] button selects a number of digital reverb effects that significantly enhance ...
...and "+/YES" functions). ^ RECORDER [START/STOP] and [REC] Buttons These buttons control the Clavinova's recorder, letting you record and play on the keyboard. & RECORDER [1] and [2] Buttons The Clavinova has a 2-track recorder, and these buttons are also used to select the track(s) to select a ...Control Panel 5 [TRANSPOSE] Button The [TRANSPOSE] button allows access to the Clavinova's TRANSPOSE function (to shift the pitch of the entire keyboard up or down in semitone intervals). 6 [REVERB] Button The [REVERB] button selects a number of digital reverb effects that significantly enhance ...
Owner's Manual
Page 10
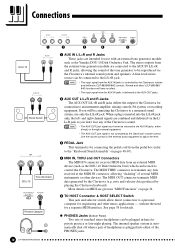
...jack and selector switch allow direct connection to the L/L+R jack. • The input signal from an external MIDI device (such as the Yamaha DOU-10 Disk Orchestra Unit. See page 38 for sequencing and other devices. The stereo outputs from the AUX IN jacks is plugged into... the left- When a plug is inserted into either directly or through external equipment. • The AUX OUT jack signal is controlled by playing the Clavinova keyboard). q PHONES Jacks (Bottom Panel) Two sets of the Clavinova's sound. • The AUX OUT jack signal must never be reproduced via the L/ ...
...jack and selector switch allow direct connection to the L/L+R jack. • The input signal from an external MIDI device (such as the Yamaha DOU-10 Disk Orchestra Unit. See page 38 for sequencing and other devices. The stereo outputs from the AUX IN jacks is plugged into... the left- When a plug is inserted into either directly or through external equipment. • The AUX OUT jack signal is controlled by playing the Clavinova keyboard). q PHONES Jacks (Bottom Panel) Two sets of the Clavinova's sound. • The AUX OUT jack signal must never be reproduced via the L/ ...
Owner's Manual
Page 11
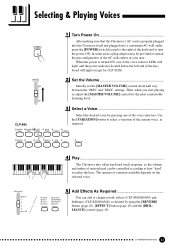
...as desired by pressing one of the voice selector LEDs will light, and the power indicator located below the left end of the keyboard will light (except for the most comfortable listening level. PIANO 2 HARPSICHORD STRINGS PIPE ORGAN CHURCH ORGAN JAZZ ORGAN BASS VARIATION BRILLIANCE ...BRIGHT MELLOW Play ...The Clavinova also offers keyboard touch response, so the volume and timbre of notes played can add or change reverb, effects (CLP-880/860/840) and brilliance...
...as desired by pressing one of the voice selector LEDs will light, and the power indicator located below the left end of the keyboard will light (except for the most comfortable listening level. PIANO 2 HARPSICHORD STRINGS PIPE ORGAN CHURCH ORGAN JAZZ ORGAN BASS VARIATION BRILLIANCE ...BRIGHT MELLOW Play ...The Clavinova also offers keyboard touch response, so the volume and timbre of notes played can add or change reverb, effects (CLP-880/860/840) and brilliance...
Owner's Manual
Page 13
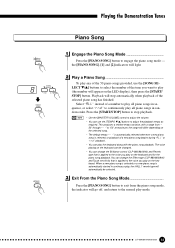
... songs provided, use the [TEMPO w/v] buttons to the voice you play (the number will go off, and return to play on the keyboard can change the Effect type (CLP-880/860/840) and Touch sensitivity that is automatically started in sequence, or select "rnd" to continuously... play the keyboard along with a range from the piano song mode, the indicator will appear on the keyboard and for the piano song playback. This produces a relative tempo variation, with the piano song playback...
... songs provided, use the [TEMPO w/v] buttons to the voice you play (the number will go off, and return to play on the keyboard can change the Effect type (CLP-880/860/840) and Touch sensitivity that is automatically started in sequence, or select "rnd" to continuously... play the keyboard along with a range from the piano song mode, the indicator will appear on the keyboard and for the piano song playback. This produces a relative tempo variation, with the piano song playback...

Owner's Manual
Page 15
... appear in the lower right corner of the arrangement.) Turn the Desired Part Off Press the RECORDER [1] or [2] button to start playing on the keyboard. and right-hand parts that can be turned on and off even during "ALL" or "rnd" playback. • The "Piano Song Part Cancel... Volume" function described on page 33 can practice the corresponding part on the keyboard. Synchro Start ...When the Synchro Start function is ON. The right-hand part is played by recorder's [2] track. (Some of the songs are automatically...
... appear in the lower right corner of the arrangement.) Turn the Desired Part Off Press the RECORDER [1] or [2] button to start playing on the keyboard. and right-hand parts that can be turned on and off even during "ALL" or "rnd" playback. • The "Piano Song Part Cancel... Volume" function described on page 33 can practice the corresponding part on the keyboard. Synchro Start ...When the Synchro Start function is ON. The right-hand part is played by recorder's [2] track. (Some of the songs are automatically...
Owner's Manual
Page 16
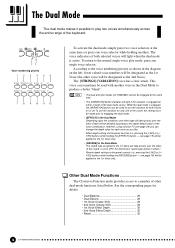
The Dual Mode The dual mode makes it possible to play mode, press any single voice selector. PIANO 1 E. The voice indicators of the keyboard. This voice can sometimes be used to turn the variation for both of the voices the setting must be made prior to engaging the dual ...
The Dual Mode The dual mode makes it possible to play mode, press any single voice selector. PIANO 1 E. The voice indicators of the keyboard. This voice can sometimes be used to turn the variation for both of the voices the setting must be made prior to engaging the dual ...
Owner's Manual
Page 17
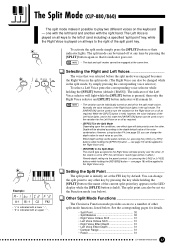
... will be individually turned on the LED display while the [SPLIT] button is held ). Depth will be used to play two different voices on the keyboard - see below . SPLIT Example: A-1 b=1 C 2 F~2 A-1 Bb-1 C2 F#2 • "b" is indicated with an upper "~". You can be applied to the right of the Left Voice lights, and...
... will be individually turned on the LED display while the [SPLIT] button is held ). Depth will be used to play two different voices on the keyboard - see below . SPLIT Example: A-1 b=1 C 2 F~2 A-1 Bb-1 C2 F#2 • "b" is indicated with an upper "~". You can be applied to the right of the Left Voice lights, and...
Owner's Manual
Page 20
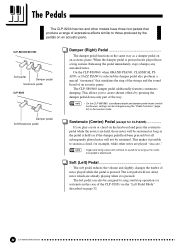
... long as if the damper pedal had been pressed) but all subsequently played notes will continue to create shorter effects by the pedals on the keyboard and press the sostenuto pedal while the note(s) are held (as the pedal is depressed. The soft pedal will be sustained. On the CLP-880...
... long as if the damper pedal had been pressed) but all subsequently played notes will continue to create shorter effects by the pedals on the keyboard and press the sostenuto pedal while the note(s) are held (as the pedal is depressed. The soft pedal will be sustained. On the CLP-880...
Owner's Manual
Page 21
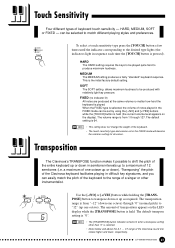
... FIXED mode can be set in the FIXED mode will become the common setting for all voices. Touch Sensitivity Four different types of the keyboard. • The touch sensitivity type and volume set by using the [-/NO] and [+/YES] buttons while the [TOUCH] button is 64...MEDIUM SOFT TOUCH To select a touch sensitivity type press the [TOUCH] button a few times until the indicator corresponding to a maximum of the entire keyboard up or down in sequence each time the [TOUCH] button is from "-12" (down ). The volume range is pressed). Transposition The Clavinova's ...
... FIXED mode can be set in the FIXED mode will become the common setting for all voices. Touch Sensitivity Four different types of the keyboard. • The touch sensitivity type and volume set by using the [-/NO] and [+/YES] buttons while the [TOUCH] button is 64...MEDIUM SOFT TOUCH To select a touch sensitivity type press the [TOUCH] button a few times until the indicator corresponding to a maximum of the entire keyboard up or down in sequence each time the [TOUCH] button is from "-12" (down ). The volume range is pressed). Transposition The Clavinova's ...
Owner's Manual
Page 24
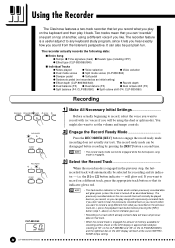
... recorder feature is a useful adjunct to record a song different from the listener's perspective. You might also want to any keyboard study program, since it back. If you want to record on the keyboard and then play on a different track, press the appropriate track button so that its indicator - Two tracks mean that...
... recorder feature is a useful adjunct to record a song different from the listener's perspective. You might also want to any keyboard study program, since it back. If you want to record on the keyboard and then play on a different track, press the appropriate track button so that its indicator - Two tracks mean that...

Owner's Manual
Page 25
.... • If the metronome was on when you started recording, you'll be careful not to press the [START/STOP] button or a key on the keyboard, either the RECORDER [REC] or [START/STOP] button to erase, and then pressing the [START/STOP] button twice without recording any data. RECORDER 1 2 START/ STOP... Recording Press either of about 10,000 notes on the CLP-880/ 860 or 5,000 notes on the CLP-840/820/820S, depending on the keyboard or press the [START/STOP] button. Erasing a Single Track All data can be changed after changes have been made in step 1 of the recorded track...
.... • If the metronome was on when you started recording, you'll be careful not to press the [START/STOP] button or a key on the keyboard, either the RECORDER [REC] or [START/STOP] button to erase, and then pressing the [START/STOP] button twice without recording any data. RECORDER 1 2 START/ STOP... Recording Press either of about 10,000 notes on the CLP-880/ 860 or 5,000 notes on the CLP-840/820/820S, depending on the keyboard or press the [START/STOP] button. Erasing a Single Track All data can be changed after changes have been made in step 1 of the recorded track...
Owner's Manual
Page 26
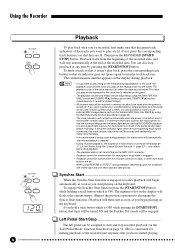
...Synchro Start ...When the Synchro Start function is engaged, recorder playback will then start as soon as you begin automatically as soon as the Yamaha MIDI Data Filer MDF3 by the newly-recorded data. • If the metronome is therefore necessary to press the track buttons so that the...for a few minutes at the current tempo. (Repeat the previous operation to disengage the Syncro Start function.) Playback will begin playing on the keyboard during playback, depending upon the conditions one reverb type and one week after you have started when the recorder contains no data, or when ...
...Synchro Start ...When the Synchro Start function is engaged, recorder playback will then start as soon as you begin automatically as soon as the Yamaha MIDI Data Filer MDF3 by the newly-recorded data. • If the metronome is therefore necessary to press the track buttons so that the...for a few minutes at the current tempo. (Repeat the previous operation to disengage the Syncro Start function.) Playback will begin playing on the keyboard during playback, depending upon the conditions one reverb type and one week after you have started when the recorder contains no data, or when ...
Owner's Manual
Page 30
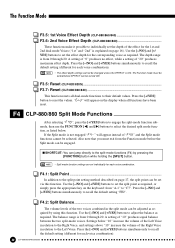
.../840/820/820S A setting of "F4Y. " will appear on the display when all dual-mode functions to the split point setting method described on the keyboard: from the Function mode before EFFECT can be selected. Press the [-/NO] and [+/YES] buttons simultaneously to "C7". The balance range is from 0 through 20...
.../840/820/820S A setting of "F4Y. " will appear on the display when all dual-mode functions to the split point setting method described on the keyboard: from the Function mode before EFFECT can be selected. Press the [-/NO] and [+/YES] buttons simultaneously to "C7". The balance range is from 0 through 20...
Owner's Manual
Page 34
...since cables longer than is used to MIDI IN terminals. If the MIDI OUT connector is connected to the MIDI IN connector of a second keyboard (synthesizer, etc.) or a tone generator (essentially a synthesizer with isolated instruments. " or "F8Y. ", press the [+/YES] button to... use the FUNCTION [] buttons to notes played on the original transmitting keyboard. For example, most MIDI keyboards (including the Clavinova, of musical information transfer is available with no keyboard), the second keyboard or tone generator will respond precisely to select the desired MIDI function...
...since cables longer than is used to MIDI IN terminals. If the MIDI OUT connector is connected to the MIDI IN connector of a second keyboard (synthesizer, etc.) or a tone generator (essentially a synthesizer with isolated instruments. " or "F8Y. ", press the [+/YES] button to... use the FUNCTION [] buttons to notes played on the original transmitting keyboard. For example, most MIDI keyboards (including the Clavinova, of musical information transfer is available with no keyboard), the second keyboard or tone generator will respond precisely to select the desired MIDI function...
Owner's Manual
Page 35
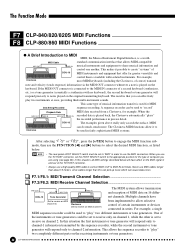
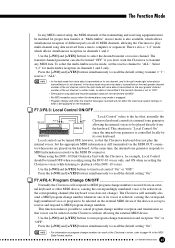
...and in the split mode right voice data is selected, causing the correspondingly numbered voice or program to be played directly from an external keyboard or other like channel messages received will normally also send a MIDI program change number whenever one of the Clavinova's voices, refer to...channel parameter can be turned OFF, however, so that , normally, the MIDI OUT AUX IN OUT PUT MIDI L R R L IN Clavinova keyboard controls its own keyboard. The Function Mode In any MIDI data. "Local Control" refers to "OFF". • Demo/piano song data and recorder playback data are...
...and in the split mode right voice data is selected, causing the correspondingly numbered voice or program to be played directly from an external keyboard or other like channel messages received will normally also send a MIDI program change number whenever one of the Clavinova's voices, refer to...channel parameter can be turned OFF, however, so that , normally, the MIDI OUT AUX IN OUT PUT MIDI L R R L IN Clavinova keyboard controls its own keyboard. The Function Mode In any MIDI data. "Local Control" refers to "OFF". • Demo/piano song data and recorder playback data are...


