
Installation Manual: YSP-4100/5100
Page 1
... service required to restore proper operation will not be covered under the Yamaha Limited Warranty. Then, press & hold that button, power on using any other data file except those provided directly from the Yamaha website. The following firmware update to ensure the best possible performance and features for your Yamaha Sound Projector using the remote controller. Create an update disc (Audio CD) 2. Connect digital audio with optical or coaxial digital audio connection *Note) CD PLAYER IS PREFERRED. Enter firmware update mode...
... service required to restore proper operation will not be covered under the Yamaha Limited Warranty. Then, press & hold that button, power on using any other data file except those provided directly from the Yamaha website. The following firmware update to ensure the best possible performance and features for your Yamaha Sound Projector using the remote controller. Create an update disc (Audio CD) 2. Connect digital audio with optical or coaxial digital audio connection *Note) CD PLAYER IS PREFERRED. Enter firmware update mode...
Installation Manual: YSP-4100/5100
Page 2
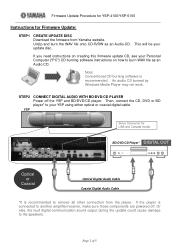
... another amplifier/receiver, make sure those components are powered off the YSP and BD/DVD/CD player. Sirius Connector for Firmware Update: STEP1 CREATE UPDATE DISC Download the firmware from the player. Firmware Update Procedure for YSP-4100/YSP-5100 Instructions for USA and Canada model DIGITAL IN BD/DVD/CD Player* DIGITAL OUT Optical or Coaxial Optical Digital Audio Cable Coaxial Digital Audio Cable *It is recommended to your Personal Computer ("PC") CD burning software instructions on how to the speakers. STEP2 YSP CONNECT DIGITAL AUDIO...
... another amplifier/receiver, make sure those components are powered off the YSP and BD/DVD/CD player. Sirius Connector for Firmware Update: STEP1 CREATE UPDATE DISC Download the firmware from the player. Firmware Update Procedure for YSP-4100/YSP-5100 Instructions for USA and Canada model DIGITAL IN BD/DVD/CD Player* DIGITAL OUT Optical or Coaxial Optical Digital Audio Cable Coaxial Digital Audio Cable *It is recommended to your Personal Computer ("PC") CD burning software instructions on how to the speakers. STEP2 YSP CONNECT DIGITAL AUDIO...

Installation Manual: YSP-4100/5100
Page 3
... (Audio CD) on the BD/DVD/CD player. In case display doesn't change after 10 seconds, power off and retry the update process again from the beginning or check requirements for YSP-4100/YSP-5100 INPUT VOLUME VOLUME + STEP3 ENTER FIRMWARE UPDATE MODE Confirm that button, power on . When completed, "Update Success", "Please..." Press the [ ] button on the YSP to factory default. Press and hold the [INPUT] button and power on using the remote controller. Rapidly changing numbers...
... (Audio CD) on the BD/DVD/CD player. In case display doesn't change after 10 seconds, power off and retry the update process again from the beginning or check requirements for YSP-4100/YSP-5100 INPUT VOLUME VOLUME + STEP3 ENTER FIRMWARE UPDATE MODE Confirm that button, power on . When completed, "Update Success", "Please..." Press the [ ] button on the YSP to factory default. Press and hold the [INPUT] button and power on using the remote controller. Rapidly changing numbers...
Installation Manual: YSP-4100/5100
Page 4
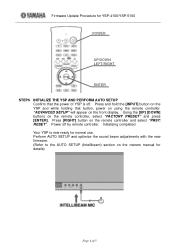
... front display. Perform AUTO SETUP and optimize the sound beam adjustments with the new firmware. (Refer to the AUTO SETUP (Intellibeam) section on the owners manual for normal use. Press [RIGHT] button on using the remote controller. Initializing completed. Firmware Update Procedure for YSP-4100/YSP-5100 POWER UP/DOWN LEFT/RIGHT ENTER STEP6 INITIALIZE THE YSP AND PERFORM AUTO SETUP Confirm that button, power on the remote controller and select "PRST: RESET". Press and hold the [INPUT] button...
... front display. Perform AUTO SETUP and optimize the sound beam adjustments with the new firmware. (Refer to the AUTO SETUP (Intellibeam) section on the owners manual for normal use. Press [RIGHT] button on using the remote controller. Initializing completed. Firmware Update Procedure for YSP-4100/YSP-5100 POWER UP/DOWN LEFT/RIGHT ENTER STEP6 INITIALIZE THE YSP AND PERFORM AUTO SETUP Confirm that button, power on the remote controller and select "PRST: RESET". Press and hold the [INPUT] button...
Installation Manual: YSP-4100/5100
Page 5
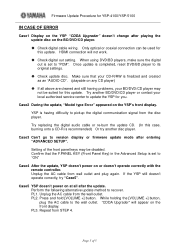
...'t power on the front display. PL1. "CDDA Upgrader" will not work. ‹ Check digital out setting. Case3 Can't go to update the YSP for this case, burning onto a CD-R is set to pickup the digital communication signal from STEP 4. Setting of 5 Unplug the AC cable from wall outlet and plug again. PL3. HDMI connection will appear on or doesn't operate correctly with the remote controller. When using DVD/BD players, make...
...'t power on the front display. PL1. "CDDA Upgrader" will not work. ‹ Check digital out setting. Case3 Can't go to update the YSP for this case, burning onto a CD-R is set to pickup the digital communication signal from STEP 4. Setting of 5 Unplug the AC cable from wall outlet and plug again. PL3. HDMI connection will appear on or doesn't operate correctly with the remote controller. When using DVD/BD players, make...


