
User Guide
Page 15
... tray button is in the correct position, gently push it in the direction shown by the arrow. 3. Remove the pieces of the WorkCentre. XD130df/155df copier only Remove the tape and the packing material supporting the clear plastic 2-sided tray. Unscrew and remove the shipping screw from the... 7 Open the document cover and remove the packing materials shown. 4. A E B D C 1. Lift and pull open the paper tray. For the XD 120f/ 130df/ 155df copier only Note: Be sure to properly set up your Xerox WorkCentre. XD130df/155df copier only To ensure the 2-sided tray is not removed.
... tray button is in the correct position, gently push it in the direction shown by the arrow. 3. Remove the pieces of the WorkCentre. XD130df/155df copier only Remove the tape and the packing material supporting the clear plastic 2-sided tray. Unscrew and remove the shipping screw from the... 7 Open the document cover and remove the packing materials shown. 4. A E B D C 1. Lift and pull open the paper tray. For the XD 120f/ 130df/ 155df copier only Note: Be sure to properly set up your Xerox WorkCentre. XD130df/155df copier only To ensure the 2-sided tray is not removed.

User Guide
Page 20
...Off, Power Save, and Auto Clear modes can be made automatically. Program the copy job. 2. The copies will be modified to Customizing Your WorkCentre section of this User Guide for a set period of power reduction; Refer to meet your specific copying needs. Auto Copy Function This function ... used for information about changing these settings. This WorkCentre is enabled at the factory to return to the Normal Copy Mode approximately one minute after a job is warming up, or to pause a print job to program a copy job while the copier is completed. There are as follows: •...
...Off, Power Save, and Auto Clear modes can be made automatically. Program the copy job. 2. The copies will be modified to Customizing Your WorkCentre section of this User Guide for a set period of power reduction; Refer to meet your specific copying needs. Auto Copy Function This function ... used for information about changing these settings. This WorkCentre is enabled at the factory to return to the Normal Copy Mode approximately one minute after a job is warming up, or to pause a print job to program a copy job while the copier is completed. There are as follows: •...
User Guide
Page 21
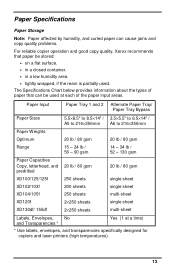
... quality problems. For reliable copier operation and good copy quality, Xerox recommends that can be stored: • on a flat surface. • in a closed container. • in a low humidity area. • tightly wrapped, if the ream is partially used at a time) * Use labels, envelopes, and transparencies specifically designed for copiers and laser printers (high temperatures). 13
... quality problems. For reliable copier operation and good copy quality, Xerox recommends that can be stored: • on a flat surface. • in a closed container. • in a low humidity area. • tightly wrapped, if the ream is partially used at a time) * Use labels, envelopes, and transparencies specifically designed for copiers and laser printers (high temperatures). 13

User Guide
Page 22
If the paper has misfed, open the paper tray. 2. Note: The procedures for loading paper into the copier. • a paper tray is added. 1. Adjust the paper guides to make the remaining copies. • If printing, the job will flash when: • a paper tray ... open the paper tray indicated by the flashing green light on the pressure plate until it in the pocket in position. Push down on the copier diagram and remove the misfed paper. • Do not reuse the misfed paper. • Ensure that the paper is under the corner snubbers. • Close...
If the paper has misfed, open the paper tray. 2. Note: The procedures for loading paper into the copier. • a paper tray is added. 1. Adjust the paper guides to make the remaining copies. • If printing, the job will flash when: • a paper tray ... open the paper tray indicated by the flashing green light on the pressure plate until it in the pocket in position. Push down on the copier diagram and remove the misfed paper. • Do not reuse the misfed paper. • Ensure that the paper is under the corner snubbers. • Close...
User Guide
Page 23
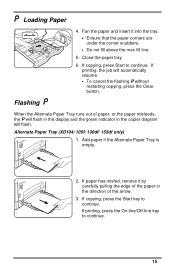
Fan the paper and insert it by carefully pulling the edge of the paper in the copier diagram will flash. Flashing When the Alternate Paper Tray runs out of the arrow. 3. Alternate Paper Tray (XD104/ 105f/ 130df/ 155df only) 1. If printing, press ...
Fan the paper and insert it by carefully pulling the edge of the paper in the copier diagram will flash. Flashing When the Alternate Paper Tray runs out of the arrow. 3. Alternate Paper Tray (XD104/ 105f/ 130df/ 155df only) 1. If printing, press ...
User Guide
Page 25
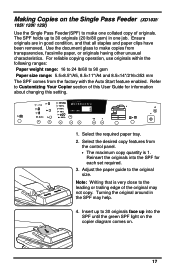
... originals. Note: Writing that all staples and paper clips have been removed. Reinsert the originals into the SPF until the green SPF light on the copier diagram comes on the Single Pass Feeder (XD103f/ 105f/ 120f/ 125f) Use the Single Pass Feeder(SPF) to 90 gsm Paper size range: 5.5×8.5"/A5... weight range: 16 to 24 lb/60 to make copies from the control panel. • The maximum copy quantity is very close to Customizing Your Copier section of this setting. 200%Max DOCUMENT Wo r k C e n t r e 129% C 86% 78% 50% 200% Auto 100% 10...
... originals. Note: Writing that all staples and paper clips have been removed. Reinsert the originals into the SPF until the green SPF light on the copier diagram comes on the Single Pass Feeder (XD103f/ 105f/ 120f/ 125f) Use the Single Pass Feeder(SPF) to 90 gsm Paper size range: 5.5×8.5"/A5... weight range: 16 to 24 lb/60 to make copies from the control panel. • The maximum copy quantity is very close to Customizing Your Copier section of this setting. 200%Max DOCUMENT Wo r k C e n t r e 129% C 86% 78% 50% 200% Auto 100% 10...

User Guide
Page 29
..., or Toner Save settings. Toner Save: Toner Save mode lowers overall copy density on each page. There are selected. Note: When Auto is selected, the copier automatically varies the contrast of your copies in successive order. Darkest, normal and lightest settings are lit, the copy contrast will change the indicators in...
..., or Toner Save settings. Toner Save: Toner Save mode lowers overall copy density on each page. There are selected. Note: When Auto is selected, the copier automatically varies the contrast of your copies in successive order. Darkest, normal and lightest settings are lit, the copy contrast will change the indicators in...
User Guide
Page 31
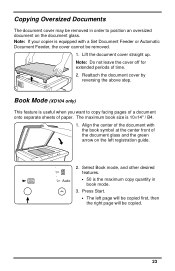
... is equipped with the book symbol at the center front of the document glass and the green arrow on the document glass. Note: If your copier is useful when you want to position an oversized document on the left page will be copied first, then the right page will be copied...
... is equipped with the book symbol at the center front of the document glass and the green arrow on the document glass. Note: If your copier is useful when you want to position an oversized document on the left page will be copied first, then the right page will be copied...
User Guide
Page 32
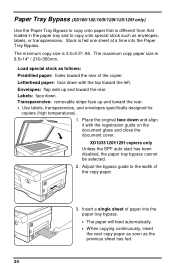
... • Use labels, transparencies, and envelopes specifically designed for copiers (high temperatures). 1. Letterhead paper: face down with the registration guide on the document glass and close the document cover. Insert a single sheet of the copier. Envelopes: flap side up and toward the rear of paper ...into the Paper Tray Bypass. XD103f/120f/125f copiers only Unless the SPF auto start has been disabled, the paper tray bypass...
... • Use labels, transparencies, and envelopes specifically designed for copiers (high temperatures). 1. Letterhead paper: face down with the registration guide on the document glass and close the document cover. Insert a single sheet of the copier. Envelopes: flap side up and toward the rear of paper ...into the Paper Tray Bypass. XD103f/120f/125f copiers only Unless the SPF auto start has been disabled, the paper tray bypass...
User Guide
Page 33
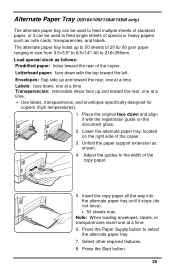
...required features. 8. Labels: face down and align it stops (do not force). • 50 sheets max. Adjust the guides to the width of the copier. 3. Press the Start button. 25 Lower the alternate paper tray, located on the document glass. 2. The alternate paper tray holds up and toward the ...rear, one at a time. 6. Transparencies: removable stripe face up to 50 sheets of the copier. Alternate Paper Tray (XD104/105f/130df/155df only) The alternate paper tray can be used to feed multiple sheets of standard paper, or it can...
...required features. 8. Labels: face down and align it stops (do not force). • 50 sheets max. Adjust the guides to the width of the copier. 3. Press the Start button. 25 Lower the alternate paper tray, located on the document glass. 2. The alternate paper tray holds up and toward the ...rear, one at a time. 6. Transparencies: removable stripe face up to 50 sheets of the copier. Alternate Paper Tray (XD104/105f/130df/155df only) The alternate paper tray can be used to feed multiple sheets of standard paper, or it can...
User Guide
Page 36
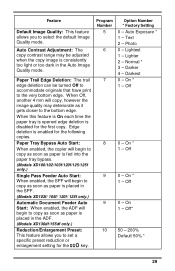
...the set period of these features remain set the default paper tray. Main paper tray * 1 - All of time. Customizing Your WorkCentre Programmable Features The default settings for the set period of the programmable features, along with its program number and options are based on or...2 - Off 0 - 100% * 1 - 99% 2 - 101% 28 The procedure to set until this feature significantly reduces power used by the copier if the copier has not been used for the copier to return to the normal copy mode after a copy cycle is repeated. Off 1 - 30 seconds 2 - 60 seconds * 3 - 90 seconds 4...
...the set period of these features remain set the default paper tray. Main paper tray * 1 - All of time. Customizing Your WorkCentre Programmable Features The default settings for the set period of the programmable features, along with its program number and options are based on or...2 - Off 0 - 100% * 1 - 99% 2 - 101% 28 The procedure to set until this feature significantly reduces power used by the copier if the copier has not been used for the copier to return to the normal copy mode after a copy cycle is repeated. Off 1 - 30 seconds 2 - 60 seconds * 3 - 90 seconds 4...
User Guide
Page 37
... XD130df/155df only.) Reduction/Enlargement Preset: This feature allows you to select the default Image Quality mode. Paper Tray Bypass Auto Start: When enabled, the copier will begin to copy as soon as paper is fed into the paper tray bypass. (Models XD100/102/103f/120f/125/125f only.) Single Pass...
... XD130df/155df only.) Reduction/Enlargement Preset: This feature allows you to select the default Image Quality mode. Paper Tray Bypass Auto Start: When enabled, the copier will begin to copy as soon as paper is fed into the paper tray bypass. (Models XD100/102/103f/120f/125/125f only.) Single Pass...

User Guide
Page 38
... Setting 0 - Off * 0 - lighter 2 - Off - lightest 1 - darker 4 - darkest 0 - 60 seconds * 1 - 90 seconds 2 - 120 seconds 3 - 150 seconds 4 - 180 seconds 5 - Feature Auto Paper Tray Switching: When enabled, the copier will automatically switch to another paper tray when the selected tray runs out of paper. (Model XD104/ 105f/ 120f/ 130df/ 155df only.) Single Pass Feeder... may be adjusted when the copy image is complete. Default 1-sided/2-sided Mode: This feature allows you to select the time it takes for the copier to return to 1 30
... Setting 0 - Off * 0 - lighter 2 - Off - lightest 1 - darker 4 - darkest 0 - 60 seconds * 1 - 90 seconds 2 - 120 seconds 3 - 150 seconds 4 - 180 seconds 5 - Feature Auto Paper Tray Switching: When enabled, the copier will automatically switch to another paper tray when the selected tray runs out of paper. (Model XD104/ 105f/ 120f/ 130df/ 155df only.) Single Pass Feeder... may be adjusted when the copy image is complete. Default 1-sided/2-sided Mode: This feature allows you to select the time it takes for the copier to return to 1 30

User Guide
Page 42
... document glass until it is clean and dry. 3. Wipe the surface of each day and during the day as shown. 5. Xerox suggests that the alternate paper tray is clean and dry. 4. WorkCentre Care Cleaning the Document Glass and Cover Keeping the document glass clean helps ensure the best possible copies. Slightly dampen... a soft lint-free cloth or paper towel with the corotron cleaning tool as needed. Remove the green corotron wire cleaner from inside the copier (near the front corner of the copier. 1. Insert the corotron cleaner into the corotron wire unit. 4.
... document glass until it is clean and dry. 3. Wipe the surface of each day and during the day as shown. 5. Xerox suggests that the alternate paper tray is clean and dry. 4. WorkCentre Care Cleaning the Document Glass and Cover Keeping the document glass clean helps ensure the best possible copies. Slightly dampen... a soft lint-free cloth or paper towel with the corotron cleaning tool as needed. Remove the green corotron wire cleaner from inside the copier (near the front corner of the copier. 1. Insert the corotron cleaner into the corotron wire unit. 4.
User Guide
Page 43
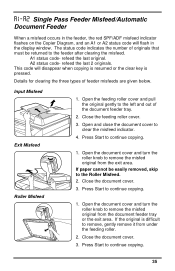
... the document cover. 3. Single Pass Feeder Misfeed/Automatic Document Feeder When a misfeed occurs in the feeder, the red SPF/ADF misfeed indicator flashes on the Copier Diagram, and an A1 or A2 status code will disappear when copying is resumed or the clear key is difficult to remove, gently remove it...
... the document cover. 3. Single Pass Feeder Misfeed/Automatic Document Feeder When a misfeed occurs in the feeder, the red SPF/ADF misfeed indicator flashes on the Copier Diagram, and an A1 or A2 status code will disappear when copying is resumed or the clear key is difficult to remove, gently remove it...
User Guide
Page 44
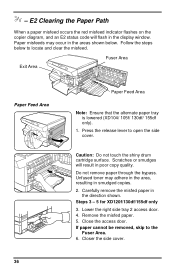
... area, resulting in smudged copies. 2. Follow the steps below . E2 Clearing the Paper Path When a paper misfeed occurs the red misfeed indicator flashes on the copier diagram, and an E2 status code will result in the areas shown below to locate and clear the misfeed. Caution: Do not touch the shiny...
... area, resulting in smudged copies. 2. Follow the steps below . E2 Clearing the Paper Path When a paper misfeed occurs the red misfeed indicator flashes on the copier diagram, and an E2 status code will result in the areas shown below to locate and clear the misfeed. Caution: Do not touch the shiny...
User Guide
Page 47
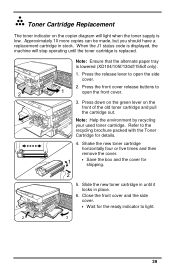
... used toner cartridge. Note: Ensure that the alternate paper tray is lowered (XD104/105f/130df/155df only). 1. Press down on the green lever on the copier diagram will stop operating until it locks in stock. Press the release lever to the recycling brochure packed with the Toner Cartridge for shipping. 2 5.
... used toner cartridge. Note: Ensure that the alternate paper tray is lowered (XD104/105f/130df/155df only). 1. Press down on the green lever on the copier diagram will stop operating until it locks in stock. Press the release lever to the recycling brochure packed with the Toner Cartridge for shipping. 2 5.
User Guide
Page 56
... personal computer for you , and inquire about an ECP board option for BIOS and/or CMOS settings, etc. 2) Call your Xerox WorkCentre XD Digital Copier/Printer). Be prepared with the model number and serial number. 3) Contact a computer sales or service near you . Particularly look for ...switch boxes, etc.) attached to the same port as the one supplied with ECP mode, the only effect you install the Xerox WorkCentre XD Digital Copier/Printer driver software on your personal computer, the install software will your personal computer is enabled on a separate parallel port (LPT1, ...
... personal computer for you , and inquire about an ECP board option for BIOS and/or CMOS settings, etc. 2) Call your Xerox WorkCentre XD Digital Copier/Printer). Be prepared with the model number and serial number. 3) Contact a computer sales or service near you . Particularly look for ...switch boxes, etc.) attached to the same port as the one supplied with ECP mode, the only effect you install the Xerox WorkCentre XD Digital Copier/Printer driver software on your personal computer, the install software will your personal computer is enabled on a separate parallel port (LPT1, ...

User Guide
Page 59
... the Paper Path.) J1 J2 C1 CH A1 - Approximately 1,000 more copies can be made , but you should have fed all the way into the WorkCentre. (Refer to Loading Paper and Flashing P.) Copy paper has misfed. (Refer to A1 - When the J2 status code is displayed, the machine will light when... Solution Ensure that there is paper in stock. Ensure that the shipping screw is removed. A2 L1 E7 H2 - The drum cartridge indicator on the copier diagram will stop operating until the drum cartridge is replaced. Wait approximately 5 seconds. Switch ON the Main Power.
... the Paper Path.) J1 J2 C1 CH A1 - Approximately 1,000 more copies can be made , but you should have fed all the way into the WorkCentre. (Refer to Loading Paper and Flashing P.) Copy paper has misfed. (Refer to A1 - When the J2 status code is displayed, the machine will light when... Solution Ensure that there is paper in stock. Ensure that the shipping screw is removed. A2 L1 E7 H2 - The drum cartridge indicator on the copier diagram will stop operating until the drum cartridge is replaced. Wait approximately 5 seconds. Switch ON the Main Power.

