
User Guide
Page 7
... Rubber Pad 8.13 Chapter 9: TROUBLESHOOTING Clearing Document Jams 9.2 Input Misfeed 9.2 Exit Misfeed 9.3 Roller Misfeed 9.4 Clearing Paper Jams 9.5 In Tray 1 9.5 In Optional Tray 2 9.7 In the Fuser Area or Around the Toner Cartridge .......... 9.8 In the Paper Exit Area 9.9 In the Bypass Tray 9.11 Tips for Avoiding Paper Jams 9.12 Clearing LCD Error...9.17 Printing Problems 9.18 Printing Quality Problems 9.21 Copying Problems 9.26 Scanning Problems 9.27 Fax Problems 9.28 Common Linux Problems 9.30 Troubleshooting PS Errors (WorkCentre PE120i Only 9.33 Common Macintosh Problems...
... Rubber Pad 8.13 Chapter 9: TROUBLESHOOTING Clearing Document Jams 9.2 Input Misfeed 9.2 Exit Misfeed 9.3 Roller Misfeed 9.4 Clearing Paper Jams 9.5 In Tray 1 9.5 In Optional Tray 2 9.7 In the Fuser Area or Around the Toner Cartridge .......... 9.8 In the Paper Exit Area 9.9 In the Bypass Tray 9.11 Tips for Avoiding Paper Jams 9.12 Clearing LCD Error...9.17 Printing Problems 9.18 Printing Quality Problems 9.21 Copying Problems 9.26 Scanning Problems 9.27 Fax Problems 9.28 Common Linux Problems 9.30 Troubleshooting PS Errors (WorkCentre PE120i Only 9.33 Common Macintosh Problems...

User Guide
Page 11
...may call the following number: EUROPE +44 (0) 1707 353434 USA/CANADA 1 800 828 6571 ix Never use materials specifically designated for this XEROX product or XEROX supplied materials you may touch dangerous voltage points or short out parts which could create a hazardous situation. Keep all supplies and materials out... heat register. The product should not be placed in a built-in a fire or electric shock. Never push objects of any kind into the fuser area, located just inside the exit tray area, as they were intended. Never spill liquid of any kind on an unstable cart, stand or...
...may call the following number: EUROPE +44 (0) 1707 353434 USA/CANADA 1 800 828 6571 ix Never use materials specifically designated for this XEROX product or XEROX supplied materials you may touch dangerous voltage points or short out parts which could create a hazardous situation. Keep all supplies and materials out... heat register. The product should not be placed in a built-in a fire or electric shock. Never push objects of any kind into the fuser area, located just inside the exit tray area, as they were intended. Never spill liquid of any kind on an unstable cart, stand or...

User Guide
Page 41
Getting Started 2.15 2 Press the power switch to burn your fingers when you may receive an electric shock. Take care not to turn the machine on . "Warming Up Please Wait" appears on the display indicating that the machine is now on. 2 To the AC wall jack To view your machine becomes very hot when in another language, see page 2.16. If you do, you access this area. • Do not disassemble the machine with power on . CAUTIONS: • The fuser area inside the rear door of your display text in use.
Getting Started 2.15 2 Press the power switch to burn your fingers when you may receive an electric shock. Take care not to turn the machine on . "Warming Up Please Wait" appears on the display indicating that the machine is now on. 2 To the AC wall jack To view your machine becomes very hot when in another language, see page 2.16. If you do, you access this area. • Do not disassemble the machine with power on . CAUTIONS: • The fuser area inside the rear door of your display text in use.

User Guide
Page 77
...-sized paper • postcards • transparencies To use . Take care not to the rear output slot provides a straight paper path. Paper Handling 3.11 CAUTION: The fuser area inside the rear door of the machine face up ) Using the rear output slot, paper comes out of your fingers when you access this...
...-sized paper • postcards • transparencies To use . Take care not to the rear output slot provides a straight paper path. Paper Handling 3.11 CAUTION: The fuser area inside the rear door of the machine face up ) Using the rear output slot, paper comes out of your fingers when you access this...
User Guide
Page 178
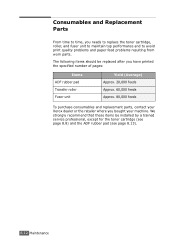
...We strongly recommend that these items be replaced after you have printed the specified number of pages: Items ADF rubber pad Transfer roller Fuser unit Yield (Average) Approx. 20,000 feeds Approx. 60,000 feeds Approx. 80,000 feeds To purchase consumables and replacement parts, contact ...your Xerox dealer or the retailer where you needs to replace the toner cartridge, roller, and fuser unit to maintain top performance and to avoid print quality problems and paper feed problems resulting from...
...We strongly recommend that these items be replaced after you have printed the specified number of pages: Items ADF rubber pad Transfer roller Fuser unit Yield (Average) Approx. 20,000 feeds Approx. 60,000 feeds Approx. 80,000 feeds To purchase consumables and replacement parts, contact ...your Xerox dealer or the retailer where you needs to replace the toner cartridge, roller, and fuser unit to maintain top performance and to avoid print quality problems and paper feed problems resulting from...

User Guide
Page 185
.../Close Door [Paper Jam 1] Open/Close Door [Paper Jam 2] Check Inside Bypass Jam Location of Jam In the paper tray (Tray 1 or Tray 2) In the fuser area or around the toner cartridge. Clearing Paper Jams When a paper jam occurs, "Paper Jam" appears on the display. If the paper does not exit...
.../Close Door [Paper Jam 1] Open/Close Door [Paper Jam 2] Check Inside Bypass Jam Location of Jam In the paper tray (Tray 1 or Tray 2) In the fuser area or around the toner cartridge. Clearing Paper Jams When a paper jam occurs, "Paper Jam" appears on the display. If the paper does not exit...

User Guide
Page 186
3 Remove the jammed paper by gently pulling it snaps into the machine until it straight out. See page 9.8. 4 Insert the paper tray into place. 5 Open and close the front door to resume printing. 9.6 Troubleshooting If there is any resistance and the paper does not move when you pull, or if you cannot see the paper in this area, check the fuser area around the toner cartridge.
3 Remove the jammed paper by gently pulling it snaps into the machine until it straight out. See page 9.8. 4 Insert the paper tray into place. 5 Open and close the front door to resume printing. 9.6 Troubleshooting If there is any resistance and the paper does not move when you pull, or if you cannot see the paper in this area, check the fuser area around the toner cartridge.

User Guide
Page 188
In the Fuser Area or Around the Toner Cartridge NOTE: The fuser area is hot. Take care when removing paper from the machine. 1 Remove paper from back by opening the back door cover and pulling it out of the fuser. 2 Open the front door and pull the toner cartridge out, lightly pushing it down. 3 Remove the jammed paper by gently pulling it straight out. 9.8 Troubleshooting
In the Fuser Area or Around the Toner Cartridge NOTE: The fuser area is hot. Take care when removing paper from the machine. 1 Remove paper from back by opening the back door cover and pulling it out of the fuser. 2 Open the front door and pull the toner cartridge out, lightly pushing it down. 3 Remove the jammed paper by gently pulling it straight out. 9.8 Troubleshooting

User Guide
Page 193
... Jam The loaded document has jammed in the Bypass tray correctly. See page 9.2. 9 (Automatic Document Feeder). [Door Open] The front door is a problem in the fuser unit. Unplug the power cord and plug it locks into memory. See page 9.11. Cancel unnecessary delayed fax job. Enter the correct item again. [Low...
... Jam The loaded document has jammed in the Bypass tray correctly. See page 9.2. 9 (Automatic Document Feeder). [Door Open] The front door is a problem in the fuser unit. Unplug the power cord and plug it locks into memory. See page 9.11. Cancel unnecessary delayed fax job. Enter the correct item again. [Low...

User Guide
Page 194
... hour or so for the line to clear and try again. Or, turn the ECM mode on. A problem has occurred in the fuser area. Paper has jammed in the LSU (Laser Scanning Unit). See page 2.5. Unplug the power cord and plug it back in. Or, the toner cartridge is already engaged. Load...
... hour or so for the line to clear and try again. Or, turn the ECM mode on. A problem has occurred in the fuser area. Paper has jammed in the LSU (Laser Scanning Unit). See page 2.5. Unplug the power cord and plug it back in. Or, the toner cartridge is already engaged. Load...

User Guide
Page 195
... page 9.7. [Paper Jam 1] Open/Close Door Paper has jammed in the feeding area of the job in the paper tray. See page 9.8. fuser area. Memory Full The memory is operational. Clear the jam. fax job. If you tried to be deleted the number for a delayed and try...display should indicate them in the paper tray has run out. Delete unnecessary documents and retransmit after several redial attempts. You must use a Xerox approved cartridge. [No Paper] Add Paper The paper in Standby mode; Load paper in memory are sent. Make sure that the receiving machine...
... page 9.7. [Paper Jam 1] Open/Close Door Paper has jammed in the feeding area of the job in the paper tray. See page 9.8. fuser area. Memory Full The memory is operational. Clear the jam. fax job. If you tried to be deleted the number for a delayed and try...display should indicate them in the paper tray has run out. Delete unnecessary documents and retransmit after several redial attempts. You must use a Xerox approved cartridge. [No Paper] Add Paper The paper in Standby mode; Load paper in memory are sent. Make sure that the receiving machine...

User Guide
Page 202
... shading. • Remove the old toner cartridge and install a new one . Contact a service representative. 9.22 Troubleshooting If white vertical streaks appear on page 8.8. • The fuser may be dirty. See "Paper Specifications" on page 8.3. • Check the paper type and quality. If the amount of the machine. See "Cleaning the Inside...
... shading. • Remove the old toner cartridge and install a new one . Contact a service representative. 9.22 Troubleshooting If white vertical streaks appear on page 8.8. • The fuser may be dirty. See "Paper Specifications" on page 8.3. • Check the paper type and quality. If the amount of the machine. See "Cleaning the Inside...

User Guide
Page 203
... are improperly formed and producing a wavy effect, the LSV may have toner on them. Troubleshooting 9.23 Try printing with a different A batch of 77.8 mm, the fuser may be damaged. Condition Suggested solutions Vertical repetitive defects AaBbCc AaBbCc AaBbCc AaBbCc AaBbCc If marks repeatedly appear on the printed side of the page...
... are improperly formed and producing a wavy effect, the LSV may have toner on them. Troubleshooting 9.23 Try printing with a different A batch of 77.8 mm, the fuser may be damaged. Condition Suggested solutions Vertical repetitive defects AaBbCc AaBbCc AaBbCc AaBbCc AaBbCc If marks repeatedly appear on the printed side of the page...

User Guide
Page 205
See "Paper Specifications" on page E.6. • Try a different paper type. Contact a service representative. • Fuser may be defective. Remove the paper and turn it . Remove the toner AaBbCc cartridge and install a new one . Contact a service representative. Curl If the printed ...
See "Paper Specifications" on page E.6. • Try a different paper type. Contact a service representative. • Fuser may be defective. Remove the paper and turn it . Remove the toner AaBbCc cartridge and install a new one . Contact a service representative. Curl If the printed ...

User Guide
Page 278
... the machine. Envelopes with the heat and pressure in .) NOTES: • Use only the manual feeder to print envelopes. • You may even damage the fuser. Please refer to seal must use envelopes within the following gives typical address margins for a commercial #10 or DL envelope.
... the machine. Envelopes with the heat and pressure in .) NOTES: • Use only the manual feeder to print envelopes. • You may even damage the fuser. Please refer to seal must use envelopes within the following gives typical address margins for a commercial #10 or DL envelope.


