
Service Manual
Page 15
... Cartridge 2-10 Laser Scan Unit (LSU 2-10 Transfer Roller 2-11 Fuser Assembly 2-11 Paper Feed Drive 2-11 Paper Out Sensor 2-11 Paper Feed Sequence 2-12 Registration Sensor 2-12 Paper Transport 2-12 Fuser Exit Sensor 2-13 Duplex Unit 2-13 3 Error Messages and Codes Introduction 3-2 Servicing Instructions 3-4 Using the Troubleshooting Procedures 3-5 General...". . 4-3 Front Panel Continually Displays "No Paper in Tray [x 4-3 Front Panel Continually Displays "Output Tray Is Full 4-4 Paper Size Switch Assembly 4-4 Power Supply Troubleshooting 4-5 xiv Phaser 3450 Laser Printer
... Cartridge 2-10 Laser Scan Unit (LSU 2-10 Transfer Roller 2-11 Fuser Assembly 2-11 Paper Feed Drive 2-11 Paper Out Sensor 2-11 Paper Feed Sequence 2-12 Registration Sensor 2-12 Paper Transport 2-12 Fuser Exit Sensor 2-13 Duplex Unit 2-13 3 Error Messages and Codes Introduction 3-2 Servicing Instructions 3-4 Using the Troubleshooting Procedures 3-5 General...". . 4-3 Front Panel Continually Displays "No Paper in Tray [x 4-3 Front Panel Continually Displays "Output Tray Is Full 4-4 Paper Size Switch Assembly 4-4 Power Supply Troubleshooting 4-5 xiv Phaser 3450 Laser Printer

Service Manual
Page 16
... Jam At Exit (Jam 2 4-11 Jam At Duplex (Duplex Jam 1 4-12 Jam At Tray/Remove Tray 2 (Duplex Jam 2 4-13 CRUM Toner Error 4-14 5 Print-Quality Troubleshooting Print-Quality Problems Overview 5-2 Defects Associated with Specific Printer Components 5-2 Front Panel Test Print 5-3 Deletions 5-4 Fusing 5-5 Resolution 5-5 Registration and Skew 5-6 Skips or Smears 5-6 Print-Quality...
... Jam At Exit (Jam 2 4-11 Jam At Duplex (Duplex Jam 1 4-12 Jam At Tray/Remove Tray 2 (Duplex Jam 2 4-13 CRUM Toner Error 4-14 5 Print-Quality Troubleshooting Print-Quality Problems Overview 5-2 Defects Associated with Specific Printer Components 5-2 Front Panel Test Print 5-3 Deletions 5-4 Fusing 5-5 Resolution 5-5 Registration and Skew 5-6 Skips or Smears 5-6 Print-Quality...

Service Manual
Page 21
Phaser 3450 Laser Printer Shown With Optional Tray 3 Insert 3/4 view of this product, participation in Xerox Phaser 3450 Laser Printer Service Training is the primary document used for repairing, maintaining, and troubleshooting the printer. Printer Introduction and Overview The Xerox Phaser 3450 Laser Printer Service Manual is strongly recommended. To ensure complete understanding of Printer with extra tray 1-2 Phaser 3450 Laser Printer Service Manual
Phaser 3450 Laser Printer Shown With Optional Tray 3 Insert 3/4 view of this product, participation in Xerox Phaser 3450 Laser Printer Service Training is the primary document used for repairing, maintaining, and troubleshooting the printer. Printer Introduction and Overview The Xerox Phaser 3450 Laser Printer Service Manual is strongly recommended. To ensure complete understanding of Printer with extra tray 1-2 Phaser 3450 Laser Printer Service Manual
Service Manual
Page 49
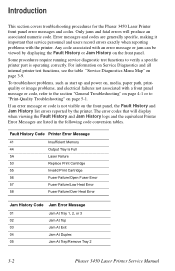
... code associated with a front panel message or code, refer to the section "General Troubleshooting" on page 4-1 or to verify a specific printer part is not visible on page 3-9. Introduction This section covers troubleshooting procedures for the Phaser 3450 Laser Printer front panel error messages and codes. Only jams and fatal errors will display when viewing the Fault...
... code associated with a front panel message or code, refer to the section "General Troubleshooting" on page 4-1 or to verify a specific printer part is not visible on page 3-9. Introduction This section covers troubleshooting procedures for the Phaser 3450 Laser Printer front panel error messages and codes. Only jams and fatal errors will display when viewing the Fault...

Service Manual
Page 50
...an error first occurs, record the error message and code then cycle power to the printer to a network and has a TCP/IP address, view the printer's web page using a web browser. Select the Troubleshoot link and the fault history will be accessed one of two ways: Accessing Fault ...History 1. Go to Troubleshooting --> Service Tools --> Fault History or Jam History. Open a web browser. View the printer's fault history on the ...
...an error first occurs, record the error message and code then cycle power to the printer to a network and has a TCP/IP address, view the printer's web page using a web browser. Select the Troubleshoot link and the fault history will be accessed one of two ways: Accessing Fault ...History 1. Go to Troubleshooting --> Service Tools --> Fault History or Jam History. Open a web browser. View the printer's fault history on the ...
Service Manual
Page 51
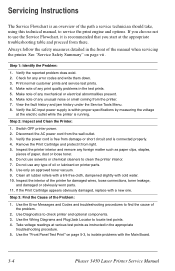
... and remove any error codes and write them down. 3. Inspect the interior of the printer for any foreign matter such as instructed in the appropriate troubleshooting procedure. 5. Use the Error Messages and Codes and troubleshooting procedures to locate test points. 4. Use the Wiring Diagrams and Plug/Jack Locator to find the cause ... to use any unusual noise or smell coming from damage or short circuit and is running. Use Diagnostics to isolate problems with the Main Board. 3-4 Phaser 3450 Laser Printer Service Manual Use the "Front Panel Test Print" on page 5-3, to check...
... and remove any error codes and write them down. 3. Inspect the interior of the printer for any foreign matter such as instructed in the appropriate troubleshooting procedure. 5. Use the Error Messages and Codes and troubleshooting procedures to locate test points. 4. Use the Wiring Diagrams and Plug/Jack Locator to find the cause ... to use any unusual noise or smell coming from damage or short circuit and is running. Use Diagnostics to isolate problems with the Main Board. 3-4 Phaser 3450 Laser Printer Service Manual Use the "Front Panel Test Print" on page 5-3, to check...

Service Manual
Page 52
...5. If your response to the question is "Yes", then follow to replace the part. Each Step in a Troubleshooting Procedure instructs you to replace a printer component, Chapter 8, "Service Parts Disassembly" on test point locations and signal names. 6. The steps are no additional ...detailed steps and functions for continuity at certain test points within the printer. Using the Troubleshooting Procedures 1. When a procedure instructs you must follow the instructions for removing and replacing all spared printer parts. Error Messages and Codes 3-5 Use the Removal and Replacement ...
...5. If your response to the question is "Yes", then follow to replace the part. Each Step in a Troubleshooting Procedure instructs you to replace a printer component, Chapter 8, "Service Parts Disassembly" on test point locations and signal names. 6. The steps are no additional ...detailed steps and functions for continuity at certain test points within the printer. Using the Troubleshooting Procedures 1. When a procedure instructs you must follow the instructions for removing and replacing all spared printer parts. Error Messages and Codes 3-5 Use the Removal and Replacement ...

Service Manual
Page 53
... a parent assembly, you to take resistance readings between "P/J 232 P/J 210" (without specified pin numbers), check all wiring harnesses and pins. 4. When a troubleshooting procedure instructs you should replace the entire parent assembly. 3-6 Phaser 3450 Laser Printer Service Manual Check P/J 232-1 to a pin that may be nothing more than a pulse, resulting in a momentary drop in the...
... a parent assembly, you to take resistance readings between "P/J 232 P/J 210" (without specified pin numbers), check all wiring harnesses and pins. 4. When a troubleshooting procedure instructs you should replace the entire parent assembly. 3-6 Phaser 3450 Laser Printer Service Manual Check P/J 232-1 to a pin that may be nothing more than a pulse, resulting in a momentary drop in the...

Service Manual
Page 54
All circuit troubleshooting can be performed using the metal frame (chassis) as the grounding point. To locate connectors or test points, refer to the frame ground. Power and signal grounds are used within this section: Stated +3.3 VDC +5.0 VDC +24.0 VDC 0.0 VDC Measured +3.135 to +3.465 VDC +4.75 to +5.25 VDC +21.6 to +26.4 VDC Less than +0.5 VDC Error Messages and Codes 3-7 Unless otherwise specified, the following voltage tolerances are connected to "Wiring Diagrams" on page 10-1 for more information. Voltage Measurements 1.
All circuit troubleshooting can be performed using the metal frame (chassis) as the grounding point. To locate connectors or test points, refer to the frame ground. Power and signal grounds are used within this section: Stated +3.3 VDC +5.0 VDC +24.0 VDC 0.0 VDC Measured +3.135 to +3.465 VDC +4.75 to +5.25 VDC +21.6 to +26.4 VDC Less than +0.5 VDC Error Messages and Codes 3-7 Unless otherwise specified, the following voltage tolerances are connected to "Wiring Diagrams" on page 10-1 for more information. Voltage Measurements 1.

Service Manual
Page 55
... hold the button until the following Button Functions and Menu Map). 3-8 Phaser 3450 Laser Printer Service Manual Diagnostics also contain built-in troubleshooting problems with the printer. Service diagnostics are to be rebooted to enter Service Diagnostics: Entering Service Diagnostics: 1. Service Diagnostics The Phaser 3450 Laser Printer has built-in diagnostics to aid in test prints, cleaning procedures...
... hold the button until the following Button Functions and Menu Map). 3-8 Phaser 3450 Laser Printer Service Manual Diagnostics also contain built-in troubleshooting problems with the printer. Service diagnostics are to be rebooted to enter Service Diagnostics: Entering Service Diagnostics: 1. Service Diagnostics The Phaser 3450 Laser Printer has built-in diagnostics to aid in test prints, cleaning procedures...

Service Manual
Page 61
... thermostat Thermistor Main Board Wiring and Plug/Jack Map References "Print Engine Interconnect Diagram" on page 10-2 Troubleshooting Procedure Steps Actions and Questions 1 Remove Fuser 2 Check resistance of overheat thermostat. Replace Main Board. 3-14 Phaser 3450 Laser Printer Service Manual Yes Go to Step 4. Any obstructions, media, or debris has been removed from the...
... thermostat Thermistor Main Board Wiring and Plug/Jack Map References "Print Engine Interconnect Diagram" on page 10-2 Troubleshooting Procedure Steps Actions and Questions 1 Remove Fuser 2 Check resistance of overheat thermostat. Replace Main Board. 3-14 Phaser 3450 Laser Printer Service Manual Yes Go to Step 4. Any obstructions, media, or debris has been removed from the...

Service Manual
Page 62
...Troubleshooting Procedure Steps Actions and Questions 1 Check that the laser connectors are properly seated. 2 Use the embedded diagnostics to Step 3. Go to check laser motor operation. Does the laser motor run? 3 Does error recur? Yes Go to Step 2. No Reseat the connectors. LSU Error or 0x5A The printer's front panel displays "Laser... Failure". Replace LSU. Printer power has been cycled and the error still appears. Complete Error Messages and Codes 3-15 Any...
...Troubleshooting Procedure Steps Actions and Questions 1 Check that the laser connectors are properly seated. 2 Use the embedded diagnostics to Step 3. Go to check laser motor operation. Does the laser motor run? 3 Does error recur? Yes Go to Step 2. No Reseat the connectors. LSU Error or 0x5A The printer's front panel displays "Laser... Failure". Replace LSU. Printer power has been cycled and the error still appears. Complete Error Messages and Codes 3-15 Any...
Service Manual
Page 63
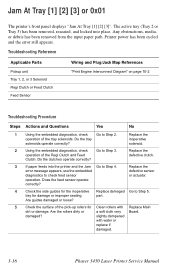
...3 Solenoid Regi Clutch or Feed Clutch Feed Sensor Wiring and Plug/Jack Map References "Print Engine Interconnect Diagram" on page 10-2 Troubleshooting Procedure Steps Actions and Questions Yes No 1 Using the embedded diagnostics, check Go to check feed sensor operation. tray for the ...damaged or loose? 5 Check the surface of the pick-up rollers for Clean rollers with water or replace if damaged. 3-16 Phaser 3450 Laser Printer Service Manual Replace the inoperative solenoid. 2 Using the embedded diagnostics, check Go to Step 4. slightly dampened with Replace Main dirt...
...3 Solenoid Regi Clutch or Feed Clutch Feed Sensor Wiring and Plug/Jack Map References "Print Engine Interconnect Diagram" on page 10-2 Troubleshooting Procedure Steps Actions and Questions Yes No 1 Using the embedded diagnostics, check Go to check feed sensor operation. tray for the ...damaged or loose? 5 Check the surface of the pick-up rollers for Clean rollers with water or replace if damaged. 3-16 Phaser 3450 Laser Printer Service Manual Replace the inoperative solenoid. 2 Using the embedded diagnostics, check Go to Step 4. slightly dampened with Replace Main dirt...

Service Manual
Page 64
... correctly? 3 Does the error recur? Go to Step 2. 2 If paper jams in front of or just inside the Replace the Fuser? Replace the Fuser. Troubleshooting Reference Applicable Parts Fuser Power Supply Board Main Board Wiring and Plug/Jack Map References "Print Engine Interconnect Diagram" on page 10... fuser Replace the Main Replace the discharge roller after leaving the Regi Board. Power Supply Board. Go to Step 4. Complete 4 If paper exits the printer but "Jam At Exit" Replace the occurs, use the embedded diagnostics to Power Supply check operation of the Regi Sensor...
... correctly? 3 Does the error recur? Go to Step 2. 2 If paper jams in front of or just inside the Replace the Fuser? Replace the Fuser. Troubleshooting Reference Applicable Parts Fuser Power Supply Board Main Board Wiring and Plug/Jack Map References "Print Engine Interconnect Diagram" on page 10... fuser Replace the Main Replace the discharge roller after leaving the Regi Board. Power Supply Board. Go to Step 4. Complete 4 If paper exits the printer but "Jam At Exit" Replace the occurs, use the embedded diagnostics to Power Supply check operation of the Regi Sensor...

Service Manual
Page 65
...? Complete 3 If paper jam occurs at the Feed Roller, use Replace the the embedded diagnostics to Step 2. Replace the Main Complete Board. 3-18 Phaser 3450 Laser Printer Service Manual Troubleshooting Reference Applicable Parts Duplex Sensor Duplex Assembly Power Supply Board Main Board Transport Roller Shaft Assembly Wiring and Plug/Jack Map References "Print Engine...
...? Complete 3 If paper jam occurs at the Feed Roller, use Replace the the embedded diagnostics to Step 2. Replace the Main Complete Board. 3-18 Phaser 3450 Laser Printer Service Manual Troubleshooting Reference Applicable Parts Duplex Sensor Duplex Assembly Power Supply Board Main Board Transport Roller Shaft Assembly Wiring and Plug/Jack Map References "Print Engine...

Service Manual
Page 66
... Board. Error Messages and Codes 3-19 Replace sensor Does the actuator bind or show signs of the sensor actuator. Troubleshooting Reference Applicable Parts Tray Full Sensor Main Board Wiring and Plug/Jack Map References "Print Engine Interconnect Diagram" on page 10...-2 Troubleshooting Procedure Steps Actions and Questions Yes 1 Check the operation of actuator. Replace Tray Full Sensor. Output Tray Is Full or 0x44 The printer's front panel displays "Output Tray Is Full". Printer power has been cycled and the error still ...
... Board. Error Messages and Codes 3-19 Replace sensor Does the actuator bind or show signs of the sensor actuator. Troubleshooting Reference Applicable Parts Tray Full Sensor Main Board Wiring and Plug/Jack Map References "Print Engine Interconnect Diagram" on page 10...-2 Troubleshooting Procedure Steps Actions and Questions Yes 1 Check the operation of actuator. Replace Tray Full Sensor. Output Tray Is Full or 0x44 The printer's front panel displays "Output Tray Is Full". Printer power has been cycled and the error still ...

Service Manual
Page 67
...-2 Troubleshooting Procedure Steps Actions and Questions Yes No 1 Is the switch actuating lever on top of the Cover Open Switch. Go to the Main Board? Does Board. Switch. 3-20 Phaser 3450 Laser Printer Service... Manual Go to Step 2. 2 Is the Cover Open Switch connector (CN20) properly connected to Step 3. Reconnect CN20. 3 Use the embedded diagnostics to check Replace the Main Replace the operation of the Replace Print Print Cartridge damaged? The Print Cartridge has been replaced with the correct Xerox Print Cartridge. Printer...
...-2 Troubleshooting Procedure Steps Actions and Questions Yes No 1 Is the switch actuating lever on top of the Cover Open Switch. Go to the Main Board? Does Board. Switch. 3-20 Phaser 3450 Laser Printer Service... Manual Go to Step 2. 2 Is the Cover Open Switch connector (CN20) properly connected to Step 3. Reconnect CN20. 3 Use the embedded diagnostics to check Replace the Main Replace the operation of the Replace Print Print Cartridge damaged? The Print Cartridge has been replaced with the correct Xerox Print Cartridge. Printer...

Service Manual
Page 68
General Troubleshooting In this chapter... ■ Introduction ■ Preliminary Procedures ■ Front Panel Troubleshooting ■ Paper Size Switch Assembly ■ Power Supply Troubleshooting ■ Media Jams and the Paper Path 4 Chapter
General Troubleshooting In this chapter... ■ Introduction ■ Preliminary Procedures ■ Front Panel Troubleshooting ■ Paper Size Switch Assembly ■ Power Supply Troubleshooting ■ Media Jams and the Paper Path 4 Chapter

Service Manual
Page 69
... instructed in the User Guide? 13. either 110 VAC or 220 VAC? 2. Does the printer have the correct ventilation space around all printer covers and doors firmly closed? 4-2 Phaser 3450 Laser Printer Service Manual For troubleshooting problems associated with an error code or front panel error message. Is the AC power cord in some cases including...
... instructed in the User Guide? 13. either 110 VAC or 220 VAC? 2. Does the printer have the correct ventilation space around all printer covers and doors firmly closed? 4-2 Phaser 3450 Laser Printer Service Manual For troubleshooting problems associated with an error code or front panel error message. Is the AC power cord in some cases including...

Service Manual
Page 70
...reseat all covers are securely closed . 2. Front Panel Continually Displays "No Paper in the correct position and moves without binding. 3. General Troubleshooting 4-3 Replace the Main Board. 6. Front Panel Continually Displays "Close Cover or Check Cartridge" 1. Ensure that all connections to the Main Board.... 2. Verify that the Print Cartridge is securely plugged into both the printer and the grounded, three prong AC outlet with the appropriate power available. 2. Replace the Main Board. Replace the Power Supply ...
...reseat all covers are securely closed . 2. Front Panel Continually Displays "No Paper in the correct position and moves without binding. 3. General Troubleshooting 4-3 Replace the Main Board. 6. Front Panel Continually Displays "Close Cover or Check Cartridge" 1. Ensure that all connections to the Main Board.... 2. Verify that the Print Cartridge is securely plugged into both the printer and the grounded, three prong AC outlet with the appropriate power available. 2. Replace the Main Board. Replace the Power Supply ...

