
Installation Instructions
Page 1
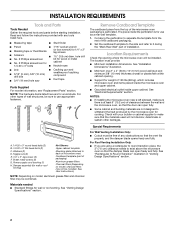
... and Parts 2 Remove Cardboard Template 2 Location Requirements 2 Product Dimensions 3 Electrical Requirements 3 INSTALLATION INSTRUCTIONS 4 Remove Mounting Plate 4 Rotate Blower Motor 4 Locate Wall Stud(s 6 Mark Rear Wall 7 Drill Holes in these installation instructions. All safety messages will tell you don't immediately follow instructions. See "Installation Requirements" section for use above electric or gas cooking products up to Wall 8 Prepare Upper Cabinet 8 Install Damper Assembly 9 Install the Microwave Oven 9 Complete Installation 10 VENTING DESIGN SPECIFICATIONS...
... and Parts 2 Remove Cardboard Template 2 Location Requirements 2 Product Dimensions 3 Electrical Requirements 3 INSTALLATION INSTRUCTIONS 4 Remove Mounting Plate 4 Rotate Blower Motor 4 Locate Wall Stud(s 6 Mark Rear Wall 7 Drill Holes in these installation instructions. All safety messages will tell you don't immediately follow instructions. See "Installation Requirements" section for use above electric or gas cooking products up to Wall 8 Prepare Upper Cabinet 8 Install Damper Assembly 9 Install the Microwave Oven 9 Complete Installation 10 VENTING DESIGN SPECIFICATIONS...
Installation Instructions
Page 2
...microwave oven for weight of the cardboard packaging. 2. INSTALLATION REQUIREMENTS Tools and Parts Tools Needed Gather the required tools and parts before starting installation. Toggle nuts (2) E. 1/4" x 2" lag screws (2) F. Power supply cord bushing (1) H. See User Instructions.) NOTE: Depending on model, charcoal filters may be installed. Materials needed ■ Standard fittings for use appropriate fasteners. See "Venting Design Specifications" section. Cut along the perforation to exist above the microwave oven so that the materials used will be combined...
...microwave oven for weight of the cardboard packaging. 2. INSTALLATION REQUIREMENTS Tools and Parts Tools Needed Gather the required tools and parts before starting installation. Toggle nuts (2) E. 1/4" x 2" lag screws (2) F. Power supply cord bushing (1) H. See User Instructions.) NOTE: Depending on model, charcoal filters may be installed. Materials needed ■ Standard fittings for use appropriate fasteners. See "Venting Design Specifications" section. Cut along the perforation to exist above the microwave oven so that the materials used will be combined...
Installation Instructions
Page 3
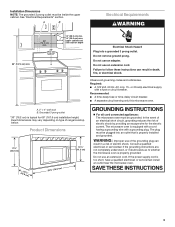
... codes and ordinances. WARNING: Improper use an adapter. Do not remove ground prong. or 20-amp electrical supply with a grounding plug. Grounded 3 prong outlet *30" (76.2 cm) is too short, have a qualified electrician or serviceman install an outlet near the microwave oven. The plug must be inside the upper cabinet. SAVE THESE INSTRUCTIONS 3 Recommended: ■ A time-delay fuse or time-delay circuit breaker. ■ A separate circuit...
... codes and ordinances. WARNING: Improper use an adapter. Do not remove ground prong. or 20-amp electrical supply with a grounding plug. Grounded 3 prong outlet *30" (76.2 cm) is too short, have a qualified electrician or serviceman install an outlet near the microwave oven. The plug must be inside the upper cabinet. SAVE THESE INSTRUCTIONS 3 Recommended: ■ A time-delay fuse or time-delay circuit breaker. ■ A separate circuit...
Installation Instructions
Page 4
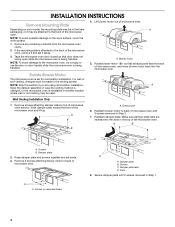
... Motor The microwave oven is reinstalled in another location where wall or roof venting may be used. Exhaust port 6. Make sure damper plate tabs are using recirculation installation. Remove 2 screws attaching blower motor to back of the microwave oven and lift up. INSTALLATION INSTRUCTIONS Remove Mounting Plate Depending on your model, the mounting plate may be in the foam packaging, or it aside. 3. NOTE: To avoid damage to the microwave oven, do not grip or use the door or door handle...
... Motor The microwave oven is reinstalled in another location where wall or roof venting may be used. Exhaust port 6. Make sure damper plate tabs are using recirculation installation. Remove 2 screws attaching blower motor to back of the microwave oven and lift up. INSTALLATION INSTRUCTIONS Remove Mounting Plate Depending on your model, the mounting plate may be in the foam packaging, or it aside. 3. NOTE: To avoid damage to the microwave oven, do not grip or use the door or door handle...
Installation Instructions
Page 5
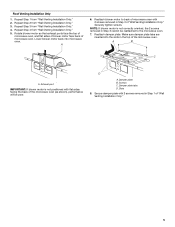
... of microwave oven, and flat sides of blower motor face back of "Wall Venting Installation Only." Reattach blower motor to the microwave oven. 7. Make sure damper plate tabs are inserted into microwave oven. Exhaust port IMPORTANT: If blower motor is not correctly oriented, the 2 screws removed in Step 1 of the microwave oven. Repeat Step 2 from "Wall Venting Installation Only." 2. Lower blower motor back into the slots in Step 3 of microwave oven. Securely tighten screws. Screws C. Damper plate tabs D. Secure damper plate...
... of microwave oven, and flat sides of blower motor face back of "Wall Venting Installation Only." Reattach blower motor to the microwave oven. 7. Make sure damper plate tabs are inserted into microwave oven. Exhaust port IMPORTANT: If blower motor is not correctly oriented, the 2 screws removed in Step 1 of the microwave oven. Repeat Step 2 from "Wall Venting Installation Only." 2. Lower blower motor back into the slots in Step 3 of microwave oven. Securely tighten screws. Screws C. Damper plate tabs D. Secure damper plate...
Installation Instructions
Page 6
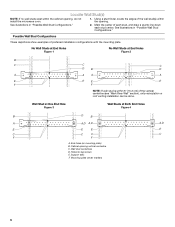
... End Holes Figure 2 B C C C D B D A A A A E E E E F F NOTE: If wall stud is within the opening. Holes for lag screws E. See illustrations in "Possible Wall Stud Configurations." Cabinet opening , do not install the microwave oven. 1. Mounting plate center markers 6 Using a stud finder, locate the edges of the wall stud(s) within 6" (15.2 cm) of the vertical centerline (see "Mark Rear Wall" section), only recirculation or roof venting installation can be done. See illustrations in...
... End Holes Figure 2 B C C C D B D A A A A E E E E F F NOTE: If wall stud is within the opening. Holes for lag screws E. See illustrations in "Possible Wall Stud Configurations." Cabinet opening , do not install the microwave oven. 1. Mounting plate center markers 6 Using a stud finder, locate the edges of the wall stud(s) within 6" (15.2 cm) of the vertical centerline (see "Mark Rear Wall" section), only recirculation or roof venting installation can be done. See illustrations in...
Installation Instructions
Page 7
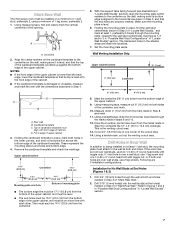
... holes in Step 6 of the upper cabinet. Set the mounting plate aside. This is level. 6. If the end holes are not over wall studs, use 2 lag screws. Mark Rear Wall The microwave oven must each other. Using measuring tape, find the wall stud centerline(s) drawn in "Locate Wall Stud(s)" section), align the mounting plate center markers to the centerline on the cardboard template to the horizontal line drawn in Step...
... holes in Step 6 of the upper cabinet. Set the mounting plate aside. This is level. 6. If the end holes are not over wall studs, use 2 lag screws. Mark Rear Wall The microwave oven must each other. Using measuring tape, find the wall stud centerline(s) drawn in "Locate Wall Stud(s)" section), align the mounting plate center markers to the centerline on the cardboard template to the horizontal line drawn in Step...
Installation Instructions
Page 8
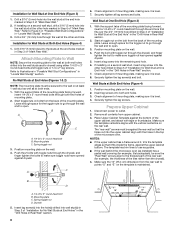
... level. 8. Remove all lag screws and bolts. NOTES: ■ If the upper cabinet has a frame around it, trim the template edges so that it is maintained. Drill 3/16" (5 mm) holes into wall stud(s) in Step 2 of the microwave oven. Start toggle nuts on the rear wall. Position mounting plate on the wall. 4. Wall Stud at Both End Holes (Figure 4) 1. Check alignment of mounting plate, making sure it is level. 7. Mounting plate...
... level. 8. Remove all lag screws and bolts. NOTES: ■ If the upper cabinet has a frame around it, trim the template edges so that it is maintained. Drill 3/16" (5 mm) holes into wall stud(s) in Step 2 of the microwave oven. Start toggle nuts on the rear wall. Position mounting plate on the wall. 4. Wall Stud at Both End Holes (Figure 4) 1. Check alignment of mounting plate, making sure it is level. 7. Mounting plate...
Installation Instructions
Page 9
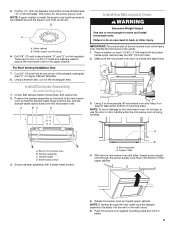
... or other injury. Power supply cord bushing 6. Failure to do not grip or use the door or door handle while the microwave oven is metal, the supply cord bushing needs to the microwave oven, do so can result in place. 9 Support tabs 4. For Roof Venting Installation Only 7. Check that the damper blade hinge is for wall venting only) 1. Mounting plate B. Damper blade D. Using a keyhole saw, cut out the rectangular area. Damper assembly C. Sheet metal screws 3. This hole...
... or other injury. Power supply cord bushing 6. Failure to do not grip or use the door or door handle while the microwave oven is metal, the supply cord bushing needs to the microwave oven, do so can result in place. 9 Support tabs 4. For Roof Venting Installation Only 7. Check that the damper blade hinge is for wall venting only) 1. Mounting plate B. Damper blade D. Using a keyhole saw, cut out the rectangular area. Damper assembly C. Sheet metal screws 3. This hole...
Installation Instructions
Page 10
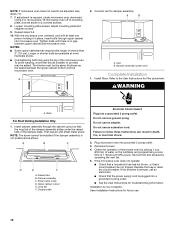
...). Install filters. Do not use an extension cord. Plug microwave oven into a grounded 3 prong outlet. ■ See the User Instructions for troubleshooting information. Reconnect power. 4. If adjustment is now complete. Repeat steps 3-6. 10. Bolts For Roof Venting Installation Only 1. NOTE: The screw cannot be adjusted, skip steps 7-9. 7. Sheet metal screw D. Damper plate Electrical Shock Hazard Plug into microwave oven. Failure to damper assembly. Test vent fan and exhaust by placing 1 cup (250 mL) of the damper plate. Installation...
...). Install filters. Do not use an extension cord. Plug microwave oven into a grounded 3 prong outlet. ■ See the User Instructions for troubleshooting information. Reconnect power. 4. If adjustment is now complete. Repeat steps 3-6. 10. Bolts For Roof Venting Installation Only 1. NOTE: The screw cannot be adjusted, skip steps 7-9. 7. Sheet metal screw D. Damper plate Electrical Shock Hazard Plug into microwave oven. Failure to damper assembly. Test vent fan and exhaust by placing 1 cup (250 mL) of the damper plate. Installation...
Installation Instructions
Page 11
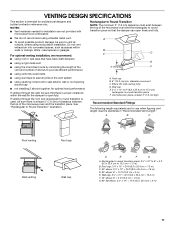
...; using a rigid metal vent ■ using caulking compound to seal exterior wall or roof opening around cap ■ not installing 2 elbows together, for use when figuring vent length. See the examples in the vent system ■ using the most direct route by minimizing the length of the vent and number of the microwave oven and the transition piece. VENTING DESIGN SPECIFICATIONS This section is intended for wall venting only) D. Wall...
...; using a rigid metal vent ■ using caulking compound to seal exterior wall or roof opening around cap ■ not installing 2 elbows together, for use when figuring vent length. See the examples in the vent system ■ using the most direct route by minimizing the length of the vent and number of the microwave oven and the transition piece. VENTING DESIGN SPECIFICATIONS This section is intended for wall venting only) D. Wall...
Installation Instructions
Page 12
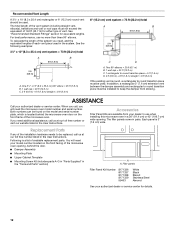
... free number listed in the User Instructions. If you need the microwave oven model number and serial number. The filler panels come in a 36" (91.4 cm) or 42" (106.7 cm) wide opening , behind the microwave oven door on the model and serial number plate, which is round, a rectangular to round transition piece must be used. Replacement Parts If any of vent. Following is 3" (7.6 cm) wide. See "Recommended Standard Fittings" section for either type of the installation...
... free number listed in the User Instructions. If you need the microwave oven model number and serial number. The filler panels come in a 36" (91.4 cm) or 42" (106.7 cm) wide opening , behind the microwave oven door on the model and serial number plate, which is round, a rectangular to round transition piece must be used. Replacement Parts If any of vent. Following is 3" (7.6 cm) wide. See "Recommended Standard Fittings" section for either type of the installation...


