Whirlpool WMH31017FS Support and Manuals
Get Help and Manuals for this Whirlpool item
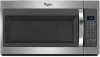
View All Support Options Below
Free Whirlpool WMH31017FS manuals!
Problems with Whirlpool WMH31017FS?
Ask a Question
Free Whirlpool WMH31017FS manuals!
Problems with Whirlpool WMH31017FS?
Ask a Question
Most Recent Whirlpool WMH31017FS Questions

Lightbulb Underneath Snapped Off At Base.
do I need to remove the entire metal panel underneath Seems like I cannot reach the bulb base to rem...
do I need to remove the entire metal panel underneath Seems like I cannot reach the bulb base to rem...
(Posted by sharonstrack 4 years ago)

New Microwave Oven Installed 5.20.17-----today, Blower Came On Without Pressing
New product installed 5.20.17. has been operating normally but today fan came on by itself. Help!!
New product installed 5.20.17. has been operating normally but today fan came on by itself. Help!!
(Posted by wdenmark 6 years ago)
Popular Whirlpool WMH31017FS Manual Pages
Installation Guide - Page 1
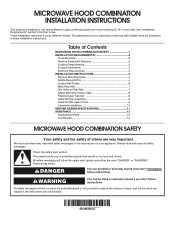
... . Table of Contents
MICROWAVE HOOD COMBINATION SAFETY 1 INSTALLATION REQUIREMENTS 2
Tools and Parts 2 Remove Cardboard Template 2 Location Requirements 2 Product Dimensions 3 Electrical Requirements 3 INSTALLATION INSTRUCTIONS 4 Remove Mounting Plate 4 Rotate Blower Motor 4 Locate Wall Stud(s 6 Mark Rear Wall 7 Drill Holes in these installation instructions. Always read and obey...
Installation Guide - Page 2
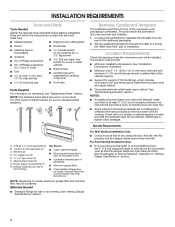
...; Charcoal filters (Depending on model, charcoal filters may not be sure to make sure there is for Z\v" x 2" lag screws
■■ 1½" (3.8 cm) diam. Sheet metal screws (2) G. The location must be combined.
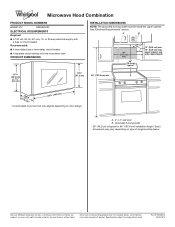
Special Requirements
For Wall Venting Installation Only:
■■ Cutout must provide:
■■ Minimum installation dimensions. See User Instructions...
Installation Guide - Page 3
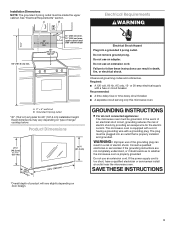
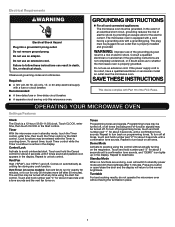
... Plug into an outlet that is properly installed and grounded. Do not use an extension cord.
Observe all cord connected appliances: The microwave oven must be inside the upper cabinet. Exact dimensions may vary depending on door design. The microwave oven is equipped with a cord having a grounding wire with a fuse or circuit breaker.
Required: ■■...
Installation Guide - Page 7
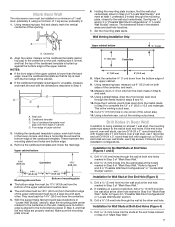
...Set the mounting plate aside. Centerline
2. Rear wall B. Cardboard template C. D. Front edge of the centerline, and mark.
10. These represent the mounting plate's end holes and bottom edge.
4. Make sure the mounting plate is the venting cutout area.
13. Drill Holes in "Locate Wall Stud(s)" section. Installation...installed on the wall, making sure its top is level with the dimensions...
Installation Guide - Page 10
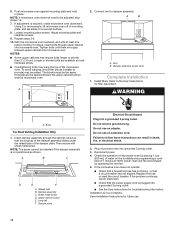
...Save Installation Instructions for troubleshooting information. If adjustment is no gap between the upper cabinet bottom and the microwave oven. Vent B.
If the problem continues,... Replace the fuse or reset the circuit breaker. Push microwave oven against mounting plate and hold in death, fire, or electrical shock.
2. A
2. Connect vent to the User Instructions for filter ...
Installation Guide - Page 11
...installation. Wall cap: 3¹⁄₄" x 10" = 40 ft (8.3 x 25.4 cm = 12.2 m) F. 45° elbow: 6" = 5 ft (15.2 cm = 1.5 m) G. 90° flat elbow: 3¹⁄₄" x 10" = 10 ft (8.3 x 25.4 cm = 3 m)
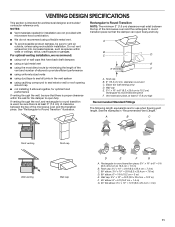
11 VENTING DESIGN SPECIFICATIONS... attics, crawl spaces or garages.
Elbow (for installation are not provided with microwave hood combination.
■■ We do not ...
Installation Guide - Page 12
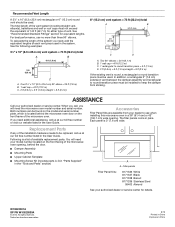
... of the microwave oven opening . To calculate the length of the system you will need , add the equivalent lengths of the installation hardware needs to use no more than three 90° elbows. The filler panels come in the User Guide.
When you call, you need your authorized dealer or service center.
Replacement Parts
If any...
Dimension Guide - Page 1
... may vary depending on type of product will vary slightly depending on door design.
Ref. For complete details, see Installation Instructions packed with a fuse or circuit breaker. Specifications subject to change without notice.
Dimensions are for 66" (167.6 cm) installation height. W10823831A 06/30/2016
See "Electrical Requirements" section.
upper cabinet and...
Use & Care Guide - Page 1
... or seriously injured if you don't follow the specific "PRECAUTIONS TO AVOID POSSIBLE EXPOSURE TO EXCESSIVE MICROWAVE ENERGY" found in the microwave oven. I Install or locate the microwave oven only in this manual and on the front facing of injury, and tell you still need your model and serial number located on your appliance.
Para obtener acceso a "Instrucciones para...
Use & Care Guide - Page 2

... oven cleaners, may damage the filter.
- I Keep cord away from the microwave oven is specifically designed to persons:
-
Use extreme care when inserting a spoon or other combustible materials are able to be overheated beyond the boiling point without appearing to be adjusted or repaired by anyone except properly qualified service personnel. I Do not let cord...
Use & Care Guide - Page 3
... a tone sounds and the vent fan turns on some models): Set vent fan to run for about 3 seconds until a confirmation tone sounds. Vent Fan
High ("SPd2"), low ("SPd1") and off at any button or open/close the door and the display will switch to whether the microwave oven is properly grounded.
Programming tones may be plugged...
Use & Care Guide - Page 4

... oz (283 to 367 g) each, then touch START control.
Enter number of the microwave oven. Always follow label instructions on the vent grille, tilt the grille forward, lift it out. Installing/Replacing Filters and Light Bulbs
■■ Grease filters: Grease filters are off and the microwave oven is behind the vent grille at 100%. To reinstall, place end of...
Use & Care Guide - Page 5
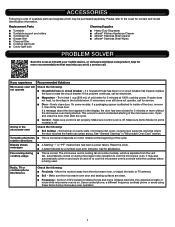
... Recommended Solutions
Microwave oven will Check the following:
not operate
■■ Household fuse or circuit breaker - Replacement Parts
■■ Turntable ■■ Turntable support and rollers ■■ Turntable hub ■■ Grease filter ■■ Charcoal filter ■■ Cooktop light bulb ■■ Cavity light bulb
Cleaning Supplies...
Use & Care Guide - Page 6

... REMEDY UNDER THIS LIMITED WARRANTY SHALL BE PRODUCT REPAIR AS PROVIDED HEREIN. house wiring, fuses or water inlet hoses).
4. light bulbs, batteries, air or water filters, preservation solutions, etc.).
5. Discoloration, rust or oxidation of the original unit's warranty period. This product is provided exclusively by Whirlpool.
8. Service or parts for warranty service to product failure...
Warranty Information - Page 1
....
2. Please take a few minutes to correct defects in remote locations where an authorized Whirlpool servicer is intended for service in materials or workmanship that vary from natural gas or L.P. and
Canada, direct all requests for Factory Specified Replacement Parts and repair labor to review the Troubleshooting or Problem Solver section of inaccessible appliances or built-in -home...
Whirlpool WMH31017FS Reviews
We have not received any reviews for Whirlpool yet.