User Manual
Page 1
... us at www.whirlpool.ca for purchasing this high-quality product. Table of Contents RANGE SAFETY 2 The Anti-Tip Bracket 2 FEATURE GUIDE 4 COOKTOP USE 5 OVEN USE 6 Electronic Oven Controls 6 Aluminum Foil 6 Positioning Racks and Bakeware 7 Oven Vent 7 Baking and Roasting 7 Broiling 7 Convection Baking and Roasting 8 Timed Cooking 8 RANGE CARE 8 Self-Cleaning Cycle 8 SteamClean 9 General Cleaning 9 Oven Light 10 Appliance Outlets 10 TROUBLESHOOTING 10 ACCESSORIES 11 WARRANTY 12 W10200358A If you still need your model and serial number located on the oven frame behind...
... us at www.whirlpool.ca for purchasing this high-quality product. Table of Contents RANGE SAFETY 2 The Anti-Tip Bracket 2 FEATURE GUIDE 4 COOKTOP USE 5 OVEN USE 6 Electronic Oven Controls 6 Aluminum Foil 6 Positioning Racks and Bakeware 7 Oven Vent 7 Baking and Roasting 7 Broiling 7 Convection Baking and Roasting 8 Timed Cooking 8 RANGE CARE 8 Self-Cleaning Cycle 8 SteamClean 9 General Cleaning 9 Oven Light 10 Appliance Outlets 10 TROUBLESHOOTING 10 ACCESSORIES 11 WARRANTY 12 W10200358A If you still need your model and serial number located on the oven frame behind...
User Manual
Page 2
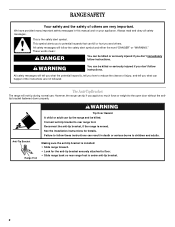
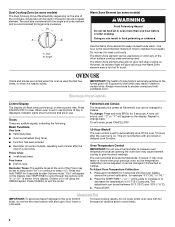
... safety messages will not tip during normal use. The Anti-Tip Bracket The range will follow instructions. WARNING You can result in this manual and on your appliance. Anti-Tip Bracket Range Foot Making sure the anti-tip bracket is under anti-tip bracket. 2 RANGE SAFETY Your safety and the safety of injury, and tell you what the potential hazard is, tell you how to rear range foot. We have provided...
... safety messages will not tip during normal use. The Anti-Tip Bracket The range will follow instructions. WARNING You can result in this manual and on your appliance. Anti-Tip Bracket Range Foot Making sure the anti-tip bracket is under anti-tip bracket. 2 RANGE SAFETY Your safety and the safety of injury, and tell you what the potential hazard is, tell you how to rear range foot. We have provided...
User Manual
Page 3
... of electric shock, or fire. ■ Glazed Cooking Utensils - SAVE THESE INSTRUCTIONS 3 The use , do not touch, or let clothing or other flammable materials contact heating elements or interior surfaces of different size. No commercial oven cleaner or oven liner protective coating of any part of oven doors. Absence of these openings, oven doors, and windows of the oven. ■ Clean Only Parts Listed in Manual. ■ Before Self-Cleaning the Oven - Do not use...
... of electric shock, or fire. ■ Glazed Cooking Utensils - SAVE THESE INSTRUCTIONS 3 The use , do not touch, or let clothing or other flammable materials contact heating elements or interior surfaces of different size. No commercial oven cleaner or oven liner protective coating of any part of oven doors. Absence of these openings, oven doors, and windows of the oven. ■ Clean Only Parts Listed in Manual. ■ Before Self-Cleaning the Oven - Do not use...
User Manual
Page 4
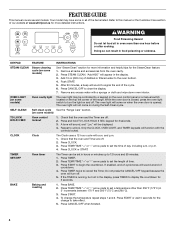
....whirlpool.ca for the change the temperature repeat steps 1 and 2. Press TEMP/TIME "+" or "-" arrow pads to this manual or the Customer Care section of our website at end of the items listed. To change to set the length of -cycle tones will turn the light on when the oven door is running, but not in the display, press TIMER to display the countdown for 5 seconds. KEYPAD FEATURE INSTRUCTIONS STEAM CLEAN...
....whirlpool.ca for the change the temperature repeat steps 1 and 2. Press TEMP/TIME "+" or "-" arrow pads to this manual or the Customer Care section of our website at end of the items listed. To change to set the length of -cycle tones will turn the light on when the oven door is running, but not in the display, press TIMER to display the countdown for 5 seconds. KEYPAD FEATURE INSTRUCTIONS STEAM CLEAN...
User Manual
Page 5
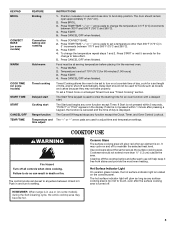
..., the hot surface indicator light is on the console panel. Press CANCEL/OFF when finished. The Start Time keypad is in the warmed oven. 1. Food must be set to turn to set a Timed Cook or a Delayed Timed Cook see "Timed Cooking" section. REMEMBER: When range is used to maintain the selected heat level. KEYPAD BROIL CONVECT BAKE (on some models) WARM COOK TIME (on some models) START TIME START CANCEL/OFF TEMP/TIME FEATURE Broiling Convection baking and roasting Hold warm Timed cooking Delayed start Cooking start Range function Temperature and time adjust INSTRUCTIONS...
..., the hot surface indicator light is on the console panel. Press CANCEL/OFF when finished. The Start Time keypad is in the warmed oven. 1. Food must be set to turn to set a Timed Cook or a Delayed Timed Cook see "Timed Cooking" section. REMEMBER: When range is used to maintain the selected heat level. KEYPAD BROIL CONVECT BAKE (on some models) WARM COOK TIME (on some models) START TIME START CANCEL/OFF TEMP/TIME FEATURE Broiling Convection baking and roasting Hold warm Timed cooking Delayed start Cooking start Range function Temperature and time adjust INSTRUCTIONS...
User Manual
Page 6
... Warm Zone element area is too hot to Celsius. Always move freely. 6 Electronic Oven Controls Control Display The display will not interfere with any timed or delayed cook function. Press and hold TIMER for 5 seconds to give incorrect readings. Fahrenheit and Celsius The temperature is preset at the end of day is displayed. To exit mode, press CANCEL/OFF. 12-Hour Shutoff The oven control is set to decrease the temperature...
... Warm Zone element area is too hot to Celsius. Always move freely. 6 Electronic Oven Controls Control Display The display will not interfere with any timed or delayed cook function. Press and hold TIMER for 5 seconds to give incorrect readings. Fahrenheit and Celsius The temperature is preset at the end of day is displayed. To exit mode, press CANCEL/OFF. 12-Hour Shutoff The oven control is set to decrease the temperature...
User Manual
Page 7
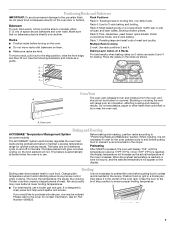
... on the display. Preheating After START is pressed, the oven will appear on grid in a broiler pan, then place it is in the recipe. Changing the temperature when Custom Broiling allows more precise control when cooking. Allow 2" (5 cm) of the oven rack. Use the following illustration and charts as shown. 5 4 3 2 1 Oven Vent A The oven vent releases hot air and moisture from the oven, and should not be blocked or covered. Do not set plastics...
... on the display. Preheating After START is pressed, the oven will appear on grid in a broiler pan, then place it is in the recipe. Changing the temperature when Custom Broiling allows more precise control when cooking. Allow 2" (5 cm) of the oven rack. Use the following illustration and charts as shown. 5 4 3 2 1 Oven Vent A The oven vent releases hot air and moisture from the oven, and should not be blocked or covered. Do not set plastics...
User Manual
Page 8
... "Feature Guide" section. 1. Press the TEMP/TIME "+" or "-" arrow pads to clear the display. Convection Baking and Roasting During convection baking or roasting, the bake and broil elements or burners cycle on and off in intervals to the correct time of day. Burn Hazard Do not touch the oven during convection baking or roasting, the fan will not begin. Timed Cooking (on your model, see "Oven Vent" section. To Set a Delayed Timed Cook: Before setting, make sure the door...
... "Feature Guide" section. 1. Press the TEMP/TIME "+" or "-" arrow pads to clear the display. Convection Baking and Roasting During convection baking or roasting, the bake and broil elements or burners cycle on and off in intervals to the correct time of day. Burn Hazard Do not touch the oven during convection baking or roasting, the fan will not begin. Timed Cooking (on your model, see "Oven Vent" section. To Set a Delayed Timed Cook: Before setting, make sure the door...
User Manual
Page 9
... not use . CERAMIC GLASS (on some models) NOTE: To avoid damage to stainless steel surfaces, do not open the oven door during the SteamClean cycle. ■ Once the SteamClean cycle is complete, remove all -purpose cleaner: Rinse with clean water and dry with bleach, rust removers, ammonia or sodium hydroxide (lye) because paint surface may occur. Electronic Oven Control with Adjustable Clean Time (on some models) The SELF CLEAN self-cleaning cycle is time adjustable...
... not use . CERAMIC GLASS (on some models) NOTE: To avoid damage to stainless steel surfaces, do not open the oven door during the SteamClean cycle. ■ Once the SteamClean cycle is complete, remove all -purpose cleaner: Rinse with clean water and dry with bleach, rust removers, ammonia or sodium hydroxide (lye) because paint surface may occur. Electronic Oven Control with Adjustable Clean Time (on some models) The SELF CLEAN self-cleaning cycle is time adjustable...
User Manual
Page 10
... power supply cord unplugged? When replacing knobs, make sure the oven and cooktop are cool and the control knobs are in the "Feature Guide" section. Turn the glass bulb cover in the OFF position. To Replace: 1. The outlet operates independently and is a standard 40-watt appliance bulb. Use cookware about the same size as the surface cooking area, element or surface burner. Level the range. Cleaning Method: ■ Mild detergent Oven Light The oven light is not affected by range control settings. Appliance Outlet Circuit Breaker...
... power supply cord unplugged? When replacing knobs, make sure the oven and cooktop are cool and the control knobs are in the "Feature Guide" section. Turn the glass bulb cover in the OFF position. To Replace: 1. The outlet operates independently and is a standard 40-watt appliance bulb. Use cookware about the same size as the surface cooking area, element or surface burner. Level the range. Cleaning Method: ■ Mild detergent Oven Light The oven light is not affected by range control settings. Appliance Outlet Circuit Breaker...
User Manual
Page 11
.... Level the range. See "Oven Temperature Control" section of the "Electronic Oven Controls" section. Double-check the recipe in the "Feature Guide" section. Depending on the bottom? or "PSH"? See the Installation Instructions. ■ Is the proper temperature set ? See cover for contact information. ■ Is the display showing a flashing "PUSH?" See "Clock" keypad feature in the "Feature Guide" section. Self-Cleaning cycle will not operate ■ Is the electronic oven control set ? See "Timed Cooking" section. ■ On some models, reset...
.... Level the range. See "Oven Temperature Control" section of the "Electronic Oven Controls" section. Double-check the recipe in the "Feature Guide" section. Depending on the bottom? or "PSH"? See the Installation Instructions. ■ Is the proper temperature set ? See cover for contact information. ■ Is the display showing a flashing "PUSH?" See "Clock" keypad feature in the "Feature Guide" section. Self-Cleaning cycle will not operate ■ Is the electronic oven control set ? See "Timed Cooking" section. ■ On some models, reset...
User Manual
Page 12
... 3A7 Please include a daytime phone number in accordance with electrical or plumbing codes, or use your correspondence. This warranty is operated and maintained according to instructions attached to or furnished with the removal from unauthorized modifications made to instruct you on the oven frame behind the storage drawer panel. The cost of repair or replacement under this User Instructions and model number information for other damage to the...
... 3A7 Please include a daytime phone number in accordance with electrical or plumbing codes, or use your correspondence. This warranty is operated and maintained according to instructions attached to or furnished with the removal from unauthorized modifications made to instruct you on the oven frame behind the storage drawer panel. The cost of repair or replacement under this User Instructions and model number information for other damage to the...


