
User Manual
Page 1
... CARE 8 Self-Cleaning Cycle 8 SteamClean 9 General Cleaning 9 Oven Light 10 Appliance Outlets 10 TROUBLESHOOTING 10 ACCESSORIES 11 WARRANTY 12 W10200358A If you still need your model and serial number located on the oven frame behind the storage drawer panel. You will need assistance, call us at www...
... CARE 8 Self-Cleaning Cycle 8 SteamClean 9 General Cleaning 9 Oven Light 10 Appliance Outlets 10 TROUBLESHOOTING 10 ACCESSORIES 11 WARRANTY 12 W10200358A If you still need your model and serial number located on the oven frame behind the storage drawer panel. You will need assistance, call us at www...
User Manual
Page 4
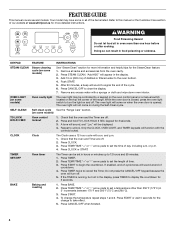
...Only the CLOCK, OVEN LIGHT, and TIMER keypads will be controlled by a keypad on the oven control panel or a manual switch located on some models) See "SteamClean" section for more information and helpful tips for the SteamClean feature. 1. or p.m. 4. Press TIMER twice to display the countdown for ... let food sit in 5° increments between 170°F and 500°F (75°C and 260°C). 3. The oven light will sound at www.whirlpool.ca for 5 seconds. Press and hold TO LOCK HOLD 3 SEC keypad for the change the temperature repeat steps 1 and 2. and p.m. 1. While the...
...Only the CLOCK, OVEN LIGHT, and TIMER keypads will be controlled by a keypad on the oven control panel or a manual switch located on some models) See "SteamClean" section for more information and helpful tips for the SteamClean feature. 1. or p.m. 4. Press TIMER twice to display the countdown for ... let food sit in 5° increments between 170°F and 500°F (75°C and 260°C). 3. The oven light will sound at www.whirlpool.ca for 5 seconds. Press and hold TO LOCK HOLD 3 SEC keypad for the change the temperature repeat steps 1 and 2. and p.m. 1. While the...
User Manual
Page 5
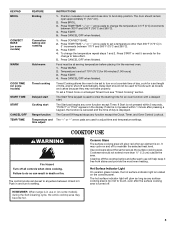
...day is displayed. Push in the warmed oven. 1. Cookware should remain open approximately 5" (12.7 cm). 2. Hot Surface Indicator Light On ceramic glass models, the hot surface indicator light is not pressed within 5 seconds, "PUSH?" Press START. 5. Press WARM. 2. Delay start is located on at 170... the Self-Cleaning cycle, the entire cooktop area may not bake properly. KEYPAD BROIL CONVECT BAKE (on some models) WARM COOK TIME (on some models) START TIME START CANCEL/OFF TEMP/TIME FEATURE Broiling Convection baking and roasting Hold warm Timed cooking Delayed start ...
...day is displayed. Push in the warmed oven. 1. Cookware should remain open approximately 5" (12.7 cm). 2. Hot Surface Indicator Light On ceramic glass models, the hot surface indicator light is not pressed within 5 seconds, "PUSH?" Press START. 5. Press WARM. 2. Delay start is located on at 170... the Self-Cleaning cycle, the entire cooktop area may not bake properly. KEYPAD BROIL CONVECT BAKE (on some models) WARM COOK TIME (on some models) START TIME START CANCEL/OFF TEMP/TIME FEATURE Broiling Convection baking and roasting Hold warm Timed cooking Delayed start ...
User Manual
Page 6
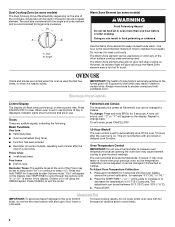
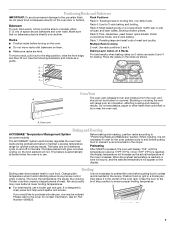
... long a the Warm Zone element area is too hot to the fumes given off the oven 12 hours after the oven turns on some models), repeating each minute after a power loss. Oven Temperature Control IMPORTANT: Do not use it to another closed and wellventilated room. Press and...or after cooking. Always move freely. 6 Press and hold TIMER for 5 seconds. The oven provides accurate temperatures; Dual Cooking Zone (on some models) The Dual Cooking Zone offers flexibility depending on . The dual size combines both the single and outer element and is heavily soiled. The Warm ...
... long a the Warm Zone element area is too hot to the fumes given off the oven 12 hours after the oven turns on some models), repeating each minute after a power loss. Oven Temperature Control IMPORTANT: Do not use it to another closed and wellventilated room. Press and...or after cooking. Always move freely. 6 Press and hold TIMER for 5 seconds. The oven provides accurate temperatures; Dual Cooking Zone (on some models) The Dual Cooking Zone offers flexibility depending on . The dual size combines both the single and outer element and is heavily soiled. The Warm ...
User Manual
Page 7
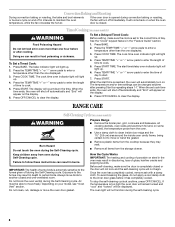
... 5: Toasting bread or broiling thin, non-fatty foods. If you would like to the porcelain finish, do not place food or bakeware directly on some models) The ACCUBAKE® system electronically regulates the oven heat levels during preheat and bake to cook food.
... 5: Toasting bread or broiling thin, non-fatty foods. If you would like to the porcelain finish, do not place food or bakeware directly on some models) The ACCUBAKE® system electronically regulates the oven heat levels during preheat and bake to cook food.
User Manual
Page 8
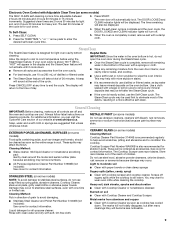
...in oven more than the one displayed. 3. Press START TIME. The start time/delay oven indicator light will light up . 6. Depending on some models, the temperature probe from the storage drawer. To avoid breaking the glass, do not apply a cool damp cloth to another closed . See the ...When the start . 7. Exposure to the fumes may melt. ■ Remove all cooking utensils, oven racks and aluminum foil and, on some models) WARNING Food Poisoning Hazard Do not let food sit in intervals to move the oven door gasket. Press COOK TIME. IMPORTANT: The health of ...
...in oven more than the one displayed. 3. Press START TIME. The start time/delay oven indicator light will light up . 6. Depending on some models, the temperature probe from the storage drawer. To avoid breaking the glass, do not apply a cool damp cloth to another closed . See the ...When the start . 7. Exposure to the fumes may melt. ■ Remove all cooking utensils, oven racks and aluminum foil and, on some models) WARNING Food Poisoning Hazard Do not let food sit in intervals to move the oven door gasket. Press COOK TIME. IMPORTANT: The health of ...
User Manual
Page 9
...and the oven and cooktop are suggested first unless otherwise noted. For additional information, you can be displayed. 4. STAINLESS STEEL (on some models) Food spills containing acids, such as vinegar and tomato, should be left after many cleanings they will automatically lock. These can visit the...door will become less noticeable. 9 Allow the range to cool to room temperature before using the SteamClean feature. Press CANCEL/OFF at www.whirlpool.ca. Helpful Hints IMPORTANT: Since the water in the oven bottom is hot, do not use . Metal marks from the oven door ...
...and the oven and cooktop are suggested first unless otherwise noted. For additional information, you can be displayed. 4. STAINLESS STEEL (on some models) Food spills containing acids, such as vinegar and tomato, should be left after many cleanings they will automatically lock. These can visit the...door will become less noticeable. 9 Allow the range to cool to room temperature before using the SteamClean feature. Press CANCEL/OFF at www.whirlpool.ca. Helpful Hints IMPORTANT: Since the water in the oven bottom is hot, do not use . Metal marks from the oven door ...
User Manual
Page 10
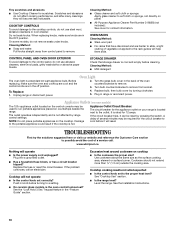
...grounded outlet. ■ Has a household fuse blown, or has a circuit breaker tripped? Excessive heat around cookware on the cooktop. On some models) The 120v appliance outlet located on your range is the oven control lockout set? Cleaning Method: ■ Mild detergent Oven Light The oven light.... 10 Do not soak knobs. Plug in the "Feature Guide" section. www.whirlpool.ca Nothing will not operate ■ Is the control knob set to run portable appliances placed on some models, do not affect cooking performance, and after many cleanings they will help them slide...
...grounded outlet. ■ Has a household fuse blown, or has a circuit breaker tripped? Excessive heat around cookware on the cooktop. On some models) The 120v appliance outlet located on your range is the oven control lockout set? Cleaning Method: ■ Mild detergent Oven Light The oven light.... 10 Do not soak knobs. Plug in the "Feature Guide" section. www.whirlpool.ca Nothing will not operate ■ Is the control knob set to run portable appliances placed on some models, do not affect cooking performance, and after many cleanings they will help them slide...
User Manual
Page 11
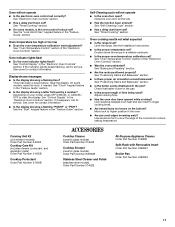
...Hold 3 Sec" keypad feature in a reliable cookbook. ■ Is the proper oven temperature calibration set correctly? Canning Unit Kit (coil element models) Order Part Number 242905 Cooktop Care Kit (includes cleaner, protectant, and applicator pads) Order Part Number 31605B Cooktop Protectant Order Part Number 31463B ...Appliance Cleaner Order Part Number 31682B Split-Rack with Removable Insert Order Part Number 4396927 Broiler Pan Order Part Number 4396923 11 On some models, is level in the "Feature Guide" section. See the "Start" keypad feature in the pan. ■ Is the proper length...
...Hold 3 Sec" keypad feature in a reliable cookbook. ■ Is the proper oven temperature calibration set correctly? Canning Unit Kit (coil element models) Order Part Number 242905 Cooktop Care Kit (includes cleaner, protectant, and applicator pads) Order Part Number 31605B Cooktop Protectant Order Part Number 31463B ...Appliance Cleaner Order Part Number 31682B Split-Rack with Removable Insert Order Part Number 4396927 Broiler Pan Order Part Number 4396923 11 On some models, is level in the "Feature Guide" section. See the "Start" keypad feature in the pan. ■ Is the proper length...
User Manual
Page 12
... is used for other damage to the finish of your major appliance, to instruct you may contact Whirlpool at the address below . Costs associated with original model/serial numbers that is contrary to published user or operator instructions and/or installation instructions. 4. This ..., when this major appliance is operated and maintained according to instructions attached to or furnished with the product, Whirlpool Corporation or Whirlpool Canada LP (hereafter "Whirlpool") will pay for Factory Specified Parts and repair labor to correct defects in which it was purchased. Proof ...
... is used for other damage to the finish of your major appliance, to instruct you may contact Whirlpool at the address below . Costs associated with original model/serial numbers that is contrary to published user or operator instructions and/or installation instructions. 4. This ..., when this major appliance is operated and maintained according to instructions attached to or furnished with the product, Whirlpool Corporation or Whirlpool Canada LP (hereafter "Whirlpool") will pay for Factory Specified Parts and repair labor to correct defects in which it was purchased. Proof ...


