
Installation Guide
Page 1
...MOUNT CANOPY RANGE HOOD Installation Instructions and Use & Care Guide For questions about features, operation/performance, parts, accessories or service, call: 1-800-253-1301 or visit our website at www.whirlpool.com In Canada, call 1-800-807-6777 or visit our website at www.whirlpool.ca HOTTE ...utilisation et d'entretien Au Canada, pour assistance, installation ou service, composer le 1-800-807-6777 ou visiter notre site Web à www.whirlpool.ca Table of Contents/Table des matières 2 IMPORTANT: READ AND SAVE THESE INSTRUCTIONS. FOR RESIDENTIAL USE ONLY. POUR UTILISATION RÉ...
...MOUNT CANOPY RANGE HOOD Installation Instructions and Use & Care Guide For questions about features, operation/performance, parts, accessories or service, call: 1-800-253-1301 or visit our website at www.whirlpool.com In Canada, call 1-800-807-6777 or visit our website at www.whirlpool.ca HOTTE ...utilisation et d'entretien Au Canada, pour assistance, installation ou service, composer le 1-800-807-6777 ou visiter notre site Web à www.whirlpool.ca Table of Contents/Table des matières 2 IMPORTANT: READ AND SAVE THESE INSTRUCTIONS. FOR RESIDENTIAL USE ONLY. POUR UTILISATION RÉ...
Installation Guide
Page 2
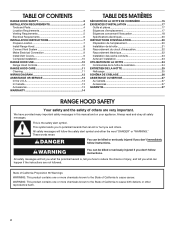
... 4 Venting Requirements 5 Electrical Requirements 6 INSTALLATION INSTRUCTIONS 7 Prepare Location 7 Install Range Hood 8 Connect Vent System 8 Make Electrical Connection 9 Install Vent Covers 9 Complete Installation 10 RANGE HOOD USE 10 Range Hood Controls 10 RANGE HOOD CARE 11 Cleaning 11 WIRING DIAGRAM 12 ASSISTANCE OR SERVICE 13 In the U.S.A 13 ...SCHÉMA DE CÂBLAGE 26 ASSISTANCE OU SERVICE 27 Au Canada 27 Accessoires 27 GARANTIE 27 RANGE HOOD SAFETY Your safety and the safety of others . This is , tell you how to cause birth defects or other reproductive harm...
... 4 Venting Requirements 5 Electrical Requirements 6 INSTALLATION INSTRUCTIONS 7 Prepare Location 7 Install Range Hood 8 Connect Vent System 8 Make Electrical Connection 9 Install Vent Covers 9 Complete Installation 10 RANGE HOOD USE 10 Range Hood Controls 10 RANGE HOOD CARE 11 Cleaning 11 WIRING DIAGRAM 12 ASSISTANCE OR SERVICE 13 In the U.S.A 13 ...SCHÉMA DE CÂBLAGE 26 ASSISTANCE OU SERVICE 27 Au Canada 27 Accessoires 27 GARANTIE 27 RANGE HOOD SAFETY Your safety and the safety of others . This is , tell you how to cause birth defects or other reproductive harm...
Installation Guide
Page 4
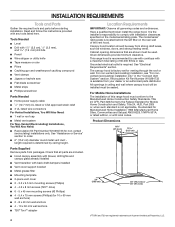
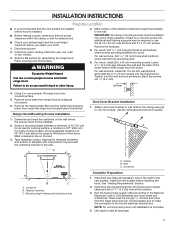
... Remove parts from strong draft areas, such as windows, doors, and strong heating vents. Have a qualified technician install the range hood. Canopy hood location should be away from packages. Grounded electrical outlet is factory set for 10 x 60 mm wall anchors) ■■ ...;■ T20® Torx®† adapter 4 Location Requirements IMPORTANT: Observe all parts are registered trademarks of the vent hood. For Mobile Home Installations The installation of 60,000 BTUs or less. Given dimensions provide minimum clearance. INSTALLATION REQUIREMENTS Tools and...
... Remove parts from strong draft areas, such as windows, doors, and strong heating vents. Have a qualified technician install the range hood. Canopy hood location should be away from packages. Grounded electrical outlet is factory set for 10 x 60 mm wall anchors) ■■ ...;■ T20® Torx®† adapter 4 Location Requirements IMPORTANT: Observe all parts are registered trademarks of the vent hood. For Mobile Home Installations The installation of 60,000 BTUs or less. Given dimensions provide minimum clearance. INSTALLATION REQUIREMENTS Tools and...
Installation Guide
Page 5
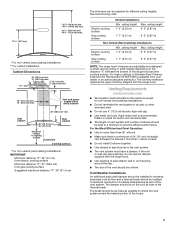
... must have a damper. ceiling height Electric cooking surface 7' 4" (2.23 m) 9' 9" (2.97 m) Gas cooking surface 7' 7" (2.31 m) 9' 9" (2.97 m) NOTE: The range hood chimneys are adjustable and designed to meet varying ceiling or soffit heights depending on the cold air side of the house. 5 If the roof or.... ■■ The length of vent system and number of elbows should be installed to minimize conduction of the range hood and the cooking surface. Cold Weather Installations An additional back draft damper should be installed to minimize backward cold air flow ...
... must have a damper. ceiling height Electric cooking surface 7' 4" (2.23 m) 9' 9" (2.97 m) Gas cooking surface 7' 7" (2.31 m) 9' 9" (2.97 m) NOTE: The range hood chimneys are adjustable and designed to meet varying ceiling or soffit heights depending on the cold air side of the house. 5 If the roof or.... ■■ The length of vent system and number of elbows should be installed to minimize conduction of the range hood and the cooking surface. Cold Weather Installations An additional back draft damper should be installed to minimize backward cold air flow ...
Installation Guide
Page 6
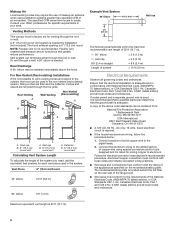
...procedure. Makeup Air Local building codes may be installed immediately above code standards can be used , it is 35 ft (10.7 m). 6 The hood exhaust opening is required. ■■ If the house has aluminum wiring, follow the procedure below: 1. Rear Discharge A 90° elbow...;■ Wire sizes and connections must conform to the added section of copper wire using ventilation systems greater than specified CFM of the above the hood. Vent Piece 6" (15.2 cm) Round 45° elbow 2.5 ft (0.8 m) 90° elbow 5 ft (1.5 m) Example Vent System 90 Elbow 6 ft (1.8 m) 2...
...procedure. Makeup Air Local building codes may be installed immediately above code standards can be used , it is 35 ft (10.7 m). 6 The hood exhaust opening is required. ■■ If the house has aluminum wiring, follow the procedure below: 1. Rear Discharge A 90° elbow...;■ Wire sizes and connections must conform to the added section of copper wire using ventilation systems greater than specified CFM of the above the hood. Vent Piece 6" (15.2 cm) Round 45° elbow 2.5 ft (0.8 m) 90° elbow 5 ft (1.5 m) Example Vent System 90 Elbow 6 ft (1.8 m) 2...
Installation Guide
Page 7
...NOTE: Do not reconnect power until the wall anchors are being used. 6. Select a flat surface for exhaust vent. ■■ Check your hood. 1. Failure to do so can result in place, aligning the template centerline and bottom of the screw head to make the connection in the ...) hole at all openings. 7 Tighten until installation is no wood to the wall. Select a mounting height between the wall and the back of template with hood bottom line and with the centerline marked on the wall. Centerline B. A B C A. Ceiling B. For wall anchors, drill 7/16" (10 mm) holes at this ...
...NOTE: Do not reconnect power until the wall anchors are being used. 6. Select a flat surface for exhaust vent. ■■ Check your hood. 1. Failure to do so can result in place, aligning the template centerline and bottom of the screw head to make the connection in the ...) hole at all openings. 7 Tighten until installation is no wood to the wall. Select a mounting height between the wall and the back of template with hood bottom line and with the centerline marked on the wall. Centerline B. A B C A. Ceiling B. For wall anchors, drill 7/16" (10 mm) holes at this ...
Installation Guide
Page 8
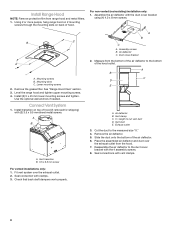
...the duct to cut vent duct D. Seal connections with the 4 assembly screws. 8. For non-vented (recirculating) installation only: 1. Level the range hood and tighten upper mounting screws. 4. Vent transition B. 3.5 x 9.5 mm screw For vented installations only: 1. Check that back draft dampers work ...C. A B X C D E A. Place the assembled air deflector and duct over the exhaust outlet. 2. Using 2 or more people, hang range hood on 2 mounting screws through the mounting slots on top of the air deflector. 6. Remove the grease filter. Install (2) 5 x 45 mm lower mounting...
...the duct to cut vent duct D. Seal connections with the 4 assembly screws. 8. For non-vented (recirculating) installation only: 1. Level the range hood and tighten upper mounting screws. 4. Vent transition B. 3.5 x 9.5 mm screw For vented installations only: 1. Check that back draft dampers work ...C. A B X C D E A. Place the assembled air deflector and duct over the exhaust outlet. 2. Using 2 or more people, hang range hood on 2 mounting screws through the mounting slots on top of the air deflector. 6. Remove the grease filter. Install (2) 5 x 45 mm lower mounting...
Installation Guide
Page 9
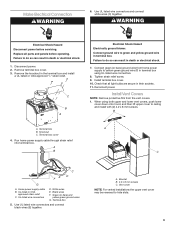
... WARNING 6. Disconnect power. 2. Remove terminal box cover. 3. Remove the knockout in terminal box using both upper and lower vent covers, push lower cover down onto hood, and then lift upper cover to green and yellow ground wire in death or electrical shock. 1. Connect green (or bare) ground wire from the vent...
... WARNING 6. Disconnect power. 2. Remove terminal box cover. 3. Remove the knockout in terminal box using both upper and lower vent covers, push lower cover down onto hood, and then lift upper cover to green and yellow ground wire in death or electrical shock. 1. Connect green (or bare) ground wire from the vent...
Installation Guide
Page 10
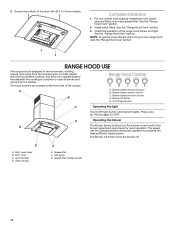
...several minutes after the cooking is designed to clear all smoke and odors from the kitchen. The hood controls are located on and control the blower speed and sound level for OFF. Range Hood Controls A B C DE A A. Blower speed medium button C. Blower off . The Blower... Off button turns the blower off button E. Duct cover holes B. Glass canopy F E. See the "Range Hood Care" section. 3. NOTE: To get the most efficient use from the cooktop area. D Operating the blower G The Blower Speed buttons turn the blower on...
...several minutes after the cooking is designed to clear all smoke and odors from the kitchen. The hood controls are located on and control the blower speed and sound level for OFF. Range Hood Controls A B C DE A A. Blower speed medium button C. Blower off . The Blower... Off button turns the blower off button E. Duct cover holes B. Glass canopy F E. See the "Range Hood Care" section. 3. NOTE: To get the most efficient use from the cooktop area. D Operating the blower G The Blower Speed buttons turn the blower on...
Installation Guide
Page 11
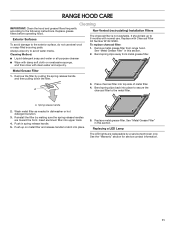
... is not washable. It should last up on metal filter and release handle to the metal filter. Bend spring clips away from range hood. Remove the filter by a service technician only. A. Reinstall the filter by making sure the spring release handles are replaceable by pulling... filter into place. 5. Wash metal filter as needed in spring release handle. 5. Push in dishwasher or hot detergent solution. 3. RANGE HOOD CARE Cleaning IMPORTANT: Clean the hood and grease filters frequently according to 6 months with clean water and wipe dry. Replace grease filters before operating...
... is not washable. It should last up on metal filter and release handle to the metal filter. Bend spring clips away from range hood. Remove the filter by a service technician only. A. Reinstall the filter by making sure the spring release handles are replaceable by pulling... filter into place. 5. Wash metal filter as needed in spring release handle. 5. Push in dishwasher or hot detergent solution. 3. RANGE HOOD CARE Cleaning IMPORTANT: Clean the hood and grease filters frequently according to 6 months with clean water and wipe dry. Replace grease filters before operating...
Dimension Guide
Page 1
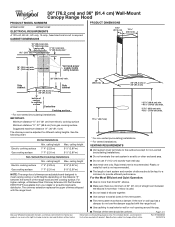
30" (76.2 cm) and 36" (91.4 cm) Wall-Mount Canopy Range Hood PRODUCT MODEL NUMBERS WVW51UC0F WVW51UC6F ELECTRICAL REQUIREMENTS A 120-volt, 60-Hz., AC-only, 15-amp, fused electrical circuit is available from ...hood. ■■ Use caulking to the outdoors except for non-vented (recirculating) installations. ceiling height 7' 4" (2.23 m) 7' 7" (2.31 m) Max. The chimney extension replaces the upper chimney shipped with product. Rigid metal vent is used. ■■ Do not install 2 elbows together. ■■ Use clamps to provide efficient performance. Because Whirlpool...
30" (76.2 cm) and 36" (91.4 cm) Wall-Mount Canopy Range Hood PRODUCT MODEL NUMBERS WVW51UC0F WVW51UC6F ELECTRICAL REQUIREMENTS A 120-volt, 60-Hz., AC-only, 15-amp, fused electrical circuit is available from ...hood. ■■ Use caulking to the outdoors except for non-vented (recirculating) installations. ceiling height 7' 4" (2.23 m) 7' 7" (2.31 m) Max. The chimney extension replaces the upper chimney shipped with product. Rigid metal vent is used. ■■ Do not install 2 elbows together. ■■ Use clamps to provide efficient performance. Because Whirlpool...
Dimension Guide
Page 2
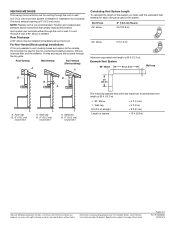
...vent length is not recommended. Example Vent System 90 elbow 6 ft (1.8 m) Wall cap B B B A 2 ft (0.6 m) A. The hood exhaust opening is needed for planning purposes only. To vent through the top grille. Roof Venting Wall Venting Non-Vented (Recirculating) A A Calculating Vent... ft (1.5 m) = 0 ft (0 m) = 8 ft (2.4 m) = 13 ft (3.9 m) Because Whirlpool Corporation includes a continues commitment to improve our products, we reserve the right to the outside, the hood can terminate either through the roof or wall. Roof cap B. 6" (15.2 cm) round vent A. ...
...vent length is not recommended. Example Vent System 90 elbow 6 ft (1.8 m) Wall cap B B B A 2 ft (0.6 m) A. The hood exhaust opening is needed for planning purposes only. To vent through the top grille. Roof Venting Wall Venting Non-Vented (Recirculating) A A Calculating Vent... ft (1.5 m) = 0 ft (0 m) = 8 ft (2.4 m) = 13 ft (3.9 m) Because Whirlpool Corporation includes a continues commitment to improve our products, we reserve the right to the outside, the hood can terminate either through the roof or wall. Roof cap B. 6" (15.2 cm) round vent A. ...


