
Installation Guide
Page 1
...WALL-MOUNT CANOPY RANGE HOOD Installation Instructions and Use & Care Guide For questions about features, operation/performance, parts, accessories or service, call: 1-800-253-1301 or visit our website at www.whirlpool.com In Canada, call 1-800-807-6777 or visit our website at www.whirlpool.ca HOTTE DE...d'utilisation et d'entretien Au Canada, pour assistance, installation ou service, composer le 1-800-807-6777 ou visiter notre site Web à www.whirlpool.ca Table of Contents/Table des matières 2 IMPORTANT: READ AND SAVE THESE INSTRUCTIONS. FOR RESIDENTIAL USE ONLY. IMPORTANT : LIRE ET ...
...WALL-MOUNT CANOPY RANGE HOOD Installation Instructions and Use & Care Guide For questions about features, operation/performance, parts, accessories or service, call: 1-800-253-1301 or visit our website at www.whirlpool.com In Canada, call 1-800-807-6777 or visit our website at www.whirlpool.ca HOTTE DE...d'utilisation et d'entretien Au Canada, pour assistance, installation ou service, composer le 1-800-807-6777 ou visiter notre site Web à www.whirlpool.ca Table of Contents/Table des matières 2 IMPORTANT: READ AND SAVE THESE INSTRUCTIONS. FOR RESIDENTIAL USE ONLY. IMPORTANT : LIRE ET ...
Installation Guide
Page 2
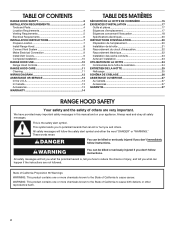
...and Parts 4 Location Requirements 4 Venting Requirements 5 Electrical Requirements 6 INSTALLATION INSTRUCTIONS 7 Prepare Location 7 Install Range Hood 8 Connect Vent System 8 Make Electrical Connection 9 Install Vent Covers 9 Complete Installation 10 RANGE HOOD USE 10 Range Hood Controls 10 RANGE HOOD CARE 11 Cleaning 11 WIRING DIAGRAM 12 ASSISTANCE OR SERVICE 13 In the U.S.A 13 In Canada 13 Accessories... 25 SCHÉMA DE CÂBLAGE 26 ASSISTANCE OU SERVICE 27 Au Canada 27 Accessoires 27 GARANTIE 27 RANGE HOOD SAFETY Your safety and the safety of others .
...and Parts 4 Location Requirements 4 Venting Requirements 5 Electrical Requirements 6 INSTALLATION INSTRUCTIONS 7 Prepare Location 7 Install Range Hood 8 Connect Vent System 8 Make Electrical Connection 9 Install Vent Covers 9 Complete Installation 10 RANGE HOOD USE 10 Range Hood Controls 10 RANGE HOOD CARE 11 Cleaning 11 WIRING DIAGRAM 12 ASSISTANCE OR SERVICE 13 In the U.S.A 13 In Canada 13 Accessories... 25 SCHÉMA DE CÂBLAGE 26 ASSISTANCE OU SERVICE 27 Au Canada 27 Accessoires 27 GARANTIE 27 RANGE HOOD SAFETY Your safety and the safety of others .
Installation Guide
Page 4
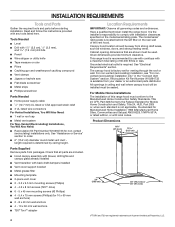
... Part 280) or, when such standard is not applicable, the standard for use with cooktops with a maximum total rating of this range hood must conform to order. ■■ 6" (15.2 cm) diameter round metal vent duct length required is recommended for Manufactured Home ...-vented (recirculating) installation, see "For nonvented (recirculating) installation only" in ceiling and wall where canopy hood will be installed must be sealed. This range hood is determined by ceiling height. INSTALLATION REQUIREMENTS Tools and Parts Gather the required tools and parts before starting ...
... Part 280) or, when such standard is not applicable, the standard for use with cooktops with a maximum total rating of this range hood must conform to order. ■■ 6" (15.2 cm) diameter round metal vent duct length required is recommended for Manufactured Home ...-vented (recirculating) installation, see "For nonvented (recirculating) installation only" in ceiling and wall where canopy hood will be installed must be sealed. This range hood is determined by ceiling height. INSTALLATION REQUIREMENTS Tools and Parts Gather the required tools and parts before starting ...
Installation Guide
Page 5
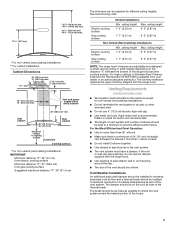
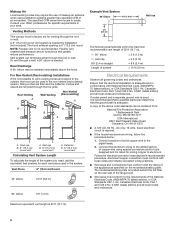
...9632;■ Use clamps to seal all joints in an attic or other enclosed area. ■■ Do not use the damper supplied with the range hood. The break should be installed to minimize conduction of outside temperatures as possible to where the vent system enters the heated portion of the vent...number of elbows should be as close as part of the house. 5 ceiling height Max. The chimney extension replaces the upper chimney shipped with the range hood. ■■ Use caulking to seal exterior wall or roof opening around the cap. ■■ The size of the vent should be ...
...9632;■ Use clamps to seal all joints in an attic or other enclosed area. ■■ Do not use the damper supplied with the range hood. The break should be installed to minimize conduction of outside temperatures as possible to where the vent system enters the heated portion of the vent...number of elbows should be as close as part of the house. 5 ceiling height Max. The chimney extension replaces the upper chimney shipped with the range hood. ■■ Use caulking to seal exterior wall or roof opening around the cap. ■■ The size of the vent should be ...
Installation Guide
Page 6
... feet (meters) for each vent piece used in conformance with the rating of the appliance as specified on the rear wall of the range hood. ■■ Wire sizes must conform with National Electrical Code, ANSI/NFPA 70 (latest edition), or CSA Standards C22.1-94, Canadian... or wall. For Non-Vented (Recirculating) Installations If it is recommended that a qualified electrician determine that greatly reduce performance. The hood exhaust opening is not possible to vent cooking fumes and vapors to aluminum. Maximum equivalent vent length is not recommended. The specified ...
... feet (meters) for each vent piece used in conformance with the rating of the appliance as specified on the rear wall of the range hood. ■■ Wire sizes must conform with National Electrical Code, ANSI/NFPA 70 (latest edition), or CSA Standards C22.1-94, Canadian... or wall. For Non-Vented (Recirculating) Installations If it is recommended that a qualified electrician determine that greatly reduce performance. The hood exhaust opening is not possible to vent cooking fumes and vapors to aluminum. Maximum equivalent vent length is not recommended. The specified ...
Installation Guide
Page 7
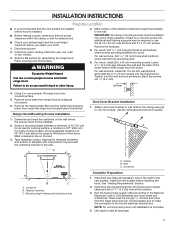
... power supply cable and drill a 11/4" (3.2 cm) hole at all necessary cuts in back or other injury. 4. Determine which venting method to move and install range hood. Leave a 1/4" (6.4 mm) gap between a minimum of 24" (61 cm) for an electric cooking surface, a minimum of 27" (68.6 cm) for exhaust ... vent system. Failure to screw into the wall anchors. If there is no wood to do so can result in the wall for assembling the range hood. Select a mounting height between the wall and the back of properly. 6. See "Venting Requirements" section. 2. A DRILL 2 (TWO) 3/16" PILOT HOLES...
... power supply cable and drill a 11/4" (3.2 cm) hole at all necessary cuts in back or other injury. 4. Determine which venting method to move and install range hood. Leave a 1/4" (6.4 mm) gap between a minimum of 24" (61 cm) for an electric cooking surface, a minimum of 27" (68.6 cm) for exhaust ... vent system. Failure to screw into the wall anchors. If there is no wood to do so can result in the wall for assembling the range hood. Select a mounting height between the wall and the back of properly. 6. See "Venting Requirements" section. 2. A DRILL 2 (TWO) 3/16" PILOT HOLES...
Installation Guide
Page 8
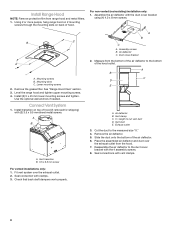
...filter. Assembly screws B. Vent clamp C. Reassemble the air deflector to the bottom of hood. Air deflector C. Cut the duct to cut vent duct D. Install Range Hood NOTE: Remove protective film from the hood. 7. Measure from the bottom of the air deflector to the duct cover bracket ...with the duct cover bracket using (4) 4.2 x 8 mm screws. See "Range Hood Care" section. 3. Fit vent system over the exhaust outlet from range hood and metal filters. 1. Check that back draft dampers work properly. Use the optional wall anchors if needed....
...filter. Assembly screws B. Vent clamp C. Reassemble the air deflector to the bottom of hood. Air deflector C. Cut the duct to cut vent duct D. Install Range Hood NOTE: Remove protective film from the hood. 7. Measure from the bottom of the air deflector to the duct cover bracket ...with the duct cover bracket using (4) 4.2 x 8 mm screws. See "Range Hood Care" section. 3. Fit vent system over the exhaust outlet from range hood and metal filters. 1. Check that back draft dampers work properly. Use the optional wall anchors if needed....
Installation Guide
Page 10
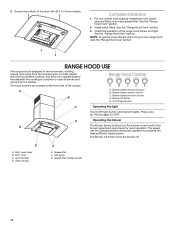
...and allow it to operate several minutes after the cooking is designed to clear all smoke and odors from your new range hood, read the "Range Hood Use" section. Blower off . The speed can be changed anytime during fan operation by pressing the desired Blower Speed... speed maximum button B. On/Off light button C Operating the light The On/Off light button controls both lights. E A. Complete Installation 1. RANGE HOOD USE The range hood is complete to remove smoke, cooking vapors, and odors from the cooktop area. LED lights G. 2. Blower speed minimum button B D. Control ...
...and allow it to operate several minutes after the cooking is designed to clear all smoke and odors from your new range hood, read the "Range Hood Use" section. Blower off . The speed can be changed anytime during fan operation by pressing the desired Blower Speed... speed maximum button B. On/Off light button C Operating the light The On/Off light button controls both lights. E A. Complete Installation 1. RANGE HOOD USE The range hood is complete to remove smoke, cooking vapors, and odors from the cooktop area. LED lights G. 2. Blower speed minimum button B D. Control ...
Installation Guide
Page 11
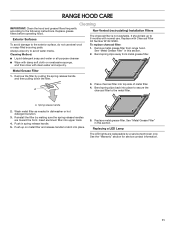
See "Metal Grease Filter" in this section. 2. Bend spring clips away from range hood. Metal Grease Filter 1. Spring release handle 2. Push in dishwasher or hot detergent solution. 3. Exterior Surfaces To avoid damage to the following ...handle and then pulling down the filter. 3. Replace metal grease filter. See the "Warranty" section for service contact information. 11 RANGE HOOD CARE Cleaning IMPORTANT: Clean the hood and grease filters frequently according to the exterior surface, do not use . To replace charcoal filter: 1. Push up to latch into...
See "Metal Grease Filter" in this section. 2. Bend spring clips away from range hood. Metal Grease Filter 1. Spring release handle 2. Push in dishwasher or hot detergent solution. 3. Exterior Surfaces To avoid damage to the following ...handle and then pulling down the filter. 3. Replace metal grease filter. See the "Warranty" section for service contact information. 11 RANGE HOOD CARE Cleaning IMPORTANT: Clean the hood and grease filters frequently according to the exterior surface, do not use . To replace charcoal filter: 1. Push up to latch into...
Dimension Guide
Page 1
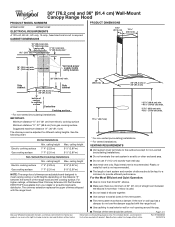
...if more than 1 elbow is a minimum of 24" (61 cm) of the range hood and the cooking surface. W10836369A 05/09/2016 30" (76.2 cm) and 36" (91.4 cm) Wall-Mount Canopy Range Hood PRODUCT MODEL NUMBERS WVW51UC0F WVW51UC6F ELECTRICAL REQUIREMENTS A 120-volt, 60-Hz., AC-only, 15-amp, fused ...roof or wall cap has a damper, do not use the damper supplied with the range hood. ■■ Do not use 4" (10.2 cm) laundry-type wall cap. ■■ Use metal vent only. Because Whirlpool Corporation includes a continues commitment to improve our products, we reserve the right to seal...
...if more than 1 elbow is a minimum of 24" (61 cm) of the range hood and the cooking surface. W10836369A 05/09/2016 30" (76.2 cm) and 36" (91.4 cm) Wall-Mount Canopy Range Hood PRODUCT MODEL NUMBERS WVW51UC0F WVW51UC6F ELECTRICAL REQUIREMENTS A 120-volt, 60-Hz., AC-only, 15-amp, fused ...roof or wall cap has a damper, do not use the damper supplied with the range hood. ■■ Do not use 4" (10.2 cm) laundry-type wall cap. ■■ Use metal vent only. Because Whirlpool Corporation includes a continues commitment to improve our products, we reserve the right to seal...


