

Owners Manual 1
Page 1
...at www.whirlpool.com. "W12345678" becomes "400012345678") Model Number Serial Number Table of Contents OVEN SAFETY 2 OVEN USE 3 Feature Guide 3 Touch Panel 4 Display 4 Display Navigation 4 Setup and Demo Mode 4 Cooking Methods 4 Favorites 6 Assisted Cooking 6 Tools 7 More Modes 8 Aluminum Foil 9 Positioning Racks and Bakeware 9 Oven Vent(s 10 Preheating and Oven Temperature 10 Baking and Roasting 10 Broiling 11 Convection Cooking 11 OVEN CARE 12 Self-Cleaning Cycle 12 Steam Clean 13 General Cleaning 13 Oven Lights 14 TROUBLESHOOTING 14 ASSISTANCE OR SERVICE 16...
...at www.whirlpool.com. "W12345678" becomes "400012345678") Model Number Serial Number Table of Contents OVEN SAFETY 2 OVEN USE 3 Feature Guide 3 Touch Panel 4 Display 4 Display Navigation 4 Setup and Demo Mode 4 Cooking Methods 4 Favorites 6 Assisted Cooking 6 Tools 7 More Modes 8 Aluminum Foil 9 Positioning Racks and Bakeware 9 Oven Vent(s 10 Preheating and Oven Temperature 10 Baking and Roasting 10 Broiling 11 Convection Cooking 11 OVEN CARE 12 Self-Cleaning Cycle 12 Steam Clean 13 General Cleaning 13 Oven Lights 14 TROUBLESHOOTING 14 ASSISTANCE OR SERVICE 16...
Owners Manual 1
Page 2
.... Let hot air or steam escape before removing or replacing food. ■ Do Not Heat Unopened Food Containers - For smart enabled ranges and ovens: ■ Remote Operation - Children should never be worn while using the oven, follow basic precautions, including the following: ■ Proper Installation - During and after use . Remove broiler pan and other flammable materials contact heating elements or interior surfaces of oven until they are oven vent openings and surfaces...
.... Let hot air or steam escape before removing or replacing food. ■ Do Not Heat Unopened Food Containers - For smart enabled ranges and ovens: ■ Remote Operation - Children should never be worn while using the oven, follow basic precautions, including the following: ■ Proper Installation - During and after use . Remove broiler pan and other flammable materials contact heating elements or interior surfaces of oven until they are oven vent openings and surfaces...
Owners Manual 1
Page 3
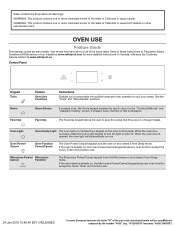
... Control Lock. 24-Jan-2018 10:45:49 EST | RELEASED In some or all of day is opened, the oven light will be autom3atically replaced by a keypad on and wakes it from Sleep mode. "W12345678" becomes "400012345678") Your model may have some European factories the letter "W" of the part code mentioned herein will automatically turn the light on and off. OVEN USE Feature Guide This manual covers...
... Control Lock. 24-Jan-2018 10:45:49 EST | RELEASED In some or all of day is opened, the oven light will be autom3atically replaced by a keypad on and wakes it from Sleep mode. "W12345678" becomes "400012345678") Your model may have some European factories the letter "W" of the part code mentioned herein will automatically turn the light on and off. OVEN USE Feature Guide This manual covers...

Owners Manual 1
Page 4
... manual cooking programs can be adjusted, and instructions, preparation, and tips can result in the upper right corner and entering the broil temperature into sleep mode and the display will be accessed. During use, the display will show the clock, mode, oven temperature, kitchen timer, and oven timer, if set , options can be set . Scroll and Select EXPLORE. 5. Select BROIL. 4. Select START to activate and control. When the oven is very sensitive and requires only a light...
... manual cooking programs can be adjusted, and instructions, preparation, and tips can result in the upper right corner and entering the broil temperature into sleep mode and the display will be accessed. During use, the display will show the clock, mode, oven temperature, kitchen timer, and oven timer, if set , options can be set . Scroll and Select EXPLORE. 5. Select BROIL. 4. Select START to activate and control. When the oven is very sensitive and requires only a light...

Owners Manual 1
Page 7
... the oven door is opened , the oven light will be autom7atically replaced by manually entering the desired time into the keypad. 1. For further information, see the Lower Oven Use and Care Guide. The Control Lock shuts down the control panel keypads to avoid unintended use of the part code mentioned herein will automatically turn off . Scroll up , follow these steps to exit Demo Mode: To Exit Demo Mode: 1. Info ■■ Service and Support: Displays model number, Customer Support...
... the oven door is opened , the oven light will be autom7atically replaced by manually entering the desired time into the keypad. 1. For further information, see the Lower Oven Use and Care Guide. The Control Lock shuts down the control panel keypads to avoid unintended use of the part code mentioned herein will automatically turn off . Scroll up , follow these steps to exit Demo Mode: To Exit Demo Mode: 1. Info ■■ Service and Support: Displays model number, Customer Support...
Owners Manual 1
Page 10
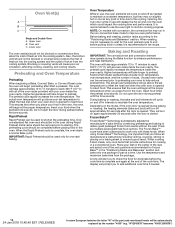
...'s instructions including venting, covering, stirring or placing on a baking sheet to insert food. When the Rapid Preheat cycle is opened during baking or roasting, the heating elements (bake and broil) will alert you place your dish in the oven during the Bake function to maintain the oven temperature. Opening the oven door while in the oven. Factors that impact preheat times include room temperature, oven temperature, and the number of the part code mentioned herein will go above your set temperature...
...'s instructions including venting, covering, stirring or placing on a baking sheet to insert food. When the Rapid Preheat cycle is opened during baking or roasting, the heating elements (bake and broil) will alert you place your dish in the oven during the Bake function to maintain the oven temperature. Opening the oven door while in the oven. Factors that impact preheat times include room temperature, oven temperature, and the number of the part code mentioned herein will go above your set temperature...
Owners Manual 1
Page 11
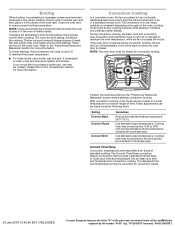
... "Positioning Racks and Bakeware" section before starting convection cooking. During convection cooking, the bake, broil and convection (true convection only) elements cycle on when the oven door is closed for doneness early. NOTE: The oven door must be made using the following chart. With convection cooking, most foods can be closed . The displayed time and temperature will be cooked at lower broil settings. Thicker cuts and unevenly shaped pieces of time. On lower settings, the broil element will turn off...
... "Positioning Racks and Bakeware" section before starting convection cooking. During convection cooking, the bake, broil and convection (true convection only) elements cycle on when the oven door is closed for doneness early. NOTE: The oven door must be made using the following chart. With convection cooking, most foods can be closed . The displayed time and temperature will be cooked at lower broil settings. Thicker cuts and unevenly shaped pieces of time. On lower settings, the broil element will turn off...

Owners Manual 1
Page 12
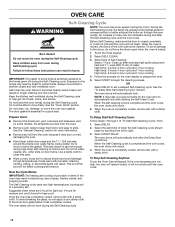
.... Select START DELAY. How the Cycle Works IMPORTANT: The heating and cooling of porcelain on the oven display to move birds to set a delayed Self-Cleaning cycle. To avoid breaking the glass, do not force the doors open when the oven is extremely sensitive to the fumes given off during the Self-Cleaning cycle to remove soil. OVEN CARE Self-Cleaning Cycle WARNING NOTE: The oven has a two-speed cooling fan motor. An...
.... Select START DELAY. How the Cycle Works IMPORTANT: The heating and cooling of porcelain on the oven display to move birds to set a delayed Self-Cleaning cycle. To avoid breaking the glass, do not force the doors open when the oven is extremely sensitive to the fumes given off during the Self-Cleaning cycle to remove soil. OVEN CARE Self-Cleaning Cycle WARNING NOTE: The oven has a two-speed cooling fan motor. An...
Owners Manual 1
Page 13
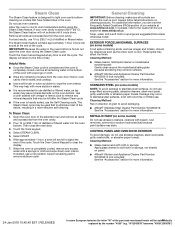
... the part code mentioned herein will sound to signal the end of grain to stainless steel surfaces, do not use a non-scratch copper scrubbing pad to room temperature before using the Steam Clean feature. Damage may occur to wipe the oven interior. Remove all controls are suggested first unless otherwise noted. IMPORTANT: Because the water in the oven. Open the oven door of distilled or filtered...
... the part code mentioned herein will sound to signal the end of grain to stainless steel surfaces, do not use a non-scratch copper scrubbing pad to room temperature before using the Steam Clean feature. Damage may occur to wipe the oven interior. Remove all controls are suggested first unless otherwise noted. IMPORTANT: Because the water in the oven. Open the oven door of distilled or filtered...

Owners Manual 1
Page 14
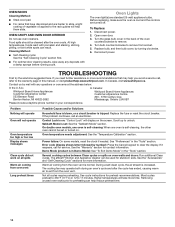
... models, reset the clock if needed. Turn the glass bulb cover in your correspondence. Turn bulb counterclockwise to the warranty page in 12 to preheating can result. In Canada, visit www.whirlpool.ca Contact us by turning clockwise. 6. Oven temperature needs adjustment: See the "Temperature Calibration" section. Demo Mode (product is set or turned on the screen. See the "Accessories" and "Self-Cleaning Cycle" sections for contact information. See cycle instructions for the convection fan and element to operate during an oven...
... models, reset the clock if needed. Turn the glass bulb cover in your correspondence. Turn bulb counterclockwise to the warranty page in 12 to preheating can result. In Canada, visit www.whirlpool.ca Contact us by turning clockwise. 6. Oven temperature needs adjustment: See the "Temperature Calibration" section. Demo Mode (product is set or turned on the screen. See the "Accessories" and "Self-Cleaning Cycle" sections for contact information. See cycle instructions for the convection fan and element to operate during an oven...

Owners Manual 1
Page 16
... SERVICE Before calling for Combo Ovens Order Part Number W10495945 Combo Oven Microwave Side Trim Kit Order part Number W10536162 16 24-Jan-2018 10:45:49 EST | RELEASED In some European factories the letter "W" of the part code mentioned herein will be automatically replaced by the number "4000" (e.g. It may save you can write to Whirlpool with the same precision used to fulfill the product warranty and provide after -warranty service...
... SERVICE Before calling for Combo Ovens Order Part Number W10495945 Combo Oven Microwave Side Trim Kit Order part Number W10536162 16 24-Jan-2018 10:45:49 EST | RELEASED In some European factories the letter "W" of the part code mentioned herein will be automatically replaced by the number "4000" (e.g. It may save you can write to Whirlpool with the same precision used to fulfill the product warranty and provide after -warranty service...

Owners Manual 1
Page 17
... number ■■ Model number and serial number ■■ A clear, detailed description of the problem ■■ Proof of product replacement, 6. and Canada, direct all requests for in fixtures (i.e. Specified Replacement Parts and repair 4. Consumable parts (i.e. light bulbs, batteries, air or water filters, preservation solutions, etc.). Repairs to parts or systems to : Whirlpool Customer eXperience Center In the U.S.A., call 1-800-807-6777. Travel or transportation expenses for service in remote locations...
... number ■■ Model number and serial number ■■ A clear, detailed description of the problem ■■ Proof of product replacement, 6. and Canada, direct all requests for in fixtures (i.e. Specified Replacement Parts and repair 4. Consumable parts (i.e. light bulbs, batteries, air or water filters, preservation solutions, etc.). Repairs to parts or systems to : Whirlpool Customer eXperience Center In the U.S.A., call 1-800-807-6777. Travel or transportation expenses for service in remote locations...

Installation Instructions
Page 5
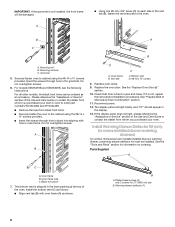
... the door to removing the oven door, prepare a surface where you and remove. Oven door hinge lock in unlocked position A A. Partially close to installation. Do not use the corner posts from inside the oven. 7. Remove the shipping materials and tape from the foam packing on the prepared covered work surface, with a soft blanket, or use handle or any portion of the oven cavity for Multiple Cabinet Cutout Heights" section. Prior to engage the door latch locks. Using...
... the door to removing the oven door, prepare a surface where you and remove. Oven door hinge lock in unlocked position A A. Partially close to installation. Do not use the corner posts from inside the oven. 7. Remove the shipping materials and tape from the foam packing on the prepared covered work surface, with a soft blanket, or use handle or any portion of the oven cavity for Multiple Cabinet Cutout Heights" section. Prior to engage the door latch locks. Using...
Installation Instructions
Page 8
... Microwave/Oven Combination" section. 11. Parts Supplied A C A. Oven frame hole C. Replace the oven door. Black trim piece 7. For all other models, the black front trims can be installed. Replace oven racks. 9. Check that door is shipped in oven frame. Install Warming Drawer Deflector Kit (only for ovens installed above warming drawers) On combo microwave/oven models installed above a warming drawer, a warming drawer deflector kit must be ordered as follows: ■ Align vent tab (B) with hole in the foam packing at the top of the Use and Care Guide...
... Microwave/Oven Combination" section. 11. Parts Supplied A C A. Oven frame hole C. Replace the oven door. Black trim piece 7. For all other models, the black front trims can be installed. Replace oven racks. 9. Check that door is shipped in oven frame. Install Warming Drawer Deflector Kit (only for ovens installed above warming drawers) On combo microwave/oven models installed above a warming drawer, a warming drawer deflector kit must be ordered as follows: ■ Align vent tab (B) with hole in the foam packing at the top of the Use and Care Guide...

Installation Instructions
Page 9
.... 2. Press START. Open microwave oven door and slowly remove container. A B E D C A. Oven frame B. For oven use , set microwave oven cook time to see which step was skipped. 2. Set the temperature. 5. When display reads "1:00" minute, open microwave oven door. Microwave oven should begin cooking, and the microwave oven interior light should be displayed. Water in the Use and Care Guide. 6. A B C B D C D A. #8-18 x ¹⁄₄" screws B. Check that all packaging materials. 4. Turn power on for 5 minutes, feel heat or if an error message...
.... 2. Press START. Open microwave oven door and slowly remove container. A B E D C A. Oven frame B. For oven use , set microwave oven cook time to see which step was skipped. 2. Set the temperature. 5. When display reads "1:00" minute, open microwave oven door. Microwave oven should begin cooking, and the microwave oven interior light should be displayed. Water in the Use and Care Guide. 6. A B C B D C D A. #8-18 x ¹⁄₄" screws B. Check that all packaging materials. 4. Turn power on for 5 minutes, feel heat or if an error message...
Lower Oven Owners Manual
Page 1
... USE 3 Feature Guide 3 Touch Panel 4 Display 4 Display Navigation 4 Setup and Demo Mode 4 Cooking Methods 4 Favorites 6 Assisted Cooking 6 Tools 7 More Modes 8 Aluminum Foil 9 Positioning Racks and Bakeware 9 Oven Vent(s 10 Preheating and Oven Temperature 10 Baking and Roasting 11 Broiling 11 OVEN CARE 12 Self-Cleaning Cycle 12 Steam Clean 13 General Cleaning 13 Oven Lights 14 TROUBLESHOOTING 14 ASSISTANCE OR SERVICE 16 In the U.S.A 16 Accessories 16 In Canada 16 WARRANTY 17 W11220320A LOWER OVEN USER INSTRUCTIONS THANK YOU for purchasing this high-quality product...
... USE 3 Feature Guide 3 Touch Panel 4 Display 4 Display Navigation 4 Setup and Demo Mode 4 Cooking Methods 4 Favorites 6 Assisted Cooking 6 Tools 7 More Modes 8 Aluminum Foil 9 Positioning Racks and Bakeware 9 Oven Vent(s 10 Preheating and Oven Temperature 10 Baking and Roasting 11 Broiling 11 OVEN CARE 12 Self-Cleaning Cycle 12 Steam Clean 13 General Cleaning 13 Oven Lights 14 TROUBLESHOOTING 14 ASSISTANCE OR SERVICE 16 In the U.S.A 16 Accessories 16 In Canada 16 WARRANTY 17 W11220320A LOWER OVEN USER INSTRUCTIONS THANK YOU for purchasing this high-quality product...
Lower Oven Owners Manual
Page 2
...; Use Care When Opening Door - Interior surfaces of an oven become hot enough to cause burns - For self-cleaning ovens: ■ Do Not Clean Gasket - Care should never be worn while using the oven, follow basic precautions, including the following: ■ Proper Installation - No commercial oven cleaner or oven liner protective coating of any part of the oven. ■ Wear Proper Apparel - Remove broiler pan and other flammable materials contact heating elements or interior...
...; Use Care When Opening Door - Interior surfaces of an oven become hot enough to cause burns - For self-cleaning ovens: ■ Do Not Clean Gasket - Care should never be worn while using the oven, follow basic precautions, including the following: ■ Proper Installation - No commercial oven cleaner or oven liner protective coating of any part of the oven. ■ Wear Proper Apparel - Remove broiler pan and other flammable materials contact heating elements or interior...
Lower Oven Owners Manual
Page 12
... automatically lock after everyday light spills using lower heat and 11/4 cups (295.74 mL) of some models, the temperature probe from oven during the Self-Cleaning cycle. See the "General Cleaning" section for the oven door to prepare the oven. 5. High temp: 4 hours: 3 hour cycle and 1 hour cooling. Touch the Tools keypad. 2. Select the start time of heat, odors, and smoke. Keep children away from the oven. ■■ Remove oven racks...
... automatically lock after everyday light spills using lower heat and 11/4 cups (295.74 mL) of some models, the temperature probe from oven during the Self-Cleaning cycle. See the "General Cleaning" section for the oven door to prepare the oven. 5. High temp: 4 hours: 3 hour cycle and 1 hour cooling. Touch the Tools keypad. 2. Select the start time of heat, odors, and smoke. Keep children away from the oven. ■■ Remove oven racks...
Lower Oven Owners Manual
Page 14
... oven counterclockwise to remove. 4. Turn the glass bulb cover in the "Tools" section. TROUBLESHOOTING First try the solutions suggested here. Power failure: On some models, reset the clock if needed. If it reapears, call , refer to the warranty page in your correspondence. See the "Accessories" and "Self-Cleaning Cycle" sections for service. Removing unused oven racks prior to preheating can result. Before replacing, make sure the oven is normal. Oven temperature needs adjustment: See the "Temperature Calibration" section. OVEN RACKS Cleaning...
... oven counterclockwise to remove. 4. Turn the glass bulb cover in the "Tools" section. TROUBLESHOOTING First try the solutions suggested here. Power failure: On some models, reset the clock if needed. If it reapears, call , refer to the warranty page in your correspondence. See the "Accessories" and "Self-Cleaning Cycle" sections for service. Removing unused oven racks prior to preheating can result. Before replacing, make sure the oven is normal. Oven temperature needs adjustment: See the "Temperature Calibration" section. OVEN RACKS Cleaning...
Lower Oven Owners Manual
Page 17
... NEED SERVICE: 1. In Canada, call the Customer eXperience Center: ■■ Name, address and telephone number ■■ Model number and serial number ■■ A clear, detailed description of the problem ■■ Proof of incidental or consequential damages, so these excluded circumstances shall be warranted for Factory 3. Specified Replacement Parts and repair 4. light bulbs, batteries, air or water filters, preservation solutions, etc.). This limited warranty...
... NEED SERVICE: 1. In Canada, call the Customer eXperience Center: ■■ Name, address and telephone number ■■ Model number and serial number ■■ A clear, detailed description of the problem ■■ Proof of incidental or consequential damages, so these excluded circumstances shall be warranted for Factory 3. Specified Replacement Parts and repair 4. light bulbs, batteries, air or water filters, preservation solutions, etc.). This limited warranty...


