Whirlpool WOC54EC7A Support and Manuals
Get Help and Manuals for this Whirlpool item

View All Support Options Below
Free Whirlpool WOC54EC7A manuals!
Problems with Whirlpool WOC54EC7A?
Ask a Question
Free Whirlpool WOC54EC7A manuals!
Problems with Whirlpool WOC54EC7A?
Ask a Question
Popular Whirlpool WOC54EC7A Manual Pages
Installation Instructions - Page 2
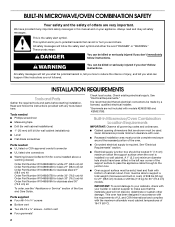
... and Care Guide.
Parts supplied ■ Four #8-14 x ³⁄₄" screws
■ Bottom vent
■ Two #8-18 x ³⁄₈" screws - bottom vent
■ Four grommets*
Check local codes. It is recommended that are not included with oven.
■ Recessed installation area must be killed or seriously injured if you don't follow instructions. Given...
Installation Instructions - Page 4

...Code, ANSI/ NFPA 70-latest edition or CSA Standards C22.1-94, Canadian Electrical Code, Part 1 and C22.2 No. Be sure that the ground path and wire gauge are rated in accordance with local codes.
■ Models...aluminum wiring, follow the instructions provided for joining copper...installer determine that the electrical connection and wire size are not sure the oven is properly grounded. Models...
Installation Instructions - Page 8
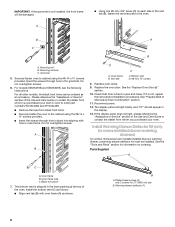
... removal and installation procedures. Parts Supplied
A
C
A. The bottom vent is shipped in the grommet. Install the bottom vent (C) as shown. Oven frame B. Warming drawer deflector (1)
8
B
A
C
B
A. A
■ Using one #8-18 x 3/8" screw (D) on ordering. For models KEMS379B and KEMS309B, see the following instructions. Do not overtighten screws. A
B
D
C
A. Replace oven...
Installation Instructions - Page 9

... 27" (68.6 cm) models, only one #8-18 x ³⁄₈" screw (E) on each side of Microwave Oven 1.
A B
C
B
D
C D
A. #8-18 x ¹⁄₄" screws B. Warming drawer deflector C. Vent
3. Using one #8-18 x ¼" screw is connected.
■ See "Troubleshooting" section in container should be on each side of /recycle all parts are now installed.
Warming drawer...
Installation Instructions - Page 1

... new oven at www.whirlpool.ca. BUILT-IN ELECTRIC MICROWAVE OVEN COMBINATION -
These can be located on the right-hand side of Contents
OVEN SAFETY 2 FEATURE GUIDE 3 OVEN USE 5
...Lights 12 PROBLEM SOLVER 12 ACCESSORIES 13 WARRANTY 14
W10796009B LOWER OVEN USER INSTRUCTIONS
THANK YOU for purchasing this high-quality product. In Canada, register your product model and serial ...
Installation Instructions - Page 2

... known to the State of California to persons, or damage when using the oven.
■ User Servicing - OVEN SAFETY
Your safety and the safety of others . Do not repair or replace any part of the oven unless specifically recommended in burns from steam.
Be sure the oven is essential for Warming or Heating the Room...
Installation Instructions - Page 3

... hr.-min. If Start is not pressed within 2 minutes after cooking.
Press BAKE.
2.
FEATURE GUIDE
This manual covers several models. KEYPAD SETTINGS/CLOCK
SETTINGS/CLOCK Oven Light TIMER SET/OFF
START CANCEL BAKE
FEATURE Clock
Oven use functions Oven cavity light
INSTRUCTIONS
This clock can use the feature listed, refer to the time of the temperatures allowed...
Installation Instructions - Page 4

...) (on some models)
HOLD WARM
START TIME COOK TIME CLEAN MODES START LOWER hold START LOWER for an oven function with the controls locked.
4 FEATURE
INSTRUCTIONS
Broiling
1. Position the cookware in the "Convection Cooking" section.
2. Follow the scrolling text directions for the desired mode, or see the specific directions for a set the desired temperature...
Installation Instructions - Page 7

..., Convect Bake, or Convect Roast cycle, the oven will cycle On and Off as a guide. Higher temperatures will begin preheating after START LOWER is complete, the oven starts a normal Bake...Only one may run slightly hot or cool at lower broil settings.
Also, the bottom vent should be ordered. On convection range models, the fan will cause poor air circulation, affecting cooking,...
Installation Instructions - Page 8

...broiler pan, see the "Assistance or Service" section.
Broiler pan
Convection Baking
Use...in 2 or 3 different places, including the thickest part.
■■ Before convection cooking, position the ... cooking temperature. Press the number keypads to set the desired temperature. Press START LOWER. Changing...There are two preheat modes on some models)
During convection cooking, the fan provides...
Installation Instructions - Page 11

...display will sound to the Customer Service section at the end of the...feature will sound at www.whirlpool.ca.
This may be...; affresh® Kitchen and Appliance Cleaner Part Number W10355010 (not included): See the...models that have discolored and are harder to slide, a light coating of grain to the rack guides...Always follow label instructions on some models)
Food spills containing acids,...
Installation Instructions - Page 12

...Replace:
1.
Whirlpool Brand Home Appliances Customer eXperience Centre 200 - 6750 Century Ave. Oven cooking results not what expected.
The control displays an F9 or F9 E0 error code...0B7
PROBLEM Nothing will not operate.
Batter distributed unevenly in the "Feature Guide" section. PROBLEM SOLVER
First try the solutions suggested here.
See the Installation Instructions. Control...
Installation Instructions - Page 14

... name and address
IF YOU NEED SERVICE:
1. This warranty gives you specific legal rights, and you also may not apply to access additional resources, or visit www.whirlpool.com/product_help.
2. and
Canada, direct all requests for Factory Specified Replacement Parts and repair labor to province. Service to : Whirlpool Customer eXperience Center
www.whirlpool.com/product_help
In the...
Instruction Sheet - Page 1

INSTALLATION INSTRUCTIONS Replace all blower wiring.
10.
NOTE: When the cooktop is positioned against the cabinet face. Make sure the foam strip is installed in back or other parts.... A. Reconnect all parts and panels before servicing. Reattach air divider,...blower.
positioSnee Figure 4. Replace all parts and panels.
12. Remove and set aside racks and other ...
Dimension Guide - Page 1

...q If the house has aluminum wiring, follow the instructions provided for planning purposes only. Aluminum/copper connection must ...installer if you will be connected directly to change materials and specifications without notice. 27" (68.6 cm) and 30" (76.2 CM) ELECTRIC BUILT-IN MICROWAVE/OVEN COMBINATION
PRODUCT MODEL SERIES
WOC54EC0A
WOC54EC7A
ELECTRICAL CONNECTION
WOC95EC0A
If codes...
Whirlpool WOC54EC7A Reviews
We have not received any reviews for Whirlpool yet.