Whirlpool WOS51EC0H Support and Manuals
Get Help and Manuals for this Whirlpool item

View All Support Options Below
Free Whirlpool WOS51EC0H manuals!
Problems with Whirlpool WOS51EC0H?
Ask a Question
Free Whirlpool WOS51EC0H manuals!
Problems with Whirlpool WOS51EC0H?
Ask a Question
Popular Whirlpool WOS51EC0H Manual Pages
Specification Sheet - Page 1

... purposes only. Specifications subject to remote enable. 5.0 cu. Smart Single Wall Oven
WOS51EC0H
Stainless Steel WOS51EC0HS
Also available in the U.S.A.
Voice Control with a Compatible Voice-Enabled device** Control your kitchen no matter what you use most with product. WOS51EC0HSpecSheetV01.
Printed in :
White
WOS51EC0HW
Black
WOS51EC0HB
Capacity
Oven
5.0 cu. ft...
Garantia - Page 1
...
In the U.S.A., call 1-800-807-6777. operated and maintained according to chemicals. instructions attached to correct product damage or defects caused by Whirlpool. house wiring, fuses or water inlet hoses). Consumable parts (i.e. Repairs to parts or systems to or furnished with servicing, removal or replacement of the product.
15. but not limited to high salt concentrations, high...
Installation Instructions - Page 2

... safety of the Installation Instructions provided with your appliance. WARNING
You can kill or hurt you and others are very important. NOTE: Refer to support a single oven weight of 251 lbs (114 kg) for 27" (68.6 cm) models or 288 lbs (131 kg) for wall cabinet installations) ■■ Level ■■ Flat-blade screwdriver
Parts Needed ■...
Installation Instructions - Page 3
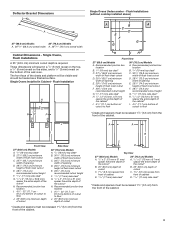
...(13 mm x 51 mm) spacer the entire depth of the cabinet*
I
Front View
27" (68.6 cm) Models
A. 3/4" (19 mm) top cleat*
B. 271/4" (69.2 cm) minimum width of flush inset cutout
C. 257... 11/16" (17 mm) side cleat*
G. 1/2" x 2" (13 mm x 50.8 mm) spacer the entire depth of the wall oven. Single Ovens Installed in a 1/4" (6 mm) reveal on the top, a 1/4" (6 mm) reveal on the sides, and a 1/8" (3 mm) ...
Installation Instructions - Page 4
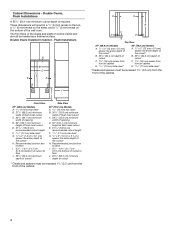
...) depth of cutout
C. 13/8" (3.5 cm) recess from front of the wall oven. Flush Installations
A
B
C
D
E
F
F
G
G
H
H
J
I
Front View
27" (68.6 cm) Models
A. 9/16" (14 mm) top cleat*
B. 271/4" (69.2 cm... cm) minimum depth of cutout
* Cleats and spacers must be treated as a finished surface.
Double Ovens Installed in a 1/4" (6 mm) reveal on the top, a 1/4" (6 mm) reveal on the sides...
Installation Instructions - Page 5

... to installation. To avoid floor damage, set the oven onto cardboard prior to engage the door latch locks. Remember to keep the corner posts and other injury.
5. Move oven and cardboard close hinge arm on select models
B. Locate the oven door hinge locks in partially unlocked position
5 Oven door hinge lock in both corners of the Installation Instructions provided...
Installation Instructions - Page 6

... on that side is not properly installed. Slot in the corners of the oven cavity. If one side of the oven door is engaged in the lower front of the oven door, and rotate the hinge locks toward the oven cavity to the "Make Electrical Connection" section in the Installation Instructions provided with slots in the slot...
Installation Instructions - Page 7
... Instructions provided with this kit. A
B
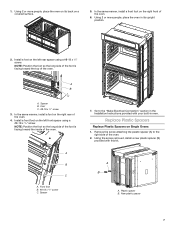
A. Using 2 or more people, place the oven on its upright position.
2. Install a foot on the left rear spacer using a #8‑18 x 3/8" screw.
Front foot B. #8-18 x 3/8" screw C. Spacer B. Go to the
right side of the oven.
6. New plastic spacer
7 Install a front foot on the left front spacer using a #8-18 x 3/8" screw. Replace...
Installation Instructions - Page 8
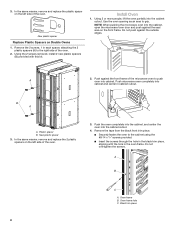
.... Black trim piece
8 Using 2 or more people, lift the oven partially into the cabinet cutout.
4. Plastic spacer B. Oven frame B. 3. In the same manner, remove and replace the plastic spacer on the left side of the oven.
3.
Remove the 2 screws, 1 in the oven frame. Install Oven
1. Use the oven opening as an area to the cabinet using the #8‑...
Installation Instructions - Page 9
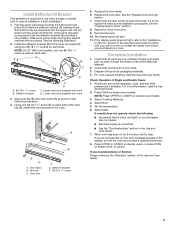
... is not,
repeat the removal and installation procedures. NOTE: On 27" (68.6 cm) models, only one #8-18 x 3/8" screw (E) on each side of the vent tab (B), fasten the vent securely to the "Assistance or Service" section of the Use and Care Guide.
9 Oven frame B. Vent tab C. Replace the oven racks. 6. For oven use , set up the language, clock, and any...
Fit System Guarantee - Page 1

... Limited Guarantee Service Center at 800-253-1301
to initiate your claim.
❷ WITHIN 90 DAYS of fitting your new 27" or 30" Whirlpool Brand built-in replacement
installations;
All submitted proofs become the property of Whirlpool Corporation and cannot be liable for new cabinet installations related to cabinet modification and spatial issues in wall oven into your...
Internet Connectivity Guide - Page 1

... app, connectivity setup instructions, terms of your router's capablilities, refer to the router manufacturer's instructions.
■■ The router to be guided through the steps to set up a user account and to connect your appliance. Once installed, launch the app. En cas de problèmes ou pour toute question, communiquez avec l'équipe Whirlpool Corporation Connected...
Internet Connectivity Guide - Page 2
...times. The user manual for help. ...Part 15 of the device into which the module is installed must also display a label
Antenna Type
Maximum Permissible
Required
referring to the enclosed module. This device complies with Part 15 of the part code...instructions, may cause undesired operation of a type and maximum (or lesser) gain approved for the transmitter by Industry Canada to install...
Internet Connectivity Guide - Page 4
...author may not be automatically replaced by Eclipse Foundation, Inc. ...code must retain the above copyright notice, this software is governed by name to opensource@whirlpool...specific prior written permission.
17-May-2017 17:39:35 EDT | RELEASED
In some European factories the letter "W" of the part code...TO, PROCUREMENT OF SUBSTITUTE GOODS OR SERVICES; Redistribution and use in binary form...
Internet Connectivity Guide - Page 6

All rights reserved. W11097305C
UtIilnisésosomues lEicuenrcoepaeuanCafnaacdtao.rTieousstdhreoiltestrtéesrer"vWés". "W12345678" becomes "400012345678") of the part co de men tioned herein will be autom0a5ti/c1a7lly
17-May-2017 17:39:35 EDT | RELEASED
replaced by the number "4000" (e.g.
®/™ ©2017 Whirlpool. Used under license in Canada.
Whirlpool WOS51EC0H Reviews
We have not received any reviews for Whirlpool yet.