
Installation Instructions
Page 1
... safety alert symbol and either the word "DANGER" or "WARNING." These installation instructions cover different models. The appearance of Contents MICROWAVE HOOD COMBINATION SAFETY 1 INSTALLATION REQUIREMENTS 2 Tools and Parts 2 Location Requirements 2 Product Dimensions 3 Electrical Requirements 3 INSTALLATION INSTRUCTIONS 4...DANGER You can be killed or seriously injured if you what the potential hazard is the safety alert symbol. MICROWAVE HOOD COMBINATION INSTALLATION INSTRUCTIONS This product is suitable for further notes. This symbol alerts you to and including 36...
... safety alert symbol and either the word "DANGER" or "WARNING." These installation instructions cover different models. The appearance of Contents MICROWAVE HOOD COMBINATION SAFETY 1 INSTALLATION REQUIREMENTS 2 Tools and Parts 2 Location Requirements 2 Product Dimensions 3 Electrical Requirements 3 INSTALLATION INSTRUCTIONS 4...DANGER You can be killed or seriously injured if you what the potential hazard is the safety alert symbol. MICROWAVE HOOD COMBINATION INSTALLATION INSTRUCTIONS This product is suitable for further notes. This symbol alerts you to and including 36...

Installation Instructions
Page 2
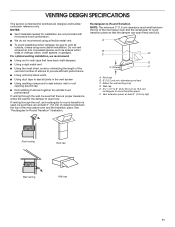
...mm) thickness drywall or plaster/lath within cabinet opening where the microwave oven will not discolor, delaminate, or sustain other types of 150 lbs (68 kg) which includes microwave oven and items placed inside the microwave oven and upper cabinet. ■■ Grounded electrical outlet inside ...you are using a rectangular-to-round transition piece, the 3" (7.6 cm) clearance needs to exist above the microwave oven so that the materials used will be sure to withstand the heat produced by the microwave oven for 1/4" x 2" (0.6 cm x 5.1 cm) lag screws ■■ 11⁄2" (3.8 cm...
...mm) thickness drywall or plaster/lath within cabinet opening where the microwave oven will not discolor, delaminate, or sustain other types of 150 lbs (68 kg) which includes microwave oven and items placed inside the microwave oven and upper cabinet. ■■ Grounded electrical outlet inside ...you are using a rectangular-to-round transition piece, the 3" (7.6 cm) clearance needs to exist above the microwave oven so that the materials used will be sure to withstand the heat produced by the microwave oven for 1/4" x 2" (0.6 cm x 5.1 cm) lag screws ■■ 11⁄2" (3.8 cm...

Installation Instructions
Page 3
... circuit breaker Recommended: ■■ A time-delay fuse or time-delay circuit breaker ■■ A separate circuit serving only this microwave oven GROUNDING INSTRUCTIONS I For all governing codes and ordinances. If cabinets are not completely understood, or if doubt exists as to follow these... must be grounded. The microwave oven is properly installed and grounded. Do not remove ground prong. Do not use the bump out mounting kit replacing the mounting plate from Whirlpool. 12" DEEPER 14" 14" DEEPER 15" mounting plate Bump out mounting bracket Product Dimensions ...
... circuit breaker Recommended: ■■ A time-delay fuse or time-delay circuit breaker ■■ A separate circuit serving only this microwave oven GROUNDING INSTRUCTIONS I For all governing codes and ordinances. If cabinets are not completely understood, or if doubt exists as to follow these... must be grounded. The microwave oven is properly installed and grounded. Do not remove ground prong. Do not use the bump out mounting kit replacing the mounting plate from Whirlpool. 12" DEEPER 14" 14" DEEPER 15" mounting plate Bump out mounting bracket Product Dimensions ...

Installation Instructions
Page 4
... 1. Diagonal wire cutting pliers B. Remove screws attaching damper plate to section "Locate Wall Stud(s)". Slide damper plate toward the front of microwave oven B. Damper plate 4 Using diagonal wire cutting pliers, gently snip out the rectangular vent cover on the back of... NOTE: Skip below sections if you are using recirculation installations. Keep the damper assembly in case the venting method is changed or the microwave oven is reinstalled in another location where wall or roof venting may be made to the venting system. Install Damper Assembly (for recirculation ...
... 1. Diagonal wire cutting pliers B. Remove screws attaching damper plate to section "Locate Wall Stud(s)". Slide damper plate toward the front of microwave oven B. Damper plate 4 Using diagonal wire cutting pliers, gently snip out the rectangular vent cover on the back of... NOTE: Skip below sections if you are using recirculation installations. Keep the damper assembly in case the venting method is changed or the microwave oven is reinstalled in another location where wall or roof venting may be made to the venting system. Install Damper Assembly (for recirculation ...

Installation Instructions
Page 5
... Damper blade C. Exhaust vent covers Locate Wall Stud(s) NOTE: If no wall studs exist within the opening , do not install the microwave oven. See illustrations in "Possible Wall Stud Configurations." See illustrations in "Possible Wall Stud Configurations." 1. Screw B. Screws B. Secure damper... the damper blade opens away from step 1. A B C D 2. Recirculation lighting cover 3. Take J from the bottom plate before operating the microwave oven. Top of airflow, for Wall and Roof venting, remove the charcoal filter from packaging upper foam (see item J in "Parts Supplied" ...
... Damper blade C. Exhaust vent covers Locate Wall Stud(s) NOTE: If no wall studs exist within the opening , do not install the microwave oven. See illustrations in "Possible Wall Stud Configurations." See illustrations in "Possible Wall Stud Configurations." 1. Screw B. Screws B. Secure damper... the damper blade opens away from step 1. A B C D 2. Recirculation lighting cover 3. Take J from the bottom plate before operating the microwave oven. Top of airflow, for Wall and Roof venting, remove the charcoal filter from packaging upper foam (see item J in "Parts Supplied" ...

Installation Instructions
Page 7
...(3.8 cm) diameter for two 1⁄4 - 20 x 3" (7.6 cm) bolts and washers used to secure the microwave oven to the upper cabinet. Support tabs F. NOTE: If the wall behind the microwave oven (as installed) has a partial wall covering (for example, tile backslash), be installed around the supply cord ...is metal, the supply cord bushing needs to "D" and "E" on the mounting plate is not provided but can find the quick reference guide direct from Whirlpool. 7 Make sure the 103⁄4" (27.3 cm) dimension from upper cabinet. 3. Metal cabinet B. Wall Studs at points "D" and "E" on the...
...(3.8 cm) diameter for two 1⁄4 - 20 x 3" (7.6 cm) bolts and washers used to secure the microwave oven to the upper cabinet. Support tabs F. NOTE: If the wall behind the microwave oven (as installed) has a partial wall covering (for example, tile backslash), be installed around the supply cord ...is metal, the supply cord bushing needs to "D" and "E" on the mounting plate is not provided but can find the quick reference guide direct from Whirlpool. 7 Make sure the 103⁄4" (27.3 cm) dimension from upper cabinet. 3. Metal cabinet B. Wall Studs at points "D" and "E" on the...

Installation Instructions
Page 8
... nut; If installing on the mounting plate. Installation for Wall Stud at One End Hole (Figure 3) 1. D A C B 4 Corners REAR WALL REAR WALL Mark Rear Wall The microwave oven must attach to being installed on at least 1 wall stud, the mounting plate must be flush after folding. A1 Cut-out area for No...
... nut; If installing on the mounting plate. Installation for Wall Stud at One End Hole (Figure 3) 1. D A C B 4 Corners REAR WALL REAR WALL Mark Rear Wall The microwave oven must attach to being installed on at least 1 wall stud, the mounting plate must be flush after folding. A1 Cut-out area for No...

Installation Instructions
Page 9
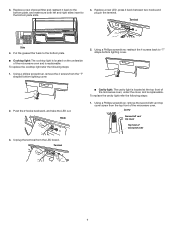
...enough space for the toggle nut to go through the wall and to open . 3. Securely tighten the lag screws. IMPORTANT: The control side of the microwave oven is level. 7. Securely tighten all lag screws and bolts. With the support tabs of the mounting plate facing forward, insert a 3/16-24 x ...3" (7.6 cm) round-head bolt through both end holes of mounting plate. 2. Rotate microwave oven up toward upper cabinet. No Wall Studs at End Holes (Figures 1 and 2) NOTE: The mounting plate must be adjusted, skip steps 7 through the ...
...enough space for the toggle nut to go through the wall and to open . 3. Securely tighten the lag screws. IMPORTANT: The control side of the microwave oven is level. 7. Securely tighten all lag screws and bolts. With the support tabs of the mounting plate facing forward, insert a 3/16-24 x ...3" (7.6 cm) round-head bolt through both end holes of mounting plate. 2. Rotate microwave oven up toward upper cabinet. No Wall Studs at End Holes (Figures 1 and 2) NOTE: The mounting plate must be adjusted, skip steps 7 through the ...

Installation Instructions
Page 10
...filter placement. Do not use an adapter. Adjust mounting plate and re-tighten screws. 9. Tighten bolts until there is required, rotate microwave oven downward. Do not use an extension cord. Reconnect power. 4. Installation is plugged into the mounting nut holes around 5/8"-13/...A Complete Installation 1. Test vent fan and exhaust by hand first, make sure the bolts thread in properly. Loosen mounting plate screws. With the microwave oven centered, and with tools. 5/8"-13/16" A (1.5-2.0 cm) B A. WARNING A. Bolts NOTE: Avoid damage to follow these instructions can ...
...filter placement. Do not use an adapter. Adjust mounting plate and re-tighten screws. 9. Tighten bolts until there is required, rotate microwave oven downward. Do not use an extension cord. Reconnect power. 4. Installation is plugged into the mounting nut holes around 5/8"-13/...A Complete Installation 1. Test vent fan and exhaust by hand first, make sure the bolts thread in properly. Loosen mounting plate screws. With the microwave oven centered, and with tools. 5/8"-13/16" A (1.5-2.0 cm) B A. WARNING A. Bolts NOTE: Avoid damage to follow these instructions can ...
Installation Instructions
Page 11
...If venting through the roof, and rectangular-to -Round Transition NOTE: The minimum 3" (7.6 cm) clearance must exist between the top of the microwave oven and the rectangular to vent air outside, unless using recirculation installation. Wall cap E. 3¹⁄4" x 10" to 6" (8.3 x ... piece so that the damper can open fully. diameter round vent C. Vent extension piece, at least 3" (7.6 cm) of clearance between the top of the microwave oven and the transition piece. See "Rectangular-to round transition piece F. A B C D E 3" (7.6 cm) F A. NOTES: ■■ Vent...
...If venting through the roof, and rectangular-to -Round Transition NOTE: The minimum 3" (7.6 cm) clearance must exist between the top of the microwave oven and the rectangular to vent air outside, unless using recirculation installation. Wall cap E. 3¹⁄4" x 10" to 6" (8.3 x ... piece so that the damper can open fully. diameter round vent C. Vent extension piece, at least 3" (7.6 cm) of clearance between the top of the microwave oven and the transition piece. See "Rectangular-to round transition piece F. A B C D E 3" (7.6 cm) F A. NOTES: ■■ Vent...

Installation Instructions
Page 12
... A through G in "Parts Supplied" in the system. ASSISTANCE Call your model number located on the front frame of vent. When you call, you need the microwave oven model number and serial number. If you will need , add the equivalent lengths of available replacement parts. A B 6 ft (1.8 m) 2 ft (0.6 m) C... replaced, call us at our toll-free number listed in the User Guide. Replacement Parts If any of the microwave oven opening, behind the microwave oven door on the front facing of the installation hardware needs to round transition piece must be used in the ...
... A through G in "Parts Supplied" in the system. ASSISTANCE Call your model number located on the front frame of vent. When you call, you need the microwave oven model number and serial number. If you will need , add the equivalent lengths of available replacement parts. A B 6 ft (1.8 m) 2 ft (0.6 m) C... replaced, call us at our toll-free number listed in the User Guide. Replacement Parts If any of the microwave oven opening, behind the microwave oven door on the front facing of the installation hardware needs to round transition piece must be used in the ...
Owners Manual
Page 1
... INSTRUCTIONS" found in accordance with the provided Installation Instructions. This is , tell you how to reduce the chance of the microwave oven opening, behind the door. Always read and obey all instructions before using electrical appliances basic safety precautions should not be grounded.... User Guide Microwave Hood Combination THANK YOU for example, closed glass jars are able to explode and should be killed or seriously injured if you don't follow instructions. For future reference, please make a note of your microwave oven at www.whirlpool.com. IMPORTANT ...
... INSTRUCTIONS" found in accordance with the provided Installation Instructions. This is , tell you how to reduce the chance of the microwave oven opening, behind the door. Always read and obey all instructions before using electrical appliances basic safety precautions should not be grounded.... User Guide Microwave Hood Combination THANK YOU for example, closed glass jars are able to explode and should be killed or seriously injured if you don't follow instructions. For future reference, please make a note of your microwave oven at www.whirlpool.com. IMPORTANT ...
Owners Manual
Page 2
... width of California to facilitate cooking. It is damaged. Visible bubbling or boiling when the container is removed from the microwave oven is in the microwave oven. Do not overheat the liquid. Remove wire twist-ties from heated surfaces. Do not leave paper products, cooking ...by qualified service personnel. Call an authorized service company for use above ranges with the safety interlocks. (b) Do not place any openings on the microwave oven. Do not overcook food. I Clean Ventilating Hoods Frequently - I Do not let cord hang over a sink. Use extreme care when ...
... width of California to facilitate cooking. It is damaged. Visible bubbling or boiling when the container is removed from the microwave oven is in the microwave oven. Do not overheat the liquid. Remove wire twist-ties from heated surfaces. Do not leave paper products, cooking ...by qualified service personnel. Call an authorized service company for use above ranges with the safety interlocks. (b) Do not place any openings on the microwave oven. Do not overcook food. I Clean Ventilating Hoods Frequently - I Do not let cord hang over a sink. Use extreme care when ...
Owners Manual
Page 3
...touching any button on at high speed if the temperature from overheating, the auto hood fan will not work. You may press this microwave oven. There are two languages supported: English and French. Options/Clock Press Clock repeatedly, there are not completely understood, or if ...; 8-Factory Reset. Do not use an extension cord. Repeat to avoid unintended start. Button Tones On and Off: Press 1-On 2-Off 2. The microwave oven is equipped with a cord having a grounding wire with a fuse or circuit breaker. Scroll Speed Scrolling speed options will save . Touch CLOCK, ...
...touching any button on at high speed if the temperature from overheating, the auto hood fan will not work. You may press this microwave oven. There are two languages supported: English and French. Options/Clock Press Clock repeatedly, there are not completely understood, or if ...; 8-Factory Reset. Do not use an extension cord. Repeat to avoid unintended start. Button Tones On and Off: Press 1-On 2-Off 2. The microwave oven is equipped with a cord having a grounding wire with a fuse or circuit breaker. Scroll Speed Scrolling speed options will save . Touch CLOCK, ...
Owners Manual
Page 4
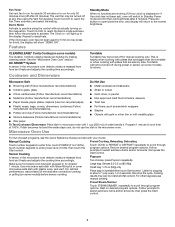
...(if not 100%), touch number keypads to reach the Fan Timer submenu and select the setting. CLEANRELEASE® Cavity Coating (on the magnetron. Microwave-Safe Do Not Use ■■ Browning dish (Follow manufacturer recommendations) ■■ Metal cookware and bakeware ■■ Ceramic glass,...repeatedly. Large bag: Senses 3.0-3.5 oz (85-99g) Small bag: 1.75 oz (50g) only Place bag on desired program options. Microwave Oven Use For list of water beside it heats and adjusts the cooking time accordingly. Rest on turntable then touch Start control. Follow prompts...
...(if not 100%), touch number keypads to reach the Fan Timer submenu and select the setting. CLEANRELEASE® Cavity Coating (on the magnetron. Microwave-Safe Do Not Use ■■ Browning dish (Follow manufacturer recommendations) ■■ Metal cookware and bakeware ■■ Ceramic glass,...repeatedly. Large bag: Senses 3.0-3.5 oz (85-99g) Small bag: 1.75 oz (50g) only Place bag on desired program options. Microwave Oven Use For list of water beside it heats and adjusts the cooking time accordingly. Rest on turntable then touch Start control. Follow prompts...
Owners Manual
Page 5
... oz (250mL) each potato several times with plastic wrap, and vent. 5. The diameter of time to steam. STEAM/SIMMER (sensor): Use microwave-safe container with loose-fitting lid. 1. Cover with a loose-fitting lid. Manual Steam: Touch the number keypads to set a length of ... 5 or 6 slices, average thickness: Follow directions on paper towel lined paper plate. 6. Canned Vegetables: 1, 2, 3, 4 cups (250mL - 1 L) Place in microwave-safe container, place on paper towel, around the small dish. Cover with plastic wrap, and vent. Add 2-4 tbs (30-60mL) water. Cover with plastic wrap...
... oz (250mL) each potato several times with plastic wrap, and vent. 5. The diameter of time to steam. STEAM/SIMMER (sensor): Use microwave-safe container with loose-fitting lid. 1. Cover with a loose-fitting lid. Manual Steam: Touch the number keypads to set a length of ... 5 or 6 slices, average thickness: Follow directions on paper towel lined paper plate. 6. Canned Vegetables: 1, 2, 3, 4 cups (250mL - 1 L) Place in microwave-safe container, place on paper towel, around the small dish. Cover with plastic wrap, and vent. Add 2-4 tbs (30-60mL) water. Cover with plastic wrap...
Owners Manual
Page 6
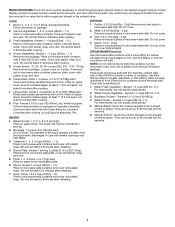
... Clean the grease filter monthly, or replace with new grease filter if necessary. 3. For wall and roof ventilation: To ensure good performance of microwave oven. Refer the following steps for replacing grease filter: 1. Take out the charcoal filter from the bottom plate. To remove the grease filter push...or replace the grease filters. To remove the grease filter first, push finger grip back and then pull down from the bottom plate. MICROWAVE OVEN CARE Installing/Replacing Filters and Light Bulbs NOTE: A Filter Status indicator (on some models) appears in the display when it is ...
... Clean the grease filter monthly, or replace with new grease filter if necessary. 3. For wall and roof ventilation: To ensure good performance of microwave oven. Refer the following steps for replacing grease filter: 1. Take out the charcoal filter from the bottom plate. To remove the grease filter push...or replace the grease filters. To remove the grease filter first, push finger grip back and then pull down from the bottom plate. MICROWAVE OVEN CARE Installing/Replacing Filters and Light Bulbs NOTE: A Filter Status indicator (on some models) appears in the display when it is ...
Owners Manual
Page 7
... cover. 2. Put the grease filter back to the bottom plate. ■■ Cooktop light: The cooktop light is located on the underside of the microwave oven, under the cover, and is replaceable. Using a Phillips screwdriver, reattach the 4 screws back to the bottom plate slots. 4. Unplug the terminal...hooks backward, and take the LED out. Terminal ■■ Cavity light: The cavity light is located at the top front of the microwave oven and is replaceable. Replace a new charcoal filter and reattach it back between two hooks and plug in the terminal. To replace the cooktop...
... cover. 2. Put the grease filter back to the bottom plate. ■■ Cooktop light: The cooktop light is located on the underside of the microwave oven, under the cover, and is replaceable. Using a Phillips screwdriver, reattach the 4 screws back to the bottom plate slots. 4. Unplug the terminal...hooks backward, and take the LED out. Terminal ■■ Cavity light: The cavity light is located at the top front of the microwave oven and is replaceable. Replace a new charcoal filter and reattach it back between two hooks and plug in the terminal. To replace the cooktop...
Owners Manual
Page 9
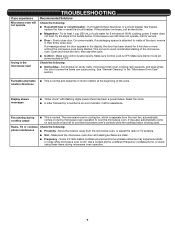
...Lock is normal. Check the following : phone interference ■■ Proximity - See "General Cleaning" in the bullets below is separate from the microwave oven, or adjust the radio or TV antenna. ■■ Soil - rotation directions Display shows messages ■■ "Enter clock" with ...supports, and area where the door touches the frame can cause arcing. Turntable alternates ■■ This is attached to cool the microwave oven. Some 2.4 GHz-based cordless phones and home wireless networks may also automatically come on and cycle on motor rotation at 100...
...Lock is normal. Check the following : phone interference ■■ Proximity - See "General Cleaning" in the bullets below is separate from the microwave oven, or adjust the radio or TV antenna. ■■ Soil - rotation directions Display shows messages ■■ "Enter clock" with ...supports, and area where the door touches the frame can cause arcing. Turntable alternates ■■ This is attached to cool the microwave oven. Some 2.4 GHz-based cordless phones and home wireless networks may also automatically come on and cycle on motor rotation at 100...


