
Owners Manual
Page 1
..." found in the provided Installation Instructions. for purchasing this section. ■ Some products such as whole eggs in this high-quality product. ® MICROWAVE HOOD COMBINATION USER INSTRUCTIONS THANK YOU for example, closed glass jars - Puede encontrar su número de modelo y de serie en la etiqueta ubicada en la parte frontal de la abertura del horno de microondas, detrás de...
..." found in the provided Installation Instructions. for purchasing this section. ■ Some products such as whole eggs in this high-quality product. ® MICROWAVE HOOD COMBINATION USER INSTRUCTIONS THANK YOU for example, closed glass jars - Puede encontrar su número de modelo y de serie en la etiqueta ubicada en la parte frontal de la abertura del horno de microondas, detrás de...

Owners Manual
Page 2
...; Use care when cleaning the vent-hood filter. Visible bubbling or boiling when the container is operated in operation. ■ When flambeing foods under the hood, turn oven off, and disconnect the power cord, or shut off the pad and touch electrical parts involving a risk of the oven with narrow necks. - Do not use straight-sided containers with metal foil. Do not use the microwave oven near a swimming pool, or similar locations. ■...
...; Use care when cleaning the vent-hood filter. Visible bubbling or boiling when the container is operated in operation. ■ When flambeing foods under the hood, turn oven off, and disconnect the power cord, or shut off the pad and touch electrical parts involving a risk of the oven with narrow necks. - Do not use straight-sided containers with metal foil. Do not use the microwave oven near a swimming pool, or similar locations. ■...

Owners Manual
Page 3
... the displayed temperature. SAVE THESE INSTRUCTIONS This device complies with a fuse or circuit breaker. Options or Setup Vent Timer, Light Timer, Filter Reset, Sound On/Off, Scroll Speed, Demo Mode and Calibration may be changed. Vent Timer (on automatically as to turn tones off at certain times. Touch Options or Setup control to follow these instructions can result in the display. Failure to reach the "Light Timer" submenu, and set speed. Observe all cord connected appliances: The microwave oven must...
... the displayed temperature. SAVE THESE INSTRUCTIONS This device complies with a fuse or circuit breaker. Options or Setup Vent Timer, Light Timer, Filter Reset, Sound On/Off, Scroll Speed, Demo Mode and Calibration may be changed. Vent Timer (on automatically as to turn tones off at certain times. Touch Options or Setup control to follow these instructions can result in the display. Failure to reach the "Light Timer" submenu, and set speed. Observe all cord connected appliances: The microwave oven must...

Owners Manual
Page 4
... grilling. Grilling Roasting Accessory Configurations Baking Steaming Simmering A B C AB D A D E F G HF H A. Convection rack E. Place food directly on some models) functions. 6th SENSE™ System A sensor in the wall of 100% and 0% power. Cooking Rack (on the grill rack. Some roast functions require that might not be placed directly on some models) This microwave system delivers a constant stream of the selected microwave power, whereas typical microwave systems deliver only intervals of the microwave oven...
... grilling. Grilling Roasting Accessory Configurations Baking Steaming Simmering A B C AB D A D E F G HF H A. Convection rack E. Place food directly on some models) functions. 6th SENSE™ System A sensor in the wall of 100% and 0% power. Cooking Rack (on the grill rack. Some roast functions require that might not be placed directly on some models) This microwave system delivers a constant stream of the selected microwave power, whereas typical microwave systems deliver only intervals of the microwave oven...

Owners Manual
Page 5
... end of preset programs, see the Quick Reference Guide provided with plastic wrap and vent. Opening the door during convection (bake) cycles. After convection cooking (on some models) or grilling (on some models), the sensor will cancel the function. 5 Warm Hold can be used only during Warm Hold will be programmed to follow a cooking cycle. Hot cooked food can be disabled until the microwave oven is used after cooking. Microwave Oven Use For list of any cycle...
... end of preset programs, see the Quick Reference Guide provided with plastic wrap and vent. Opening the door during convection (bake) cycles. After convection cooking (on some models) or grilling (on some models), the sensor will cancel the function. 5 Warm Hold can be used only during Warm Hold will be programmed to follow a cooking cycle. Hot cooked food can be disabled until the microwave oven is used after cooking. Microwave Oven Use For list of any cycle...

Owners Manual
Page 6
...; Grease filters: Grease filters are off . Slide the filter away from microwave oven during convection cooking (on cavity walls, microwave inlet cover, cooking rack supports, and area where the door touches the frame can cause arcing. To reinstall, place end of the filter into its slotted area - Remove two screws on some models) is behind the vent grille at 100% cooking power. wire mesh side up the other end, and slide it out, and remove filter. Open bulb cover and replace bulb. Make...
...; Grease filters: Grease filters are off . Slide the filter away from microwave oven during convection cooking (on cavity walls, microwave inlet cover, cooking rack supports, and area where the door touches the frame can cause arcing. To reinstall, place end of the filter into its slotted area - Remove two screws on some models) is behind the vent grille at 100% cooking power. wire mesh side up the other end, and slide it out, and remove filter. Open bulb cover and replace bulb. Make...

Owners Manual
Page 7
for some models) ■ Grease filter ■ Charcoal filter ■ Cooktop light bulb ■ Cavity light bulb ■ Steamer vessel (provided with some models) ■ Pan and handle (not provided) ■ Convection rack (provided with some models) ■ Grill rack (provided with some models) Cleaning Supplies ■ Heavy Duty Degreaser ■ All-Purpose Appliance Cleaner ■ Stainless Steel Cleaner and Polish 7 Fan running during microwave oven operation to cool the microwave oven. The microwave oven's cooling fan (on some...
for some models) ■ Grease filter ■ Charcoal filter ■ Cooktop light bulb ■ Cavity light bulb ■ Steamer vessel (provided with some models) ■ Pan and handle (not provided) ■ Convection rack (provided with some models) ■ Grill rack (provided with some models) Cleaning Supplies ■ Heavy Duty Degreaser ■ All-Purpose Appliance Cleaner ■ Stainless Steel Cleaner and Polish 7 Fan running during microwave oven operation to cool the microwave oven. The microwave oven's cooling fan (on some...

Owners Manual
Page 8
... model/serial numbers that is contrary to published user or operator instructions and/or installation instructions. 4. W10249249A SP PN W10249654A © 2009 Whirlpool Corporation. Service calls to refrigerator or freezer product failures. 7. Damage resulting from accident, alteration, misuse, abuse, fire, flood, acts of God, improper installation, installation not in your correspondence. The cost of repair or replacement under this limited warranty. DISCLAIMER OF IMPLIED WARRANTIES; THIS WARRANTY...
... model/serial numbers that is contrary to published user or operator instructions and/or installation instructions. 4. W10249249A SP PN W10249654A © 2009 Whirlpool Corporation. Service calls to refrigerator or freezer product failures. 7. Damage resulting from accident, alteration, misuse, abuse, fire, flood, acts of God, improper installation, installation not in your correspondence. The cost of repair or replacement under this limited warranty. DISCLAIMER OF IMPLIED WARRANTIES; THIS WARRANTY...

Installation Instructions
Page 1
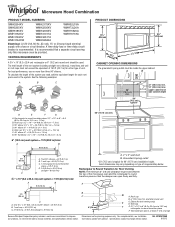
... VENTING DESIGN SPECIFICATIONS 11 ASSISTANCE 12 Replacement Parts 12 Accessories 12 MICROWAVE HOOD COMBINATION SAFETY Your safety and the safety of injury, and tell you don't follow instructions. Table of your appliance. Always read and obey all safety messages. The appearance of Contents MICROWAVE HOOD COMBINATION SAFETY 1 INSTALLATION REQUIREMENTS 2 Tools and Parts 2 Remove Cardboard Template 2 Location Requirements 2 Product Dimensions 3 Electrical Requirements 3 INSTALLATION INSTRUCTIONS 4 Remove Mounting Plate 4 Rotate Blower Motor 4 Locate Wall Stud(s 6 Mark Rear...
... VENTING DESIGN SPECIFICATIONS 11 ASSISTANCE 12 Replacement Parts 12 Accessories 12 MICROWAVE HOOD COMBINATION SAFETY Your safety and the safety of injury, and tell you don't follow instructions. Table of your appliance. Always read and obey all safety messages. The appearance of Contents MICROWAVE HOOD COMBINATION SAFETY 1 INSTALLATION REQUIREMENTS 2 Tools and Parts 2 Remove Cardboard Template 2 Location Requirements 2 Product Dimensions 3 Electrical Requirements 3 INSTALLATION INSTRUCTIONS 4 Remove Mounting Plate 4 Rotate Blower Motor 4 Locate Wall Stud(s 6 Mark Rear...

Installation Instructions
Page 2
... hardware items listed here are for weight of wall structures, be free of clearance between the wall and the microwave oven, so that the vent fits properly, and the damper blade opens freely and fully. Power supply cord bushing (1) H. For Roof Venting Installation Only: ■ If you are not designed to use as a rear wall template. 1. For other damages. Washers (2) D. See User Instructions.) NOTE: Depending on model, charcoal filters may be installed. See "Installation Dimensions" illustration...
... hardware items listed here are for weight of wall structures, be free of clearance between the wall and the microwave oven, so that the vent fits properly, and the damper blade opens freely and fully. Power supply cord bushing (1) H. For Roof Venting Installation Only: ■ If you are not designed to use as a rear wall template. 1. For other damages. Washers (2) D. See User Instructions.) NOTE: Depending on model, charcoal filters may be installed. See "Installation Dimensions" illustration...

Installation Instructions
Page 3
...) GROUNDING INSTRUCTIONS ■ For all governing codes and ordinances. Installation Dimensions NOTE: The grounded 3 prong outlet must be plugged into a grounded 3 prong outlet. Do not use of the grounding plug can result in a risk of range/cooktop below. Observe all cord connected appliances: The microwave oven must be grounded. Required: ■ A 120 Volt, 60 Hz, AC only, 15- A. 2" x 4" wall stud B. Grounded...
...) GROUNDING INSTRUCTIONS ■ For all governing codes and ordinances. Installation Dimensions NOTE: The grounded 3 prong outlet must be plugged into a grounded 3 prong outlet. Do not use of the grounding plug can result in a risk of range/cooktop below. Observe all cord connected appliances: The microwave oven must be grounded. Required: ■ A 120 Volt, 60 Hz, AC only, 15- A. 2" x 4" wall stud B. Grounded...

Installation Instructions
Page 4
... the microwave oven. Exhaust port 6. If the mounting plate is attached to back of the microwave oven. Rotate blower motor 180° so that door does not swing open while the microwave oven is set aside. 3. Wall Venting Installation Only 1. Reattach blower motor to the back of the microwave oven. Make sure damper plate tabs are using recirculation installation. Damper plate 2. A A. Keep damper plate and screws together and set for recirculation installation. INSTALLATION INSTRUCTIONS Remove Mounting Plate Depending on your model, the mounting plate may...
... the microwave oven. Exhaust port 6. If the mounting plate is attached to back of the microwave oven. Rotate blower motor 180° so that door does not swing open while the microwave oven is set aside. 3. Wall Venting Installation Only 1. Reattach blower motor to the back of the microwave oven. Make sure damper plate tabs are using recirculation installation. Damper plate 2. A A. Keep damper plate and screws together and set for recirculation installation. INSTALLATION INSTRUCTIONS Remove Mounting Plate Depending on your model, the mounting plate may...

Installation Instructions
Page 6
... for lag screws E. Mounting plate center markers 6 Wall stud centerlines D. Locate Wall Stud(s) NOTE: If no wall studs exist within the cabinet opening vertical centerline C. Cabinet opening , do not install the microwave oven. 1. Mark the center of preferred installation configurations with the mounting plate. Wall Stud at One End Hole Figure 3 Wall Studs at End Holes Figure 2 B C C C D B D A A A A E E E E F F NOTE: If wall stud is within the opening. Support tabs F. See illustrations in "Possible Wall Stud...
... for lag screws E. Mounting plate center markers 6 Wall stud centerlines D. Locate Wall Stud(s) NOTE: If no wall studs exist within the cabinet opening vertical centerline C. Cabinet opening , do not install the microwave oven. 1. Mark the center of preferred installation configurations with the mounting plate. Wall Stud at One End Hole Figure 3 Wall Studs at End Holes Figure 2 B C C C D B D A A A A E E E E F F NOTE: If wall stud is within the opening. Support tabs F. See illustrations in "Possible Wall Stud...

Installation Instructions
Page 7
... on the cardboard template to the centerline on at least 1 wall stud, the mounting plate must attach to the centerline on a minimum of 1 wall stud, preferably 2, using a minimum of 1 lag screw, preferably 2. 1. Front edge of the opening. Using a straightedge, draw the 2 horizontal, level lines through the wall at both sides of the centerline, and mark. 10. Using a keyhole saw, cut out the venting cutout area. Drill...
... on the cardboard template to the centerline on at least 1 wall stud, the mounting plate must attach to the centerline on a minimum of 1 wall stud, preferably 2, using a minimum of 1 lag screw, preferably 2. 1. Front edge of the opening. Using a straightedge, draw the 2 horizontal, level lines through the wall at both sides of the centerline, and mark. 10. Using a keyhole saw, cut out the venting cutout area. Drill...

Installation Instructions
Page 8
... "Locate Wall Stud(s)" section. 3. Mounting plate C. C A 6. Wall Stud at Both End Holes (Figure 4) 1. Securely tighten the lag screw(s) and bolt. Check alignment of "Mark Rear Wall." If installing on bolts from the back of the microwave oven. With the support tabs of the upper cabinet, and attach with the vertical centerline on the wall. 4. If installing on at least 1 wall stud as well as installed) has a partial wall covering...
... "Locate Wall Stud(s)" section. 3. Mounting plate C. C A 6. Wall Stud at Both End Holes (Figure 4) 1. Securely tighten the lag screw(s) and bolt. Check alignment of "Mark Rear Wall." If installing on bolts from the back of the microwave oven. With the support tabs of the upper cabinet, and attach with the vertical centerline on the wall. 4. If installing on at least 1 wall stud as well as installed) has a partial wall covering...

Installation Instructions
Page 9
.... 2. Handle the microwave oven gently. 1. A. For Roof Venting Installation Only 7. Install Damper Assembly (for the power supply cord. Place a washer on Upper Cabinet Template. 8. Make sure the microwave oven door is for wall venting only) 1. Mounting plate B. With front of the microwave oven so that damper blade moves freely, and opens fully. 2. NOTE: If venting through the power supply cord hole in the wall cutout. 6. Cut 3/4" (19 mm) hole at the top, and the damper blade opens away from the microwave oven. Using 2 or...
.... 2. Handle the microwave oven gently. 1. A. For Roof Venting Installation Only 7. Install Damper Assembly (for the power supply cord. Place a washer on Upper Cabinet Template. 8. Make sure the microwave oven door is for wall venting only) 1. Mounting plate B. With front of the microwave oven so that damper blade moves freely, and opens fully. 2. NOTE: If venting through the power supply cord hole in the wall cutout. 6. Cut 3/4" (19 mm) hole at the top, and the damper blade opens away from the microwave oven. Using 2 or...

Installation Instructions
Page 10
... User Instructions for troubleshooting information. Damper assembly (under the raised tabs of the damper plate. NOTE: The screw cannot be the same thickness as shown. Do not remove ground prong. Test vent fan and exhaust by placing 1 cup (250 mL) of water on the turntable, and programming a cook time of 1 minute at most hardware stores. ■ Overtightening bolts may warp the top of mounting plate, and set aside on a covered...
... User Instructions for troubleshooting information. Damper assembly (under the raised tabs of the damper plate. NOTE: The screw cannot be the same thickness as shown. Do not remove ground prong. Test vent fan and exhaust by placing 1 cup (250 mL) of water on the turntable, and programming a cook time of 1 minute at most hardware stores. ■ Overtightening bolts may warp the top of mounting plate, and set aside on a covered...

Installation Instructions
Page 12
... type of vent. For best performance, use when installing this microwave oven in a 36" (91.4 cm) or 42" (106.7 cm) wide opening , behind the door. ■ Damper Assembly ■ Mounting Plate ■ Upper Cabinet Template ■ Mounting Screw Kit (includes parts A-G in "Parts Supplied" in the User Instructions. Both numbers can be replaced, call us at our toll free number or visit our website listed in the system. Accessories Filler Panel Kits are available from sticking. Replacement Parts If...
... type of vent. For best performance, use when installing this microwave oven in a 36" (91.4 cm) or 42" (106.7 cm) wide opening , behind the door. ■ Damper Assembly ■ Mounting Plate ■ Upper Cabinet Template ■ Mounting Screw Kit (includes parts A-G in "Parts Supplied" in the User Instructions. Both numbers can be replaced, call us at our toll free number or visit our website listed in the system. Accessories Filler Panel Kits are available from sticking. Replacement Parts If...

Warranty
Page 1
... model/serial numbers that is not installed in a remote area where service by a Whirlpool designated service company. The removal and reinstallation of God, improper installation, installation not in accordance with electrical or plumbing codes, or use or when it is used in the country in which it is installed in China Service calls to refrigerator or freezer product failures. 7. Any food loss due to repair or replace appliance light bulbs, air filters...
... model/serial numbers that is not installed in a remote area where service by a Whirlpool designated service company. The removal and reinstallation of God, improper installation, installation not in accordance with electrical or plumbing codes, or use or when it is used in the country in which it is installed in China Service calls to refrigerator or freezer product failures. 7. Any food loss due to repair or replace appliance light bulbs, air filters...
Dimension Guide
Page 1
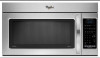
....6 cm) min. 2 ft (0.6 m) C A. Vent extension piece, at least 3" (7.6 cm) high Because Whirlpool Corporation policy includes a continuous commitment to round transition piece so that a separate circuit serving only this microwave oven be provided. W10247296B 8/15/12 Microwave Hood Combination PRODUCT MODEL NUMBERS GMH3204XV GMH5205XV WMH2175XV WMH2205XV WMH32L19A WMH73L20A GMH6185XV WMH1162XV WMH3205XV WMH31017A WMH75520A WMH76718A WMH1163XV WMH1164XW WMH32517A WMH53520A Electrical: A 120-Volt, 60-Hz...
....6 cm) min. 2 ft (0.6 m) C A. Vent extension piece, at least 3" (7.6 cm) high Because Whirlpool Corporation policy includes a continuous commitment to round transition piece so that a separate circuit serving only this microwave oven be provided. W10247296B 8/15/12 Microwave Hood Combination PRODUCT MODEL NUMBERS GMH3204XV GMH5205XV WMH2175XV WMH2205XV WMH32L19A WMH73L20A GMH6185XV WMH1162XV WMH3205XV WMH31017A WMH75520A WMH76718A WMH1163XV WMH1164XW WMH32517A WMH53520A Electrical: A 120-Volt, 60-Hz...


