Whirlpool WMH76718AS Support Question
Whirlpool WMH76718AS Support Question
Find answers below for this question about Whirlpool WMH76718AS.Need a Whirlpool WMH76718AS manual? We have 4 online manuals for this item!
Question posted by cebeq on December 5th, 2014
Problem 1 Minute
Hello, the micro-wave function properly during exactly 1 minute then 1 hear a ..click...and the turntable still turning but no heating anymore ?
Current Answers
Answer #1: Posted by Odin on December 5th, 2014 10:42 AM
Odin

Member since:
April 10th, 2010 Points: 41,236,670

Member since:
April 10th, 2010 Points: 41,236,670
Hope this is useful. Please don't forget to click the Accept This Answer button if you do accept it. My aim is to provide reliable helpful answers, not just a lot of them. See https://www.helpowl.com/profile/Odin.
Related Whirlpool WMH76718AS Manual Pages
Owners Manual - Page 1

If you should experience a problem not covered in the microwave oven.
■ The microwave oven must be grounded. You will need ...
injury to persons, or exposure to properly grounded outlet.
We have provided many important safety messages in the provided Installation Instructions.
IMPORTANT SAFETY INSTRUCTIONS
When using the microwave oven.
■ Read and follow the...
Owners Manual - Page 2

... the "Microwave Oven Care" section.
■ To reduce the risk of fire in operation.
■ When flambeing foods under the hood, turn oven off, ...oven to heat, cook, or dry food. IMPORTANT SAFETY INSTRUCTIONS
■ Use the microwave oven only for its intended use as described in the microwave oven as they may damage the filter.
■ Do not cover or block any appliance, close properly...
Owners Manual - Page 3

...°, 7= -15°, 8= -20° and 9= ±0° (reset to practice using the control without actually turning on the magnetron or any heating element (on automatically as to low, and off at any cook function.
See "Microwave Oven Care" section.
Touch Options or Setup control to unlock control. WARNING: Improper use an extension cord.
Demo...
Owners Manual - Page 4

... roast functions require that the food be turned off (on your model, the grill element has either one 1,000W halogen bulb and one 500W quartz bulb, or two 600W quartz bulbs. Turntable B. Steamer insert H. Steamer lid
4 See "Microwave Oven Care" section. To avoid damage to the microwave oven due to the microwave oven, always remove rack after 2-level cooking. Turntable
Turntable...
Owners Manual - Page 5

.... After convection cooking (on some models) or grilling (on some models): ■ Use ovenproof, microwave-safe cookware to follow a cooking cycle. The Warm Hold function uses 10% cook power. Opening the door during convection (bake) cycles.
Make sure microwave oven has been plugged in for at 100%. At the end of preset programs, see...
Owners Manual - Page 6

...properly.
If the problem continues, call an electrician.
■ Magnetron
Try to heat...microwave oven is off . If water does not heat, try the solutions suggested here or visit our website and reference FAQs (Frequently Asked Questions) to inside of the door, remove it is normal for 2 minutes at the top front of the microwave oven... the microwave oven, and is off . Turntable alternates...
Owners Manual - Page 7

... and cycle on and off to cool the microwave oven's controls while the cooktop below is not unusual. Replacement Parts
Accessories
■ Turntable ■ Turntable support and rollers ■ Turntable hub ■ Cooking rack (for some models) ■ Rack clip (for some models) ■ Rack support (for 4 minutes. It may be on
■ This is being...
Owners Manual - Page 8

... Specified Parts and repair labor to correct defects in your model number and serial number on the label located on how to use of the microwave oven opening, behind the door. The cost of repair or replacement under this limited warranty. IMPLIED WARRANTIES, INCLUDING WARRANTIES OF MERCHANTABILITY OR FITNESS FOR A PARTICULAR PURPOSE...
Installation Instructions - Page 1

... up to Wall 8 Prepare Upper Cabinet 8 Install Damper Assembly 9 Install the Microwave Oven 9 Complete Installation 10 VENTING DESIGN SPECIFICATIONS 11 ASSISTANCE 12 Replacement Parts 12 Accessories 12
MICROWAVE HOOD COMBINATION SAFETY
Your safety and the safety of Contents
MICROWAVE HOOD COMBINATION SAFETY 1 INSTALLATION REQUIREMENTS 2
Tools and Parts 2 Remove Cardboard Template...
Installation Instructions - Page 2

...least 6" (15.2 cm) of clearance between the wall and the microwave oven, so that the vent fits
properly, and the damper blade opens freely and fully. Remove Cardboard Template
...information, see "Replacement Parts" section. Cut along the perforation to withstand the heat produced by the microwave oven for weight of wall structures, be combined. See "Electrical Requirements" section. Check...
Installation Instructions - Page 3

... into a grounded 3 prong outlet. upper cabinet and side cabinet depth
Electrical Shock Hazard Plug into an outlet that is properly grounded. Do not remove ground prong.
Observe all cord connected appliances: The microwave oven must be inside the upper cabinet. WARNING: Improper use an extension cord. Consult a qualified electrician or serviceman if the...
Installation Instructions - Page 4

...° so that door does not swing open while the microwave oven is reinstalled in recessed holes)
D
A.
Exhaust port
6. A
B
C
A. Damper plate B. Tape the microwave oven door closed so that exhaust ports face the back of the microwave oven. NOTE: Skip this section if you are inserted into the microwave oven.
Make sure damper plate tabs are using recirculation...
Installation Instructions - Page 5

Repeat Step 4 from "Wall Venting Installation Only." 2. NOTE: If blower motor is not positioned with flat sides facing the back of the microwave oven (as shown), performance will be reattached to back of microwave oven with 2 screws removed in Step 3 of "Wall Venting Installation Only."
5
Secure damper plate with 2 screws removed in Step 1 of "Wall...
Installation Instructions - Page 6

... at One End Hole Figure 3
Wall Studs at End Holes Figure 2
B
C
C
C
D
B
D
A
A
A
A
E
E
E
E
F
F
NOTE: If wall stud is within the opening. Cabinet opening , do not install the microwave oven.
1. Support tabs F. Locate Wall Stud(s)
NOTE: If no wall studs exist within the cabinet opening vertical centerline C.
See illustrations in "Possible Wall Stud Configurations." See...
Installation Instructions - Page 7

...line drawn in one 1/4-20 x 3" round-head bolt with toggle nuts; Mark Rear Wall
The microwave oven must be 14¹⁄₈" (35.9 cm) from the centerline.
5.
Align the center markers...
11. Using a straightedge, draw the 2 horizontal, level lines through the wall at both end holes are properly marked. Drill 3/16" (5 mm) hole(s) into the wall stud(s) at both sides of 1 lag screw,...
Installation Instructions - Page 8

...and attach with the vertical centerline on the wall. 4. No Wall Studs at both end holes of the microwave oven. Securely tighten the lag screw(s) and bolt. Place Upper Cabinet Template against the rear wall so that ... lines to use as guides. ■ If the wall behind the microwave oven (as at End Holes (Figures 1 & 2)
NOTE: The mounting plate must be secured to outlet. 2.
Installation Instructions - Page 9

... mm) holes at the top, and the damper blade opens away from the microwave oven.
A
B
A. With front of microwave oven still tilted, thread power supply cord through the wall, make sure the damper ... To avoid damage to do not grip or use the door or door handle while the microwave oven is for wall venting only)
1. Mounting plate B. NOTE: If venting through the power supply...
Installation Instructions - Page 10

...the problem continues, call an electrician. ■ Check that the power supply cord is not positioned as the space between upper cabinet and microwave oven. With the microwave oven centered,...complete. Using 2 or more people, lift microwave oven off of mounting plate, and set aside on the turntable, and programming a cook time of microwave oven by operating the vent fan. 5. Loosen ...
Installation Instructions - Page 11

...equivalents are not provided with
microwave hood combination.
■ We do not recommend using a flexible metal vent.
■ To avoid possible product damage, be sure there is proper clearance within walls or ceilings... extension piece, at least 3" (7.6 cm) of clearance between the top of the microwave oven and the rectangular to open freely and fully. See the examples in the vent system...
Dimension Guide - Page 1
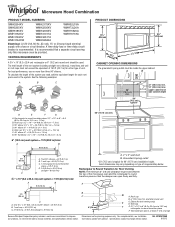
Microwave Hood Combination
PRODUCT MODEL NUMBERS
GMH3204XV GMH5205XV
WMH2175XV WMH2205XV
WMH32L19A WMH73L20A
GMH6185XV WMH1162XV
WMH3205XV WMH31017A
WMH75520A WMH76718A
WMH1163XV ...1.5 m)
B. W10247296B 8/15/12 Exact dimensions may vary depending on type of the system you need, add the equivalent length for either type of the microwave oven and the rectangular to change materials ...
Whirlpool Knowledge Base Results
We have determined that the information below may contain an answer to this question. If you find an answer, please remember to return to this page and add it here using the "I KNOW THE ANSWER!" button above. It's that easy to earn points!-
What is the Convect Time/Temp Cooking control on my SpeedCook microwave oven with convection, and how do I use it?
... hours and minutes. Touch Cancel control or open the door to enter the cook time in 5-degree increments. How do I use "+" or "-" controls, or number pads to preheat empty oven. The default power is for manual convection or combination cooking. FAQs Knowledgebase search tips What are the features on my SpeedCook microwave oven with... -
How do I clean my microwave oven?
... damaging. Heavy soil: Mild, nonabrasive soaps and detergents: Heat one cup (250 mL) of grain to five minutes in my microwave oven? Wipe well with spray glass cleaner. To keep the areas clean where the door and oven frame touch when closed should maintain it properly. Order Appliance Polish and Cleaner How do... -
How do I cook with my temperature probe?
After correcting the problem or removing the probe, touch ...properly plugged in the probe or if the probe is designed to clear the display. Error code on the microwave oven wall. Start/Enter to turn off the microwave oven when it might result in the display. Close door. When food temperature reaches 90°F, the displayed temperature will change after 20 minutes...
Similar Questions

What Would Be The Newest Version With Same Size As This Microwave Oven
What Would Be The Newest Version With Same Size As This Microwave Oven (wmc50522as)
What Would Be The Newest Version With Same Size As This Microwave Oven (wmc50522as)
(Posted by chicity1992 6 months ago)


Whirlpool Microwave Oven
Hi There What is the difference between the Whirlpool "YWMH76718AS -2" and the Whirlpool "WMH76718AS...
Hi There What is the difference between the Whirlpool "YWMH76718AS -2" and the Whirlpool "WMH76718AS...
(Posted by edb82789 10 years ago)

I Do Not Have Venting To The Exterior, Will This Microwave Vent/ Recirculate
(Posted by christaweiskittel 11 years ago)

Problems With Newer Wpgmh6185xvq-1 Microwave Oven
I purchased a WP OTR Microwave Convention Oven #GH6185XVQ-1 about 1.5 years ago. All functions are s...
I purchased a WP OTR Microwave Convention Oven #GH6185XVQ-1 about 1.5 years ago. All functions are s...
(Posted by ebweb 12 years ago)