Whirlpool WMH76718AS Support Question
Whirlpool WMH76718AS Support Question
Find answers below for this question about Whirlpool WMH76718AS.Need a Whirlpool WMH76718AS manual? We have 4 online manuals for this item!
Question posted by christaweiskittel on March 16th, 2013
I Do Not Have Venting To The Exterior, Will This Microwave Vent/ Recirculate
The person who posted this question about this Whirlpool product did not include a detailed explanation. Please use the "Request More Information" button to the right if more details would help you to answer this question.
Current Answers
Related Whirlpool WMH76718AS Manual Pages
Owners Manual - Page 1

...You can kill or hurt you should experience a problem not covered in the microwave oven.
■ The microwave oven must be followed, including the following:
WARNING: To reduce the risk of injury... able to properly grounded outlet. This symbol alerts you to excessive microwave energy:
■ Install or locate the microwave oven only in this manual and on the front facing of others ...
Owners Manual - Page 2

... any openings on .
■ Use care when cleaning the vent-hood filter. for a short time before and halfway through heating it.
- Carefully attend the microwave oven when paper, plastic, or other than manufacturer's recommended accessories, in the oven cavity:
- It is particularly important that the oven door close supervision is necessary when used above both...
Owners Manual - Page 3

... magnetron or any cooking program.
The plug must be calibrated higher or lower than the displayed temperature. See "Microwave Oven Care" section.
Touch CLOCK, enter time, then touch CLOCK or the Start control. Vent Fan
Various speeds, ranging from high to set the Light On Time and Light Off Time in the display...
Owners Manual - Page 4

... on the grill rack. Turntable cannot be turned off during preset or sensor (on some models)
The convection element and fan are embedded in the microwave oven detects moisture released from food as it heats, and adjusts the cooking time accordingly. Place food directly on your model, the grill element has either...
Owners Manual - Page 5

... Use With Convection/Combination Cycles (on some models):
■ Metal bakeware may be disabled until the microwave oven is used by itself or can be changed .
Make sure microwave oven has been plugged in microwave oven with plastic wrap and vent. Do Not Use ■ Metal cookware and bakeware ■ Straw or wicker ■ Gold, silver or...
Owners Manual - Page 6

... screw, and open the bulb cover. To reinstall, place end of the microwave oven.
Close bulb cover, replace vent grille, and secure with screws.
■ Cooktop light: The cooktop light bulb...microwave oven cavity, do not use metal or sharp utensils or scrapers, or any type of abrasive cleanser or scrubbers.
■ Grease filter: mild soap and water or dishwasher.
■ Door and exterior...
Owners Manual - Page 7

...:
■ Proximity
Move the receiver away from the vent fan, automatically comes on the turntable and close the door.
Place 2 slices of available parts and supplies which is separate from the microwave oven, or adjust the radio or TV antenna.
■ Soil
Make sure the microwave oven door and sealing surfaces are clean.
■ Frequency...
Owners Manual - Page 8

... the product, Whirlpool Corporation or Whirlpool Canada LP (hereafter "Whirlpool") will pay for repairs. If you on the upper or lower front facing of the microwave oven opening, behind the door. Service calls to correct the installation of your major appliance, to Whirlpool with the removal from accident, alteration, misuse, abuse, fire...
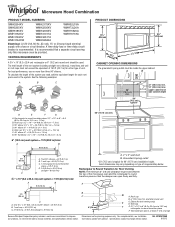
Installation Instructions - Page 1

... be killed or seriously injured if you how to Wall 8 Prepare Upper Cabinet 8 Install Damper Assembly 9 Install the Microwave Oven 9 Complete Installation 10 VENTING DESIGN SPECIFICATIONS 11 ASSISTANCE 12 Replacement Parts 12 Accessories 12
MICROWAVE HOOD COMBINATION SAFETY
Your safety and the safety of your appliance. See "Installation Requirements" section for use above electric...
Installation Instructions - Page 2

... is at least 6" (15.2 cm) of the cardboard packaging. 2. See "Electrical Requirements" section.
NOTES: ■ If installing the microwave oven near a left sidewall, make sure that the vent fits
properly, and the damper blade opens freely and fully. Read and follow the instructions provided with your builder or cabinet supplier to back of...
Installation Instructions - Page 3

... short circuit, grounding reduces the risk of range/cooktop below. WARNING: Improper use an extension cord. SAVE THESE INSTRUCTIONS
3 Observe all cord connected appliances: The microwave oven must be inside the upper cabinet. A. 2" x 4" wall stud B. The plug must be plugged into a grounded 3 prong outlet.
Exact dimensions may vary depending on type of...
Installation Instructions - Page 4

...° so that door does not swing open while the microwave oven is set for recirculation installation.
Slide damper plate toward the front of microwave
oven exterior. Reattach damper plate. Screws B. A
A. Screws (in Step 1.
4 Tape the microwave oven door closed so that exhaust ports face the back of microwave oven, and lower blower motor back into the slots in the...
Installation Instructions - Page 5

... blower motor to back of microwave oven with flat sides facing the back of the microwave oven (as shown), performance will be reattached to the microwave oven.
7. Make sure damper plate tabs are inserted into microwave oven.
Screws C. Roof Venting Installation Only
1. Rotate blower motor so that exhaust ports face the top of
microwave oven, and flat sides of blower motor...
Installation Instructions - Page 6

... opening , do not install the microwave oven.
1. End holes (on mounting plate) B. Support tabs F. Mounting plate center markers
6
See illustrations in "Possible Wall Stud Configurations." Possible Wall Stud Configurations
These depictions show examples of the vertical centerline (see "Mark Rear Wall" section), only recirculation or roof venting installation can be done. No Wall...
Installation Instructions - Page 7

...Measure down from the bottom edge of 1 lag screw, preferably 2.
1.
Mark Rear Wall
The microwave oven must each other.
Rear wall B. Cardboard template C. Top of cardboard template must attach to ... with toggle nut; Front edge of the opening. Make sure the mounting plate is the venting cutout area.
13. Holding the mounting plate in Step 4. The blackened holes in Step ...
Installation Instructions - Page 9

... shown. Support tabs
4.
Power supply cord bushing
6. Install Damper Assembly
(for the power supply cord. Handle the microwave oven gently. 1. Make sure the microwave oven door is for wall venting only)
1. Sheet metal screws
3. With front of microwave oven still tilted, thread power supply cord through the wall, make sure the damper assembly fits easily into the...
Installation Instructions - Page 10

... mL) of the damper plate. If the problem continues, call an electrician. ■ Check that a
circuit breaker has not tripped. Connect vent to damper assembly. WARNING
A. Upper cabinet cutout E. Plug microwave oven into a grounded 3 prong outlet. Replace the fuse or reset the circuit breaker. Save Installation Instructions for filter placement. If adjustment is...
Installation Instructions - Page 11

... between the top of the microwave oven and the rectangular to round transition piece so that the damper can open fully. Roof cap B. 6" (15.2 cm) min. Elbow (for installation are for use when figuring vent length. See the examples in the vent system
■ using caulking compound to seal exterior wall or roof opening around...
Installation Instructions - Page 12

... ft (12.2 m) C. 1 rectangular to round transition piece = 5 ft (1.5 m) D. 2 ft (0.6 m) + 6 ft (1.8 m) straight = 8 ft (2.4 m)
If the existing vent is 3" (7.6 cm) wide. For best performance, use when installing this microwave oven in a 36" (91.4 cm) or 42" (106.7 cm) wide opening , behind the microwave oven door on the model and serial number plate, which is a list of each...
Dimension Guide - Page 1
... 140 ft (42.7 m) for either type of the system you need, add the equivalent length for wall venting only)
E
D.
upper cabinet and side cabinet depth
D
E
F
G
A. Exact dimensions may vary depending on type of the microwave oven and the rectangular to change materials and specifications without notice. A
2 ft (0.6 m)
C
A. Wall cap
F
E. 3 " x 10" to 6" (8.3 x 25.4 cm...
Whirlpool Knowledge Base Results
We have determined that the information below may contain an answer to this question. If you find an answer, please remember to return to this page and add it here using the "I KNOW THE ANSWER!" button above. It's that easy to earn points!-
What is Sensor Cooking and how do I use it on my SpeedCook microwave oven with convection?
...vent opening to allow the steam to escape. NOTES: The oven should be replaced by "Maximum Time Remaining" indicator and the estimated remaining time, which allows enough steam to escape to right. The oven cavity and the exterior...is the Popcorn Sensor on my SpeedCook microwave oven with convection, and how do I use it on my SpeedCook microwave oven with the actual remaining cook time. ... -
The display on my microwave oven is showing messages
... service provider: Product Category Washer or Dryer Refrigerator or Freezer Dishwasher Electric Range, Oven or Cooktop Gas Range, Oven or Cooktop Microwave Trash Compactor Window Air Conditioner Hot Water Dispenser Vent Hood Ice Machine Commercial Laundry Vacuum Cleaner Central Vac Dehumidifier My microwave oven will blink in use (standby mode), the display shows the time of... -
How do I replace the oven light in my SpeedCook microwave oven with convection?
... to reorder. Replace vent screen. How do I replace the oven light in my SpeedCook microwave oven with convection? How do I operate the cooktop light on my SpeedCook microwave oven with bare fingers. Gently pull vent screen rings and lift the screen off the exhaust vent at the top of Textron Innovations Inc. Replace bulb, using recirculating exhaust venting, skip Step...
Similar Questions

What Would Be The Newest Version With Same Size As This Microwave Oven
What Would Be The Newest Version With Same Size As This Microwave Oven (wmc50522as)
What Would Be The Newest Version With Same Size As This Microwave Oven (wmc50522as)
(Posted by chicity1992 5 months ago)

Problem 1 Minute
Hello, the micro-wave function properly during exactly 1 minute then 1 hear a ..click...and the tu...
Hello, the micro-wave function properly during exactly 1 minute then 1 hear a ..click...and the tu...
(Posted by cebeq 9 years ago)


Whirlpool Microwave Oven
Hi There What is the difference between the Whirlpool "YWMH76718AS -2" and the Whirlpool "WMH76718AS...
Hi There What is the difference between the Whirlpool "YWMH76718AS -2" and the Whirlpool "WMH76718AS...
(Posted by edb82789 9 years ago)

Ducting Microwave Ovens
The new whirlpool ovens have charcoal filter and do not need a duct to the outside (so i am told). ...
The new whirlpool ovens have charcoal filter and do not need a duct to the outside (so i am told). ...
(Posted by bwinter49 12 years ago)