
Installation Instructions
Page 2
... be included. Damper assembly (for wall or roof venting) ■■ Charcoal filters (Depending on reordering, see the "Replacement Parts" section. Power supply cord bushing (1) ■■ Aluminum grease filters H. Read and follow the instructions provided with any tools ... cm) drill bits ■■ 3/4" (1.9 cm) hole saw ■■ Caulking gun and weatherproof caulking compound ■■ Duct tape Parts Needed For information on model, charcoal filters may be sure to back of microwave oven) E. 1/4" x 2" lag screws (2) ■■ Cardboard template...
... be included. Damper assembly (for wall or roof venting) ■■ Charcoal filters (Depending on reordering, see the "Replacement Parts" section. Power supply cord bushing (1) ■■ Aluminum grease filters H. Read and follow the instructions provided with any tools ... cm) drill bits ■■ 3/4" (1.9 cm) hole saw ■■ Caulking gun and weatherproof caulking compound ■■ Duct tape Parts Needed For information on model, charcoal filters may be sure to back of microwave oven) E. 1/4" x 2" lag screws (2) ■■ Cardboard template...

Installation Instructions
Page 3
...fully. Exact dimensions may vary depending on door design. 3 Set the cardboard template to the side and refer to separate the template from Whirlpool. 12" DEEPER 14" 14" DEEPER 15" I bar mounting plate fr om the wall. The piece inside the upper cabinet. NOTE:... and side cabinet depth A. 2" x 4" (5.1 x 10.2 cm) wall stud B. Cut along the perforation to it during the "Mark Rear Wall" part of range/cooktop below. Location Requirements Check the opening . ■■ Support for packing. Special Requirements For Wall Venting Installation Only: ■■ Cutout...
...fully. Exact dimensions may vary depending on door design. 3 Set the cardboard template to the side and refer to separate the template from Whirlpool. 12" DEEPER 14" 14" DEEPER 15" I bar mounting plate fr om the wall. The piece inside the upper cabinet. NOTE:... and side cabinet depth A. 2" x 4" (5.1 x 10.2 cm) wall stud B. Cut along the perforation to it during the "Mark Rear Wall" part of range/cooktop below. Location Requirements Check the opening . ■■ Support for packing. Special Requirements For Wall Venting Installation Only: ■■ Cutout...
Installation Instructions
Page 10
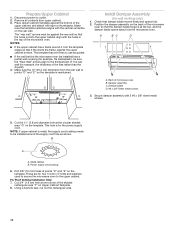
...: If upper cabinet is at one corner of the microwave oven so that damper blade moves freely and opens fully. 2. Disconnect power to the thickest part of microwave oven B. For Roof Venting Installation Only: 7. Make sure the 10" (25.4 cm) dimension from upper cabinet. 3. Metal cabinet B. A B C D Upper-cabinet template D 10" (25...
...: If upper cabinet is at one corner of the microwave oven so that damper blade moves freely and opens fully. 2. Disconnect power to the thickest part of microwave oven B. For Roof Venting Installation Only: 7. Make sure the 10" (25.4 cm) dimension from upper cabinet. 3. Metal cabinet B. A B C D Upper-cabinet template D 10" (25...

Installation Instructions
Page 14
...ft (1.8 m) straight = 8 ft (2.4 m) If the existing vent is located behind the microwave oven door on the front facing of available replacement parts. ASSISTANCE Call your authorized dealer or service center for details. 14 Accessories Filler Panel Kits are available from sticking. The filler panels come in a...; Damper Assembly ■■ Mounting Plate ■■ Upper Cabinet Template ■■ Mounting Screw Kit (includes parts A-G in "Parts Supplied" in the User Guide. Each panel is a list of the microwave oven opening . Filler panels 8171336 White 8171337...
...ft (1.8 m) straight = 8 ft (2.4 m) If the existing vent is located behind the microwave oven door on the front facing of available replacement parts. ASSISTANCE Call your authorized dealer or service center for details. 14 Accessories Filler Panel Kits are available from sticking. The filler panels come in a...; Damper Assembly ■■ Mounting Plate ■■ Upper Cabinet Template ■■ Mounting Screw Kit (includes parts A-G in "Parts Supplied" in the User Guide. Each panel is a list of the microwave oven opening . Filler panels 8171336 White 8171337...


