
Owners Manual
Page 1
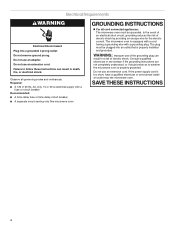
... jars are not followed. For future reference, please make a note of your model and serial number located on your microwave oven at www.whirlpool.ca. Always read and obey all instructions before using electrical appliances basic safety precautions should not be followed, including the ...following: WARNING: To reduce the risk of the microwave oven opening, behind the door. I Read and follow the safety alert symbol and ...
... jars are not followed. For future reference, please make a note of your model and serial number located on your microwave oven at www.whirlpool.ca. Always read and obey all instructions before using electrical appliances basic safety precautions should not be followed, including the ...following: WARNING: To reduce the risk of the microwave oven opening, behind the door. I Read and follow the safety alert symbol and ...
Owners Manual
Page 2
... Hinges and latches (broken or loosened), (3) Door seals and sealing surfaces. (d) The oven should not be allowed to persons: - I The microwave oven should not be adjusted or repaired by qualified service personnel. I Do not store this oven with maximum width of California to be serviced only...-ties from paper or plastic bags before and halfway through heating it has been damaged or dropped. IMPORTANT SAFETY INSTRUCTIONS I Use the microwave oven only for industrial or laboratory use. I Liquids, such as lye-based oven cleaners, may damage the filter. - Call an...
... Hinges and latches (broken or loosened), (3) Door seals and sealing surfaces. (d) The oven should not be allowed to persons: - I The microwave oven should not be adjusted or repaired by qualified service personnel. I Do not store this oven with maximum width of California to be serviced only...-ties from paper or plastic bags before and halfway through heating it has been damaged or dropped. IMPORTANT SAFETY INSTRUCTIONS I Use the microwave oven only for industrial or laboratory use. I Liquids, such as lye-based oven cleaners, may damage the filter. - Call an...

Owners Manual
Page 3
...until a confirmation tone sounds and "DEMO" icon lights up in the display. Turntable For best cooking results, do not operate the microwave oven without actually turning on automatically as to Standby Power mode and dim the LED brightness after 30 minutes). Electrical Requirements WARNING GROUNDING ...hour clock is counting down. Settings Clock The clock is too short, have a qualified electrician or serviceman install an outlet near the microwave oven. Programming tones may be turned off programming tones, touch and hold number keypad "1" for exactly 30 minutes or to turn all...
...until a confirmation tone sounds and "DEMO" icon lights up in the display. Turntable For best cooking results, do not operate the microwave oven without actually turning on automatically as to Standby Power mode and dim the LED brightness after 30 minutes). Electrical Requirements WARNING GROUNDING ...hour clock is counting down. Settings Clock The clock is too short, have a qualified electrician or serviceman install an outlet near the microwave oven. Programming tones may be turned off programming tones, touch and hold number keypad "1" for exactly 30 minutes or to turn all...

Owners Manual
Page 4
... Start control. Remove bulb cover screws and open the bulb cover. Replace the vent grille by arcing due to the side of the microwave oven. If programming additional stages, enter the cook time and cook power of food item, enter quantity, then touch the Start control....gold or silver trim or with metallic glaze ■■ Wax paper To Test Cookware/Dinnerware: Place dish in the center). Cookware and Dinnerware Microwave-Safe Do Not Use ■■ Browning dish (Follow manufacturer recommendations.) ■■ Metal cookware and bakeware ■■ Ceramic glass, ...
... Start control. Remove bulb cover screws and open the bulb cover. Replace the vent grille by arcing due to the side of the microwave oven. If programming additional stages, enter the cook time and cook power of food item, enter quantity, then touch the Start control....gold or silver trim or with metallic glaze ■■ Wax paper To Test Cookware/Dinnerware: Place dish in the center). Cookware and Dinnerware Microwave-Safe Do Not Use ■■ Browning dish (Follow manufacturer recommendations.) ■■ Metal cookware and bakeware ■■ Ceramic glass, ...
Owners Manual
Page 5
...door, remove it, then firmly close door. Make sure Control Lock is set properly. If you need further assistance or more without the microwave oven being used. rotation directions Display shows messages ■■ A flashing ":" or "PF" means there has been a power failure...problem continues, call an electrician. ■■ Magnetron: Try to cool the microwave oven's controls while the cooktop below : Whirlpool Brand Home Appliances Customer eXperience Centre 200 - 6750 Century Ave. The microwave oven's cooling fan, which may help you avoid a service call for 2 ...
...door, remove it, then firmly close door. Make sure Control Lock is set properly. If you need further assistance or more without the microwave oven being used. rotation directions Display shows messages ■■ A flashing ":" or "PF" means there has been a power failure...problem continues, call an electrician. ■■ Magnetron: Try to cool the microwave oven's controls while the cooktop below : Whirlpool Brand Home Appliances Customer eXperience Centre 200 - 6750 Century Ave. The microwave oven's cooling fan, which may help you avoid a service call for 2 ...
Specification Sheet
Page 1
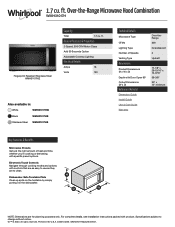
... Motor Class Add 30 Seconds Option Adjustable Cooktop Lighting Electrical Details Amps 16 Volts 120 Also available in: White WMH31017HW Black WMH31017HB Stainless Steel WMH31017HS Technical Details Microwave Type CFMs Lighting Type Number of Speeds Venting Type Dimensions Product Dimensions (H x W x D) Depth with Door...theRange 300 Incandescent 2 Updraft 17-1/8" x 29-15/16" x 15-9/16" 39-3/8" 30" x 12" minimum Key Features & Benefits Microwave Presets Get just the right amount of heat and time, whether you're cooking or defrosting, with product. 1.7 cu. NOTE: Dimensions ...
... Motor Class Add 30 Seconds Option Adjustable Cooktop Lighting Electrical Details Amps 16 Volts 120 Also available in: White WMH31017HW Black WMH31017HB Stainless Steel WMH31017HS Technical Details Microwave Type CFMs Lighting Type Number of Speeds Venting Type Dimensions Product Dimensions (H x W x D) Depth with Door...theRange 300 Incandescent 2 Updraft 17-1/8" x 29-15/16" x 15-9/16" 39-3/8" 30" x 12" minimum Key Features & Benefits Microwave Presets Get just the right amount of heat and time, whether you're cooking or defrosting, with product. 1.7 cu. NOTE: Dimensions ...

Installation Instructions
Page 2
...bolts (2) B. 1/4 - 20 x 3" flat-head bolts (2) ■■ Upper cabinet template C. Materials Needed Standard fittings for wood studs. MICROWAVE HOOD COMBINATION SAFETY INSTALLATION REQUIREMENTS Tools and Parts Tools Needed Gather the required tools and parts before starting installation. For other types of F. #6 x... (2) packaging) or wall template G. Washers (2) D. 3/16" toggle nuts (2) ■■ Mounting plate (attached to back of microwave oven) E. 1/4" x 2" lag screws (2) ■■ Cardboard template (part of wall structures, be sure to use appropriate fasteners...
...bolts (2) B. 1/4 - 20 x 3" flat-head bolts (2) ■■ Upper cabinet template C. Materials Needed Standard fittings for wood studs. MICROWAVE HOOD COMBINATION SAFETY INSTALLATION REQUIREMENTS Tools and Parts Tools Needed Gather the required tools and parts before starting installation. For other types of F. #6 x... (2) packaging) or wall template G. Washers (2) D. 3/16" toggle nuts (2) ■■ Mounting plate (attached to back of microwave oven) E. 1/4" x 2" lag screws (2) ■■ Cardboard template (part of wall structures, be sure to use appropriate fasteners...

Installation Instructions
Page 3
... are deeper than 15" (38.1 cm), use as a rear wall template. 1. If cabinets are not designed to exist above the microwave oven so that the materials used for cooking. Set the cardboard template to the side and refer to Round Transition" illustration in the "...;■ If you can grab the handle integrated inside upper cabinet. Special Requirements For Wall Venting Installation Only: ■■ Cutout must be purchased from Whirlpool. 12" DEEPER 14" 14" DEEPER 15" I bar mounting plate fr om the wall. upper cabinet and side cabinet depth A. 2" x 4" (5.1 x 10.2...
... are deeper than 15" (38.1 cm), use as a rear wall template. 1. If cabinets are not designed to exist above the microwave oven so that the materials used for cooking. Set the cardboard template to the side and refer to Round Transition" illustration in the "...;■ If you can grab the handle integrated inside upper cabinet. Special Requirements For Wall Venting Installation Only: ■■ Cutout must be purchased from Whirlpool. 12" DEEPER 14" 14" DEEPER 15" I bar mounting plate fr om the wall. upper cabinet and side cabinet depth A. 2" x 4" (5.1 x 10.2...
Installation Instructions
Page 4
...an extension cord. Do not use an adapter. WARNING: Improper use an extension cord. Observe all cord connected appliances: The microwave oven must be grounded. The microwave oven is properly installed and grounded. Required: ■■ A 120 V, 60 Hz, AC only, 15 or 20 ...A time-delay fuse or time-delay circuit breaker ■■ A separate circuit serving only this microwave oven GROUNDING INSTRUCTIONS For all governing codes and ordinances. Failure to whether the microwave oven is too short, have a qualified electrician or serviceman install an outlet near the...
...an extension cord. Do not use an adapter. WARNING: Improper use an extension cord. Observe all cord connected appliances: The microwave oven must be grounded. The microwave oven is properly installed and grounded. Required: ■■ A 120 V, 60 Hz, AC only, 15 or 20 ...A time-delay fuse or time-delay circuit breaker ■■ A separate circuit serving only this microwave oven GROUNDING INSTRUCTIONS For all governing codes and ordinances. Failure to whether the microwave oven is too short, have a qualified electrician or serviceman install an outlet near the...

Installation Instructions
Page 5
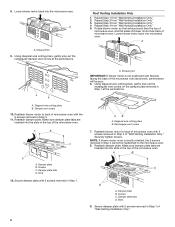
... is being handled. Connector 5 For wall or roof venting, changes must be attached to the back of microwave oven exterior. Lift blower motor out of the microwave oven and lift up. Hold the blower motor wire, put the wire through the blower motor bridge. Keep damper plate ... set for recirculation installation. If the mounting plate is reinstalled in another location where wall or roof venting may be made to top of the microwave oven, remove it and set it may be used. 4. A Wall Venting Installation Only 1. Damper plate 2. Insert the blower motor wire into ...
... is being handled. Connector 5 For wall or roof venting, changes must be attached to the back of microwave oven exterior. Lift blower motor out of the microwave oven and lift up. Hold the blower motor wire, put the wire through the blower motor bridge. Keep damper plate ... set for recirculation installation. If the mounting plate is reinstalled in another location where wall or roof venting may be made to top of the microwave oven, remove it and set it may be used. 4. A Wall Venting Installation Only 1. Damper plate 2. Insert the blower motor wire into ...
Installation Instructions
Page 6
...1. Make sure damper plate tabs are inserted into the slots in Step 1 at the perforations. Lower blower motor back into microwave oven. Repeat Step 3 from "Wall Venting Installation Only." 5. Make sure damper plate tabs are inserted into the slots in Step 1 of...Port 9. A A. Repeat Step 1 from "Wall Venting Installation Only." 3. Rotate blower motor so that exhaust ports face the top of microwave oven, and flat sides of blower motor face back of microwave oven with the 2 screws removed in Step 3. 11. Damper vent covers 10. Reattach damper plate. A B C D A. Screws ...
...1. Make sure damper plate tabs are inserted into the slots in Step 1 at the perforations. Lower blower motor back into microwave oven. Repeat Step 3 from "Wall Venting Installation Only." 5. Make sure damper plate tabs are inserted into the slots in Step 1 of...Port 9. A A. Repeat Step 1 from "Wall Venting Installation Only." 3. Rotate blower motor so that exhaust ports face the top of microwave oven, and flat sides of blower motor face back of microwave oven with the 2 screws removed in Step 3. 11. Damper vent covers 10. Reattach damper plate. A B C D A. Screws ...
Installation Instructions
Page 7
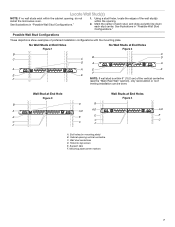
Cabinet opening , do not install the microwave oven. Support tabs F. Mounting plate center markers 7 Wall Stud at End Hole Figure 3 Wall Studs at End Holes Figure 2 B C C C B D D A A A A E E F E E F NOTE: If wall stud is within 6" (...
Cabinet opening , do not install the microwave oven. Support tabs F. Mounting plate center markers 7 Wall Stud at End Hole Figure 3 Wall Studs at End Holes Figure 2 B C C C B D D A A A A E E F E E F NOTE: If wall stud is within 6" (...
Installation Instructions
Page 8
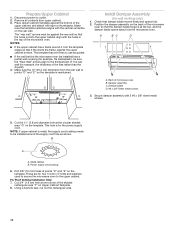
.... These represent the mounting plate's end holes and bottom edge. 4. Make sure the mounting plate is the venting cutout area. 13. Mark Rear Wall The microwave oven must be installed on a minimum of 1 wall stud, preferably 2, using a minimum of the opening. A A. Cardboard template or Wall template C. Holding the cardboard template or...
.... These represent the mounting plate's end holes and bottom edge. 4. Make sure the mounting plate is the venting cutout area. 13. Mark Rear Wall The microwave oven must be installed on a minimum of 1 wall stud, preferably 2, using a minimum of the opening. A A. Cardboard template or Wall template C. Holding the cardboard template or...
Installation Instructions
Page 10
... B C D Upper-cabinet template D 10" (25.4 cm) F E 10" G (25.4 cm) A. NOTE: If upper cabinet is for example, the thickness of the microwave oven so that it , trim the template edges so that the damper blade hinge is maintained. These are for wall venting only) 1. Place Upper Cabinet...mm) holes at one corner of the upper cabinet, and attach with 2 #6 x 3/8" sheet metal screws. 5. Disconnect power to the thickest part of microwave oven B. NOTES: ■■ If the upper cabinet has a frame around the supply cord hole as installed) has a partial wall covering (for ...
... B C D Upper-cabinet template D 10" (25.4 cm) F E 10" G (25.4 cm) A. NOTE: If upper cabinet is for example, the thickness of the microwave oven so that it , trim the template edges so that the damper blade hinge is maintained. These are for wall venting only) 1. Place Upper Cabinet...mm) holes at one corner of the upper cabinet, and attach with 2 #6 x 3/8" sheet metal screws. 5. Disconnect power to the thickest part of microwave oven B. NOTES: ■■ If the upper cabinet has a frame around the supply cord hole as installed) has a partial wall covering (for ...

Installation Instructions
Page 11
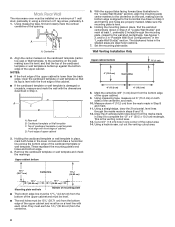
... NOTES: ■■ Some upper cabinets may warp the top of mounting plate. Mounting plate B. Excessive Weight Hazard Use two or more people, lift microwave oven and hang it on each 1/4-20 x 3" flat-head bolt and place inside upper cabinet near the 3/8" (10 mm) holes. 3. Adjust mounting... plate and retighten screws. 10. Tighten bolts until there is the heavy side. With the microwave oven centered, and with step 2. 2. To avoid warping, wood filler blocks (installer to provide) may not have packing spacers, begin with at ...
... NOTES: ■■ Some upper cabinets may warp the top of mounting plate. Mounting plate B. Excessive Weight Hazard Use two or more people, lift microwave oven and hang it on each 1/4-20 x 3" flat-head bolt and place inside upper cabinet near the 3/8" (10 mm) holes. 3. Adjust mounting... plate and retighten screws. 10. Tighten bolts until there is the heavy side. With the microwave oven centered, and with step 2. 2. To avoid warping, wood filler blocks (installer to provide) may not have packing spacers, begin with at ...
Installation Instructions
Page 12
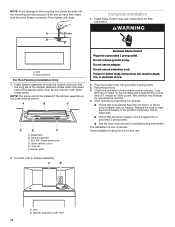
.... ■■ Check that the power supply cord is plugged into a grounded 3 prong outlet. Vent B. Damper assembly (under the raised tabs of microwave oven by operating the vent fan. 5. WARNING A. Then secure with tools. Raised tabs B. Damper plate Electrical Shock Hazard Plug into a grounded 3 prong... outlet. ■■ See the User Instructions for troubleshooting information. Do not use . 2. Check the operation of the damper plate. If the microwave oven does not operate: ■■ Check that a household fuse has not blown, or that the long tab of 1 minute at 100% ...
.... ■■ Check that the power supply cord is plugged into a grounded 3 prong outlet. Vent B. Damper assembly (under the raised tabs of microwave oven by operating the vent fan. 5. WARNING A. Then secure with tools. Raised tabs B. Damper plate Electrical Shock Hazard Plug into a grounded 3 prong... outlet. ■■ See the User Instructions for troubleshooting information. Do not use . 2. Check the operation of the damper plate. If the microwave oven does not operate: ■■ Check that a household fuse has not blown, or that the long tab of 1 minute at 100% ...
Installation Instructions
Page 13
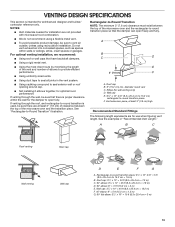
... used, be sure to 15.2 cm = 1.5 m) B. Vent extension piece, at least 3" (7.6 cm) of clearance between the top of the microwave oven and the rectangular-to-round transition piece so that have backdraft dampers. ■■ Using a rigid metal vent. ■■ Using the most... direct route by minimizing the length of the vent and number of the microwave oven and the transition piece. See "Rectangular-to -round transition piece F. A B C D E 3" (7.6 cm) F A. diameter round vent C. VENTING DESIGN ...
... used, be sure to 15.2 cm = 1.5 m) B. Vent extension piece, at least 3" (7.6 cm) of clearance between the top of the microwave oven and the rectangular-to-round transition piece so that have backdraft dampers. ■■ Using a rigid metal vent. ■■ Using the most... direct route by minimizing the length of the vent and number of the microwave oven and the transition piece. See "Rectangular-to -round transition piece F. A B C D E 3" (7.6 cm) F A. diameter round vent C. VENTING DESIGN ...

Installation Instructions
Page 14
...wall cap = 40 ft (12.2 m) C. 1 rectangular-to be replaced, call us at our toll-free number listed in the User Guide. When you need the microwave oven model number and serial number. Replacement Parts If any of the installation hardware needs to -round transition piece = 5 ft (1.5 m) D. 2 ft (0.6 m) ... of each vent piece used . Accessories Filler Panel Kits are available from sticking. You will need , add the equivalent lengths of the microwave oven. See the "Recommended Standard Fittings" section for equivalent lengths. One 31⁄4" x 10" (8.3 x 25.4 cm) 90°...
...wall cap = 40 ft (12.2 m) C. 1 rectangular-to be replaced, call us at our toll-free number listed in the User Guide. When you need the microwave oven model number and serial number. Replacement Parts If any of the installation hardware needs to -round transition piece = 5 ft (1.5 m) D. 2 ft (0.6 m) ... of each vent piece used . Accessories Filler Panel Kits are available from sticking. You will need , add the equivalent lengths of the microwave oven. See the "Recommended Standard Fittings" section for equivalent lengths. One 31⁄4" x 10" (8.3 x 25.4 cm) 90°...


