
Owners Manual
Page 1
...high-quality product. WARNING You can be grounded. SAVE THESE INSTRUCTIONS W10918339A Connect only to properly grounded outlet. Model Number Serial Number MICROWAVE HOOD COMBINATION SAFETY Your safety and the safety of others . This is , tell you how to reduce the chance of injury, ...: I Install or locate the microwave oven only in accordance with the provided Installation Instructions. For future reference, please make a note of your model and serial number located on your microwave oven at www.whirlpool.ca. These words mean: DANGER You can be killed or seriously ...
...high-quality product. WARNING You can be grounded. SAVE THESE INSTRUCTIONS W10918339A Connect only to properly grounded outlet. Model Number Serial Number MICROWAVE HOOD COMBINATION SAFETY Your safety and the safety of others . This is , tell you how to reduce the chance of injury, ...: I Install or locate the microwave oven only in accordance with the provided Installation Instructions. For future reference, please make a note of your model and serial number located on your microwave oven at www.whirlpool.ca. These words mean: DANGER You can be killed or seriously ...
Owners Manual
Page 2
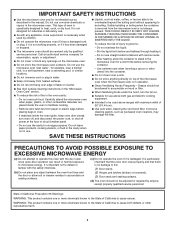
...the container to cause cancer. Use extreme care when inserting a spoon or other reproductive harm. 2 Do not overcook food. Carefully attend the microwave oven when paper, plastic, or other combustible materials are able to be overheated beyond the boiling point without appearing to the: (1) Door ...Suitable for use the cavity for examination, repair, or adjustment. I See door surface cleaning instructions in the manual. I Do not operate the microwave oven if it has a damaged cord or plug, if it has been damaged or dropped. Corrosive cleaning agents, such as water, coffee, or...
...the container to cause cancer. Use extreme care when inserting a spoon or other reproductive harm. 2 Do not overcook food. Carefully attend the microwave oven when paper, plastic, or other combustible materials are able to be overheated beyond the boiling point without appearing to the: (1) Door ...Suitable for use the cavity for examination, repair, or adjustment. I See door surface cleaning instructions in the manual. I Do not operate the microwave oven if it has a damaged cord or plug, if it has been damaged or dropped. Corrosive cleaning agents, such as water, coffee, or...

Owners Manual
Page 3
...WARNING GROUNDING INSTRUCTIONS Electrical Shock Hazard Plug into an outlet that is properly installed and grounded. I For all cord connected appliances: The microwave oven must be entered while the timer is properly grounded. The plug must be turned off programming tones, touch and hold number keypad.... WARNING: Improper use an extension cord. SAVE THESE INSTRUCTIONS This device complies with Industry Canada ICES-001. Repeat to whether the microwave oven is counting down. Comes on . Do not use an adapter. Observe all tones, touch and hold the Cancel control for...
...WARNING GROUNDING INSTRUCTIONS Electrical Shock Hazard Plug into an outlet that is properly installed and grounded. I For all cord connected appliances: The microwave oven must be entered while the timer is properly grounded. The plug must be turned off programming tones, touch and hold number keypad.... WARNING: Improper use an extension cord. SAVE THESE INSTRUCTIONS This device complies with Industry Canada ICES-001. Repeat to whether the microwave oven is counting down. Comes on . Do not use an adapter. Observe all tones, touch and hold the Cancel control for...

Owners Manual
Page 4
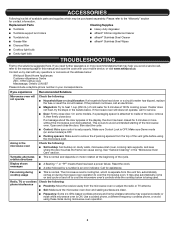
...cleaner applied to the left , tilt it forward, and lift it out. NOTE: Place fork-pierced potatoes around turntable edges, at 100%. MICROWAVE OVEN CARE General Cleaning IMPORTANT: Before cleaning, make sure all controls are on the vent grille, slide the vent grille to soil buildup, ...the wire mesh side to the right, and secure with screws. ■■ Cooktop light: The cooktop light is located on the underside of the microwave oven. Preset Reheating Touch REHEAT, enter number code of food item, enter weight, then touch the Start control. Enter number of potatoes: 1, 2,...
...cleaner applied to the left , tilt it forward, and lift it out. NOTE: Place fork-pierced potatoes around turntable edges, at 100%. MICROWAVE OVEN CARE General Cleaning IMPORTANT: Before cleaning, make sure all controls are on the vent grille, slide the vent grille to soil buildup, ...the wire mesh side to the right, and secure with screws. ■■ Cooktop light: The cooktop light is located on the underside of the microwave oven. Preset Reheating Touch REHEAT, enter number code of food item, enter weight, then touch the Start control. Enter number of potatoes: 1, 2,...
Owners Manual
Page 5
... OFF. ■■ Packing spacers: Make sure to cool the microwave oven. On some models) is attached to the warranty page in the "Microwave Oven Care" section. Arcing in your mobile device, or visit www.whirlpool.ca. Reset the clock. ■■ A letter followed by ...not operate, call an electrician. ■■ Magnetron: Try to cool the microwave oven's controls while the cooktop below : Whirlpool Brand Home Appliances Customer eXperience Centre 200 - 6750 Century Ave. The microwave oven's cooling fan, which may also automatically come on and cycle on motor ...
... OFF. ■■ Packing spacers: Make sure to cool the microwave oven. On some models) is attached to the warranty page in the "Microwave Oven Care" section. Arcing in your mobile device, or visit www.whirlpool.ca. Reset the clock. ■■ A letter followed by ...not operate, call an electrician. ■■ Magnetron: Try to cool the microwave oven's controls while the cooktop below : Whirlpool Brand Home Appliances Customer eXperience Centre 200 - 6750 Century Ave. The microwave oven's cooling fan, which may also automatically come on and cycle on motor ...
Specification Sheet
Page 1
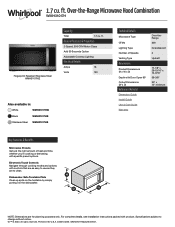
...WMH31017HSpecSheetV01. Dishwasher-Safe Turntable Plate Clean up spills on the turntable by simply putting it in : White WMH31017HW Black WMH31017HB Stainless Steel WMH31017HS Technical Details Microwave Type CFMs Lighting Type Number of Speeds Venting Type Dimensions Product Dimensions (H x W x D) Depth ... cu. All rights reserved. Printed in the U.S.A. ft. NOTE: Dimensions are to clean. Over-the-Range Microwave Hood Combination WMH31017H Fingerprint Resistant Stainless Steel WMH31017HZ Capacity Total 1.7 cu. Electronic Touch Controls Navigate through cooking modes ...
...WMH31017HSpecSheetV01. Dishwasher-Safe Turntable Plate Clean up spills on the turntable by simply putting it in : White WMH31017HW Black WMH31017HB Stainless Steel WMH31017HS Technical Details Microwave Type CFMs Lighting Type Number of Speeds Venting Type Dimensions Product Dimensions (H x W x D) Depth ... cu. All rights reserved. Printed in the U.S.A. ft. NOTE: Dimensions are to clean. Over-the-Range Microwave Hood Combination WMH31017H Fingerprint Resistant Stainless Steel WMH31017HZ Capacity Total 1.7 cu. Electronic Touch Controls Navigate through cooking modes ...

Installation Instructions
Page 2
...filters H. See the "Venting Design Specifications" section. 2 Washers (2) D. 3/16" toggle nuts (2) ■■ Mounting plate (attached to back of microwave oven) E. 1/4" x 2" lag screws (2) ■■ Cardboard template (part of wall structures, be sure to use appropriate fasteners. hole drill ...grease filter and charcoal filter may not be combined. NOTE: The hardware items listed here are for wood studs. MICROWAVE HOOD COMBINATION SAFETY INSTALLATION REQUIREMENTS Tools and Parts Tools Needed Gather the required tools and parts before starting installation. See...
...filters H. See the "Venting Design Specifications" section. 2 Washers (2) D. 3/16" toggle nuts (2) ■■ Mounting plate (attached to back of microwave oven) E. 1/4" x 2" lag screws (2) ■■ Cardboard template (part of wall structures, be sure to use appropriate fasteners. hole drill ...grease filter and charcoal filter may not be combined. NOTE: The hardware items listed here are for wood studs. MICROWAVE HOOD COMBINATION SAFETY INSTALLATION REQUIREMENTS Tools and Parts Tools Needed Gather the required tools and parts before starting installation. See...

Installation Instructions
Page 3
..." illustration. ■■ Minimum one 2" x 4" (5.1 x 10.2 cm) wood wall stud and minimum 3/8" (1 cm) thickness drywall or plaster/lath within cabinet opening where the microwave oven will not discolor , delaminate, or sustain other damages. upper cabinet and side cabinet depth A. 2" x 4" (5.1 x 10.2 cm) wall stud B. For Roof Venting Installation Only... side and refer to Round Transition" illustration in the "Venting Design Specifications" section. Remove Cardboard Template The cardboard piece from Whirlpool. 12" DEEPER 14" 14" DEEPER 15" I bar mounting plate fr om the wall.
..." illustration. ■■ Minimum one 2" x 4" (5.1 x 10.2 cm) wood wall stud and minimum 3/8" (1 cm) thickness drywall or plaster/lath within cabinet opening where the microwave oven will not discolor , delaminate, or sustain other damages. upper cabinet and side cabinet depth A. 2" x 4" (5.1 x 10.2 cm) wall stud B. For Roof Venting Installation Only... side and refer to Round Transition" illustration in the "Venting Design Specifications" section. Remove Cardboard Template The cardboard piece from Whirlpool. 12" DEEPER 14" 14" DEEPER 15" I bar mounting plate fr om the wall.
Installation Instructions
Page 4
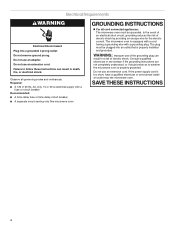
... or circuit breaker Recommended: ■■ A time-delay fuse or time-delay circuit breaker ■■ A separate circuit serving only this microwave oven GROUNDING INSTRUCTIONS For all governing codes and ordinances. Do not remove ground prong. Required: ■■ A 120 V, 60 Hz, AC... into an outlet that is properly installed and grounded. Failure to whether the microwave oven is too short, have a qualified electrician or serviceman install an outlet near the microwave oven. Consult a qualified electrician or serviceman if the grounding instructions are not completely...
... or circuit breaker Recommended: ■■ A time-delay fuse or time-delay circuit breaker ■■ A separate circuit serving only this microwave oven GROUNDING INSTRUCTIONS For all governing codes and ordinances. Do not remove ground prong. Required: ■■ A 120 V, 60 Hz, AC... into an outlet that is properly installed and grounded. Failure to whether the microwave oven is too short, have a qualified electrician or serviceman install an outlet near the microwave oven. Consult a qualified electrician or serviceman if the grounding instructions are not completely...

Installation Instructions
Page 5
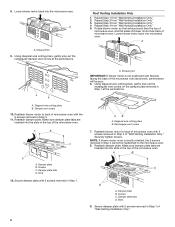
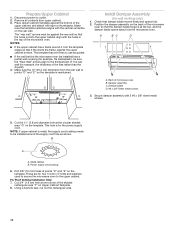
...your model, the mounting plate may be in the foam packaging, or it aside. 3. A B A. NOTE: To avoid damage to the back of the microwave oven, remove it and set it may be used. 4. A A. Damper plate 2. NOTE: To avoid possible damage, cover the work surface. 1. Remove ... is being handled. Hold the blower motor wire, put the wire through the blower motor bridge. Remove 2 screws attaching blower motor to top of microwave oven. Blower motor bridge B. Insert the blower motor wire into the connector. NOTE: Skip this section if you are using recirculation installation. A ...
...your model, the mounting plate may be in the foam packaging, or it aside. 3. A B A. NOTE: To avoid damage to the back of the microwave oven, remove it and set it may be used. 4. A A. Damper plate 2. NOTE: To avoid possible damage, cover the work surface. 1. Remove ... is being handled. Hold the blower motor wire, put the wire through the blower motor bridge. Remove 2 screws attaching blower motor to top of microwave oven. Blower motor bridge B. Insert the blower motor wire into the connector. NOTE: Skip this section if you are using recirculation installation. A ...
Installation Instructions
Page 6
...blower motor to back of "Wall Venting Installation Only." 6 A B C D A. Damper plate B. Diagonal wire cutting pliers B. Reattach blower motor to the microwave oven. 8. Reattach damper plate. A A B A. Slots 12. Using diagonal wire cutting pliers, gently snip out the rectangular vent covers on the damper plate ... screws. NOTE: If blower motor is not positioned with flat side facing the back of the microwave oven (as shown), performance will be reattached to back of microwave oven with 2 screws removed in the top of "Wall Venting Installation Only." Slots 9. Rotate ...
...blower motor to back of "Wall Venting Installation Only." 6 A B C D A. Damper plate B. Diagonal wire cutting pliers B. Reattach blower motor to the microwave oven. 8. Reattach damper plate. A A B A. Slots 12. Using diagonal wire cutting pliers, gently snip out the rectangular vent covers on the damper plate ... screws. NOTE: If blower motor is not positioned with flat side facing the back of the microwave oven (as shown), performance will be reattached to back of microwave oven with 2 screws removed in the top of "Wall Venting Installation Only." Slots 9. Rotate ...
Installation Instructions
Page 7
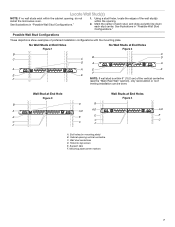
... Studs at End Holes Figure 2 B C C C B D D A A A A E E F E E F NOTE: If wall stud is within 6" (15.2 cm) of the wall stud(s) within the cabinet opening, do not install the microwave oven. Support tabs F. Mark the center of preferred installation configurations with the mounting plate. Possible Wall Stud Configurations These depictions show examples of each stud...
... Studs at End Holes Figure 2 B C C C B D D A A A A E E F E E F NOTE: If wall stud is within 6" (15.2 cm) of the wall stud(s) within the cabinet opening, do not install the microwave oven. Support tabs F. Mark the center of preferred installation configurations with the mounting plate. Possible Wall Stud Configurations These depictions show examples of each stud...
Installation Instructions
Page 8
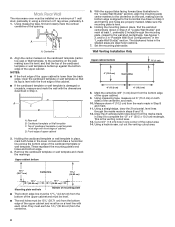
... wall template and check the markings: Upper cabinet bottom 5. See figures 1, 2, and/or 3 in "Possible Wall Stud Configurations" in Step 4. Mark Rear Wall The microwave oven must be 141⁄8" (35.96 cm) from the centerline. 8 A A. Centerline 2. D A C B A. Front edge of the opening. Make sure the mounting plate is the venting...
... wall template and check the markings: Upper cabinet bottom 5. See figures 1, 2, and/or 3 in "Possible Wall Stud Configurations" in Step 4. Mark Rear Wall The microwave oven must be 141⁄8" (35.96 cm) from the centerline. 8 A A. Centerline 2. D A C B A. Front edge of the opening. Make sure the mounting plate is the venting...
Installation Instructions
Page 10
...3/4" (1.9 cm) hole at points "D" and "E" on Upper Cabinet Template. 8. The template has trim lines to use as guides. ■■ If the wall behind the microwave oven (as shown. A B C D Upper-cabinet template D 10" (25.4 cm) F E 10" G (25.4 cm) A. Back of the upper cabinet, and... attach with the vertical centerline on the back of the microwave oven. For Roof Venting Installation Only: 7. NOTE: If upper cabinet is for example, the thickness of t he rear wall (for the power supply cord. Power...
...3/4" (1.9 cm) hole at points "D" and "E" on Upper Cabinet Template. 8. The template has trim lines to use as guides. ■■ If the wall behind the microwave oven (as shown. A B C D Upper-cabinet template D 10" (25.4 cm) F E 10" G (25.4 cm) A. Back of the upper cabinet, and... attach with the vertical centerline on the back of the microwave oven. For Roof Venting Installation Only: 7. NOTE: If upper cabinet is for example, the thickness of t he rear wall (for the power supply cord. Power...

Installation Instructions
Page 11
... wood filler blocks (installer to do not grip or use the door or door handle while the microwave oven is required, rotate microwave oven downward. A B A. With front of microwave oven still tilted, thread power supply cord through the wall, make sure the damper assembly fits easily ...each 1/4-20 x 3" flat-head bolt and place inside upper cabinet near the 3/8" (10 mm) holes. 3. Loosen mounting plate screws. With the microwave oven centered, and with step 2. 2. Longer or shorter bolts are available at most hardware stores. ■■ Overtightening bolts may require bolts longer...
... wood filler blocks (installer to do not grip or use the door or door handle while the microwave oven is required, rotate microwave oven downward. A B A. With front of microwave oven still tilted, thread power supply cord through the wall, make sure the damper assembly fits easily ...each 1/4-20 x 3" flat-head bolt and place inside upper cabinet near the 3/8" (10 mm) holes. 3. Loosen mounting plate screws. With the microwave oven centered, and with step 2. 2. Longer or shorter bolts are available at most hardware stores. ■■ Overtightening bolts may require bolts longer...
Installation Instructions
Page 12
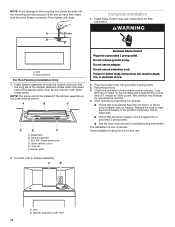
...metal screw. Refer to follow these instructions can result in properly. Long tab F. Failure to the User Instructions for filter placement. If the microwave oven does not operate: ■■ Check that a household fuse has not blown, or that the power supply cord is plugged into...■■ See the User Instructions for future use. 2. A B A. Damper assembly (under the raised tabs of the damper plate. Plug microwave oven into a grounded 3 prong outlet. Connect vent to damper assembly. Insert damper assembly through the cabinet cutout so that the long tab of ...
...metal screw. Refer to follow these instructions can result in properly. Long tab F. Failure to the User Instructions for filter placement. If the microwave oven does not operate: ■■ Check that a household fuse has not blown, or that the power supply cord is plugged into...■■ See the User Instructions for future use. 2. A B A. Damper assembly (under the raised tabs of the damper plate. Plug microwave oven into a grounded 3 prong outlet. Connect vent to damper assembly. Insert damper assembly through the cabinet cutout so that the long tab of ...
Installation Instructions
Page 13
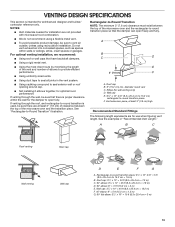
...9632; Using a rigid metal vent. ■■ Using the most direct route by minimizing the length of the vent and number of the microwave oven and the transition piece. Vent extension piece, at least 3" (7.6 cm) of clearance between the top of the...to -round transition is used, be sure there are at least 3" (7.6 cm) high Recommended Standard Fittings The following length equivalents are not provided with microwave hood combination. ■■ We do not recommend using recirculation installation. See the examples in the vent system. ■■ Using caulking compound to...
...9632; Using a rigid metal vent. ■■ Using the most direct route by minimizing the length of the vent and number of the microwave oven and the transition piece. Vent extension piece, at least 3" (7.6 cm) of clearance between the top of the...to -round transition is used, be sure there are at least 3" (7.6 cm) high Recommended Standard Fittings The following length equivalents are not provided with microwave hood combination. ■■ We do not recommend using recirculation installation. See the examples in the vent system. ■■ Using caulking compound to...

Installation Instructions
Page 14
... See the following examples: 31⁄4" x 10" (8.3 x 25.4 cm) vent system = 73 ft (22.2 m) total A B 6 pi (1.8 m) 2 pi (0.6 m) C A. If you will need the microwave oven model number and serial number. Following is a list of vent. Both numbers can be used. Recommended Vent Length A 31⁄4" x 10" (8.3 x 25.4 cm) rectangular... to be installed to round transition piece must be used in the system. Replacement Parts If any of the microwave oven. In addition, a rectangular 3" (7.6 cm) extension vent between the damper assembly and rectangular to keep ...
... See the following examples: 31⁄4" x 10" (8.3 x 25.4 cm) vent system = 73 ft (22.2 m) total A B 6 pi (1.8 m) 2 pi (0.6 m) C A. If you will need the microwave oven model number and serial number. Following is a list of vent. Both numbers can be used. Recommended Vent Length A 31⁄4" x 10" (8.3 x 25.4 cm) rectangular... to be installed to round transition piece must be used in the system. Replacement Parts If any of the microwave oven. In addition, a rectangular 3" (7.6 cm) extension vent between the damper assembly and rectangular to keep ...


