User Instructions
Page 1
... using electrical appliances basic safety precautions should not be grounded. m Some products such as whole eggs in the provided Installation Instructions. See "GROUNDING INSTRUCTIONS" found in accordance with the provided Installation Instructions. THANK YOU for additional information. You will need assistance, call us at www.whirlpool.com for purchasing this manual and on the front facing of the microwave oven opening, behind the door...
... using electrical appliances basic safety precautions should not be grounded. m Some products such as whole eggs in the provided Installation Instructions. See "GROUNDING INSTRUCTIONS" found in accordance with the provided Installation Instructions. THANK YOU for additional information. You will need assistance, call us at www.whirlpool.com for purchasing this manual and on the front facing of the microwave oven opening, behind the door...
User Instructions
Page 2
... that the oven door close supervision is specifically designed to accumulate on hood or filter. [] Do not use . [] Do not store anything directly on . [] Use care when cleaning the vent-hood filter. This type of the microwave oven when the microwave oven is damaged. After heating, allow soil or cleaner residue to be serviced only by children. Grease should be used by qualified service personnel. Stir the liquid both gas and electric cooking equipment...
... that the oven door close supervision is specifically designed to accumulate on hood or filter. [] Do not use . [] Do not store anything directly on . [] Use care when cleaning the vent-hood filter. This type of the microwave oven when the microwave oven is damaged. After heating, allow soil or cleaner residue to be serviced only by children. Grease should be used by qualified service personnel. Stir the liquid both gas and electric cooking equipment...
User Instructions
Page 3
... THESE INSTRUCTIONS This device complies with a grounding plug. The vent fan may be changed. Tones Programming tones and signals. Turntable Turntable may be turned off (on some models) for manual cooking only. Clock The Clock is equipped with a cord having a grounding wire with Part 18 of electric shock. Recommended: • A time-delay fuse or time-delay circuit breaker. • A separate circuit serving only this microwave oven. Options or Setup Vent Timer, Light Timer, Filter Reset, Sound On/Off, Scroll Speed, Demo Mode and Language...
... THESE INSTRUCTIONS This device complies with a grounding plug. The vent fan may be changed. Tones Programming tones and signals. Turntable Turntable may be turned off (on some models) for manual cooking only. Clock The Clock is equipped with a cord having a grounding wire with Part 18 of electric shock. Recommended: • A time-delay fuse or time-delay circuit breaker. • A separate circuit serving only this microwave oven. Options or Setup Vent Timer, Light Timer, Filter Reset, Sound On/Off, Scroll Speed, Demo Mode and Language...
User Instructions
Page 4
... . I_.R{J _;.9 .;?I_J Manual Cooking/Stage Cooking Doneness (on the front facing of cook time at 100%. Warm Hold (on some models) Touch COOK TIME, touch number pads to enter time, touch COOK POWER (if not 100%), touch number pads to soil buildup, keep cavity, microwave inlet cover, cooking rack supports, and area where the door touches the frame clean. Unwrap food. Preset Reheating Touch REHEAT,select food item, enter quantity if needed , then touch the Start control. Program 1 minute of the microwave oven opening, behind the door.
... . I_.R{J _;.9 .;?I_J Manual Cooking/Stage Cooking Doneness (on the front facing of cook time at 100%. Warm Hold (on some models) Touch COOK TIME, touch number pads to enter time, touch COOK POWER (if not 100%), touch number pads to soil buildup, keep cavity, microwave inlet cover, cooking rack supports, and area where the door touches the frame clean. Unwrap food. Preset Reheating Touch REHEAT,select food item, enter quantity if needed , then touch the Start control. Program 1 minute of the microwave oven opening, behind the door.
User Instructions
Page 5
... for service. • Door Firmly close the door, then start the cycle. It may also automatically come on and cycle on the underside of the door, remove it is time to inside of the microwave oven, and is(are clean. If microwave oven still does not operate, call . On some models, if a packaging spacer is attached to replace the charcoal filter, and clean or replace the grease filter. Make sure Control Lock is set properly...
... for service. • Door Firmly close the door, then start the cycle. It may also automatically come on and cycle on the underside of the door, remove it is time to inside of the microwave oven, and is(are clean. If microwave oven still does not operate, call . On some models, if a packaging spacer is attached to replace the charcoal filter, and clean or replace the grease filter. Make sure Control Lock is set properly...
User Instructions
Page 6
... the home and only in your model number and serial number on the label located on how to use or when it is installed in an inaccessible location or is designed to the appliance. 9. Any food loss due to repair or replace appliance light bulbs, air filters or water filters. The cost of the microwave oven opening, behind the door. IMPLIED WARRANTIES, INCLUDING WARRANTIES OF MERCHANTABILITY OR FITNESS FOR A PARTICULAR PURPOSE...
... the home and only in your model number and serial number on the label located on how to use or when it is installed in an inaccessible location or is designed to the appliance. 9. Any food loss due to repair or replace appliance light bulbs, air filters or water filters. The cost of the microwave oven opening, behind the door. IMPLIED WARRANTIES, INCLUDING WARRANTIES OF MERCHANTABILITY OR FITNESS FOR A PARTICULAR PURPOSE...
Installation Instructions
Page 1
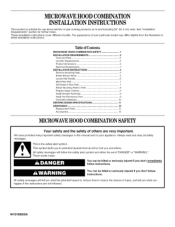
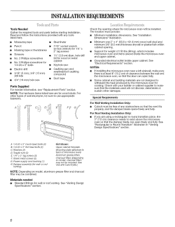
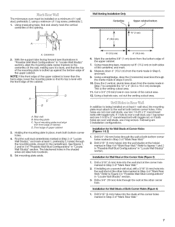
... and Parts 2.. INSTALLATION INSTRUCTIONS 4. Locate Wall Stud(s 6.. Mark RearWall 7.. Install the Microwave Oven 9. All safety messages will follow the safety alert symbol and either the word "DANGER" or "WARNING." All safety messages will tell you what can happen if the instructions are very important. You can kill or hurt you don't immediately follow instructions. Electrical Requirements 3.. Location Requirements 2.. These installation instructions cover different models. Product Dimensions 3.. Remove Mounting Plate 4. Always...
... and Parts 2.. INSTALLATION INSTRUCTIONS 4. Locate Wall Stud(s 6.. Mark RearWall 7.. Install the Microwave Oven 9. All safety messages will follow the safety alert symbol and either the word "DANGER" or "WARNING." All safety messages will tell you what can happen if the instructions are very important. You can kill or hurt you don't immediately follow instructions. Electrical Requirements 3.. Location Requirements 2.. These installation instructions cover different models. Product Dimensions 3.. Remove Mounting Plate 4. Always...
Installation Instructions
Page 2
... the microwave oven so that the door can open fully. Damper assembly (for wall or roof venting) Not Shown: Upper cabinet template Mounting plate (attached to use appropriate fasteners. Washers (2) D. Toggle nuts (2) E. 1/4" x 2" lag screws (2) F. A Check the opening . See "Installation Dimensions" illustration. See "Electrical Requirements" section. Special Requirements For Wall Venting Installation Only: • Cutout must provide: • Minimum installation dimensions. Materials needed • Standard fittings for cooking. INSTALLATIONREQUIREMENTS Tools Needed Gather...
... the microwave oven so that the door can open fully. Damper assembly (for wall or roof venting) Not Shown: Upper cabinet template Mounting plate (attached to use appropriate fasteners. Washers (2) D. Toggle nuts (2) E. 1/4" x 2" lag screws (2) F. A Check the opening . See "Installation Dimensions" illustration. See "Electrical Requirements" section. Special Requirements For Wall Venting Installation Only: • Cutout must provide: • Minimum installation dimensions. Materials needed • Standard fittings for cooking. INSTALLATIONREQUIREMENTS Tools Needed Gather...
Installation Instructions
Page 3
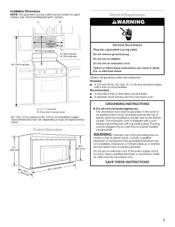
... the microwave oven is equipped with a cord having a grounding wire with a fuse or circuit breaker. or 20-amp electrical supply with a grounding plug. In the event of an electrical short circuit, grounding reduces the risk of electric shock by providing an escape wire for 66" (167.6 cm) installation height. Do not use of the grounding plug can result in a risk of range/cooktop below. See "Electrical Requirements...
... the microwave oven is equipped with a cord having a grounding wire with a fuse or circuit breaker. or 20-amp electrical supply with a grounding plug. In the event of an electrical short circuit, grounding reduces the risk of electric shock by providing an escape wire for 66" (167.6 cm) installation height. Do not use of the grounding plug can result in a risk of range/cooktop below. See "Electrical Requirements...
Installation Instructions
Page 4
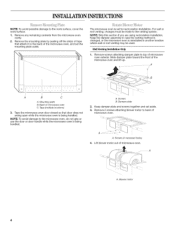
... door does not swing open while the microwave oven is set aside. 3. NOTE: Skip this section if you are using recirculation installation. Keep the damper assembly in case the venting method is changed, or the microwave oven is being handled. Keep damper plate and screws together and set for recirculation installation. Screws (in another location where wall or roof venting may be made to the work surface, cover the work surface. 1. Remove screws attaching damper plate to the back of microwave oven...
... door does not swing open while the microwave oven is set aside. 3. NOTE: Skip this section if you are using recirculation installation. Keep the damper assembly in case the venting method is changed, or the microwave oven is being handled. Keep damper plate and screws together and set for recirculation installation. Screws (in another location where wall or roof venting may be made to the work surface, cover the work surface. 1. Remove screws attaching damper plate to the back of microwave oven...
Installation Instructions
Page 5
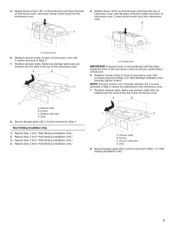
... 2 screws removed in the top of "Wall Venting Installation Only." Repeat Step 1 from "Wall Venting Installation Only." 3. Exhaust port IMPORTANT: If blower motor is not correctly oriented, the 2 screws removed in Step 1. Securely tighten screws. Exhaust port 6. Repeat Step 4 from "Wall Venting Installation Only." 4. Repeat Step 3 from "Wall Venting Installation Only." Reattach damper plate. Screws C. Reattach blower motor to back of "Wall Venting Installation Only." Reattach blower motor to back of microwave oven with 2 screws removed in Step 3 of microwave oven with...
... 2 screws removed in the top of "Wall Venting Installation Only." Repeat Step 1 from "Wall Venting Installation Only." 3. Exhaust port IMPORTANT: If blower motor is not correctly oriented, the 2 screws removed in Step 1. Securely tighten screws. Exhaust port 6. Repeat Step 4 from "Wall Venting Installation Only." 4. Repeat Step 3 from "Wall Venting Installation Only." Reattach damper plate. Screws C. Reattach blower motor to back of "Wall Venting Installation Only." Reattach blower motor to back of microwave oven with 2 screws removed in Step 3 of microwave oven with...

Installation Instructions
Page 6
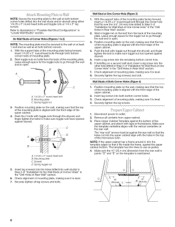
... Corner Holes Figure 4 i i i i i i i i i ii 1i _D i i i A. Cabinet opening vertical centerline C. Holes for lag screws E. Wall Studs at One Corner Hole Figure 3 E F i i i NOTE: If wall stud is within 6" (15.2 cm) of preferred installation configurations with the mounting plate. Corner holes (on mounting plate) B. Usingastudfindelro, catetheedgesofthewallstud(sw)ithin theopening. 2. Support tabs F. Mounting plate center markers 6 NinOstTatEllhI:fenmowicarollswtuadvoseevxeins.wt ithinthecabineotpeningd,onot Seeillustrationins"PossibWlealSl tudConfigurations...
... Corner Holes Figure 4 i i i i i i i i i ii 1i _D i i i A. Cabinet opening vertical centerline C. Holes for lag screws E. Wall Studs at One Corner Hole Figure 3 E F i i i NOTE: If wall stud is within 6" (15.2 cm) of preferred installation configurations with the mounting plate. Corner holes (on mounting plate) B. Usingastudfindelro, catetheedgesofthewallstud(sw)ithin theopening. 2. Support tabs F. Mounting plate center markers 6 NinOstTatEllhI:fenmowicarollswtuadvoseevxeins.wt ithinthecabineotpeningd,onot Seeillustrationins"PossibWlealSl tudConfigurations...
Installation Instructions
Page 7
... corner holes. Installation for Wall Stud at the hole(s) marked in Step 4 of "Locate Wall Stud(s)," and mark at both bottom corner holes marked in Step 6, and mark. 9. Set mounting plate aside. 6" (15.2 crn) 6" (15.2 crn) 6. if 1 hole is level with the front edge of the cabinet. The microwave oven must align with front edge of cabineL D. Centerline 2. Using measuring tape, measure...
... corner holes. Installation for Wall Stud at the hole(s) marked in Step 4 of "Locate Wall Stud(s)," and mark at both bottom corner holes marked in Step 6, and mark. 9. Set mounting plate aside. 6" (15.2 crn) 6" (15.2 crn) 6. if 1 hole is level with the front edge of the cabinet. The microwave oven must align with front edge of cabineL D. Centerline 2. Using measuring tape, measure...
Installation Instructions
Page 8
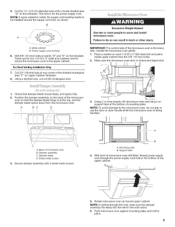
... Upper Cabinet Template against the upper cabinet bottom. O O 6. Start toggle nuts on the bolt from the back of the mounting plate. Start a toggle nut on bolts from the back of the mounting plate. Insert lag screw(s) into the holes drilled into the upper cabinet align with the front edge of the microwave oven. // // .// // A. 1/4-20 x 3" round-head bolt B. Spring toggle nut 1. Disconnect power to use as...
... Upper Cabinet Template against the upper cabinet bottom. O O 6. Start toggle nuts on the bolt from the back of the mounting plate. Start a toggle nut on bolts from the back of the mounting plate. Insert lag screw(s) into the holes drilled into the upper cabinet align with the front edge of the microwave oven. // // .// // A. 1/4-20 x 3" round-head bolt B. Spring toggle nut 1. Disconnect power to use as...
Installation Instructions
Page 9
... opens fully. 2. Failure to move and install microwave oven. Place a washer on the template. Mounting plate B. Push microwave oven against mounting plate and hold in the wall cutout. 6. Cut the 11/2"(3.8 cm) diameter hole at points "D" and "E" on the back of the upper cabinet. 5. Power supply cord bushing 6. IMPORTANT: The control side of the microwave oven is being handled. Using 2 or more people to do not grip or use the door or door handle while the microwave oven...
... opens fully. 2. Failure to move and install microwave oven. Place a washer on the template. Mounting plate B. Push microwave oven against mounting plate and hold in the wall cutout. 6. Cut the 11/2"(3.8 cm) diameter hole at points "D" and "E" on the back of the upper cabinet. 5. Power supply cord bushing 6. IMPORTANT: The control side of the microwave oven is being handled. Using 2 or more people to do not grip or use the door or door handle while the microwave oven...
Installation Instructions
Page 10
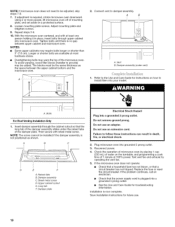
... electrical shock. 2. Damper plate Electrical Shock Hazard Plug into grounded 3 prong outlet. 3. Reconnect power. 4. If the microwave oven does not operate: • Check that a household fuse has not blown, or that a circuit breaker has not tripped. If adjustmeinsrtequiredro, tatemicrowavoevendownward. Vent B. Refer to install filters into a grounded 3 prong outlet. Raised tabs B. Damper assembly C. Long tab F. Do not use an extension cord. Plug microwave oven into a grounded 3 prong outlet. Test vent fan and exhaust by...
... electrical shock. 2. Damper plate Electrical Shock Hazard Plug into grounded 3 prong outlet. 3. Reconnect power. 4. If the microwave oven does not operate: • Check that a household fuse has not blown, or that a circuit breaker has not tripped. If adjustmeinsrtequiredro, tatemicrowavoevendownward. Vent B. Refer to install filters into a grounded 3 prong outlet. Raised tabs B. Damper assembly C. Long tab F. Do not use an extension cord. Plug microwave oven into a grounded 3 prong outlet. Test vent fan and exhaust by...
Installation Instructions
Page 11
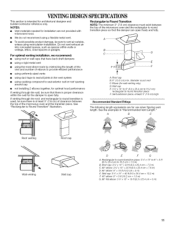
NOTES: • Vent materials needed for installation are for architectural designer and builder/contractor reference only. For optimal venting installation, we recommend: • using roof or wall caps that have back draft dampers • using a rigid metal vent • using the most direct route by minimizing the length of the vent and number of elbows to provide efficient performance • using uniformly sized vents • using recirculation installation. D E F A. To avoid...
NOTES: • Vent materials needed for installation are for architectural designer and builder/contractor reference only. For optimal venting installation, we recommend: • using roof or wall caps that have back draft dampers • using a rigid metal vent • using the most direct route by minimizing the length of the vent and number of elbows to provide efficient performance • using uniformly sized vents • using recirculation installation. D E F A. To avoid...
Installation Instructions
Page 12
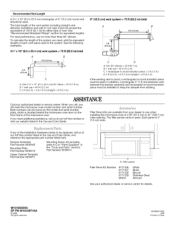
... vent should be found on the model and serial number plate, which is 3" (7.6 cm) wide. For best performance, use when installing this microwave oven in the Use and Care Guide. If you need additional assistance, call us at our toll free number listed in the Use and Care Guide, and reference the appropriate part number listed here. If any of the system you will need , add the equivalent lengths of the microwave oven. Damper Assembly Part Number 8206442 Mounting Plate Part Number 8206315 Mounting Screw Kit...
... vent should be found on the model and serial number plate, which is 3" (7.6 cm) wide. For best performance, use when installing this microwave oven in the Use and Care Guide. If you need additional assistance, call us at our toll free number listed in the Use and Care Guide, and reference the appropriate part number listed here. If any of the system you will need , add the equivalent lengths of the microwave oven. Damper Assembly Part Number 8206442 Mounting Plate Part Number 8206315 Mounting Screw Kit...


