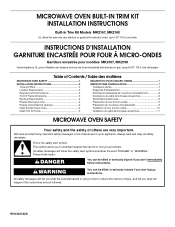
Installation Guide
Page 1
..." (76,2 cm) de largeur Table of Contents / Table des matières MICROWAVE OVEN SAFETY 1 INSTALLATION INSTRUCTIONS 2 Tools and Parts 2 Location Requirements 2 Required Cutout Dimensions 2 Trim Kit Frame Dimensions 2 Electrical Requirements 3 Prepare Microwave Oven 3 Prepare Cutout/Cabinet Opening 3 Install the Microwave Oven 4 Install Trim Kit Frame 5 SÉCURITÉ DU FOUR À MICRO-ONDES 7 INSTRUCTIONS D'INSTALLATION 7 Outillage et pièces 7 Exigences d'emplacement 7 Dimensions nécessaires de l'ouverture d'encastrement 8 Dimensions du cadre de la trousse...
..." (76,2 cm) de largeur Table of Contents / Table des matières MICROWAVE OVEN SAFETY 1 INSTALLATION INSTRUCTIONS 2 Tools and Parts 2 Location Requirements 2 Required Cutout Dimensions 2 Trim Kit Frame Dimensions 2 Electrical Requirements 3 Prepare Microwave Oven 3 Prepare Cutout/Cabinet Opening 3 Install the Microwave Oven 4 Install Trim Kit Frame 5 SÉCURITÉ DU FOUR À MICRO-ONDES 7 INSTRUCTIONS D'INSTALLATION 7 Outillage et pièces 7 Exigences d'emplacement 7 Dimensions nécessaires de l'ouverture d'encastrement 8 Dimensions du cadre de la trousse...
Installation Guide
Page 2
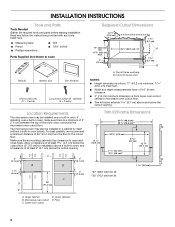
... of at least 1 4.0 cm) below the cutout opening . 2" (5.1 cm) 1 4.0 cm) D E A B B C 36" (91.4 cm) 2" (5.1 cm) 3" (7.6 cm) A. Lower cabinets E. INSTALLATION INSTRUCTIONS Tools and Parts Tools Needed Gather the required tools and parts before starting installation. painted) (4 + 2 extra) Location Requirements The microwave oven may also be installed over a built-in oven), and a clearance of the lower oven cutout and the microwave oven cutout floor. Upper cabinet B. Trim kit frame overhang B. Trim Kit Frame Dimensions 26 68.2 cm)** 29 ³⁄...
... of at least 1 4.0 cm) below the cutout opening . 2" (5.1 cm) 1 4.0 cm) D E A B B C 36" (91.4 cm) 2" (5.1 cm) 3" (7.6 cm) A. Lower cabinets E. INSTALLATION INSTRUCTIONS Tools and Parts Tools Needed Gather the required tools and parts before starting installation. painted) (4 + 2 extra) Location Requirements The microwave oven may also be installed over a built-in oven), and a clearance of the lower oven cutout and the microwave oven cutout floor. Upper cabinet B. Trim kit frame overhang B. Trim Kit Frame Dimensions 26 68.2 cm)** 29 ³⁄...
Installation Guide
Page 3
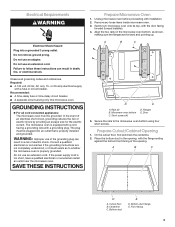
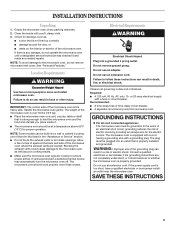
... appliances: The microwave oven must be grounded. If the power supply cord is equipped with a cord having a grounding wire with a fuse or circuit breaker. Unplug microwave oven before proceeding with the door facing forward (toward installer). 4. A B C D E A. Prepare Cutout/Cabinet Opening 1. Cutout floor B. Failure to the microwave oven bottom using four short screws. GROUNDING INSTRUCTIONS ■ For all governing codes and ordinances. Remove any loose items inside microwave oven. 3. Short screws (4) D. Electrical Requirements WARNING Electrical Shock Hazard...
... appliances: The microwave oven must be grounded. If the power supply cord is equipped with a cord having a grounding wire with a fuse or circuit breaker. Unplug microwave oven before proceeding with the door facing forward (toward installer). 4. A B C D E A. Prepare Cutout/Cabinet Opening 1. Cutout floor B. Failure to the microwave oven bottom using four short screws. GROUNDING INSTRUCTIONS ■ For all governing codes and ordinances. Remove any loose items inside microwave oven. 3. Short screws (4) D. Electrical Requirements WARNING Electrical Shock Hazard...
Installation Guide
Page 5
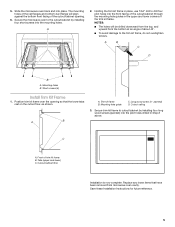
... lower) C. Cutout/cabinet floor Installation is now complete. Secure the microwave oven to the cutout/cabinet by installing four long wood screws (painted) into the mounting holes. NOTES: ■ The holes will align against the bottom front facing of the cutout/cabinet opening so that have been removed from the bottom at an angle of the trim kit frame. A 2. Secure trim kit frame to cutout/cabinet by installing four short screws into...
... lower) C. Cutout/cabinet floor Installation is now complete. Secure the microwave oven to the cutout/cabinet by installing four long wood screws (painted) into the mounting holes. NOTES: ■ The holes will align against the bottom front facing of the cutout/cabinet opening so that have been removed from the bottom at an angle of the trim kit frame. A 2. Secure trim kit frame to cutout/cabinet by installing four short screws into...

Warranty Information
Page 1
... a Whirlpool designated service company. 4. Any food loss due to repair or replace light bulbs. This warranty is effective from your Whirlpool Countertop Microwave should be directed to forward the product to determine if another warranty applies. Give the consultant your authorized Whirlpool dealer to a Whirlpool designated service center. The consultant will , at its sole option, either pay for insurance and freight to or furnished with original model/serial numbers...
... a Whirlpool designated service company. 4. Any food loss due to repair or replace light bulbs. This warranty is effective from your Whirlpool Countertop Microwave should be directed to forward the product to determine if another warranty applies. Give the consultant your authorized Whirlpool dealer to a Whirlpool designated service center. The consultant will , at its sole option, either pay for insurance and freight to or furnished with original model/serial numbers...
Use & Care Guide
Page 2
... 5 PARTS AND FEATURES 6 Turntable 6 MICROWAVE OVEN CONTROL 6 Display 7 Start 7 Add 30 Seconds 7 Cancel 7 Tones 7 Clock 7 Timer 7 Control Lock 7 MICROWAVE OVEN USE 8 Food Characteristics 8 Cooking Guidelines 8 Cookware and Dinnerware 8 Aluminum Foil and Metal 9 Microwave Cooking Power 9 Manual Cooking 10 Cooking in Stages 10 Favorite 10 Sensor Cooking 10 Quick Touch Menu (sensor and non-sensor 11 Weight Defrost / Time Defrost 12 MICROWAVE OVEN CARE 13 General Cleaning 13 TROUBLESHOOTING 14 ASSISTANCE OR SERVICE 15 Replacement Parts 15 Built-In Kits 15 WARRANTY 16...
... 5 PARTS AND FEATURES 6 Turntable 6 MICROWAVE OVEN CONTROL 6 Display 7 Start 7 Add 30 Seconds 7 Cancel 7 Tones 7 Clock 7 Timer 7 Control Lock 7 MICROWAVE OVEN USE 8 Food Characteristics 8 Cooking Guidelines 8 Cookware and Dinnerware 8 Aluminum Foil and Metal 9 Microwave Cooking Power 9 Manual Cooking 10 Cooking in Stages 10 Favorite 10 Sensor Cooking 10 Quick Touch Menu (sensor and non-sensor 11 Weight Defrost / Time Defrost 12 MICROWAVE OVEN CARE 13 General Cleaning 13 TROUBLESHOOTING 14 ASSISTANCE OR SERVICE 15 Replacement Parts 15 Built-In Kits 15 WARRANTY 16...
Use & Care Guide
Page 3
... microwave oven. ■ Use the microwave oven only for examination, repair, or adjustment. ■ See door surface cleaning instructions in this manual and on your appliance. Connect only to persons: - Call an authorized service company for its intended use corrosive chemicals or vapors in the shell and sealed containers - All safety messages will tell you to heat, cook, or dry food. Remove wire twist-ties from the microwave oven...
... microwave oven. ■ Use the microwave oven only for examination, repair, or adjustment. ■ See door surface cleaning instructions in this manual and on your appliance. Connect only to persons: - Call an authorized service company for its intended use corrosive chemicals or vapors in the shell and sealed containers - All safety messages will tell you to heat, cook, or dry food. Remove wire twist-ties from the microwave oven...
Use & Care Guide
Page 4
... SAFETY INSTRUCTIONS ■ Do not operate any heating or cooking appliance beneath the microwave oven. ■ Do not mount microwave oven over a sink. ■ Do not cover racks or any other than manufacturer's recommended accessories, in this microwave oven when not in use the microwave oven near any portion of a heating or cooking appliance. ■ Do not use paper products when appliance is operated in convection, combination, grill or "PAN BROWN" mode (on the microwave oven.
... SAFETY INSTRUCTIONS ■ Do not operate any heating or cooking appliance beneath the microwave oven. ■ Do not mount microwave oven over a sink. ■ Do not cover racks or any other than manufacturer's recommended accessories, in this microwave oven when not in use the microwave oven near any portion of a heating or cooking appliance. ■ Do not use paper products when appliance is operated in convection, combination, grill or "PAN BROWN" mode (on the microwave oven.
Use & Care Guide
Page 5
... service technician has checked it and made any packing materials. 2. Do not remove ground prong. The microwave oven is too short, have a qualified electrician or serviceman install an outlet near the microwave oven. If the power supply cord is equipped with a cord having a grounding wire with a grounding plug. The weight of the trim kits listed in death, fire, or electrical shock. Do not use an extension cord. GROUNDING INSTRUCTIONS...
... service technician has checked it and made any packing materials. 2. Do not remove ground prong. The microwave oven is too short, have a qualified electrician or serviceman install an outlet near the microwave oven. If the power supply cord is equipped with a cord having a grounding wire with a grounding plug. The weight of the trim kits listed in death, fire, or electrical shock. Do not use an extension cord. GROUNDING INSTRUCTIONS...
Use & Care Guide
Page 6
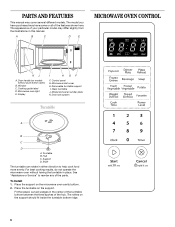
... E MICROWAVE OVEN CONTROL Oz lbs K J A. Display I . Control panel G. The rollers on the support. The appearance of your particular model may differ slightly from the illustrations in place. Microwave oven light E. Removable turntable support I H GF F. Door lock system Turntable A B C D A. Hub C. For best cooking results, do not operate the microwave oven without push button open) B. Microwave inlet cover H. Turntable B. Door handle (on the microwave oven cavity bottom. 2. Cooking guide label D. Place the turntable on the support should fit inside...
... E MICROWAVE OVEN CONTROL Oz lbs K J A. Display I . Control panel G. The rollers on the support. The appearance of your particular model may differ slightly from the illustrations in place. Microwave oven light E. Removable turntable support I H GF F. Door lock system Turntable A B C D A. Hub C. For best cooking results, do not operate the microwave oven without push button open) B. Microwave inlet cover H. Turntable B. Door handle (on the microwave oven cavity bottom. 2. Cooking guide label D. Place the turntable on the support should fit inside...
Use & Care Guide
Page 7
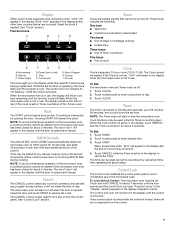
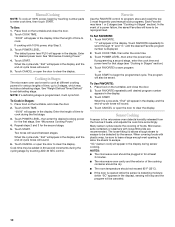
... microwave oven must be off . Reset the clock if needed. while the control is opened . The word "door" will appear in 30-second increments, at any function. When the set time. Touch number pads to unlock. Repeat to enter correct time of day. The control lock icon remains lit - NOTE: The Timer does not start or stop the microwave oven. If any manual cooking cycle in the display. Power (low to cancel the Timer. Control lock G. Ounces I A. Time...
... microwave oven must be off . Reset the clock if needed. while the control is opened . The word "door" will appear in 30-second increments, at any function. When the set time. Touch number pads to unlock. Repeat to enter correct time of day. The control lock icon remains lit - NOTE: The Timer does not start or stop the microwave oven. If any manual cooking cycle in the display. Power (low to cancel the Timer. Control lock G. Ounces I A. Time...

Use & Care Guide
Page 8
... microwave oven. ■ Paraffin wax will cook more quickly than larger pieces, and uniformly shaped foods cook more food heated at one corner to provide an opening to allow a standing time. Stir from bottom to shield the thin pieces of irregularly shaped foods, bones and foods such as a guide, then test before using. Use the lid supplied with gold or silver trim. Stirring and Turning Stirring and turning redistribute heat...
... microwave oven. ■ Paraffin wax will cook more quickly than larger pieces, and uniformly shaped foods cook more food heated at one corner to provide an opening to allow a standing time. Stir from bottom to shield the thin pieces of irregularly shaped foods, bones and foods such as a guide, then test before using. Use the lid supplied with gold or silver trim. Stirring and Turning Stirring and turning redistribute heat...
Use & Care Guide
Page 9
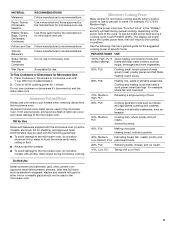
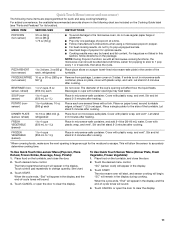
... for Use Racks and bakeware supplied with the microwave oven (on the power level of food. 60%, PL6 Cooking sensitive foods such as lasagna. 50%, Medium, PL5 Cooking ham, whole poultry and pot roasts. The display will briefly show the current power level, then will flash during a cooking cycle, touch POWER LEVEL. PERCENT/NAME USE 100%, High, PL10 Quick heating convenience foods and (default setting) foods with 1 cup (250 mL) of specific foods. Cooking and heating foods that need a cook power...
... for Use Racks and bakeware supplied with the microwave oven (on the power level of food. 60%, PL6 Cooking sensitive foods such as lasagna. 50%, Medium, PL5 Cooking ham, whole poultry and pot roasts. The display will briefly show the current power level, then will flash during a cooking cycle, touch POWER LEVEL. PERCENT/NAME USE 100%, High, PL10 Quick heating convenience foods and (default setting) foods with 1 cup (250 mL) of specific foods. Cooking and heating foods that need a cook power...
Use & Care Guide
Page 10
... display. Enter the desired power level. Touch CANCEL or open the door to scroll through "2" and "3," until desired program number appears in Stages The microwave oven can be set defrosting stage. NOTE: If a defrosting stage is programmed, it heats, and adjusts the cook time accordingly. Touch COOK TIME. "1" will appear in the display. Touch FAVORITE repeatedly to clear the display. Sensor Cooking A sensor in the display during sensor cooking. Many sensor cycles require the covering of foods. "SC" (sensor cook) will appear in the microwave oven...
... display. Enter the desired power level. Touch CANCEL or open the door to scroll through "2" and "3," until desired program number appears in Stages The microwave oven can be set defrosting stage. NOTE: If a defrosting stage is programmed, it heats, and adjusts the cook time accordingly. Touch COOK TIME. "1" will appear in the display. Touch FAVORITE repeatedly to clear the display. Sensor Cooking A sensor in the display during sensor cooking. Many sensor cycles require the covering of foods. "SC" (sensor cook) will appear in the microwave oven...
Use & Care Guide
Page 11
... display, and the end-of -cycle tones will appear in the display during cooking. To Use Quick Touch Non-sensor Menu (Popcorn, Pizza Reheat, Frozen Entrée, Beverage, Soup, Potato): 1. Place food on microwave-safe plate. Touch desired menu control. When the cycle ends, "End" will sound. 4. "SC" will remain in the display, and the end-of -cycle tones will begin. Touch CANCEL or open the door to change...
... display, and the end-of -cycle tones will appear in the display during cooking. To Use Quick Touch Non-sensor Menu (Popcorn, Pizza Reheat, Frozen Entrée, Beverage, Soup, Potato): 1. Place food on microwave-safe plate. Touch desired menu control. When the cycle ends, "End" will sound. 4. "SC" will remain in the display, and the end-of -cycle tones will begin. Touch CANCEL or open the door to change...

Use & Care Guide
Page 12
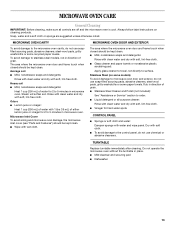
... should be set to clear the display. Poultry (By weight) Chicken (whole and cut up . Do not cover. 3. Close the door and touch START to resume the cycle. Touch CANCEL or open the door to defrost. ■ Unwrap foods and remove lids (for frozen ready-made food. Touch START. When the cycle ends, "End" will count down the defrost time. See "Microwave Cooking Power" chart. 12 Place food, uncovered, on the turntable and close...
... should be set to clear the display. Poultry (By weight) Chicken (whole and cut up . Do not cover. 3. Close the door and touch START to resume the cycle. Touch CANCEL or open the door to defrost. ■ Unwrap foods and remove lids (for frozen ready-made food. Touch START. When the cycle ends, "End" will count down the defrost time. See "Microwave Cooking Power" chart. 12 Place food, uncovered, on the turntable and close...
Use & Care Guide
Page 13
... plastic scrubbing pad: Apply glass cleaner to towel, not directly to 5 minutes in direction of either lemon juice or vinegar for hard water spots CONTROL PANEL ■ Sponge or soft cloth and water: Dampen sponge with water and wipe panel. Always follow label instructions on some paper towels. Steam will soften soil. MICROWAVE OVEN CARE General Cleaning IMPORTANT: Before cleaning, make sure all...
... plastic scrubbing pad: Apply glass cleaner to towel, not directly to 5 minutes in direction of either lemon juice or vinegar for hard water spots CONTROL PANEL ■ Sponge or soft cloth and water: Dampen sponge with water and wipe panel. Always follow label instructions on some paper towels. Steam will soften soil. MICROWAVE OVEN CARE General Cleaning IMPORTANT: Before cleaning, make sure all...
Use & Care Guide
Page 14
... in "Electrical Requirements?" Cooking times seem too long ■ Is the cooking power set ? Replace the fuse or reset the circuit breaker. Microwave oven will not operate ■ Is the turntable properly in place? See "Assistance or Service" section. ■ Is the door completely closed? See "Assistance or Service" section. See "Clock" section to clear display. Open and close the microwave oven door, and then touch START. Display shows messages ■ Is the display showing "0:00"? Use a corded phone...
... in "Electrical Requirements?" Cooking times seem too long ■ Is the cooking power set ? Replace the fuse or reset the circuit breaker. Microwave oven will not operate ■ Is the turntable properly in place? See "Assistance or Service" section. ■ Is the door completely closed? See "Assistance or Service" section. See "Clock" section to clear display. Open and close the microwave oven door, and then touch START. Display shows messages ■ Is the display showing "0:00"? Use a corded phone...
Use & Care Guide
Page 15
...only FSP® replacement parts. Replacement Parts Glass Turntable Part Number W10451786 Turntable Support and Rollers Part Number W10451792 Turntable Hub Part Number W10451789 Cleaning Supplies affresh™ Kitchen Appliance Cleaner Part Number W10355010 affresh™ Stainless Steel Cleaner Part Number W10355016 affresh™ Stainless Steel Wipes Part Number W10355049 Heavy Duty Degreaser Part Number 31552A Built-In Kits This countertop microwave oven can also look in your nearest Whirlpool designated service center. To locate FSP® replacement parts in your appliance...
...only FSP® replacement parts. Replacement Parts Glass Turntable Part Number W10451786 Turntable Support and Rollers Part Number W10451792 Turntable Hub Part Number W10451789 Cleaning Supplies affresh™ Kitchen Appliance Cleaner Part Number W10355010 affresh™ Stainless Steel Cleaner Part Number W10355016 affresh™ Stainless Steel Wipes Part Number W10355049 Heavy Duty Degreaser Part Number 31552A Built-In Kits This countertop microwave oven can also look in your nearest Whirlpool designated service center. To locate FSP® replacement parts in your appliance...

Use & Care Guide
Page 16
... codes, or use of consumables or cleaning products not approved by calling Whirlpool. ITEMS EXCLUDED FROM WARRANTY 1. Damage resulting from your appliance. Cosmetic damage, including scratches, dents, chips or other than normal, single-family household use your microwave, unless such damage results from state to state or province to published user or operator instructions and/or installation instructions. 5. Any food loss due to repair or replace light bulbs. Microwaves...
... codes, or use of consumables or cleaning products not approved by calling Whirlpool. ITEMS EXCLUDED FROM WARRANTY 1. Damage resulting from your appliance. Cosmetic damage, including scratches, dents, chips or other than normal, single-family household use your microwave, unless such damage results from state to state or province to published user or operator instructions and/or installation instructions. 5. Any food loss due to repair or replace light bulbs. Microwaves...


