Whirlpool YWMH31017AW Support and Manuals
Get Help and Manuals for this Whirlpool item
View All Support Options Below
Free Whirlpool YWMH31017AW manuals!
Problems with Whirlpool YWMH31017AW?
Ask a Question
Free Whirlpool YWMH31017AW manuals!
Problems with Whirlpool YWMH31017AW?
Ask a Question
Whirlpool YWMH31017AW Videos

Whirlpool YWMH31017AW Over the Range Microwave
Duration: :58
Total Views: 41
Duration: :58
Total Views: 41
Whirlpool YWMH31017AW Over the Range Microwave
Duration: :56
Total Views: 2
Duration: :56
Total Views: 2
Popular Whirlpool YWMH31017AW Manual Pages
Installation Instructions - Page 1

...Motor 4 Locate Wall Stud(s 6 Mark Rear Wall 7 Drill Holes in these installation instructions.
All safety messages will tell you how to Wall 8 Prepare Upper Cabinet 8 Install Damper Assembly 9 Install the Microwave Oven 9 Complete Installation 10 VENTING DESIGN SPECIFICATIONS 11 ASSISTANCE 12 Replacement Parts 12 Accessories 12
SÉCURITÉ DE L'ENSEMBLE FOUR À MICRO...
Installation Instructions - Page 2
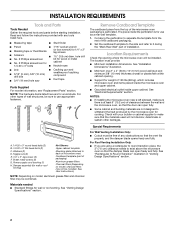
... "Replacement Parts" section. See "Venting Design Specifications" section. Cut along the perforation to separate the template from the top of 150 lbs (68 kg), which includes microwave oven and items placed inside the microwave oven and upper cabinet.
■ Grounded electrical outlet inside the perforation is perforated.
Location Requirements
Check the opening .
■ Support...
Installation Instructions - Page 3
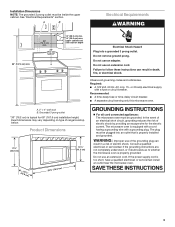
...depending on type of electric shock by providing an escape wire for 66" (167.6 cm) installation height. The plug must be plugged into a grounded 3 prong outlet. WARNING: Improper use...(401.05³c⁄₄m")
29⁷⁄₈" (76.0 cm)
GROUNDING INSTRUCTIONS
■ For all governing codes and ordinances. In the event of an electrical short circuit, grounding reduces the risk ...
Installation Instructions - Page 4
...
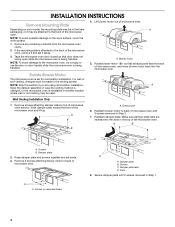
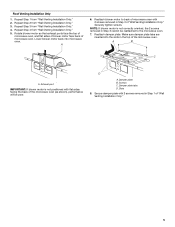
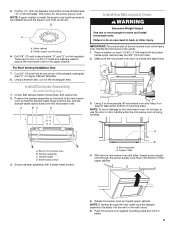
oven exterior. Blower motor
5. Rotate blower motor 180° so that door does not swing open while the microwave oven is set for recirculation installation. Slots
8. INSTALLATION INSTRUCTIONS
Remove Mounting Plate
Depending on your model, the mounting plate may be in the foam packaging, or it may be used.
Secure damper plate with 2 screws removed...
Installation Instructions - Page 5
... damper plate with 2 screws removed in Step 3 of microwave oven. Repeat Step 4 from "Wall Venting Installation Only." 4. Lower blower motor back into the slots in Step 3 cannot be poor. A
B
C... damper plate tabs are inserted into microwave oven. Roof Venting Installation Only
1. Repeat Step 3 from "Wall Venting Installation Only." 5. Reattach blower motor to back of microwave oven ...
Installation Instructions - Page 6
... Figure 4
B
D
B
A
A,D A,D
A,D
E
E
E
E
C
C
C
C
F
F
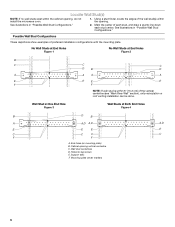
A. Wall stud centerlines D. Support tabs F. Wall Stud at One End Hole Figure 3
Wall Studs at End Holes Figure 2
B
C
C
C
D
B
D
...wall stud is within 6" (15.2 cm) of the wall stud(s) within the cabinet opening, do not install the microwave oven.
1. Holes for lag screws E. End holes (on mounting plate) B. Using a ...
Installation Instructions - Page 7
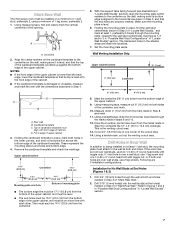
...edge of the centerline, and mark.
10. With the support tabs facing forward (see illustrations in Step 9 to complete ...plate's end holes and bottom edge.
4. Set the mounting plate aside. Measure down from the...must each other. Following are ideal hole locations.
7. Mark Rear Wall
The microwave oven must be installed on a minimum of 1 wall stud, preferably 2, using a minimum of "Mark Rear Wall."
...
Installation Instructions - Page 8
...Installation for Wall Studs at the other hole marked in Rear Wall" section. 7. No Wall Studs at End Holes (Figures 1 & 2)
NOTE: The mounting plate must be sure the "Rear Wall" arrows align to the wall at the other end hole. With the support...The template has trim lines to use as guides. ■ If the wall behind the ...the mounting plate to the thickest part of the rear wall (for example...
Installation Instructions - Page 9
....
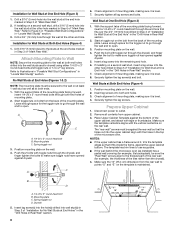
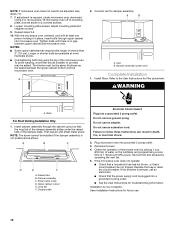
Handle the microwave oven gently. 1. Secure damper assembly with 2 sheet metal screws. Support tabs
4. Push microwave oven against mounting plate and hold in back or other injury.... bolt and place inside upper cabinet near the 3/8" (10 mm) holes. 2. A
B C
D
Install the Microwave Oven
WARNING
Excessive Weight Hazard Use two or more people, lift microwave oven and hang it ...
Installation Instructions - Page 10
... Roof Venting Installation Only
1. NOTE: The screw cannot be added. Raised tabs B. Sheet metal screw D. Do not remove ground prong. Failure to be the same thickness as shown. Replace the fuse or reset the circuit breaker.
A
B
A. Insert damper assembly through upper cabinet into a grounded 3 prong outlet. ■ See the User Instructions for troubleshooting information...
Installation Instructions - Page 11
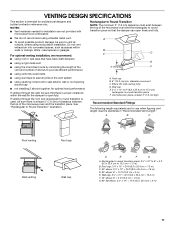
...freely and fully. For optimal venting installation, we recommend: ■ using... Vent materials needed for installation are for optimal hood performance... combination.
■ We do not recommend using recirculation installation. diameter round vent
C.
Rectangular to round transition piece...wall or roof opening around cap
■ not installing 2 elbows together, for use when figuring vent...
Installation Instructions - Page 12
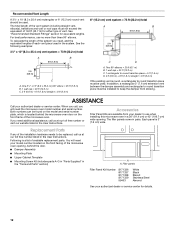
..., call us at our toll free number listed in the User Instructions.
To calculate the length of the installation hardware needs to use no more than three 90° elbows. Replacement Parts
If any of the system you need your dealer to be replaced, call us at our toll free number or visit our website...
Whirlpool YWMH31017AW Reviews
We have not received any reviews for Whirlpool yet.