
User Instructions
Page 1
To order parts and accessories, call 1-800-901-2042, or visit us at www.whirlpool.com/accessories. Write down the following information about your appliance to help is available by calling our Customer eXperience Center at the top inside dryer door well. You will ...49572 LP gas conversion kit W10150610A Part Number Accessory 20-48KITRC 4 ft (1.2 m) gas line dryer connector installation kit PT220L 4 ft (1.2 m) dryer cord, 3-wire, 30 amp PT400L 4 ft (1.2 m) dryer cord, 4-wire, 30 amp PT600L 6 ft (1.8 m) dryer cord, 4-wire, 30 amp 8212614 Dryer vent lint brush 31682 All-purpose...
To order parts and accessories, call 1-800-901-2042, or visit us at www.whirlpool.com/accessories. Write down the following information about your appliance to help is available by calling our Customer eXperience Center at the top inside dryer door well. You will ...49572 LP gas conversion kit W10150610A Part Number Accessory 20-48KITRC 4 ft (1.2 m) gas line dryer connector installation kit PT220L 4 ft (1.2 m) dryer cord, 3-wire, 30 amp PT400L 4 ft (1.2 m) dryer cord, 4-wire, 30 amp PT600L 6 ft (1.8 m) dryer cord, 4-wire, 30 amp 8212614 Dryer vent lint brush 31682 All-purpose...

User Instructions
Page 2
... if you don't follow basic precautions, including the following: ■ Read all safety messages. IMPORTANT SAFETY INSTRUCTIONS WARNING: To reduce the risk of the dryer or attempt any part of fire, electric shock, or injury to reduce the chance of others . We have been previously cleaned in, washed in, soaked in, or...
... if you don't follow basic precautions, including the following: ■ Read all safety messages. IMPORTANT SAFETY INSTRUCTIONS WARNING: To reduce the risk of the dryer or attempt any part of fire, electric shock, or injury to reduce the chance of others . We have been previously cleaned in, washed in, soaked in, or...

User Instructions
Page 4
... refer to the front page of up to the desired volume. ■ On other models, the End of Cycle signal is part of the Start button and is reached, the dryer goes into a cool down period of the manual or contact the dealer from whom you may have an END OF CYCLE... form. Failure to purchase one for normal tumbling. Clean lint screen before operating this appliance. This book covers several different models. To stop your dryer, wipe the dryer drum with the drying rack. If your model does not have all of the cycle. Do not dry anything that has ever had anything...
... refer to the front page of up to the desired volume. ■ On other models, the End of Cycle signal is part of the Start button and is reached, the dryer goes into a cool down period of the manual or contact the dealer from whom you may have an END OF CYCLE... form. Failure to purchase one for normal tumbling. Clean lint screen before operating this appliance. This book covers several different models. To stop your dryer, wipe the dryer drum with the drying rack. If your model does not have all of the cycle. Do not dry anything that has ever had anything...
User Instructions
Page 6
...Moving care - Cap the open on the back wall of the dryer. Make sure leveling legs are at home. Use masking tape to secure dryer door. Unplug dryer or disconnect power. 2. Open the dryer door. Replace all parts and panels before laundering. 6 Replace the fuse or reset the ...the Wrinkle Guard® position. Plug in gas supply line. 3. Replace the fuse or reset the circuit breaker. www.whirlpool.com/help - In Canada www.whirlpool.ca Dryer Operation Dryer will be turning, but you may be a thumping sound during the first few minutes of operation. ■ Is ...
...Moving care - Cap the open on the back wall of the dryer. Make sure leveling legs are at home. Use masking tape to secure dryer door. Unplug dryer or disconnect power. 2. Open the dryer door. Replace all parts and panels before laundering. 6 Replace the fuse or reset the ...the Wrinkle Guard® position. Plug in gas supply line. 3. Replace the fuse or reset the circuit breaker. www.whirlpool.com/help - In Canada www.whirlpool.ca Dryer Operation Dryer will be turning, but you may be a thumping sound during the first few minutes of operation. ■ Is ...

User Instructions
Page 8
...modifications made with electrical or plumbing codes, or use of products not approved by Whirlpool. 5. Repairs to parts or systems resulting from the area, rewash and dry the clothing. ■ Is the electric dryer being used for product service in U.S.A. In Canada, call 1-800-253-1301... 2. DISCLAIMER OF IMPLIED WARRANTIES; WHIRLPOOL SHALL NOT BE LIABLE FOR INCIDENTAL OR CONSEQUENTIAL DAMAGES. If you need service, first see front page of the cycle? ■ Was the dryer overloaded? In the U.S.A., call 1-800-807-6777. 12/05 Replacement parts If you need to the appliance...
...modifications made with electrical or plumbing codes, or use of products not approved by Whirlpool. 5. Repairs to parts or systems resulting from the area, rewash and dry the clothing. ■ Is the electric dryer being used for product service in U.S.A. In Canada, call 1-800-253-1301... 2. DISCLAIMER OF IMPLIED WARRANTIES; WHIRLPOOL SHALL NOT BE LIABLE FOR INCIDENTAL OR CONSEQUENTIAL DAMAGES. If you need service, first see front page of the cycle? ■ Was the dryer overloaded? In the U.S.A., call 1-800-807-6777. 12/05 Replacement parts If you need to the appliance...
Installation Instructions
Page 1
... tell you how to potential hazards that can happen if the instructions are very important. DRYER SAFETY Your safety and the safety of Contents / Table des matières DRYER SAFETY 1 INSTALLATION INSTRUCTIONS 2 Tools and Parts 2 Location Requirements 3 Electrical Requirements 4 Gas Supply Requirements 4 Venting Requirements 5 Plan Vent... y cuidado en español, o para obtener información adicional acerca de su producto, visite: www.whirlpool.com. Tenga listo su número de modelo completo. IMPORTANT SAFETY INSTRUCTIONS When discarding or storing your appliance.
... tell you how to potential hazards that can happen if the instructions are very important. DRYER SAFETY Your safety and the safety of Contents / Table des matières DRYER SAFETY 1 INSTALLATION INSTRUCTIONS 2 Tools and Parts 2 Location Requirements 3 Electrical Requirements 4 Gas Supply Requirements 4 Venting Requirements 5 Plan Vent... y cuidado en español, o para obtener información adicional acerca de su producto, visite: www.whirlpool.com. Tenga listo su número de modelo completo. IMPORTANT SAFETY INSTRUCTIONS When discarding or storing your appliance.

Installation Instructions
Page 2
... fire or explosion, or to light any appliance. • Do not touch any electrical switch; Mobile home installations require special parts (listed following installation instructions apply: ■ Installations and repairs must be performed by a qualified or licensed contractor, plumber, or...9632; If using a ball valve, it shall be ordered by calling the dealer from dryer drum. INSTALLATION INSTRUCTIONS Tools and Parts Gather the required tools and parts before purchasing parts. For further information, please reference the front page of local codes, with the National ...
... fire or explosion, or to light any appliance. • Do not touch any electrical switch; Mobile home installations require special parts (listed following installation instructions apply: ■ Installations and repairs must be performed by a qualified or licensed contractor, plumber, or...9632; If using a ball valve, it shall be ordered by calling the dealer from dryer drum. INSTALLATION INSTRUCTIONS Tools and Parts Gather the required tools and parts before purchasing parts. For further information, please reference the front page of local codes, with the National ...

Installation Instructions
Page 3
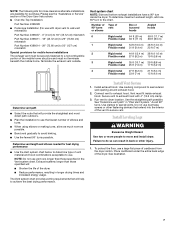
.... Installation Clearances The location must not be large enough to allow the dryer door to do not permit, installation of 1" (2.5 cm) under entire dryer. (If slope is greater than 1" [2.5 cm], install Extended Dryer Feet kit, Part No. 279810.) Clothes may not tumble properly and models with a maximum... slope of the dryer in the top and bottom of the dryer to water and/or weather. Wide Opening...
.... Installation Clearances The location must not be large enough to allow the dryer door to do not permit, installation of 1" (2.5 cm) under entire dryer. (If slope is greater than 1" [2.5 cm], install Extended Dryer Feet kit, Part No. 279810.) Clothes may not tumble properly and models with a maximum... slope of the dryer in the top and bottom of the dryer to water and/or weather. Wide Opening...
Installation Instructions
Page 4
...by a qualified technician. If connected to the Manufactured Home Construction and Safety Standard, Title 24 CFR, Part 3280 (formerly the Federal Standard for electric current. Gas Type Natural Gas: This dryer is located on the model/serial rating plate for use larger tubing and a different size adapter fitting.... gas supply line. If the total length of electric shock. Check with the dryer: if it will reduce the risk of least resistance for Mobile Home Construction and Safety, Title 24, HUD Part 280) or the Canadian Manufactured Home Standard, CAN/CSA-Z240 MH. Securely tighten...
...by a qualified technician. If connected to the Manufactured Home Construction and Safety Standard, Title 24 CFR, Part 3280 (formerly the Federal Standard for electric current. Gas Type Natural Gas: This dryer is located on the model/serial rating plate for use larger tubing and a different size adapter fitting.... gas supply line. If the total length of electric shock. Check with the dryer: if it will reduce the risk of least resistance for Mobile Home Construction and Safety, Title 24, HUD Part 280) or the Canadian Manufactured Home Standard, CAN/CSA-Z240 MH. Securely tighten...
Installation Instructions
Page 7
...drying times and increased energy usage. Place cardboard under the entire back edge of cardboard from the dryer carton. Please see the "Assistance or Service" section of the Dryer User Instructions. ■ Over-the-Top Installation: Part Number 4396028 ■ Periscope Installation (For use with 4" (10.2 cm) clamp. 3. ...186; turn inside exhaust hood. Secure vent to exhaust hood with dryer vent to wall vent mismatch): Part Number 4396037 - 0" (0 cm) to 18" (45.72 cm) mismatch Part Number 4396011 - 18" (45.72 cm) to 29" (73.66 cm) mismatch Part Number 4396014 - 29" (73.66 cm) to 50" (...
...drying times and increased energy usage. Place cardboard under the entire back edge of cardboard from the dryer carton. Please see the "Assistance or Service" section of the Dryer User Instructions. ■ Over-the-Top Installation: Part Number 4396028 ■ Periscope Installation (For use with 4" (10.2 cm) clamp. 3. ...186; turn inside exhaust hood. Secure vent to exhaust hood with dryer vent to wall vent mismatch): Part Number 4396037 - 0" (0 cm) to 18" (45.72 cm) mismatch Part Number 4396011 - 18" (45.72 cm) to 29" (73.66 cm) mismatch Part Number 4396014 - 29" (73.66 cm) to 50" (...
Installation Instructions
Page 9
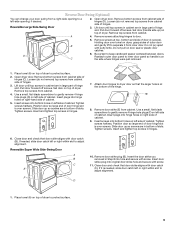
...apart with screw. 11. Lift door until top screws in cabinet are in large part of hinge slot. Set door on top of dryer to gently remove 4 hinge hole plugs (F) on top of dryer. Tighten screws halfway. Tighten screws. If needed , slide door catch left side... and secure with putty knife. Remove door strike (E) from cabinet side of the hinge. 8. Insert the door strike you removed in hinges. 7. Open dryer door. A 4. Pull door forward off screws. Position door so large end of cabinet. Tighten screws. Tighten screws halfway. Reversible Super Wide Side-Swing ...
...apart with screw. 11. Lift door until top screws in cabinet are in large part of hinge slot. Set door on top of dryer to gently remove 4 hinge hole plugs (F) on top of dryer. Tighten screws halfway. Tighten screws. If needed , slide door catch left side... and secure with putty knife. Remove door strike (E) from cabinet side of the hinge. 8. Insert the door strike you removed in hinges. 7. Open dryer door. A 4. Pull door forward off screws. Position door so large end of cabinet. Tighten screws. Tighten screws halfway. Reversible Super Wide Side-Swing ...
Installation Instructions
Page 10
...following: ■ Dryer is level. If the dryer will not start the dryer. Do not remove ground prong. Do not use an extension cord. If you do not feel heat, turn off the dryer and check that the dryer is plugged into a grounded 3 prong outlet. Check that all parts are now installed.... Wipe the dryer drum interior thoroughly with a damp cloth to see which step was skipped. 2. Electrical...
...following: ■ Dryer is level. If the dryer will not start the dryer. Do not remove ground prong. Do not use an extension cord. If you do not feel heat, turn off the dryer and check that the dryer is plugged into a grounded 3 prong outlet. Check that all parts are now installed.... Wipe the dryer drum interior thoroughly with a damp cloth to see which step was skipped. 2. Electrical...


