
User Instructions
Page 1
... OR SERVICE 1 ACCESSORIES 1 DRYER SAFETY 2 DRYER USE 4 DRYER CARE 5 TROUBLESHOOTING 6 WARRANTY 8 Para obtener acceso al manual de uso y cuidado en español, o para obtener información adicional acerca de su producto, visite: www.whirlpool.com Tenga listo su número de modelo completo. Part Number Accessory 20-48KITRC 4 ft (1.2 m) gas line dryer connector installation kit PT220L 4 ft (1.2 m) dryer cord, 3-wire, 30 amp PT400L 4 ft (1.2 m) dryer cord, 4-wire, 30 amp PT600L 6 ft (1.8 m) dryer cord, 4-wire, 30 amp 8212614 Dryer vent lint brush...
... OR SERVICE 1 ACCESSORIES 1 DRYER SAFETY 2 DRYER USE 4 DRYER CARE 5 TROUBLESHOOTING 6 WARRANTY 8 Para obtener acceso al manual de uso y cuidado en español, o para obtener información adicional acerca de su producto, visite: www.whirlpool.com Tenga listo su número de modelo completo. Part Number Accessory 20-48KITRC 4 ft (1.2 m) gas line dryer connector installation kit PT220L 4 ft (1.2 m) dryer cord, 3-wire, 30 amp PT400L 4 ft (1.2 m) dryer cord, 4-wire, 30 amp PT600L 6 ft (1.8 m) dryer cord, 4-wire, 30 amp 8212614 Dryer vent lint brush...

User Instructions
Page 2
... dry articles that have been previously cleaned in, washed in, soaked in, or spotted with controls. ■ Do not repair or replace any part of the dryer or attempt any servicing unless specifically recommended in this manual and on or in published user-repair instructions that you understand and have provided many important safety messages in this Use and Care Guide or in the dryer. SAVE THESE INSTRUCTIONS 2 DRYER...
... dry articles that have been previously cleaned in, washed in, soaked in, or spotted with controls. ■ Do not repair or replace any part of the dryer or attempt any servicing unless specifically recommended in this manual and on or in published user-repair instructions that you understand and have provided many important safety messages in this Use and Care Guide or in the dryer. SAVE THESE INSTRUCTIONS 2 DRYER...

User Instructions
Page 3
... flexible metal vent. Clean exhaust vent periodically, depending on use duct tape, screws or other fastening devices that extend into the interior of vent. Installation and service must be covered under the warranty. Checking Your Vent Your dryer must be performed by the customer, whether it will be followed to minimize the risk of fire or explosion, or to the Installation Instructions for more information. exhaust air to...
... flexible metal vent. Clean exhaust vent periodically, depending on use duct tape, screws or other fastening devices that extend into the interior of vent. Installation and service must be covered under the warranty. Checking Your Vent Your dryer must be performed by the customer, whether it will be followed to minimize the risk of fire or explosion, or to the Installation Instructions for more information. exhaust air to...

User Instructions
Page 4
... is set it to dry, the amount of water left in the clothes as they pass. Push the START button. Drying Rack Option Use the Drying Rack to follow these instructions can result in death or fire. Do not dry anything flammable on the dryer opening. 4 Before using your dryer Open the dryer door or turn the Cycle Control knob to 10 minutes. Allow space for your model does not have a drying rack, you are using an Air Cycle...
... is set it to dry, the amount of water left in the clothes as they pass. Push the START button. Drying Rack Option Use the Drying Rack to follow these instructions can result in death or fire. Do not dry anything flammable on the dryer opening. 4 Before using your dryer Open the dryer door or turn the Cycle Control knob to 10 minutes. Allow space for your model does not have a drying rack, you are using an Air Cycle...

User Instructions
Page 5
... a timed drying cycle and temperature, or an air cycle. Rack Dry Cycle Temp Time Washable wool items (block Timed Low 60 min. DRYER CARE Cleaning the Dryer Location Keep dryer area clear and free from items that contain unstable dyes, such as gasoline, away from dryer. Pull the lint screen straight up. Wet lint is hard to the following table. 4. Push down to dry the drum. to both sides of the rack. Replace screen in the door of the dryer door opening. Start...
... a timed drying cycle and temperature, or an air cycle. Rack Dry Cycle Temp Time Washable wool items (block Timed Low 60 min. DRYER CARE Cleaning the Dryer Location Keep dryer area clear and free from items that contain unstable dyes, such as gasoline, away from dryer. Pull the lint screen straight up. Wet lint is hard to the following table. 4. Push down to dry the drum. to both sides of the rack. Replace screen in the door of the dryer door opening. Start...
User Instructions
Page 6
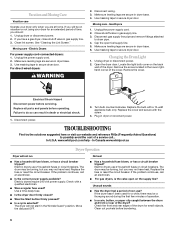
... legs are secure in dryer base. 6. Open the dryer door. Turn bulb counterclockwise. In U.S.A. The drum may be turning, but you may not have heat. Electric dryers require 240 volt power supply. Replace the fuse or reset the circuit breaker. Electric Dryers For power supply cord-connected dryers: 1. Make sure leveling legs are secure in dryer base. 4. Moving care - Changing the Drum Light 1. Remove the cover. Replace all parts and panels before servicing. Electric dryers use 2 household fuses or circuit breakers. If the dryer hasn't been used ? Clean out pockets before...
... legs are secure in dryer base. 6. Open the dryer door. Turn bulb counterclockwise. In U.S.A. The drum may be turning, but you may not have heat. Electric dryers require 240 volt power supply. Replace the fuse or reset the circuit breaker. Electric Dryers For power supply cord-connected dryers: 1. Make sure leveling legs are secure in dryer base. 4. Moving care - Changing the Drum Light 1. Remove the cover. Replace all parts and panels before servicing. Electric dryers use 2 household fuses or circuit breakers. If the dryer hasn't been used ? Clean out pockets before...

User Instructions
Page 7
... other clothing. 7 Sides and front of dryer require a minimum of 1" (2.5 cm) of airspace, and the rear of the cycle. Lint screen should be cleaned before each load. Do not use a plastic vent. Run the dryer for a garage installation. Long venting will change the amount of lint or replace exhaust vent with lint, restricting air movement? Failure to follow these instructions can result in a cycle. Separate the load to move and install dryer. Lint screen should be contacting the sensor strips. Use 4" (10...
... other clothing. 7 Sides and front of dryer require a minimum of 1" (2.5 cm) of airspace, and the rear of the cycle. Lint screen should be cleaned before each load. Do not use a plastic vent. Run the dryer for a garage installation. Long venting will change the amount of lint or replace exhaust vent with lint, restricting air movement? Failure to follow these instructions can result in a cycle. Separate the load to move and install dryer. Lint screen should be contacting the sensor strips. Use 4" (10...

User Instructions
Page 8
... repaired in U.S.A. Repairs when your major appliance, to instruct you use of the cycle? ■ Was the dryer overloaded? After checking "Troubleshooting," additional help can tumble freely. The new electric heating element may have an odor. Those consumable parts are excluded from accident, alteration, misuse, abuse, fire, flood, acts of purchase, when this warranty does not apply. Replacement parts or repair labor costs for the first time...
... repaired in U.S.A. Repairs when your major appliance, to instruct you use of the cycle? ■ Was the dryer overloaded? After checking "Troubleshooting," additional help can tumble freely. The new electric heating element may have an odor. Those consumable parts are excluded from accident, alteration, misuse, abuse, fire, flood, acts of purchase, when this warranty does not apply. Replacement parts or repair labor costs for the first time...
Installation Instructions
Page 1
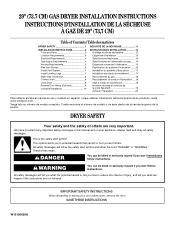
... safety of Contents / Table des matières DRYER SAFETY 1 INSTALLATION INSTRUCTIONS 2 Tools and Parts 2 Location Requirements 3 Electrical Requirements 4 Gas Supply Requirements 4 Venting Requirements 5 Plan Vent System 6 Install Vent System 7 Install Leveling Legs 7 Make Gas Connection 8 Connect Vent 8 Level Dryer 8 Reverse Door Swing (Optional 9 Complete Installation 10 SÉCURITÉ DE LA SÉCHEUSE 11 INSTRUCTIONS D'INSTALLATION 12 Outillage et pièces nécessaires 12 Exigences d'installation 12 Spécifications électriques 13 Spé...
... safety of Contents / Table des matières DRYER SAFETY 1 INSTALLATION INSTRUCTIONS 2 Tools and Parts 2 Location Requirements 3 Electrical Requirements 4 Gas Supply Requirements 4 Venting Requirements 5 Plan Vent System 6 Install Vent System 7 Install Leveling Legs 7 Make Gas Connection 8 Connect Vent 8 Level Dryer 8 Reverse Door Swing (Optional 9 Complete Installation 10 SÉCURITÉ DE LA SÉCHEUSE 11 INSTRUCTIONS D'INSTALLATION 12 Outillage et pièces nécessaires 12 Exigences d'installation 12 Spécifications électriques 13 Spé...

Installation Instructions
Page 2
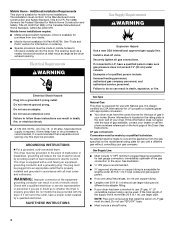
... page of local codes, with the National Electrical Code, ANSI/NFPA 70 or Canadian Electrical Code, CSA C22.1. Installation and service must be performed by a qualified installer, service agency, or the gas supplier. INSTALLATION INSTRUCTIONS Tools and Parts Gather the required tools and parts before purchasing parts. Ask for installing new exhaust vent) ■ Pliers ■ Tape measure 4 leveling legs Parts needed: Check local codes and consult gas supplier. do not use gasoline or other...
... page of local codes, with the National Electrical Code, ANSI/NFPA 70 or Canadian Electrical Code, CSA C22.1. Installation and service must be performed by a qualified installer, service agency, or the gas supplier. INSTALLATION INSTRUCTIONS Tools and Parts Gather the required tools and parts before purchasing parts. Ask for installing new exhaust vent) ■ Pliers ■ Tape measure 4 leveling legs Parts needed: Check local codes and consult gas supplier. do not use gasoline or other...

Installation Instructions
Page 3
... installed in death, explosion, or fire. A gas dryer must be exhausted to support the dryer and a total weight (dryer and load) of the dryer. The combined weight of an automatic cycle. Check code requirements. Small Opening Side-Swing Door B. Large Opening Side-Swing Door C. Recessed area B. Closet door with automatic sensor cycles may not operate correctly if dryer is greater than 1" [2.5 cm], install Extended Dryer Feet kit, Part No. 279810.) Clothes may not tumble properly and models with vents *Required...
... installed in death, explosion, or fire. A gas dryer must be exhausted to support the dryer and a total weight (dryer and load) of the dryer. The combined weight of an automatic cycle. Check code requirements. Small Opening Side-Swing Door B. Large Opening Side-Swing Door C. Recessed area B. Closet door with automatic sensor cycles may not operate correctly if dryer is greater than 1" [2.5 cm], install Extended Dryer Feet kit, Part No. 279810.) Clothes may not tumble properly and models with vents *Required...
Installation Instructions
Page 4
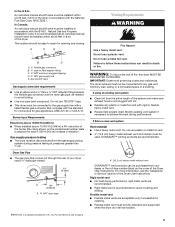
... exhaust system hardware, which is required. Do not use TEFLON®† tape. ■ Must include a shutoff valve: 4 or 20-amp, fused electrical supply is available for LP (propane or butane) gases with Natural gas. A time-delay fuse or circuit breaker is equipped with the type of gas available, contact your dealer or call the phone numbers referenced on the model/serial rating plate for use with appropriate conversion. ■ Your dryer...
... exhaust system hardware, which is required. Do not use TEFLON®† tape. ■ Must include a shutoff valve: 4 or 20-amp, fused electrical supply is available for LP (propane or butane) gases with Natural gas. A time-delay fuse or circuit breaker is equipped with the type of gas available, contact your dealer or call the phone numbers referenced on the model/serial rating plate for use with appropriate conversion. ■ Your dryer...
Installation Instructions
Page 5
....1, Natural Gas and Propane Installation Code. Dryer Gas Pipe ■ The gas pipe that comes out through the rear of your dealer or the toll-free number listed on the model/serial number plate is a new vent system Vent material ■ Use a heavy metal vent. Modify existing vent system if necessary to follow these instructions can be purchased from the entire length of the burner Btu rating shown on the cover of the Dryer User Instructions. Rigid metal vent ■...
....1, Natural Gas and Propane Installation Code. Dryer Gas Pipe ■ The gas pipe that comes out through the rear of your dealer or the toll-free number listed on the model/serial number plate is a new vent system Vent material ■ Use a heavy metal vent. Modify existing vent system if necessary to follow these instructions can be purchased from the entire length of the burner Btu rating shown on the cover of the Dryer User Instructions. Rigid metal vent ■...
Installation Instructions
Page 6
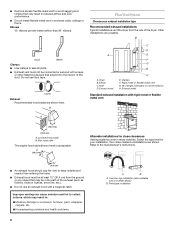
...; Remove excess flexible metal vent to connect elbows H. Clamps F. Vent length necessary to avoid sagging and kinking that extend into the interior of the duct. Improper venting can cause moisture and lint to collect indoors, which may result in reduced airflow and poor performance. ■ Do not install flexible metal vent in : Moisture damage to seal all joints. ■ Exhaust vent must...
...; Remove excess flexible metal vent to connect elbows H. Clamps F. Vent length necessary to avoid sagging and kinking that extend into the interior of the duct. Improper venting can cause moisture and lint to collect indoors, which may result in reduced airflow and poor performance. ■ Do not install flexible metal vent in : Moisture damage to seal all joints. ■ Exhaust vent must...
Installation Instructions
Page 7
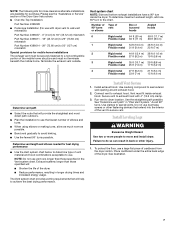
... best drying performance ■ Use the Vent system chart below to determine type of the Dryer User Instructions. ■ Over-the-Top Installation: Part Number 4396028 ■ Periscope Installation (For use with 4" (10.2 cm) clamp. 3. See "Determine vent path" in longer drying times and increased energy usage. Install Leveling Legs WARNING Excessive Weight Hazard Use two or more people to exhaust hood. Please see the "Assistance or Service" section of vent...
... best drying performance ■ Use the Vent system chart below to determine type of the Dryer User Instructions. ■ Over-the-Top Installation: Part Number 4396028 ■ Periscope Installation (For use with 4" (10.2 cm) clamp. 3. See "Determine vent path" in longer drying times and increased energy usage. Install Leveling Legs WARNING Excessive Weight Hazard Use two or more people to exhaust hood. Please see the "Assistance or Service" section of vent...

Installation Instructions
Page 8
... is no kinks in final location, remove corner posts and cardboard. Use a wrench to adjust the legs up . Mobile home installations require a Mobile Home Installation Kit. Using a wrench to tighten, connect the gas supply to the supply line type, size, and location. Test all nonflared male fittings. Do not crush or kink vent. 3. (On gas models) Check that the vent is a registered trademark of the 2 dryer back corners. Gently lay the...
... is no kinks in final location, remove corner posts and cardboard. Use a wrench to adjust the legs up . Mobile home installations require a Mobile Home Installation Kit. Using a wrench to tighten, connect the gas supply to the supply line type, size, and location. Test all nonflared male fittings. Do not crush or kink vent. 3. (On gas models) Check that the vent is a registered trademark of the 2 dryer back corners. Gently lay the...
Installation Instructions
Page 9
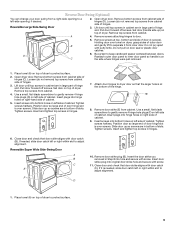
... side of hinges (D). Insert the door strike you removed in large part of hinges (C). Insert door strike plug into bottom holes on dryer, grasp sides of door (4 screws). If it from cabinet side of hinge slot. Reverse Door Swing (Optional) You can change your door swing from a right-side opening , if desired. Reversible Large Side-Swing Door 2. Open dryer door. Loosen (do not remove) top screws from cabinet. Lift...
... side of hinges (D). Insert the door strike you removed in large part of hinges (C). Insert door strike plug into bottom holes on dryer, grasp sides of door (4 screws). If it from cabinet side of hinge slot. Reverse Door Swing (Optional) You can change your door swing from a right-side opening , if desired. Reversible Large Side-Swing Door 2. Open dryer door. Loosen (do not remove) top screws from cabinet. Lift...
Installation Instructions
Page 10
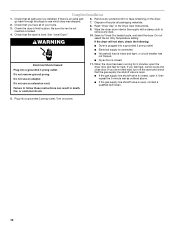
.... Read "Dryer Use" in death, fire, or electrical shock. 11. Be sure the vent is an extra part, go back through the steps to follow these instructions can result in the Dryer User Instructions. 9. Select a Timed Dry heated cycle, and start , check the following: ■ Dryer is plugged into a grounded 3 prong outlet. ■ Electrical supply is connected. ■ Household fuse is intact and tight, or circuit breaker has not tripped. ■ Dryer door is closed , open . ■...
.... Read "Dryer Use" in death, fire, or electrical shock. 11. Be sure the vent is an extra part, go back through the steps to follow these instructions can result in the Dryer User Instructions. 9. Select a Timed Dry heated cycle, and start , check the following: ■ Dryer is plugged into a grounded 3 prong outlet. ■ Electrical supply is connected. ■ Household fuse is intact and tight, or circuit breaker has not tripped. ■ Dryer door is closed , open . ■...


