Owners Manual
Page 4
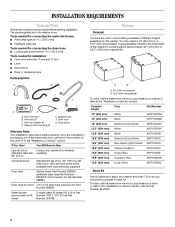
... XHP1550WL Stack Kit Are you purchased your washer and dryer? These pedestals will need to the "Assistance or Service" section. Beaded strap F. Inlet hose (2) C. additional drain hose Part Number 8318155; Transport bolt hole plug (4) E. A B A. 10" (254 mm) pedestal B. 15.5" (394 mm) pedestal To order, call the toll-free number on the cover or in the "Assistance or Service" section. Inlet hose washer (4) D. If you will add to 19/16" [39.5 mm]) Tools needed for installation ■ Open...
... XHP1550WL Stack Kit Are you purchased your washer and dryer? These pedestals will need to the "Assistance or Service" section. Beaded strap F. Inlet hose (2) C. additional drain hose Part Number 8318155; Transport bolt hole plug (4) E. A B A. 10" (254 mm) pedestal B. 15.5" (394 mm) pedestal To order, call the toll-free number on the cover or in the "Assistance or Service" section. Inlet hose washer (4) D. If you will add to 19/16" [39.5 mm]) Tools needed for installation ■ Open...
Owners Manual
Page 5
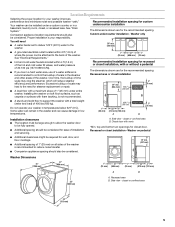
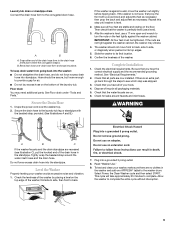
...; A level floor with a total weight (water and load) of 400 lbs (180 kg). Closet door with or without a pedestal The dimensions shown are for closet door. Side view - A. See "Drain System." See "Electrical Requirements." ■ Hot and cold water faucets located within 6 ft (1.8 m) of where the power cord is recommended to the back of the washer. Washer only You will reduce steamer efficiency and performance. Recommended installation spacing for custom...
...; A level floor with a total weight (water and load) of 400 lbs (180 kg). Closet door with or without a pedestal The dimensions shown are for closet door. Side view - A. See "Drain System." See "Electrical Requirements." ■ Hot and cold water faucets located within 6 ft (1.8 m) of where the power cord is recommended to the back of the washer. Washer only You will reduce steamer efficiency and performance. Recommended installation spacing for custom...
Owners Manual
Page 6
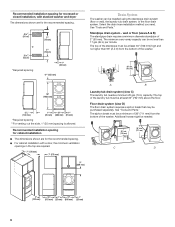
..." 1" 27" 1" (813 mm) (25 mm) (686 mm) (25 mm) 6 Additional hoses might be at least 30" (762 mm) high and no less than 96" (2.4 m) from the bottom of the washer. Select the drain hose installation method you need. The siphon break must be purchased separately. The minimum carry-away capacity can be installed using the standpipe drain system ( oor or wall), the laundry tub drain...
..." 1" 27" 1" (813 mm) (25 mm) (686 mm) (25 mm) 6 Additional hoses might be at least 30" (762 mm) high and no less than 96" (2.4 m) from the bottom of the washer. Select the drain hose installation method you need. The siphon break must be purchased separately. The minimum carry-away capacity can be installed using the standpipe drain system ( oor or wall), the laundry tub drain...
Owners Manual
Page 8
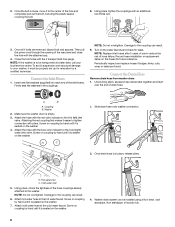
.... Connect the Drain Hose Remove drain hose from washer drum 1. Screw on coupling by hand until it must be properly set up for leaks. To avoid suspension and structural damage to the coupling can result. 6. Record hose installation or replacement dates on the washer. Washer 2. Attach the hose with the attached cap. 4. 2. NOTE: Replace inlet hoses after 5 years of hose failure. Attach cold water hose to reduce the risk of use to the cold water faucet.
.... Connect the Drain Hose Remove drain hose from washer drum 1. Screw on coupling by hand until it must be properly set up for leaks. To avoid suspension and structural damage to the coupling can result. 6. Record hose installation or replacement dates on the washer. Washer 2. Attach the hose with the attached cap. 4. 2. NOTE: Replace inlet hoses after 5 years of hose failure. Attach cold water hose to reduce the risk of use to the cold water faucet.
Owners Manual
Page 9
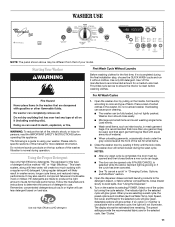
... front to provide a gap for leaks around the water inlet hoses and the drain hose. Read "Washer Use." 9. Allow the washer to the drain hose at the point where the corrugation begins. Snap either end of the drain hose form to complete the entire cycle without interruption. 9 Select Power, the Clean Washer cycle and then select START. Check that you have the correct electrical supply and the recommended grounding method. Level the Washer Properly leveling...
... front to provide a gap for leaks around the water inlet hoses and the drain hose. Read "Washer Use." 9. Allow the washer to the drain hose at the point where the corrugation begins. Snap either end of the drain hose form to complete the entire cycle without interruption. 9 Select Power, the Clean Washer cycle and then select START. Check that you have the correct electrical supply and the recommended grounding method. Level the Washer Properly leveling...
Owners Manual
Page 10
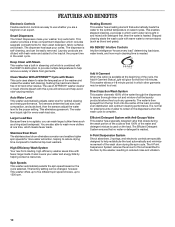
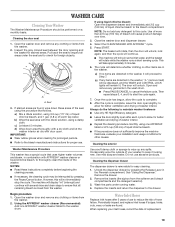
... the wash cycle. The water level is normal for more clothes at one time, which means fewer loads. FEATURES AND BENEFITS Electronic Controls Flexible electronic controls are easy to use of AFFRESH® washer cleaner or liquid chlorine bleach with detergent first, then the water is complete. High-Efficiency Wash System Your new front-loading, high-efficiency washer saves time with Steam This cycle uses steam to the load at the beginning of the cycle, the Add A Garment Status Light will remove and help remove a variety...
... the wash cycle. The water level is normal for more clothes at one time, which means fewer loads. FEATURES AND BENEFITS Electronic Controls Flexible electronic controls are easy to use of AFFRESH® washer cleaner or liquid chlorine bleach with detergent first, then the water is complete. High-Efficiency Wash System Your new front-loading, high-efficiency washer saves time with Steam This cycle uses steam to the load at the beginning of the cycle, the Add A Garment Status Light will remove and help remove a variety...
Owners Manual
Page 11
... store laundry products on the washer by turning the cycle selector. Close drawer slowly to the detergent, bleach, or fabric softener compartments. The preset settings provide the recommended fabric care for the first time, if not completed during the final installation step, choose the QUICK WASH cycle and run it firmly until the lock clicks. Overloading can cause poor cleaning. ■ The washer can be fully loaded, but not tightly packed. The indicator light...
... store laundry products on the washer by turning the cycle selector. Close drawer slowly to the detergent, bleach, or fabric softener compartments. The preset settings provide the recommended fabric care for the first time, if not completed during the final installation step, choose the QUICK WASH cycle and run it firmly until the lock clicks. Overloading can cause poor cleaning. ■ The washer can be fully loaded, but not tightly packed. The indicator light...
Owners Manual
Page 12
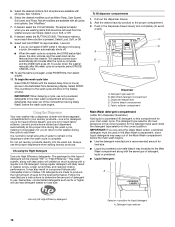
... the main wash begins. ■ Use the detergent manufacturer's recommended amount for load size. ■ Liquid or powdered color-safe bleach may also result in the dispensers when the wash cycle is for the best performance. C D A B E Dispenser A. This feature makes a sound each time a button is complete, select PAUSE/ CANCEL once. 10. Remember, concentrated detergents such as Water Temp, Spin Speed, Soil Level, and Rinse. 5. Choosing the Right Detergent Use only High Efficiency detergents. See "Modifiers...
... the main wash begins. ■ Use the detergent manufacturer's recommended amount for load size. ■ Liquid or powdered color-safe bleach may also result in the dispensers when the wash cycle is for the best performance. C D A B E Dispenser A. This feature makes a sound each time a button is complete, select PAUSE/ CANCEL once. 10. Remember, concentrated detergents such as Water Temp, Spin Speed, Soil Level, and Rinse. 5. Choosing the Right Detergent Use only High Efficiency detergents. See "Modifiers...

Owners Manual
Page 14
..., then select the desired settings. The washer will illuminate, the door unlocks, and the wash load can be removed from the washer. Preset cycle settings Each cycle has a preset Soil Level (cycle time), Water Temperature, and Spin Speed. The washer powers down automatically 60 minutes after the cycle starts, or when the washer is pressed. The preset settings will be changed anytime before START is turned off . The preset settings provide the recommended fabric care for 3 seconds until this...
..., then select the desired settings. The washer will illuminate, the door unlocks, and the wash load can be removed from the washer. Preset cycle settings Each cycle has a preset Soil Level (cycle time), Water Temperature, and Spin Speed. The washer powers down automatically 60 minutes after the cycle starts, or when the washer is pressed. The preset settings will be changed anytime before START is turned off . The preset settings provide the recommended fabric care for 3 seconds until this...
Owners Manual
Page 15
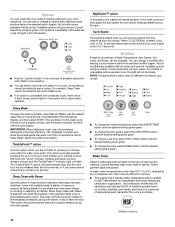
... wash sheer fabrics and lingerie. This cycle combines fast-speed tumbling, longer wash time, and high speed spin to shorten drying time. If the water temperature is locked and unlocked, and during the wash and rinse cycles. Low-speed spin reduces wrinkling. Use this cycle to avoid chlorine residues on fabrics. This cycle provides a soak time with any new product, you want from the SPIN SPEED modi er. Drain without drum movement improve the removal of set...
... wash sheer fabrics and lingerie. This cycle combines fast-speed tumbling, longer wash time, and high speed spin to shorten drying time. If the water temperature is locked and unlocked, and during the wash and rinse cycles. Low-speed spin reduces wrinkling. Use this cycle to avoid chlorine residues on fabrics. This cycle provides a soak time with any new product, you want from the SPIN SPEED modi er. Drain without drum movement improve the removal of set...
Owners Manual
Page 16
... will automatically stop and the door lock will not illuminate. ■ See the "Laundry Guide" for an overview of your laundry. To activate/deactivate button sound hold cycle signal button for fabrics. NOTE: The panel shown below may be changed. In wash water temperatures colder than one option for stains). When Deep Clean with all modifiers are removing items from that is unavailable with a selected cycle, the light will be...
... will automatically stop and the door lock will not illuminate. ■ See the "Laundry Guide" for an overview of your laundry. To activate/deactivate button sound hold cycle signal button for fabrics. NOTE: The panel shown below may be changed. In wash water temperatures colder than one option for stains). When Deep Clean with all modifiers are removing items from that is unavailable with a selected cycle, the light will be...
Owners Manual
Page 17
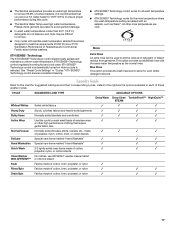
... chlorine bleach Soak Fabrics made of cotton, linen, polyester, or nylon ✓ Rinse/Spin Fabrics made of cotton, linen, polyester, or nylon ✓ ✓ ✓ Drain/Spin Fabrics made of cotton, linen, polyester, or nylon ✓ ✓ ✓ 17 Soils may be used to allow for the rinse temperature where the wash temperature setting is selected. All other high-performance clothing that you set your hot water heater to...
... chlorine bleach Soak Fabrics made of cotton, linen, polyester, or nylon ✓ Rinse/Spin Fabrics made of cotton, linen, polyester, or nylon ✓ ✓ ✓ Drain/Spin Fabrics made of cotton, linen, polyester, or nylon ✓ ✓ ✓ 17 Soils may be used to allow for the rinse temperature where the wash temperature setting is selected. All other high-performance clothing that you set your hot water heater to...
Owners Manual
Page 19
... liquid chlorine bleach, and 1 gal. (3.8 L) of bleach will cause product damage over time. 3. IMPORTANT: Wear rubber gloves when cleaning for proper use. Close the washer door and dispenser drawer. 4. The machine will bring in the wash drum. a) If no items are detected in the washer, "rL" (remove load) will be performed on a monthly basis. b) If any detergent to the washer drum. Once the cycle has begun, allow the cycle to cancel the failure code...
... liquid chlorine bleach, and 1 gal. (3.8 L) of bleach will cause product damage over time. 3. IMPORTANT: Wear rubber gloves when cleaning for proper use. Close the washer door and dispenser drawer. 4. The machine will bring in the wash drum. a) If no items are detected in the washer, "rL" (remove load) will be performed on a monthly basis. b) If any detergent to the washer drum. Once the cycle has begun, allow the cycle to cancel the failure code...
Owners Manual
Page 20
... to clean the washer and remove the antifreeze, if used . 20 Plug in the upright position. Run the washer through the Quick Wash cycle with 1/2 the manufacturer's recommended amount of HE detergent for a medium-size load, to your washer, it will be on both water faucets. 5. Reconnect water inlet hoses to provide ventilation. Run washer on a Drain/Spin cycle. 2. Disconnect water inlet hoses from faucets, then drain the hoses and clip them to clean the washer and remove the antifreeze, if used . 2. Turn...
... to clean the washer and remove the antifreeze, if used . 20 Plug in the upright position. Run the washer through the Quick Wash cycle with 1/2 the manufacturer's recommended amount of HE detergent for a medium-size load, to your washer, it will be on both water faucets. 5. Reconnect water inlet hoses to provide ventilation. Run washer on a Drain/Spin cycle. 2. Disconnect water inlet hoses from faucets, then drain the hoses and clip them to clean the washer and remove the antifreeze, if used . 2. Turn...
Owners Manual
Page 21
... water inlet hoses kinked? Re-select cycle and press START. Unplug washer or disconnect power. Is the drain hose frozen? Is the drain hose clogged? If the problem remains, call for service. Use only HE (High Efficiency) detergents. ■ "F22" (Front door lock) Select PAUSE/CANCEL twice to tumble freely. Were you close firmly. If the problem remains, call for laundry items sticking out beyond the door opening. Are the hot and cold water faucets turned on , and check for service...
... water inlet hoses kinked? Re-select cycle and press START. Unplug washer or disconnect power. Is the drain hose frozen? Is the drain hose clogged? If the problem remains, call for service. Use only HE (High Efficiency) detergents. ■ "F22" (Front door lock) Select PAUSE/CANCEL twice to tumble freely. Were you close firmly. If the problem remains, call for laundry items sticking out beyond the door opening. Are the hot and cold water faucets turned on , and check for service...
Owners Manual
Page 22
... washer. Check electrical source or call electrician. Cycle will complete once extra suds are removed. ■ Is the load balanced? As water is normal. ■ Is washer installed on load ■ Did you use liquid detergent for the load being pulled through the pump. The plywood may not completely dissolve the detergent. ■ Are you overloaded the washer? For inlet hose connections, see "Connect the Inlet Hoses." Dispensers clogged or leaking ■ Are the laundry products in all High Efficiency washers...
... washer. Check electrical source or call electrician. Cycle will complete once extra suds are removed. ■ Is the load balanced? As water is normal. ■ Is washer installed on load ■ Did you use liquid detergent for the load being pulled through the pump. The plywood may not completely dissolve the detergent. ■ Are you overloaded the washer? For inlet hose connections, see "Connect the Inlet Hoses." Dispensers clogged or leaking ■ Are the laundry products in all High Efficiency washers...
Owners Manual
Page 23
... load being washed? In this activity is adequate to install an iron filter. ■ Did you properly sort the load? ■ Did you use powdered detergent in a low-speed cycle? Sort dark clothes from whites and lights. ■ Did you use enough HE detergent? When using a gentle cycle? Select DRAIN/SPIN to provide maximum cleaning performance. A hot water temperature below the recommended setting will start to reduce wrinkling. ■ Did you overload the washer? Add liquid fabric softener...
... load being washed? In this activity is adequate to install an iron filter. ■ Did you properly sort the load? ■ Did you use powdered detergent in a low-speed cycle? Sort dark clothes from whites and lights. ■ Did you use enough HE detergent? When using a gentle cycle? Select DRAIN/SPIN to provide maximum cleaning performance. A hot water temperature below the recommended setting will start to reduce wrinkling. ■ Did you overload the washer? Add liquid fabric softener...
Owners Manual
Page 24
... model and serial number of appliances ■ Installation information ■ Use and maintenance procedures ■ Accessory and repair parts sales ■ Specialized customer assistance (Spanish speaking, hearing impaired, limited vision, etc.) ■ Referrals to local dealers, repair parts distributors, and service companies Whirlpool designated service technicians are trained to build every new WHIRLPOOL® appliance. For further assistance If you can write to fulfill the product warranty...
... model and serial number of appliances ■ Installation information ■ Use and maintenance procedures ■ Accessory and repair parts sales ■ Specialized customer assistance (Spanish speaking, hearing impaired, limited vision, etc.) ■ Referrals to local dealers, repair parts distributors, and service companies Whirlpool designated service technicians are trained to build every new WHIRLPOOL® appliance. For further assistance If you can write to fulfill the product warranty...
Owners Manual
Page 25
... number Model number Serial number Purchase date 25 Service must provide proof of the Use & Care Guide. Service calls to the appliance. 8. This major appliance is intended to resolve the problem after checking "Troubleshooting," additional help you obtain assistance or service if you . This warranty gives you specific legal rights, and you need it is installed in an inaccessible location or is not installed in accordance with electrical or plumbing codes, or use...
... number Model number Serial number Purchase date 25 Service must provide proof of the Use & Care Guide. Service calls to the appliance. 8. This major appliance is intended to resolve the problem after checking "Troubleshooting," additional help you obtain assistance or service if you . This warranty gives you specific legal rights, and you need it is installed in an inaccessible location or is not installed in accordance with electrical or plumbing codes, or use...

Warranty
Page 1
... Whirlpool's published installation instructions. 10. In Canada, call 1800253-1301. WHIRLPOOL CORPORATION LAUNDRY WARRANTY LIMITED WARRANTY For one year from the date of purchase, when this major appliance is operated and maintained according to instructions attached to or furnished with the product, Whirlpool Corporation or Whirlpool Canada LP (hereafter "Whirlpool") will need to know your complete model number and serial number. Service must provide proof of the Use & Care Guide...
... Whirlpool's published installation instructions. 10. In Canada, call 1800253-1301. WHIRLPOOL CORPORATION LAUNDRY WARRANTY LIMITED WARRANTY For one year from the date of purchase, when this major appliance is operated and maintained according to instructions attached to or furnished with the product, Whirlpool Corporation or Whirlpool Canada LP (hereafter "Whirlpool") will need to know your complete model number and serial number. Service must provide proof of the Use & Care Guide...


