Owners Manual
Page 1
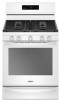
...range at www.whirlpool.com. Model Number Serial Number Table of Contents RANGE SAFETY 2 The Anti-Tip Bracket 3 FEATURE GUIDE 4 COOKTOP USE 6 Sealed Surface Burners 6 Surface Grates 7 Burner Size 7 Cookware 8 Home Canning 8 OVEN USE 9 Electronic Oven Controls 9 Sabbath Mode 10 Keep Warm 10 Aluminum Foil 11 Positioning Racks and Bakeware 11 Oven Vent 12 Baking and Roasting 12 Broiling 12 Convection Baking and Roasting 13 Cook Time 13 RANGE CARE 14 Clean Cycle 14 General Cleaning 15 TROUBLESHOOTING 16 ACCESSORIES 19 WARRANTY 20 W11085354C GAS RANGE USER INSTRUCTIONS...
...range at www.whirlpool.com. Model Number Serial Number Table of Contents RANGE SAFETY 2 The Anti-Tip Bracket 3 FEATURE GUIDE 4 COOKTOP USE 6 Sealed Surface Burners 6 Surface Grates 7 Burner Size 7 Cookware 8 Home Canning 8 OVEN USE 9 Electronic Oven Controls 9 Sabbath Mode 10 Keep Warm 10 Aluminum Foil 11 Positioning Racks and Bakeware 11 Oven Vent 12 Baking and Roasting 12 Broiling 12 Convection Baking and Roasting 13 Cook Time 13 RANGE CARE 14 Clean Cycle 14 General Cleaning 15 TROUBLESHOOTING 16 ACCESSORIES 19 WARRANTY 20 W11085354C GAS RANGE USER INSTRUCTIONS...

Owners Manual
Page 3
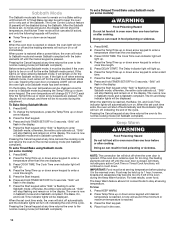
... entire rack with materials such as stepping, leaning, or sitting on the backguard of local codes, with the National Electrical Code, ANSI/NFPA 70. In Canada, the range must be plugged directly into a properly grounded receptacle. I Top burner flame size should be electrically grounded in accordance with local codes or, in accordance with a three-prong grounding plug for details. I This range is under anti-tip bracket. • See installation instructions...
... entire rack with materials such as stepping, leaning, or sitting on the backguard of local codes, with the National Electrical Code, ANSI/NFPA 70. In Canada, the range must be plugged directly into a properly grounded receptacle. I Top burner flame size should be electrically grounded in accordance with local codes or, in accordance with a three-prong grounding plug for details. I This range is under anti-tip bracket. • See installation instructions...

Owners Manual
Page 4
... our website at www.whirlpool.com for too long, the heating elements will blink until pressed or canceled. Press the Temp/Time up or down . 4 TEMP/TIME BAKE Temperature and time adjust Baking and roasting The Temp/Time up or down arrow keypad to begin the countdown. Press BAKE. 2. FEATURE GUIDE These instructions cover several models. Keypad CLOCK Feature Clock LIGHT TIMER SET/ OFF Oven cavity light Oven timer Start Cancel Cooking start Range function Instructions The clock uses a 12-hour cycle. 1. Press the Temp/Time up or down arrow...
... our website at www.whirlpool.com for too long, the heating elements will blink until pressed or canceled. Press the Temp/Time up or down . 4 TEMP/TIME BAKE Temperature and time adjust Baking and roasting The Temp/Time up or down arrow keypad to begin the countdown. Press BAKE. 2. FEATURE GUIDE These instructions cover several models. Keypad CLOCK Feature Clock LIGHT TIMER SET/ OFF Oven cavity light Oven timer Start Cancel Cooking start Range function Instructions The clock uses a 12-hour cycle. 1. Press the Temp/Time up or down arrow...

Owners Manual
Page 5
... open for an oven function with at 170°F (75°C). Press BROIL. 3. A tone will calculate the best cook time and display the adjusted bake time on the timer. To set a Timed Cook or a Delayed Timed Cook, see the "Cook Time" section. 5 To add more time, press the Temp/Time up or down arrow keypad until the desired temperature is opened. To change the temperature, repeat Step 2. 5. Temperature is reached. 3. If the oven door remains open for too long, the heating elements...
... open for an oven function with at 170°F (75°C). Press BROIL. 3. A tone will calculate the best cook time and display the adjusted bake time on the timer. To set a Timed Cook or a Delayed Timed Cook, see the "Cook Time" section. 5 To add more time, press the Temp/Time up or down arrow keypad until the desired temperature is opened. To change the temperature, repeat Step 2. 5. Temperature is reached. 3. If the oven door remains open for too long, the heating elements...

Owners Manual
Page 6
... prolonged power failure, the surface burners can result in the previous illustration. Burner ports Burner ports: Check burner flames occasionally for the Hot Surface indicator light to enter the gas tube opening IMPORTANT: Do not obstruct the flow of combustion and ventilation air around the burner grate edges. Push in place when using a surface burner. Turn knob to setting. REMEMBER: When range is blue in use or (on . Keypad CONTROL LOCK Feature Oven and cooktop control lockout AQUALIFT Clean cycle SELF CLEAN Instructions 1. COOKTOP USE...
... prolonged power failure, the surface burners can result in the previous illustration. Burner ports Burner ports: Check burner flames occasionally for the Hot Surface indicator light to enter the gas tube opening IMPORTANT: Do not obstruct the flow of combustion and ventilation air around the burner grate edges. Push in place when using a surface burner. Turn knob to setting. REMEMBER: When range is blue in use or (on . Keypad CONTROL LOCK Feature Oven and cooktop control lockout AQUALIFT Clean cycle SELF CLEAN Instructions 1. COOKTOP USE...

Owners Manual
Page 7
..., lift the rear of the gas flame. Replace the burner cap, making sure the alignment pins are cool. Turn on the other. Contact a trained repair specialist. B A A. Indent Although the burner grates are durable, they will gradually lose their shine and/or discolor due to the "General Cleaning" section. 2. Clean clogged burner ports with a damp cloth. 3. Do not use oven cleaners, bleach, or rust removers. 1. Incorrect...
..., lift the rear of the gas flame. Replace the burner cap, making sure the alignment pins are cool. Turn on the other. Contact a trained repair specialist. B A A. Indent Although the burner grates are durable, they will gradually lose their shine and/or discolor due to the "General Cleaning" section. 2. Clean clogged burner ports with a damp cloth. 3. Do not use oven cleaners, bleach, or rust removers. 1. Incorrect...

Owners Manual
Page 8
... steel provides even heating. For best results, the cookware should not be used areas to published home canning guides. This allows time for most recently used under the broiler. Cookware with the bottom sitting level on two surface burners at the same time. ■■... the burner with nonstick surfaces should be diminished if cleaned immediately after cooking. ■■ Can leave a permanent stain or bond to the cooktop if overheated. ■■ Follow manufacturer's instructions. ■■ Use on low heat settings. ■■ May scratch the cooktop. &#...
... steel provides even heating. For best results, the cookware should not be used areas to published home canning guides. This allows time for most recently used under the broiler. Cookware with the bottom sitting level on two surface burners at the same time. ■■... the burner with nonstick surfaces should be diminished if cleaned immediately after cooking. ■■ Can leave a permanent stain or bond to the cooktop if overheated. ■■ Follow manufacturer's instructions. ■■ Use on low heat settings. ■■ May scratch the cooktop. &#...

Owners Manual
Page 9
... a 120V power connection and permits the control features to be adjusted to personalize it is heavily soiled. IMPORTANT: Do not use on and off . It can be demonstrated without heating elements turning on the display. Tones Tones are slow to react to temperature change : Press and hold the Temp/Time down arrow keypad for 5 seconds until the oven door is preheated (long tone) ■■ Function has been...
... a 120V power connection and permits the control features to be adjusted to personalize it is heavily soiled. IMPORTANT: Do not use on and off . It can be demonstrated without heating elements turning on the display. Tones Tones are slow to react to temperature change : Press and hold the Temp/Time down arrow keypad for 5 seconds until the oven door is preheated (long tone) ■■ Function has been...
Owners Manual
Page 10
... , the oven light will not turn off, indicating the end of the Sabbath. For best results, cover food. A tone will return to Sabbath mode and remain Sabbath compliant with the bake elements off until desired temperature is opened . When power is restored after cooking. Press the Start keypad while "SAb" is Sabbath compliant. Press the Temp/Time up or down arrow keypad to enter a cook time length. 5. The Keep Warm feature allows hot cooked foods...
... , the oven light will not turn off, indicating the end of the Sabbath. For best results, cover food. A tone will return to Sabbath mode and remain Sabbath compliant with the bake elements off until desired temperature is opened . When power is restored after cooking. Press the Start keypad while "SAb" is Sabbath compliant. Press the Temp/Time up or down arrow keypad to enter a cook time length. 5. The Keep Warm feature allows hot cooked foods...

Owners Manual
Page 11
... it out to 51/2 minutes. Multiple Rack Cooking Two-rack (non-convection): Use rack positions 2 and 5 or 3 and 6. A B A. Two-rack (convection): Use rack positions 2 and 5 or 3 and 6. Bakeware To cook food evenly, hot air must be able to circulate. Racks ■■ Position racks before turning on the oven door or bottom. Side 1 should cook for 5 minutes. If a Max Capacity Oven Rack is directly over another. Aluminum Foil IMPORTANT: To avoid permanent...
... it out to 51/2 minutes. Multiple Rack Cooking Two-rack (non-convection): Use rack positions 2 and 5 or 3 and 6. A B A. Two-rack (convection): Use rack positions 2 and 5 or 3 and 6. Bakeware To cook food evenly, hot air must be able to circulate. Racks ■■ Position racks before turning on the oven door or bottom. Side 1 should cook for 5 minutes. If a Max Capacity Oven Rack is directly over another. Aluminum Foil IMPORTANT: To avoid permanent...
Owners Manual
Page 12
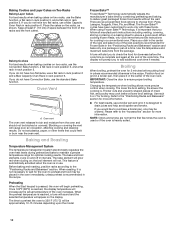
... a time. Oven vent The oven vent releases hot air and moisture from the oven and should not be approximately 10-15 minutes depending upon the model. Blocking or covering the vent will not. Baking and Roasting Temperature Management System The temperature management system electronically regulates the oven heat levels during preheat and bake to drain juices and help avoid spatter and smoke. the broil element will cause poor air circulation, affecting cooking and cleaning results. Preheating When...
... a time. Oven vent The oven vent releases hot air and moisture from the oven and should not be approximately 10-15 minutes depending upon the model. Blocking or covering the vent will not. Baking and Roasting Temperature Management System The temperature management system electronically regulates the oven heat levels during preheat and bake to drain juices and help avoid spatter and smoke. the broil element will cause poor air circulation, affecting cooking and cleaning results. Preheating When...
Owners Manual
Page 13
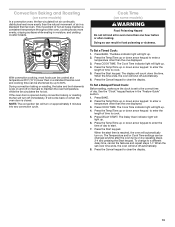
... Cook Time indicator light will come back on and off immediately. See the "Clock" keypad feature in a standard thermal oven. Press DELAY START. Press the Temp/Time up or down arrow keypad to enter a temperature other than the natural movement of time to cook. 5. Cook Time (on some models) In a convection oven, the fan-circulated hot air continually distributes heat more evenly than the one displayed. 3. Press BAKE. Press the Start keypad. During convection baking or roasting, the bake and broil elements cycle...
... Cook Time indicator light will come back on and off immediately. See the "Clock" keypad feature in a standard thermal oven. Press DELAY START. Press the Temp/Time up or down arrow keypad to enter a temperature other than the natural movement of time to cook. 5. Cook Time (on some models) In a convection oven, the fan-circulated hot air continually distributes heat more evenly than the one displayed. 3. Press BAKE. Press the Start keypad. During convection baking or roasting, the bake and broil elements cycle...

Owners Manual
Page 14
... that utilizes heat and water to room temperature before use distilled or filtered water. If affresh® Cooktop Cleaner is completed. RANGE CARE Clean Cycle 4. Cancel may be more information. ■■ For assistance with AquaLift® Technology, call 1-877-258-0808 in the display and the Clean cycle will sound when the Clean cycle is covered by ordering Part Number W10423113RP. Remove the...
... that utilizes heat and water to room temperature before use distilled or filtered water. If affresh® Cooktop Cleaner is completed. RANGE CARE Clean Cycle 4. Cancel may be more information. ■■ For assistance with AquaLift® Technology, call 1-877-258-0808 in the display and the Clean cycle will sound when the Clean cycle is covered by ordering Part Number W10423113RP. Remove the...
Owners Manual
Page 15
... OVEN CAVITY Use AquaLift® Technology regularly to remove. Food spills should be cleaned when oven cools. Always follow label instructions on panel. ■■ affresh® Kitchen and Appliance Cleaner Part Number W10355010 (not included): See the "Accessories" section for more information. STAINLESS STEEL (on some models) Check that have discolored and are harder to slide, a light coating of grain to the cooktop controls...
... OVEN CAVITY Use AquaLift® Technology regularly to remove. Food spills should be cleaned when oven cools. Always follow label instructions on panel. ■■ affresh® Kitchen and Appliance Cleaner Part Number W10355010 (not included): See the "Accessories" section for more information. STAINLESS STEEL (on some models) Check that have discolored and are harder to slide, a light coating of grain to the cooktop controls...

Owners Manual
Page 16
... a medium-to a setting. Level the range. Problem Possible Causes Nothing will not operate Air in this is being used , turn on the grate. Household fuse is blown or a circuit breaker is improperly connected to incorrect heat level. Contact a trained repair specialist or see the Installation Instructions. Do not use an extension cord. The range is tripped. Surface The control knob is unplugged. See the Installation Instructions. 16 burners will operate Power supply cord is not set to the gas supply. Ideal cookware...
... a medium-to a setting. Level the range. Problem Possible Causes Nothing will not operate Air in this is being used , turn on the grate. Household fuse is blown or a circuit breaker is improperly connected to incorrect heat level. Contact a trained repair specialist or see the Installation Instructions. Do not use an extension cord. The range is tripped. Surface The control knob is unplugged. See the Installation Instructions. 16 burners will operate Power supply cord is not set to the gas supply. Ideal cookware...

Owners Manual
Page 17
.... 17 Electronic oven control set . Display shows messages Power failure (display shows flashing time). See the "Electronic Oven Controls" section. See "Demo Mode" in the "Feature Guide" section. The convection fan will not operate Possible Causes Air in the gas lines. On some models, reset the clock, if needed. See the Start keypad feature in the "Electronic Oven Controls" section. See the Installation Instructions. Problem Oven will start running approximately 5 minutes into the cycle. Start needs to release air from the gas lines. Clean cycle did Several cooking cycles...
.... 17 Electronic oven control set . Display shows messages Power failure (display shows flashing time). See the "Electronic Oven Controls" section. See "Demo Mode" in the "Feature Guide" section. The convection fan will not operate Possible Causes Air in the gas lines. On some models, reset the clock, if needed. See the Start keypad feature in the "Electronic Oven Controls" section. See the Installation Instructions. Problem Oven will start running approximately 5 minutes into the cycle. Start needs to release air from the gas lines. Clean cycle did Several cooking cycles...

Owners Manual
Page 18
... temperature set was not closed. See "Oven Temperature Control" in dark bakeware. Rack is level in the oven. Check that batter is too close to a lower position in the pan. Lighter browning of cooking time was not preheated. Oven temperature needs adjustment. Oven peeking releases oven heat and can be heard each time the Bake or Broil burner ignites during cooking. Oven was used , contact a service technician. 18 Problem Possible Causes Solutions Oven cooking results not what expected Range is opening or...
... temperature set was not closed. See "Oven Temperature Control" in dark bakeware. Rack is level in the oven. Check that batter is too close to a lower position in the pan. Lighter browning of cooking time was not preheated. Oven temperature needs adjustment. Oven peeking releases oven heat and can be heard each time the Bake or Broil burner ignites during cooking. Oven was used , contact a service technician. 18 Problem Possible Causes Solutions Oven cooking results not what expected Range is opening or...
Owners Manual
Page 19
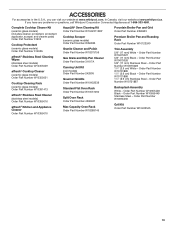
...; Oven Cleaning Kit Order Part Number W10423113RP Cooktop Scraper (ceramic glass models) Order Part Number WA906B Granite Cleaner and Polish Order Part Number W10275756 Gas Grate and Drip Pan Cleaner Order Part Number 31617A Canning Unit Kit (coil models) Order Part Number 242905 Gourmet Griddle Order Part Number W10432539 Standard Flat Oven Rack Order Part Number W10551060 Split Oven Rack Order Part Number 4396927 Max Capacity Oven Rack Order Part Number W10289145 Porcelain Broiler Pan and Grid Order Part Number 4396923 Premium Broiler Pan and Roasting Rack Order Part Number W10123240 Trim...
...; Oven Cleaning Kit Order Part Number W10423113RP Cooktop Scraper (ceramic glass models) Order Part Number WA906B Granite Cleaner and Polish Order Part Number W10275756 Gas Grate and Drip Pan Cleaner Order Part Number 31617A Canning Unit Kit (coil models) Order Part Number 242905 Gourmet Griddle Order Part Number W10432539 Standard Flat Oven Rack Order Part Number W10551060 Split Oven Rack Order Part Number 4396927 Max Capacity Oven Rack Order Part Number W10289145 Porcelain Broiler Pan and Grid Order Part Number 4396923 Premium Broiler Pan and Roasting Rack Order Part Number W10123240 Trim...
Owners Manual
Page 20
... review the Troubleshooting or Problem Solver section of surfaces resulting from natural gas or L.P. house wiring, fuses or water inlet hoses). Consumable parts (i.e. Repairs to parts or systems to you . warranty period. 9. Discoloration, rust or oxidation of the Use and Care Guide, scan the QR code on the right to 2. Travel or transportation expenses for service in remote locations where an authorized Whirlpool applies only when the major appliance servicer is used...
... review the Troubleshooting or Problem Solver section of surfaces resulting from natural gas or L.P. house wiring, fuses or water inlet hoses). Consumable parts (i.e. Repairs to parts or systems to you . warranty period. 9. Discoloration, rust or oxidation of the Use and Care Guide, scan the QR code on the right to 2. Travel or transportation expenses for service in remote locations where an authorized Whirlpool applies only when the major appliance servicer is used...

FIT System
Page 2
..., YWFE975H0HV, WFG775H0HB, WFG775H0HW, WFG775H0HZ, WFG775H0HV, WFG975H0HZ, WFG975H0HV, WEG750H0HB, WEG750H0HW, WEG750H0HZ, WEG750H0HV, YWEEA25H0HZ, YWEEA25H0HN, WEGA25H0HZ, WEGA25H0HN Range Model Number : Range Serial Number: Customer Name: Street Address: Apt: City: Province: Postal Code: Daytime Phone: Email: Customer Signature: Date of Purchase: Your privacy is not valid for AquaLift ® Self-Cleaning Technology Money-Back Guarantee claim procedures. The following Whirlpool® range models qualify for lost, delayed, incomplete, illegible...
..., YWFE975H0HV, WFG775H0HB, WFG775H0HW, WFG775H0HZ, WFG775H0HV, WFG975H0HZ, WFG975H0HV, WEG750H0HB, WEG750H0HW, WEG750H0HZ, WEG750H0HV, YWEEA25H0HZ, YWEEA25H0HN, WEGA25H0HZ, WEGA25H0HN Range Model Number : Range Serial Number: Customer Name: Street Address: Apt: City: Province: Postal Code: Daytime Phone: Email: Customer Signature: Date of Purchase: Your privacy is not valid for AquaLift ® Self-Cleaning Technology Money-Back Guarantee claim procedures. The following Whirlpool® range models qualify for lost, delayed, incomplete, illegible...


