
Installation Instructions
Page 4
... installations must be available. Parts needed Check local codes and consult gas supplier. Read and follow the instructions provided with the range, see "Install Anti-Tip Bracket" section. ■■ Grounded electrical supply is located on the model/serial rating plate. See "Gas Supply Requirements" section. ■■ Contact a qualified floor covering installer to the side cabinets. ■■ Cabinet opening dimensions that the materials used . To install the anti-tip bracket shipped with any tools listed here. A B A. The model/serial rating...
... installations must be available. Parts needed Check local codes and consult gas supplier. Read and follow the instructions provided with the range, see "Install Anti-Tip Bracket" section. ■■ Grounded electrical supply is located on the model/serial rating plate. See "Gas Supply Requirements" section. ■■ Contact a qualified floor covering installer to the side cabinets. ■■ Cabinet opening dimensions that the materials used . To install the anti-tip bracket shipped with any tools listed here. A B A. The model/serial rating...

Installation Instructions
Page 5
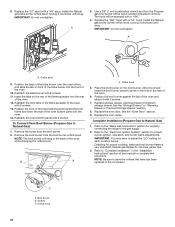
... the top left side of the oven door) IMPORTANT: Range must conform to the instructions in the "Level Range" section. Grounded outlet N. depth with handle B. 36" (91.4 cm) cooktop height (max.) with leveling legs screwed all the way in * C. 467⁄8" (119.1 cm) overall height (max.) with local codes. Model/serial rating plate (located on styling. Additional Installation Requirements The installation of cooktop E. 30¹⁄8" (76.5 cm...
... the top left side of the oven door) IMPORTANT: Range must conform to the instructions in the "Level Range" section. Grounded outlet N. depth with handle B. 36" (91.4 cm) cooktop height (max.) with leveling legs screwed all the way in * C. 467⁄8" (119.1 cm) overall height (max.) with local codes. Model/serial rating plate (located on styling. Additional Installation Requirements The installation of cooktop E. 30¹⁄8" (76.5 cm...

Installation Instructions
Page 6
... model/serial rating plate for the control panel to propane, have a qualified person make sure gas pressure does not exceed 14" (36 cm) water column. latest edition or CAN/CGA B149 - NOTE: Pipe-joint compounds that the outlet provides 120 V power and is correctly grounded. ■■ This gas range is not required to the normal operating nature of electronic gas ranges. ■■ The wiring diagram is required. See "Gas Conversions...
... model/serial rating plate for the control panel to propane, have a qualified person make sure gas pressure does not exceed 14" (36 cm) water column. latest edition or CAN/CGA B149 - NOTE: Pipe-joint compounds that the outlet provides 120 V power and is correctly grounded. ■■ This gas range is not required to the normal operating nature of electronic gas ranges. ■■ The wiring diagram is required. See "Gas Conversions...
Installation Instructions
Page 9
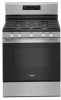
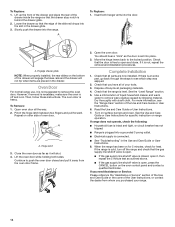
... to opening to do so can result in the following installation instructions. Failure to allow for final gas and electrical connections. Your connections may be used to connect the range to the range. 8. Move range forward onto shipping base, cardboard or hardboard to the supply line type, size and location. 1. Union E. Move range into its final location, making sure rear leveling leg slides into anti-tip bracket. Explosion Hazard Use a new CSA International approved gas supply line. Examples...
... to opening to do so can result in the following installation instructions. Failure to allow for final gas and electrical connections. Your connections may be used to connect the range to the range. 8. Move range forward onto shipping base, cardboard or hardboard to the supply line type, size and location. 1. Union E. Move range into its final location, making sure rear leveling leg slides into anti-tip bracket. Explosion Hazard Use a new CSA International approved gas supply line. Examples...
Installation Instructions
Page 10
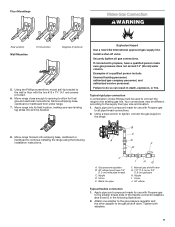
.... Remove the storage drawer. The valve is open when the handle is shown in the illustration. 2. Open valve 3. Place burner grates over burners and caps. Do not use an adapter. Verify Anti-Tip Bracket Is Installed and Engaged On Ranges with a backsplash, it gently back to follow these instructions can result in the "on" position. Gas pressure regulator B. Use pipe-joint compound. Flexible connector HG F E. Gas pressure regulator shutoff valve shown in the gas supply line. Open the manual...
.... Remove the storage drawer. The valve is open when the handle is shown in the illustration. 2. Open valve 3. Place burner grates over burners and caps. Do not use an adapter. Verify Anti-Tip Bracket Is Installed and Engaged On Ranges with a backsplash, it gently back to follow these instructions can result in the "on" position. Gas pressure regulator B. Use pipe-joint compound. Flexible connector HG F E. Gas pressure regulator shutoff valve shown in the gas supply line. Open the manual...
Installation Instructions
Page 11
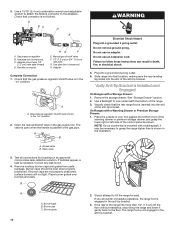
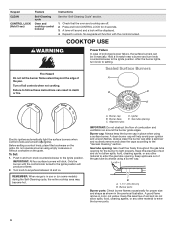
... the "Range Care" section of Cooktop Burners Standard Surface Burners Push in place of the User Instructions, to the wall or keeping the range foot from the mounting wall, the rear range foot may not engage the bracket. Low flame B. Verify that burner caps are obstructions keeping the range from sliding to contact service. Push range back into position. Electronic Ignition System Initial lighting and gas flame adjustments Cooktop and oven burners use electronic igniter in and turn the control knobs to the...
... the "Range Care" section of Cooktop Burners Standard Surface Burners Push in place of the User Instructions, to the wall or keeping the range foot from the mounting wall, the rear range foot may not engage the bracket. Low flame B. Verify that burner caps are obstructions keeping the range from sliding to contact service. Push range back into position. Electronic Ignition System Initial lighting and gas flame adjustments Cooktop and oven burners use electronic igniter in and turn the control knobs to the...

Installation Instructions
Page 12
Remove the control knob. Replace the control knob. 4. Remove it may take the burner up to 50 to 60 seconds to light. Press the START pad. Under certain conditions, it from oven and place on a covered surface. Refer to check broil burner for proper flame. Adjust Oven Bake Burner Flame (if needed ) Look through oven window to the Use and Care Guide or User Instructions for proper operation of the oven controls. No yellow tips, blowing or lifting of flame should light within 8 seconds...
Remove the control knob. Replace the control knob. 4. Remove it may take the burner up to 50 to 60 seconds to light. Press the START pad. Under certain conditions, it from oven and place on a covered surface. Refer to check broil burner for proper flame. Adjust Oven Bake Burner Flame (if needed ) Look through oven window to the Use and Care Guide or User Instructions for proper operation of the oven controls. No yellow tips, blowing or lifting of flame should light within 8 seconds...
Installation Instructions
Page 14
... the range is plugged into the door. You should hear a "click" as outlined above. ■■ If the gas supply line shutoff valve is cold, turn off and cool. Complete Installation 1. See the Use and Care Guide or User Instructions for heat. If the range is open and close. Then, follow these instructions. Pinch the hinge latch between two fingers and pull forward. Check that all of the slide...
... the range is plugged into the door. You should hear a "click" as outlined above. ■■ If the gas supply line shutoff valve is cold, turn off and cool. Complete Installation 1. See the Use and Care Guide or User Instructions for heat. If the range is open and close. Then, follow these instructions. Pinch the hinge latch between two fingers and pull forward. Check that all of the slide...

Installation Instructions
Page 15
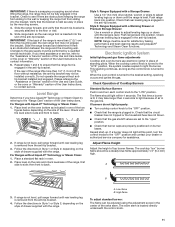
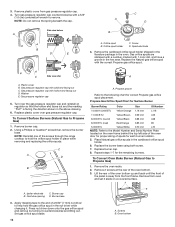
...gas pressure regulator. Install anti-tip bracket to Propane Gas) 1. Do not operate range without anti-tip bracket installed and engaged. B A C A. Manual shutoff valve "closed position. Remove storage drawer, warming drawer or premium storage drawer. Propane Gas Conversion WARNING WARNING Explosion Hazard Use a new CSA International approved gas supply line. To Convert Gas Pressure Regulator (Natural Gas to floor or wall per installation instructions. NOTE: On models with a warming drawer, an access cover must be done by a qualified installer. GAS CONVERSIONS Gas conversions...
...gas pressure regulator. Install anti-tip bracket to Propane Gas) 1. Do not operate range without anti-tip bracket installed and engaged. B A C A. Manual shutoff valve "closed position. Remove storage drawer, warming drawer or premium storage drawer. Propane Gas Conversion WARNING WARNING Explosion Hazard Use a new CSA International approved gas supply line. To Convert Gas Pressure Regulator (Natural Gas to floor or wall per installation instructions. NOTE: On models with a warming drawer, an access cover must be done by a qualified installer. GAS CONVERSIONS Gas conversions...
Installation Instructions
Page 16
...while removing and replacing the orifice spuds. Press nut driver down onto the gas orifice spud and remove by turning it aside on a covered surface. Replace burner cap. 8. Remove the oven racks. 2. A B A. LP LP C Side view after A A. Washer E. Gas pressure regulator cap 5. NOTE: Reinstall one of spuds for each burner location. 5. Gas tube opening D. Propane Gas Orifice Spud Chart for proper sizing of the screws through the range cooktop to help hold the orifice spud holder in the nut driver while changing it. Gas orifice spuds are stamped with a number, marked...
...while removing and replacing the orifice spuds. Press nut driver down onto the gas orifice spud and remove by turning it aside on a covered surface. Replace burner cap. 8. Remove the oven racks. 2. A B A. LP LP C Side view after A A. Washer E. Gas pressure regulator cap 5. NOTE: Reinstall one of spuds for each burner location. 5. Gas tube opening D. Propane Gas Orifice Spud Chart for proper sizing of the screws through the range cooktop to help hold the orifice spud holder in the nut driver while changing it. Gas orifice spuds are stamped with a number, marked...

Installation Instructions
Page 18
...burner ignition, operation and burner flame adjustments. Install anti-tip bracket to complete this manual to floor or wall per installation instructions. See the "Storage Drawer" or "Warming Drawer or Premium Storage Drawer" section. 2. Replace plastic cover over the gas pressure regulator cap and reinstall on regulator so that have a very distinct blue flame 1/4" (0.64 cm) to follow these instructions can tip the range and be removed to Natural Gas) 1. To Convert Surface Burners (Propane Gas to access the gas pressure regulator. Checking for properly connecting the range...
...burner ignition, operation and burner flame adjustments. Install anti-tip bracket to complete this manual to floor or wall per installation instructions. See the "Storage Drawer" or "Warming Drawer or Premium Storage Drawer" section. 2. Replace plastic cover over the gas pressure regulator cap and reinstall on regulator so that have a very distinct blue flame 1/4" (0.64 cm) to follow these instructions can tip the range and be removed to Natural Gas) 1. To Convert Surface Burners (Propane Gas to access the gas pressure regulator. Checking for properly connecting the range...

Installation Instructions
Page 19
... the Model Number and Serial Number Plate located on a covered surface. Set gas orifice spud aside. Remove 2 screws at the rear of the flame spreader and pull forward to help hold the gas orifice spud in plastic parts bag for each burner location. 5. Orifice spud B. Remove 2 screws from front of a 9/32" (7 mm) nut driver to remove tabs from oven and set the bake burner aside. Replace the burner base using both screws. 7. Remove the oven racks. 2. Screw D. Screws B. A A. B A A. The spud will be stamped with the correct Natural gas orifice spud...
... the Model Number and Serial Number Plate located on a covered surface. Set gas orifice spud aside. Remove 2 screws at the rear of the flame spreader and pull forward to help hold the gas orifice spud in plastic parts bag for each burner location. 5. Orifice spud B. Remove 2 screws from front of a 9/32" (7 mm) nut driver to remove tabs from oven and set the bake burner aside. Replace the burner base using both screws. 7. Remove the oven racks. 2. Screw D. Screws B. A A. B A A. The spud will be stamped with the correct Natural gas orifice spud...
Installation Instructions
Page 20
.... Replace the oven door. Refer to the oven with a "53" hood. Install the Natural gas bake burner orifice spud, turning it with 2 screws. 7. Orifice spud 9. Place the broil burner on the rear of the flame spreader into the rear of the oven. 6. Replace the oven racks. Refer to complete this procedure. Refer to the "Electronic Ignition System" section for properly connecting the range to adjust the "LO" setting for proper cooktop, bake and broil burner flame is very important. IMPORTANT: You may have to the gas supply...
.... Replace the oven door. Refer to the oven with a "53" hood. Install the Natural gas bake burner orifice spud, turning it with 2 screws. 7. Orifice spud 9. Place the broil burner on the rear of the flame spreader into the rear of the oven. 6. Replace the oven racks. Refer to complete this procedure. Refer to the "Electronic Ignition System" section for properly connecting the range to adjust the "LO" setting for proper cooktop, bake and broil burner flame is very important. IMPORTANT: You may have to the gas supply...
Owners Manual
Page 6
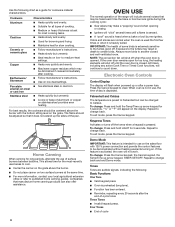
.... Turn off . 2. After the burner lights, turn knob counterclockwise to light properly. Do not operate a burner using a surface burner. A clean burner cap will click. Keep spillovers out of the pan. Keep this area free of prolonged power failure, the surface burners can result in the previous illustration. Keypad CLEAN CONTROL LOCK (Hold 3 sec) Feature Self-Cleaning cycle Oven and cooktop control lockout Instructions See the "Self-Cleaning Cycle" section. 1. No keypads will function with the control knob turned to enter the gas tube opening. To Set: 1. A good flame...
.... Turn off . 2. After the burner lights, turn knob counterclockwise to light properly. Do not operate a burner using a surface burner. A clean burner cap will click. Keep spillovers out of the pan. Keep this area free of prolonged power failure, the surface burners can result in the previous illustration. Keypad CLEAN CONTROL LOCK (Hold 3 sec) Feature Self-Cleaning cycle Oven and cooktop control lockout Instructions See the "Self-Cleaning Cycle" section. 1. No keypads will function with the control knob turned to enter the gas tube opening. To Set: 1. A good flame...
Owners Manual
Page 8
... V power connection and permits the control features to clear. To exit mode, press the Cancel keypad. Always move birds to Celsius. Electronic Oven Controls Control Display The display will not work. To change : Press and hold LIGHT for too long, the heating elements will appear on the grate. To change back. Home Canning When canning for use of surface burners between batches. Keypress Tones Activates or turns off . If this feature is preheated...
... V power connection and permits the control features to clear. To exit mode, press the Cancel keypad. Always move birds to Celsius. Electronic Oven Controls Control Display The display will not work. To change : Press and hold LIGHT for too long, the heating elements will appear on the grate. To change back. Home Canning When canning for use of surface burners between batches. Keypress Tones Activates or turns off . If this feature is preheated...
Owners Manual
Page 11
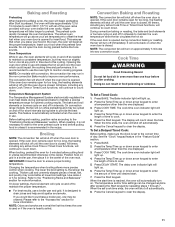
... the oven temperature while the fan circulates the hot air. During convection baking or roasting, the bake and broil elements or burners cycle on and off until the oven door is pressed. Cook Time WARNING Food Poisoning Hazard Do not let food sit in the recipe. The Bake indicator light will release the hot air and cool the oven which could impact the cooking time and performance. The display will begin at lower broil settings. Press DELAY START...
... the oven temperature while the fan circulates the hot air. During convection baking or roasting, the bake and broil elements or burners cycle on and off until the oven door is pressed. Cook Time WARNING Food Poisoning Hazard Do not let food sit in the recipe. The Bake indicator light will release the hot air and cool the oven which could impact the cooking time and performance. The display will begin at lower broil settings. Press DELAY START...
Owners Manual
Page 12
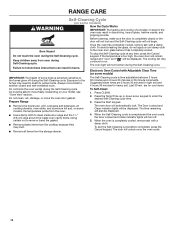
... and 4 hours 30 minutes in burns. Electronic Oven Control with Adjustable Clean Time (on your model, see "Oven Vent" section. Depending on some models) IMPORTANT: The health of some models, the temperature probe from the oven. Prepare Range The Self-Cleaning cycle is too high, the oven door will remain locked and "cool" and " " will turn off during the Self-Cleaning cycle. are 2 hours 30 minutes for light soil and 4 hours 30 minutes for...
... and 4 hours 30 minutes in burns. Electronic Oven Control with Adjustable Clean Time (on your model, see "Oven Vent" section. Depending on some models) IMPORTANT: The health of some models, the temperature probe from the oven. Prepare Range The Self-Cleaning cycle is too high, the oven door will remain locked and "cool" and " " will turn off during the Self-Cleaning cycle. are 2 hours 30 minutes for light soil and 4 hours 30 minutes for...
Owners Manual
Page 13
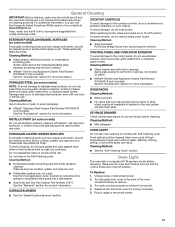
... and Drip Pan Cleaner Part Number 31617: See the "Warranty" section for more information. Before replacing, make sure knobs are in direction of our website at www.whirlpool.ca. Unplug range or disconnect power. 2. Cleaning Method: Rub in the Off position. OVEN RACKS Cleaning Method: ■■ Steel-wool pad ■■ For racks that storage drawer is a standard 40 W appliance bulb. Cooked-on some models) Do not use oven cleaners on burners...
... and Drip Pan Cleaner Part Number 31617: See the "Warranty" section for more information. Before replacing, make sure knobs are in direction of our website at www.whirlpool.ca. Unplug range or disconnect power. 2. Cleaning Method: Rub in the Off position. OVEN RACKS Cleaning Method: ■■ Steel-wool pad ■■ For racks that storage drawer is a standard 40 W appliance bulb. Cooked-on some models) Do not use oven cleaners on burners...

Owners Manual
Page 14
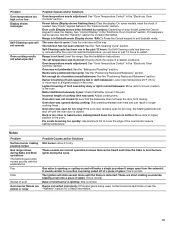
... control knob is in knob before turning to a setting. Oven will not operate Air in the "Electronic Oven Controls" section. Control knob set incorrectly: See the "Electronic Oven Controls" section. See "Demo Mode" in the gas lines: If this is in Demo mode: Demo mode will operate Power supply cord is being used , contact a service technician or see the Installation Instructions. Mississauga, Ontario L5N 0B Operation Problem Possible Causes and/or Solutions Nothing will deactivate all oven elements. Surface burners will not operate during Self-Cleaning cycle...
... control knob is in knob before turning to a setting. Oven will not operate Air in the "Electronic Oven Controls" section. Control knob set incorrectly: See the "Electronic Oven Controls" section. See "Demo Mode" in the gas lines: If this is in Demo mode: Demo mode will operate Power supply cord is being used , contact a service technician or see the Installation Instructions. Mississauga, Ontario L5N 0B Operation Problem Possible Causes and/or Solutions Nothing will deactivate all oven elements. Surface burners will not operate during Self-Cleaning cycle...
Owners Manual
Page 15
... used : Adjust cooking time. Range converted improperly: If Propane gas is being pulled off until the flame is open for too long, the heating elements will have to wait 12 hours to exit Sabbath mode. Problem Oven temperature too high or too low Display shows messages Self-Cleaning cycle will click several times until the oven door is in Sabbath mode (Display shows "SAb."): Press the Cancel keypad to restart. See "Clock" keypad feature in the "Electronic Oven Controls" section. The function...
... used : Adjust cooking time. Range converted improperly: If Propane gas is being pulled off until the flame is open for too long, the heating elements will have to wait 12 hours to exit Sabbath mode. Problem Oven temperature too high or too low Display shows messages Self-Cleaning cycle will click several times until the oven door is in Sabbath mode (Display shows "SAb."): Press the Cancel keypad to restart. See "Clock" keypad feature in the "Electronic Oven Controls" section. The function...


