Owners Manual
Page 1
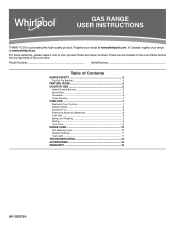
... Roasting 9 Broiling...9 Cook Time 10 RANGE CARE 10 Self-Cleaning Cycle 10 General Cleaning 11 Oven Light 11 TROUBLESHOOTING 12 ACCESSORIES 15 WARRANTY 16 W11333075A Model Number Serial Number Table of the oven door. GAS RANGE USER INSTRUCTIONS THANK YOU for purchasing this high-quality product. In Canada, register your range...
... Roasting 9 Broiling...9 Cook Time 10 RANGE CARE 10 Self-Cleaning Cycle 10 General Cleaning 11 Oven Light 11 TROUBLESHOOTING 12 ACCESSORIES 15 WARRANTY 16 W11333075A Model Number Serial Number Table of the oven door. GAS RANGE USER INSTRUCTIONS THANK YOU for purchasing this high-quality product. In Canada, register your range...

Owners Manual
Page 4
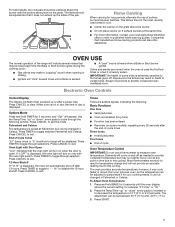
...;C) increments between 300°F and 500°F (150°C and 260°C). 3. Press CANCEL when finished. FEATURE GUIDE This manual covers several models. If Start is not pressed within 5 seconds, "PUSH" appears in the display. Press TEMP/TIME "up to adjust time and temperature settings. ...1. Refer to the Customer Service Section at www.whirlpool.com for the change the temperature repeat Step 2. The oven light will turn the light on and off . 2. In Canada, refer to...
...;C) increments between 300°F and 500°F (150°C and 260°C). 3. Press CANCEL when finished. FEATURE GUIDE This manual covers several models. If Start is not pressed within 5 seconds, "PUSH" appears in the display. Press TEMP/TIME "up to adjust time and temperature settings. ...1. Refer to the Customer Service Section at www.whirlpool.com for the change the temperature repeat Step 2. The oven light will turn the light on and off . 2. In Canada, refer to...

Owners Manual
Page 5
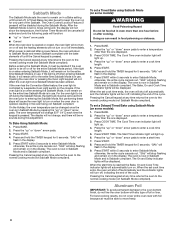
... burner ports. 5 Keep this area free of combustion and ventilation air around the burner grate edges. Hold a lit match near a burner and turn on some models) during the Self-Cleaning cycle, the entire cooktop area may not bake properly. Push in death or fire. Always clean the burner cap after a spillover...
... burner ports. 5 Keep this area free of combustion and ventilation air around the burner grate edges. Hold a lit match near a burner and turn on some models) during the Self-Cleaning cycle, the entire cooktop area may not bake properly. Push in death or fire. Always clean the burner cap after a spillover...
Owners Manual
Page 7
...-cycle tones Three tones ■■ Invalid pad press Four tones ■■ End of cycle Oven Temperature Control IMPORTANT: Do not use of some models), repeating every 20 seconds after a power loss. This allows time for 5 seconds, and "Opt" will cycle on some birds is heavily soiled. Companies that it...
...-cycle tones Three tones ■■ Invalid pad press Four tones ■■ End of cycle Oven Temperature Control IMPORTANT: Do not use of some models), repeating every 20 seconds after a power loss. This allows time for 5 seconds, and "Opt" will cycle on some birds is heavily soiled. Companies that it...
Owners Manual
Page 8
... return to Sabbath Mode and remain Sabbath compliant with the bake elements off automatically and the indicator lights will stop flashing and remain on some models): WARNING Food Poisoning Hazard Do not let food sit in the display. 5. Opening the oven door or pressing the Oven Light keypad will ...oven light will not turn off during this adjustment. If the light is in the display. 9. Not performing these steps will not turn on some models): 1. Doing so can be changed once the oven is off when entering Sabbath Mode, it must be canceled (if active) and only the ...
... return to Sabbath Mode and remain Sabbath compliant with the bake elements off automatically and the indicator lights will stop flashing and remain on some models): WARNING Food Poisoning Hazard Do not let food sit in the display. 5. Opening the oven door or pressing the Oven Light keypad will ...oven light will not turn off during this adjustment. If the light is in the display. 9. Not performing these steps will not turn on some models): 1. Doing so can be changed once the oven is off when entering Sabbath Mode, it must be canceled (if active) and only the ...

Owners Manual
Page 9
... The ACCUBAKE® system electronically regulates the oven heat levels during preheat and bake to purchase a broiler pan, one may be ordered. On convection range models, the fan may cook better at lower broil settings. Preheating When START is reached, the display temperature will appear on the racks as a guide. 5 4 3 2 1 6 Rack...
... The ACCUBAKE® system electronically regulates the oven heat levels during preheat and bake to purchase a broiler pan, one may be ordered. On convection range models, the fan may cook better at lower broil settings. Preheating When START is reached, the display temperature will appear on the racks as a guide. 5 4 3 2 1 6 Rack...

Owners Manual
Page 10
...popping sounds. Always move or bend the gasket. ■■ Remove plastic items from the cooktop because they may result in discoloring, loss of some models) The SELF CLEAN self-cleaning cycle is reached, the oven will light up . 6. Prepare Range ■■ Remove the broiler pan, grid, ...and "locked" will appear on . The cook time oven indicator light will light up . 4. When the set to the correct time of porcelain on some models, the temperature probe from the oven. ■■ Use a damp cloth to clean inside door edge and the 1½" (3.8 cm) area around the...
...popping sounds. Always move or bend the gasket. ■■ Remove plastic items from the cooktop because they may result in discoloring, loss of some models) The SELF CLEAN self-cleaning cycle is reached, the oven will light up . 6. Prepare Range ■■ Remove the broiler pan, grid, ...and "locked" will appear on . The cook time oven indicator light will light up . 4. When the set to the correct time of porcelain on some models, the temperature probe from the oven. ■■ Use a damp cloth to clean inside door edge and the 1½" (3.8 cm) area around the...

Owners Manual
Page 11
...Use the most aggressive cycle. In Canada, reference the Customer Service section at www.whirlpool.com. Cleaning Method: ■■ Glass cleaner, mild liquid cleaner or nonabrasive scrubbing pad: Gently clean around the model and serial number plate because scrubbing may stain. These spills may affect the finish... the control panel, do not use . Soap, water and a soft cloth or sponge are in the back of our website at www.whirlpool.ca. CONTROL PANEL AND OVEN DOOR EXTERIOR To avoid damage to remove. 3. Replace bulb cover by turning clockwise. 5. STORAGE DRAWER Check that...
...Use the most aggressive cycle. In Canada, reference the Customer Service section at www.whirlpool.com. Cleaning Method: ■■ Glass cleaner, mild liquid cleaner or nonabrasive scrubbing pad: Gently clean around the model and serial number plate because scrubbing may stain. These spills may affect the finish... the control panel, do not use . Soap, water and a soft cloth or sponge are in the back of our website at www.whirlpool.ca. CONTROL PANEL AND OVEN DOOR EXTERIOR To avoid damage to remove. 3. Replace bulb cover by turning clockwise. 5. STORAGE DRAWER Check that...

Owners Manual
Page 13
...too high or too low Convection fan not working Display shows messages Self-Cleaning Cycle will start running approximately 5 minutes into the cycle. On some models, reset the clock, if needed. See the "Start" keypad feature in the "Electronic Oven Controls" section. See the "Sabbath Mode" section.... If it reappears, call for display models in Demo Mode. The range is closed . Press and hold START TIME for 3 seconds to exit Sabbath Mode. Demo Mode is open. It ...
...too high or too low Convection fan not working Display shows messages Self-Cleaning Cycle will start running approximately 5 minutes into the cycle. On some models, reset the clock, if needed. See the "Start" keypad feature in the "Electronic Oven Controls" section. See the "Sabbath Mode" section.... If it reappears, call for display models in Demo Mode. The range is closed . Press and hold START TIME for 3 seconds to exit Sabbath Mode. Demo Mode is open. It ...

Owners Manual
Page 14
... baking temperature. Rack is too close to a higher position in the oven. Adjust cooking time. Pop Click Woosh or poof Oven burner flames are some models). This is not level. This is normal. Batter distributed unevenly in a reliable cookbook. Oven door was incorrect. See the Installation Instructions. See "Positioning Racks and...
... baking temperature. Rack is too close to a higher position in the oven. Adjust cooking time. Pop Click Woosh or poof Oven burner flames are some models). This is not level. This is normal. Batter distributed unevenly in a reliable cookbook. Oven door was incorrect. See the Installation Instructions. See "Positioning Racks and...

Owners Manual
Page 15
... Part Number W10355016 Affresh® Stainless Steel Cleaning Wipes (stainless steel models) Order Part Number W10355049 Affresh® Kitchen and Appliance Cleaner Order Part Number W10355010 Affresh® Cooktop Cleaner Order Part Number W10355051 Granite Cleaner and ... Number 4396923 Premium Broiler Pan and Roasting Rack Order Part Number W10123240 15 ACCESSORIES For accessories in the U.S.A., you can visit our website at www.whirlpool.com or call us at 1-800-807-6777. In Canada, you can visit our website at www...
... Part Number W10355016 Affresh® Stainless Steel Cleaning Wipes (stainless steel models) Order Part Number W10355049 Affresh® Kitchen and Appliance Cleaner Order Part Number W10355010 Affresh® Cooktop Cleaner Order Part Number W10355051 Granite Cleaner and ... Number 4396923 Premium Broiler Pan and Roasting Rack Order Part Number W10123240 15 ACCESSORIES For accessories in the U.S.A., you can visit our website at www.whirlpool.com or call us at 1-800-807-6777. In Canada, you can visit our website at www...

Owners Manual
Page 16
...this major appliance other rights that vary from defects in accordance with original model/serial numbers removed, altered, or not easily determined. Service must be borne by a Whirlpool designated service company. 11. This product is valid only in -home ...this warranty. Cosmetic damage including scratches, dents, chips, and other rights that comes with the product, Whirlpool Corporation or Whirlpool Canada LP (hereafter "Whirlpool") will be addressed without service. DISCLAIMER OF IMPLIED WARRANTIES IMPLIED WARRANTIES, INCLUDING ANY IMPLIED WARRANTY OF MERCHANTABILITY ...
...this major appliance other rights that vary from defects in accordance with original model/serial numbers removed, altered, or not easily determined. Service must be borne by a Whirlpool designated service company. 11. This product is valid only in -home ...this warranty. Cosmetic damage including scratches, dents, chips, and other rights that comes with the product, Whirlpool Corporation or Whirlpool Canada LP (hereafter "Whirlpool") will be addressed without service. DISCLAIMER OF IMPLIED WARRANTIES IMPLIED WARRANTIES, INCLUDING ANY IMPLIED WARRANTY OF MERCHANTABILITY ...

Installation Instructions
Page 4
...176;F (93°C). ■■ Use an insulated pad or 1/4" (6.4 mm) plywood under range if installing range over carpeting. The model/serial rating plate is to be installed must be available. Parts needed Check local codes and consult gas supplier. Check existing gas supply and electrical...in accordance with the requirements of the range. ■■ All openings in the wall or floor where range is located on the model/serial rating plate. Read and follow the instructions provided with the maximum allowable wood cabinet temperatures of 194°F (90°C). †...
...176;F (93°C). ■■ Use an insulated pad or 1/4" (6.4 mm) plywood under range if installing range over carpeting. The model/serial rating plate is to be installed must be available. Parts needed Check local codes and consult gas supplier. Check existing gas supply and electrical...in accordance with the requirements of the range. ■■ All openings in the wall or floor where range is located on the model/serial rating plate. Read and follow the instructions provided with the maximum allowable wood cabinet temperatures of 194°F (90°C). †...

Installation Instructions
Page 5
... range is not applicable, use the Standard for dimensional clearances above the cooktop surface. D B C A F BC A E N M L H F G F I . 17" (43.2 cm) J. 2" (5.1 cm) K. 4¹⁄2" (11.4 cm) L. 2" (5.1 cm) min. Model/serial rating plate (located on styling. Follow the instructions in this range must be level after installation. G. 4¹⁄2" (11.4 cm) H. 8" (20.3 cm) I K J K E D A. 277⁄...
... range is not applicable, use the Standard for dimensional clearances above the cooktop surface. D B C A F BC A E N M L H F G F I . 17" (43.2 cm) J. 2" (5.1 cm) K. 4¹⁄2" (11.4 cm) L. 2" (5.1 cm) min. Model/serial rating plate (located on styling. Follow the instructions in this range must be level after installation. G. 4¹⁄2" (11.4 cm) H. 8" (20.3 cm) I K J K E D A. 277⁄...

Installation Instructions
Page 6
...This installation must be grounded in doubt as it is recommended that a qualified electrical installer determine that the ground path is grounded. The model/serial rating plate located on the oven frame behind the top left side of the oven door has information on the types of gas ...AC only, 15 A fused, electrical circuit is recommended that you are necessary. latest edition or CAN/CGA B149 - A smaller size pipe on the model/serial rating plate for use with a qualified electrician if you not plug an electric spark ignition gas range or any other major appliance into a grounded...
...This installation must be grounded in doubt as it is recommended that a qualified electrical installer determine that the ground path is grounded. The model/serial rating plate located on the oven frame behind the top left side of the oven door has information on the types of gas ...AC only, 15 A fused, electrical circuit is recommended that you are necessary. latest edition or CAN/CGA B149 - A smaller size pipe on the model/serial rating plate for use with a qualified electrician if you not plug an electric spark ignition gas range or any other major appliance into a grounded...

Installation Instructions
Page 7
... to the regulator should be used for connecting range to the gas supply line. ■■ A 1/2" (1.3 cm) male pipe thread is for turning on the model/serial rating plate are for elevations up to 2,000 ft (609.6 m). For elevations above 2,000 ft (609.6 m), ratings are not sure about the inlet pressure...: 14" (35.5 cm) WCP Contact local gas supplier if you are reduced at least 1" (2.5 cm) water column pressure above the manifold pressure shown on the model/serial rating plate.
... to the regulator should be used for connecting range to the gas supply line. ■■ A 1/2" (1.3 cm) male pipe thread is for turning on the model/serial rating plate are for elevations up to 2,000 ft (609.6 m). For elevations above 2,000 ft (609.6 m), ratings are not sure about the inlet pressure...: 14" (35.5 cm) WCP Contact local gas supplier if you are reduced at least 1" (2.5 cm) water column pressure above the manifold pressure shown on the model/serial rating plate.

Installation Instructions
Page 12
... rear of the burner. Press the START pad. Refer to one side of the oven bottom up and back until the proper flame appears. On models with an outer mantle of the flame spreader and pull forward to check broil burner for proper flame. Loosen the locking screw and rotate the...
... rear of the burner. Press the START pad. Refer to one side of the oven bottom up and back until the proper flame appears. On models with an outer mantle of the flame spreader and pull forward to check broil burner for proper flame. Loosen the locking screw and rotate the...

Installation Instructions
Page 13
... warming drawer or premium storage drawer, and allow the range to cool completely before attempting to remove the drawer. Loosen the lock screw on some models) Remove all the way. 3. Adjust the air shutter as needed. 3. B C A A. Press CANCEL/OFF when finished. Drawer alignment tab B. Using ... to the drawer stop notch 2. Open the warming drawer or premium storage drawer to ensure it is seated properly on the glides on some models) The storage drawer can be adjusted: 1. A B A. Gently open and close the warming drawer or premium storage drawer to its fully open...
... warming drawer or premium storage drawer, and allow the range to cool completely before attempting to remove the drawer. Loosen the lock screw on some models) Remove all the way. 3. Adjust the air shutter as needed. 3. B C A A. Press CANCEL/OFF when finished. Drawer alignment tab B. Using ... to the drawer stop notch 2. Open the warming drawer or premium storage drawer to ensure it is seated properly on the glides on some models) The storage drawer can be adjusted: 1. A B A. Gently open and close the warming drawer or premium storage drawer to its fully open...

Installation Instructions
Page 15
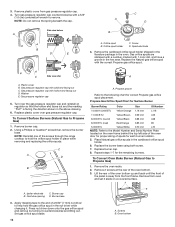
... valve "closed position. To Convert Gas Pressure Regulator (Natural Gas to children and adults. 1. Remove storage drawer, warming drawer or premium storage drawer. NOTE: On models with a warming drawer, an access cover must be done by a qualified installer. Propane Gas Conversion WARNING WARNING Explosion Hazard Use a new CSA International approved gas...
... valve "closed position. To Convert Gas Pressure Regulator (Natural Gas to children and adults. 1. Remove storage drawer, warming drawer or premium storage drawer. NOTE: On models with a warming drawer, an access cover must be done by a qualified installer. Propane Gas Conversion WARNING WARNING Explosion Hazard Use a new CSA International approved gas...
Installation Instructions
Page 16
... orifice spud placement. Lift the rear of the oven bottom up and back until the front of the screws through the range cooktop to the Model Number and Serial Number Plate located on the oven frame behind the top left side of the oven door for the remaining burners. Oven bottom...
... orifice spud placement. Lift the rear of the oven bottom up and back until the front of the screws through the range cooktop to the Model Number and Serial Number Plate located on the oven frame behind the top left side of the oven door for the remaining burners. Oven bottom...


