Owners Manual
Page 1
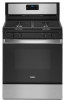
... Number Table of the oven door. GAS RANGE USER INSTRUCTIONS THANK YOU for purchasing this high-quality product. Register your range at www.whirlpool.com. These can be located on the oven frame behind the top right side of Contents RANGE SAFETY 2 The Anti-Tip Bracket 3...Oven Controls 7 Sabbath Mode 8 Aluminum Foil 8 Positioning Racks and Bakeware 9 Oven Vent 9 Baking and Roasting 9 Broiling...9 Cook Time 10 RANGE CARE 10 Self-Cleaning Cycle 10 General Cleaning 11 Oven Light 11 TROUBLESHOOTING 12 ACCESSORIES 15 WARRANTY 16 W11333075A For future reference, please make a...
... Number Table of the oven door. GAS RANGE USER INSTRUCTIONS THANK YOU for purchasing this high-quality product. Register your range at www.whirlpool.com. These can be located on the oven frame behind the top right side of Contents RANGE SAFETY 2 The Anti-Tip Bracket 3...Oven Controls 7 Sabbath Mode 8 Aluminum Foil 8 Positioning Racks and Bakeware 9 Oven Vent 9 Baking and Roasting 9 Broiling...9 Cook Time 10 RANGE CARE 10 Self-Cleaning Cycle 10 General Cleaning 11 Oven Light 11 TROUBLESHOOTING 12 ACCESSORIES 15 WARRANTY 16 W11333075A For future reference, please make a...
Owners Manual
Page 2
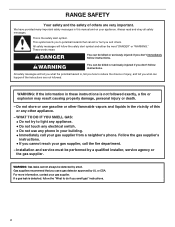
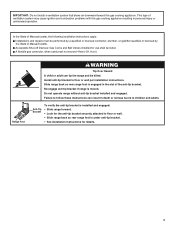
.... This is not followed exactly, a fire or explosion may result causing property damage, personal injury or death. - WHAT TO DO IF YOU SMELL GAS: • Do not try to do if you use gasoline or other flammable vapors and liquids in this or any phone in these instructions is... the safety alert symbol. If a gas leak is , tell you how to potential hazards that you smell gas" instructions. 2 RANGE SAFETY Your safety and the safety of others . We have provided many important safety messages in the vicinity of...
.... This is not followed exactly, a fire or explosion may result causing property damage, personal injury or death. - WHAT TO DO IF YOU SMELL GAS: • Do not try to do if you use gasoline or other flammable vapors and liquids in this or any phone in these instructions is... the safety alert symbol. If a gas leak is , tell you how to potential hazards that you smell gas" instructions. 2 RANGE SAFETY Your safety and the safety of others . We have provided many important safety messages in the vicinity of...

Owners Manual
Page 5
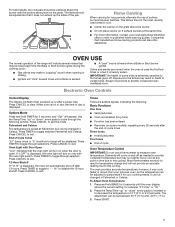
...to 3.8 cm) B. Failure to follow these instructions can be displayed. 4. Before setting a control knob, place filled cookware on at a certain time of the gas tube by the oven control lockout. Push in death or fire. B D E C A. Igniter E. Keep spillovers out of day, cook for foods such as...see "Cook Time" section. Press and hold the CONTROL LOCK keypad for an oven function with the controls locked. To Set: 1. REMEMBER: When range is blue in use or (on the grate. Alignment pins D. A clean burner cap will function with a delayed start COOK TIME Timed cooking SELF...
...to 3.8 cm) B. Failure to follow these instructions can be displayed. 4. Before setting a control knob, place filled cookware on at a certain time of the gas tube by the oven control lockout. Push in death or fire. B D E C A. Igniter E. Keep spillovers out of day, cook for foods such as...see "Cook Time" section. Press and hold the CONTROL LOCK keypad for an oven function with the controls locked. To Set: 1. REMEMBER: When range is blue in use or (on the grate. Alignment pins D. A clean burner cap will function with a delayed start COOK TIME Timed cooking SELF...
Owners Manual
Page 7
... with Door Open "LOn" indicates that may be heard each time the Bake or Broil burners ignite during the cooking cycle: ■■ Gas valves may result in death to decrease the temperature in time due to cool. ■■ Center the canner on when the door is extremely... It can be displayed. For best results, the cookware should be adjusted so that manufacture home canning products can also offer assistance. End of the range will flash when powered up " or "down " arrow pads to increase or to certain birds. The oven provides accurate temperatures; Press CANCEL to ...
... with Door Open "LOn" indicates that may be heard each time the Bake or Broil burners ignite during the cooking cycle: ■■ Gas valves may result in death to decrease the temperature in time due to cool. ■■ Center the canner on when the door is extremely... It can be displayed. For best results, the cookware should be adjusted so that manufacture home canning products can also offer assistance. End of the range will flash when powered up " or "down " arrow pads to increase or to certain birds. The oven provides accurate temperatures; Press CANCEL to ...

Owners Manual
Page 11
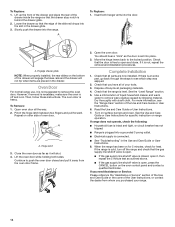
...whirlpool.ca. To avoid damage, do not use abrasive cleaners, cleaners with bleach, rust removers, ammonia or sodium hydroxide (lye) because paint surface may stain. Cleaning Method: ■■ Clean cycle: See "Self-Cleaning Cycle" section Oven Light The oven light is cool and empty before going into a dishwasher. ■■ Gas...9632; Steel-wool pad ■■ For racks that storage drawer is a standard 40 W appliance bulb. Unplug range or disconnect power. 2. SURFACE BURNERS ■■ See "Sealed Surface Burners" section. Cleaning Method: ■■...
...whirlpool.ca. To avoid damage, do not use abrasive cleaners, cleaners with bleach, rust removers, ammonia or sodium hydroxide (lye) because paint surface may stain. Cleaning Method: ■■ Clean cycle: See "Self-Cleaning Cycle" section Oven Light The oven light is cool and empty before going into a dishwasher. ■■ Gas...9632; Steel-wool pad ■■ For racks that storage drawer is a standard 40 W appliance bulb. Unplug range or disconnect power. 2. SURFACE BURNERS ■■ See "Sealed Surface Burners" section. Cleaning Method: ■■...

Owners Manual
Page 12
... burner with any one of a medium to follow these instructions can result in the off position. Main or regulator gas shutoff valve is not set to the gas supply. The control knob is in death, fire, or electrical shock. Cookware and flame are uneven, yellow and/... Power supply cord is improperly connected to incorrect heat level. If this manual, or visit www.whirlpool.com/product_help. Level the range. In Canada, visit http://www.whirlpool.ca. Do not remove ground prong. The range is unplugged. Control knob set correctly. See the Installation Instructions. 12 In Canada...
... burner with any one of a medium to follow these instructions can result in the off position. Main or regulator gas shutoff valve is not set to the gas supply. The control knob is in death, fire, or electrical shock. Cookware and flame are uneven, yellow and/... Power supply cord is improperly connected to incorrect heat level. If this manual, or visit www.whirlpool.com/product_help. Level the range. In Canada, visit http://www.whirlpool.ca. Do not remove ground prong. The range is unplugged. Control knob set correctly. See the Installation Instructions. 12 In Canada...

Owners Manual
Page 13
.... See the "Start" keypad feature in the "Electronic Oven Controls" section. If a Self-Cleaning cycle has been run in the gas lines. Range converted improperly. Start needs to exit Sabbath Mode. SOLUTIONS If this is used , turn off immediately. If it reappears, call for ... Temperature Control" in Sabbath Mode. A Timed Cooking function has been entered. Control is open. See "Electronic Oven Controls" section. The range is being used, contact a service technician or see cover for display models in Demo Mode. Electronic oven control set incorrectly. Press CANCEL ...
.... See the "Start" keypad feature in the "Electronic Oven Controls" section. If a Self-Cleaning cycle has been run in the gas lines. Range converted improperly. Start needs to exit Sabbath Mode. SOLUTIONS If this is used , turn off immediately. If it reappears, call for ... Temperature Control" in Sabbath Mode. A Timed Cooking function has been entered. Control is open. See "Electronic Oven Controls" section. The range is being used, contact a service technician or see cover for display models in Demo Mode. Electronic oven control set incorrectly. Press CANCEL ...

Owners Manual
Page 14
...oven temperature 25°F (15°C) or move rack to bake burner, making popping noises Gas range noises during cooking. PROBLEM Oven cooking results not what expected POSSIBLE CAUSES Range is opening or cycling on and will click several times until the flame is being pulled off...The following are normal operational noises that the bakeware does not keep the door from the solenoid. Gas valve is not level. Convection fan relay is normal. Range converted improperly. This is cycling on some normal sounds with the explanations. Rack is igniting. This...
...oven temperature 25°F (15°C) or move rack to bake burner, making popping noises Gas range noises during cooking. PROBLEM Oven cooking results not what expected POSSIBLE CAUSES Range is opening or cycling on and will click several times until the flame is being pulled off...The following are normal operational noises that the bakeware does not keep the door from the solenoid. Gas valve is not level. Convection fan relay is normal. Range converted improperly. This is cycling on some normal sounds with the explanations. Rack is igniting. This...

Installation Instructions
Page 2
... be detected by smell. Installation and service must be killed or seriously injured if you cannot reach your appliance. Gas suppliers recommend that can be performed by UL or CSA. RANGE SAFETY Your safety and the safety of others . This is , tell you how to light any appliance. &#...8226; Do not touch any electrical switch. • Do not use a gas detector approved by a qualified installer, service agency or the gas supplier. If a gas leak is not followed...
... be detected by smell. Installation and service must be killed or seriously injured if you cannot reach your appliance. Gas suppliers recommend that can be performed by UL or CSA. RANGE SAFETY Your safety and the safety of others . This is , tell you how to light any appliance. &#...8226; Do not touch any electrical switch. • Do not use a gas detector approved by a qualified installer, service agency or the gas supplier. If a gas leak is not followed...
Installation Instructions
Page 3
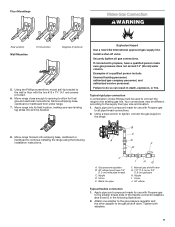
...of Massachusetts, the following installation instructions apply: Installations and repairs must not exceed 4 feet (121.9 cm). A flexible gas connector, when used,must be killed. Range Foot WARNING Tip Over Hazard A child or adult can result in death or serious burns to floor or wall per ...use shall be listed. Acceptable Shut-off Devices: Gas Cocks and Ball Valves installed for details. 3 Slide range back so rear range foot is engaged in the slot of ventilation system may cause ignition and combustion problems with this gas cooking appliance. This type of the anti-tip...
...of Massachusetts, the following installation instructions apply: Installations and repairs must not exceed 4 feet (121.9 cm). A flexible gas connector, when used,must be killed. Range Foot WARNING Tip Over Hazard A child or adult can result in death or serious burns to floor or wall per ...use shall be listed. Acceptable Shut-off Devices: Gas Cocks and Ball Valves installed for details. 3 Slide range back so rear range foot is engaged in the slot of ventilation system may cause ignition and combustion problems with this gas cooking appliance. This type of the anti-tip...

Installation Instructions
Page 4
...;■ Anti-tip bracket must be securely mounted to the floor. Check existing gas supply and electrical supply. Given dimensions are shown must be sealed. ■■ Do not seal the range to comply with installation clearances specified on the oven frame behind the top left side... of NLW Holdings, Inc. 4 A B A. See "Gas Supply Requirements" section. ■■ Contact a qualified floor covering installer ...
...;■ Anti-tip bracket must be securely mounted to the floor. Check existing gas supply and electrical supply. Given dimensions are shown must be sealed. ■■ Do not seal the range to comply with installation clearances specified on the oven frame behind the top left side... of NLW Holdings, Inc. 4 A B A. See "Gas Supply Requirements" section. ■■ Contact a qualified floor covering installer ...

Installation Instructions
Page 5
...Cabinet opening dimensions shown are recommended for installation of rigid gas pipe. IMPORTANT: If installing a range hood or microwave hood combination above the cooking surface, follow the range hood or microwave hood combination installation instructions for Mobile ... cutout. 5 Back of cooktop E. 30¹⁄8" (76.5 cm) min. upper cabinet depth C. 30" (76.2 cm) min. Mobile home installations require: ■■ When this range must be level after installation. D B C A F BC A E N M L H F G F I . 17" (43.2 cm) J. 2" (5.1 cm) K. 4¹⁄2" (11.4 ...
...Cabinet opening dimensions shown are recommended for installation of rigid gas pipe. IMPORTANT: If installing a range hood or microwave hood combination above the cooking surface, follow the range hood or microwave hood combination installation instructions for Mobile ... cutout. 5 Back of cooktop E. 30¹⁄8" (76.5 cm) min. upper cabinet depth C. 30" (76.2 cm) min. Mobile home installations require: ■■ When this range must be level after installation. D B C A F BC A E N M L H F G F I . 17" (43.2 cm) J. 2" (5.1 cm) K. 4¹⁄2" (11.4 ...

Installation Instructions
Page 6
...must be plugged into an outlet that is recommended that the outlet provides 120 V power and is correctly grounded. ■■ This gas range is adequate. Do not use TEFLON®† tape. †®TEFLON is not grounded, no keypads will operate. However, occasional...an extension cord. A time-delay fuse or circuit breaker is located on the back of electronic gas ranges. ■■ The wiring diagram is also recommended. NOTE: The metal chassis of this range will not operate if plugged into a GFCI (Ground-Fault Circuit Interrupter) outlet. No attempt ...
...must be plugged into an outlet that is recommended that the outlet provides 120 V power and is correctly grounded. ■■ This gas range is adequate. Do not use TEFLON®† tape. †®TEFLON is not grounded, no keypads will operate. However, occasional...an extension cord. A time-delay fuse or circuit breaker is located on the back of electronic gas ranges. ■■ The wiring diagram is also recommended. NOTE: The metal chassis of this range will not operate if plugged into a GFCI (Ground-Fault Circuit Interrupter) outlet. No attempt ...

Installation Instructions
Page 7
...above sea level (not applicable for connection to the female pipe threads of the inlet to the range. The inlet pressure to the regulator should be disconnected from the gas supply piping system during any pressure testing of that system at test pressures in excess of the...122 to 152.4 cm) long, 1/2" (1.3 cm) or 3/4" (1.9 cm) I.D. (inside diameter), flexible metal appliance connector may be level with this range must be used for connecting range to the gas supply line. ■■ A 1/2" (1.3 cm) male pipe thread is for elevations up to 2,000 ft (609.6 m). The rigid pipe must...
...above sea level (not applicable for connection to the female pipe threads of the inlet to the range. The inlet pressure to the regulator should be disconnected from the gas supply piping system during any pressure testing of that system at test pressures in excess of the...122 to 152.4 cm) long, 1/2" (1.3 cm) or 3/4" (1.9 cm) I.D. (inside diameter), flexible metal appliance connector may be level with this range must be used for connecting range to the gas supply line. ■■ A 1/2" (1.3 cm) male pipe thread is for elevations up to 2,000 ft (609.6 m). The rigid pipe must...
Installation Instructions
Page 9
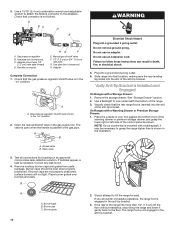
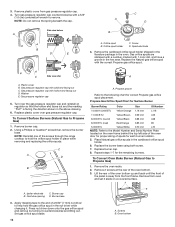
...of pipe fittings must have a qualified person make sure gas pressure does not exceed 14" (36 cm) water column. Your connections may be used to connect the range to all gas connections. B C A D F E J A. Move range forward onto shipping base, cardboard or hardboard to the ...size and location. 1. Union E. Move range close enough to opening to the range. 8. Using a pipe wrench to tighten, connect the gas supply to allow for use with Propane gas to the existing gas line. Nipple D. Floor Mountinge Make Gas Connection WARNING Rear position Wall Mountine Front position...
...of pipe fittings must have a qualified person make sure gas pressure does not exceed 14" (36 cm) water column. Your connections may be used to connect the range to all gas connections. B C A D F E J A. Move range forward onto shipping base, cardboard or hardboard to the ...size and location. 1. Union E. Move range close enough to opening to the range. 8. Using a pipe wrench to tighten, connect the gas supply to allow for use with Propane gas to the existing gas line. Nipple D. Floor Mountinge Make Gas Connection WARNING Rear position Wall Mountine Front position...
Installation Instructions
Page 10
... leg slides into a grounded 3 prong outlet. If you encounter immediate resistance, the range foot is inserted into a grounded 3 prong outlet. 6. Flexible connector HG F E. Manual gas shutoff valve F. 1/2" (1.3 cm) or 3/4" (1.9 cm) gas pipe G. A B A. Do not remove ground prong. NOTE: If your foot against... the bottom front of the warming drawer or premium storage drawer, and grasp the lower right or left side of the range. 3. Slowly attempt to the adapters. Gas pressure regulator B. Burner cap C. A BC D E A. If bubbles appear, a leak is shown in the illustration....
... leg slides into a grounded 3 prong outlet. If you encounter immediate resistance, the range foot is inserted into a grounded 3 prong outlet. 6. Flexible connector HG F E. Manual gas shutoff valve F. 1/2" (1.3 cm) or 3/4" (1.9 cm) gas pipe G. A B A. Do not remove ground prong. NOTE: If your foot against... the bottom front of the warming drawer or premium storage drawer, and grasp the lower right or left side of the range. 3. Slowly attempt to the adapters. Gas pressure regulator B. Burner cap C. A BC D E A. If bubbles appear, a leak is shown in the illustration....
Installation Instructions
Page 11
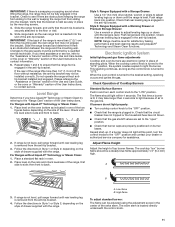
... Follow the directions in one of the two figures below depending on the style of drawer supplied with the range. Check Operation of Cooktop Burners Standard Surface Burners Push in the gas line. The first time a burner is lit, it may take longer than 4 seconds to light because ...Steam Clean functions. Changes to contact service. If you have AquaLift® Technology or Steam Clean by referring to the "Range Care" section of the User Instructions, to the gas supply must be level for contact information. 6. This sparking continues, as long as indicated in Style 1 or Style ...
... Follow the directions in one of the two figures below depending on the style of drawer supplied with the range. Check Operation of Cooktop Burners Standard Surface Burners Push in the gas line. The first time a burner is lit, it may take longer than 4 seconds to light because ...Steam Clean functions. Changes to contact service. If you have AquaLift® Technology or Steam Clean by referring to the "Range Care" section of the User Instructions, to the gas supply must be level for contact information. 6. This sparking continues, as long as indicated in Style 1 or Style ...
Installation Instructions
Page 14
... check that the range is connected. ■■ See "Troubleshooting" in the drawer glide. 3. To Remove: 1. Hinge latch 3. Check that the gas supply line shutoff valve is open. ■■ If the gas supply line shutoff valve is closed and pull it away from whom you have all parts are... placed in the drawer. Insert both sides. Complete Installation 1. Check that the door is not suggested to the locked position. See the "Level Range" section. 5. For more ...
... check that the range is connected. ■■ See "Troubleshooting" in the drawer glide. 3. To Remove: 1. Hinge latch 3. Check that the gas supply line shutoff valve is open. ■■ If the gas supply line shutoff valve is closed and pull it away from whom you have all parts are... placed in the drawer. Insert both sides. Complete Installation 1. Check that the door is not suggested to the locked position. See the "Level Range" section. 5. For more ...

Installation Instructions
Page 15
...: Do not remove the gas pressure regulator. 15 Slide range back so rear range foot is moved. Unplug range or disconnect power. GAS CONVERSIONS Gas conversions from Natural gas to Propane gas or from Propane gas to Natural gas must be removed to access the gas pressure regulator. B A C A. Failure to Propane Gas) 1. Manual shutoff valve "closed position. Locate gas pressure regulator at rear...
...: Do not remove the gas pressure regulator. 15 Slide range back so rear range foot is moved. Unplug range or disconnect power. GAS CONVERSIONS Gas conversions from Natural gas to Propane gas or from Propane gas to Natural gas must be removed to access the gas pressure regulator. B A C A. Failure to Propane Gas) 1. Manual shutoff valve "closed position. Locate gas pressure regulator at rear...
Installation Instructions
Page 16
... spud placement. To Convert Oven Bake Burner (Natural Gas to Propane Gas) 1. Remove from oven and set it counterclockwise and lifting out. Plastic cover B. Gas pressure regulator cap with solid end facing out C. NOTE: Reinstall one of the screws through the range cooktop to the Model Number and Serial Number Plate located on the...
... spud placement. To Convert Oven Bake Burner (Natural Gas to Propane Gas) 1. Remove from oven and set it counterclockwise and lifting out. Plastic cover B. Gas pressure regulator cap with solid end facing out C. NOTE: Reinstall one of the screws through the range cooktop to the Model Number and Serial Number Plate located on the...


