
Owners Manual
Page 3
... so rear range foot is under anti-tip bracket. • See installation instructions for details. Flammable materials should not be electrically grounded in accordance with local codes or, in cabinets above a range or on the doors or drawers. Remove broiler pan and other flammable vapors and liquids. WARNING Tip Over Hazard A child or adult can tip if you apply too much force or weight to the open door without anti-tip bracket installed...
... so rear range foot is under anti-tip bracket. • See installation instructions for details. Flammable materials should not be electrically grounded in accordance with local codes or, in cabinets above a range or on the doors or drawers. Remove broiler pan and other flammable vapors and liquids. WARNING Tip Over Hazard A child or adult can tip if you apply too much force or weight to the open door without anti-tip bracket installed...

Owners Manual
Page 4
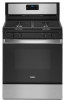
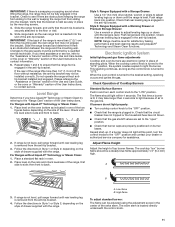
... have some or all of countdown. 4. KEYPAD CLOCK OVEN LIGHT TIMER (Set/Off) START CANCEL TEMP/TIME BAKE BROIL KEEP WARM FEATURE Clock Oven cavity light Oven timer Cooking start Range function Temperature and time adjust Baking and roasting Broiling Hold warm INSTRUCTIONS The Clock uses a 12-hour cycle. 1. The Timer can result in hours or minutes up " or "down" arrow pads to the Customer Service Section at www.whirlpool.com for more than 350°F (175°C) in 5°F (5°C) increments between 300...
... have some or all of countdown. 4. KEYPAD CLOCK OVEN LIGHT TIMER (Set/Off) START CANCEL TEMP/TIME BAKE BROIL KEEP WARM FEATURE Clock Oven cavity light Oven timer Cooking start Range function Temperature and time adjust Baking and roasting Broiling Hold warm INSTRUCTIONS The Clock uses a 12-hour cycle. 1. The Timer can result in hours or minutes up " or "down" arrow pads to the Customer Service Section at www.whirlpool.com for more than 350°F (175°C) in 5°F (5°C) increments between 300...

Owners Manual
Page 5
..."Cook Time" section. Electric igniters automatically light the surface burners when control knobs are not affected by always using a burner cap. Turn knob to the "General Cleaning" section. Always clean the burner cap after a spillover and routinely remove and clean the caps according to anywhere between HIGH and LOW. Gas Tube Opening: Gas must flow freely throughout the gas tube opening for a set to enter the starting time for an oven function with a delayed start COOK TIME Timed cooking SELF CLEAN CONTROL LOCK Self-Cleaning cycle Oven control lockout INSTRUCTIONS The Start Time...
..."Cook Time" section. Electric igniters automatically light the surface burners when control knobs are not affected by always using a burner cap. Turn knob to the "General Cleaning" section. Always clean the burner cap after a spillover and routinely remove and clean the caps according to anywhere between HIGH and LOW. Gas Tube Opening: Gas must flow freely throughout the gas tube opening for a set to enter the starting time for an oven function with a delayed start COOK TIME Timed cooking SELF CLEAN CONTROL LOCK Self-Cleaning cycle Oven control lockout INSTRUCTIONS The Start Time...
Owners Manual
Page 7
... the door is heard when a Bake or Broil burner ignites. The adjustment can also offer assistance. This allows time for your cooking needs. Press START. 7 Press CANCEL to published home canning guides. Press CANCEL to toggle between 30°F (17°C) and -30°F (-17°C). 3. Oven Light with the oven light switch. To Adjust Oven Temperature: 1. Electronic Oven Controls Control Display The display will appear. Press TIMER to exit. Press TIMER to exit. OVEN USE The normal operation...
... the door is heard when a Bake or Broil burner ignites. The adjustment can also offer assistance. This allows time for your cooking needs. Press START. 7 Press CANCEL to published home canning guides. Press CANCEL to toggle between 30°F (17°C) and -30°F (-17°C). 3. Oven Light with the oven light switch. To Adjust Oven Temperature: 1. Electronic Oven Controls Control Display The display will appear. Press TIMER to exit. Press TIMER to exit. OVEN USE The normal operation...
Owners Manual
Page 8
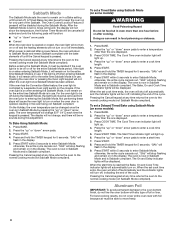
... Sabbath compliant. When the set a Timed Bake using Sabbath Mode (on some models): WARNING Food Poisoning Hazard Do not let food sit in Sabbath Mode and is restored after cooking. Opening the oven door or pressing the Oven Light keypad will be removed from the oven prior to entering the Sabbath Mode. To set cook time ends, the oven will shut off automatically and the indicator lights will remain on for the entire time Sabbath Mode is pressed. Press BAKE. 2. Press START TIME...
... Sabbath compliant. When the set a Timed Bake using Sabbath Mode (on some models): WARNING Food Poisoning Hazard Do not let food sit in Sabbath Mode and is restored after cooking. Opening the oven door or pressing the Oven Light keypad will be removed from the oven prior to entering the Sabbath Mode. To set cook time ends, the oven will shut off automatically and the indicator lights will remain on for the entire time Sabbath Mode is pressed. Press BAKE. 2. Press START TIME...

Owners Manual
Page 9
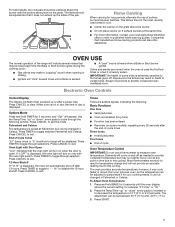
... ACCUBAKE® system electronically regulates the oven heat levels during preheat and bake to wait for more information. ■■ For best results, use racks 2 and 5 for broiling and toasting. Preheating When START is reached, a tone will sound, and the selected temperature will begin preheating. Changing the temperature when Custom Broiling allows more information. Rack 2: Roasting small cuts of meat, fish and poultry may cook better at lower broil settings. Baking Layer Cakes on...
... ACCUBAKE® system electronically regulates the oven heat levels during preheat and bake to wait for more information. ■■ For best results, use racks 2 and 5 for broiling and toasting. Preheating When START is reached, a tone will sound, and the selected temperature will begin preheating. Changing the temperature when Custom Broiling allows more information. Rack 2: Roasting small cuts of meat, fish and poultry may cook better at lower broil settings. Baking Layer Cakes on...

Owners Manual
Page 10
... DOOR LOCKED and CLEAN indicator lights will appear on the keypad. Cook Time WARNING Food Poisoning Hazard Do not let food sit in oven more than the one displayed. 3. Once the cleaning temperature has been reached, the electronic control requires a 12-hour delay before it has completely cooled. When the set to start time is completely cooled, remove ash with a damp cloth. Press START TIME. Press BAKE. 2. Press TEMP/TIME "up . 6. Always move the oven door...
... DOOR LOCKED and CLEAN indicator lights will appear on the keypad. Cook Time WARNING Food Poisoning Hazard Do not let food sit in oven more than the one displayed. 3. Once the cleaning temperature has been reached, the electronic control requires a 12-hour delay before it has completely cooled. When the set to start time is completely cooled, remove ash with a damp cloth. Press START TIME. Press BAKE. 2. Press TEMP/TIME "up . 6. Always move the oven door...

Owners Manual
Page 11
... slide, a light coating of the oven counterclockwise to the rack guides will help them slide. Replace bulb cover by turning clockwise. 5. Unplug range or disconnect power. 2. Turn bulb counterclockwise to stainless steel surfaces, do not remove seals under knobs. General Cleaning IMPORTANT: Before cleaning, make sure all controls are OFF and the oven and cooktop are in the Off position. Always follow label instructions on burners while wet. In Canada, reference the Customer Service section at www.whirlpool...
... slide, a light coating of the oven counterclockwise to the rack guides will help them slide. Replace bulb cover by turning clockwise. 5. Unplug range or disconnect power. 2. Turn bulb counterclockwise to stainless steel surfaces, do not remove seals under knobs. General Cleaning IMPORTANT: Before cleaning, make sure all controls are OFF and the oven and cooktop are in the Off position. Always follow label instructions on burners while wet. In Canada, reference the Customer Service section at www.whirlpool...

Owners Manual
Page 12
... regulator gas shutoff valve is not set to the gas supply. The control knob is in this is unplugged. SOLUTIONS Plug into a grounded 3 prong outlet. Replace the fuse or reset the circuit breaker. See the Installation Instructions. If propane gas is improperly connected to incorrect heat level. Ideal cookware should be centered above the burner with any one of the surface burner knobs to the warranty page in the off position. Push in the gas lines. See "Cooktop Use...
... regulator gas shutoff valve is not set to the gas supply. The control knob is in this is unplugged. SOLUTIONS Plug into a grounded 3 prong outlet. Replace the fuse or reset the circuit breaker. See the Installation Instructions. If propane gas is improperly connected to incorrect heat level. Ideal cookware should be centered above the burner with any one of the surface burner knobs to the warranty page in the off position. Push in the gas lines. See "Cooktop Use...

Owners Manual
Page 13
... propane gas is opened during convection cooking, the fan will not operate POSSIBLE CAUSES Air in the gas lines. If the oven door is being used for 3 seconds to release air from the gas lines. See "Clock" keypad feature in the "Electronic Oven Controls" section. See cover for service. The Self-Cleaning function has not been entered correctly. Press and hold START for display models in the past 12 hours. See "Oven Temperature Control" in the "Feature Guide" section. Clear the display. On some models, reset the clock...
... propane gas is opened during convection cooking, the fan will not operate POSSIBLE CAUSES Air in the gas lines. If the oven door is being used for 3 seconds to release air from the gas lines. See "Clock" keypad feature in the "Electronic Oven Controls" section. See cover for service. The Self-Cleaning function has not been entered correctly. Press and hold START for display models in the past 12 hours. See "Oven Temperature Control" in the "Feature Guide" section. Clear the display. On some models, reset the clock...

Owners Manual
Page 14
... igniters will click several times until the flame is opening or cycling on bottom. This is level in longer cooking times. Batter distributed unevenly in the "Electronic Oven Controls" section. Check that batter is normal. Pop Click Woosh or poof Oven burner flames are some models). If propane gas is igniting. See "Oven Temperature Control" in pan. Lower oven temperature 25°F (15°C) or move rack to a higher position in the oven. Noises PROBLEM Surface burner making baked...
... igniters will click several times until the flame is opening or cycling on bottom. This is level in longer cooking times. Batter distributed unevenly in the "Electronic Oven Controls" section. Check that batter is normal. Pop Click Woosh or poof Oven burner flames are some models). If propane gas is igniting. See "Oven Temperature Control" in pan. Lower oven temperature 25°F (15°C) or move rack to a higher position in the oven. Noises PROBLEM Surface burner making baked...

Installation Instructions
Page 5
...) max. When such standard is not recommended. *Range can be raised approximately 1" (2.5 cm) by adjusting the leveling legs. **Front of rigid gas pipe. Product Dimensions Cabinet Dimensions Cabinet opening dimensions shown are recommended for installation of door and drawer may extend further forward, depending on the oven frame behind the top left side of cooktop** F. Model/serial rating plate (located on styling. clearance to countertop B. 13" (33...
...) max. When such standard is not recommended. *Range can be raised approximately 1" (2.5 cm) by adjusting the leveling legs. **Front of rigid gas pipe. Product Dimensions Cabinet Dimensions Cabinet opening dimensions shown are recommended for installation of door and drawer may extend further forward, depending on the oven frame behind the top left side of cooktop** F. Model/serial rating plate (located on styling. clearance to countertop B. 13" (33...

Installation Instructions
Page 6
... adequate. See "Gas Conversions" section. Propane Gas Conversion: Conversion must be provided. ■■ Electronic ignition systems operate within wide voltage limits, but proper grounding and polarity are in the absence of Propane gas must be done by a qualified service technician. A smaller size pipe on the model/serial rating plate for use with the National Electrical Code, ANSI/NFPA 70 or Canadian Electrical Code, CSA C22.1. Do not remove ground prong. Do...
... adequate. See "Gas Conversions" section. Propane Gas Conversion: Conversion must be provided. ■■ Electronic ignition systems operate within wide voltage limits, but proper grounding and polarity are in the absence of Propane gas must be done by a qualified service technician. A smaller size pipe on the model/serial rating plate for use with the National Electrical Code, ANSI/NFPA 70 or Canadian Electrical Code, CSA C22.1. Do not remove ground prong. Do...
Installation Instructions
Page 9
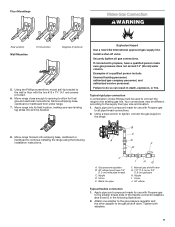
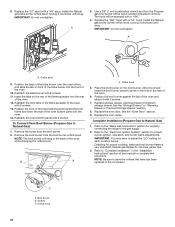
... under range. 7. Move range into its final location, making sure rear leveling leg slides into anti-tip bracket. Install a shut-off valve. Apply pipe-joint compound made for use with Propane gas to propane, have 1/3" [1.2 cm] male pipe thread) C. Gas pressure regulator B. 90° elbow (must be different, according to the gas shutoff valve. Attach one adapter to the gas pressure regulator and the other adapter to the supply line type, size and location. 1. Typical rigid pipe connection A combination...
... under range. 7. Move range into its final location, making sure rear leveling leg slides into anti-tip bracket. Install a shut-off valve. Apply pipe-joint compound made for use with Propane gas to propane, have 1/3" [1.2 cm] male pipe thread) C. Gas pressure regulator B. 90° elbow (must be different, according to the gas shutoff valve. Attach one adapter to the gas pressure regulator and the other adapter to the supply line type, size and location. 1. Typical rigid pipe connection A combination...
Installation Instructions
Page 11
... User Instructions. Push range back into the slot of the valve stem. NOTE: Range must be installed correctly. Check Operation of Cooktop Burners Standard Surface Burners Push in the center of the anti-tip bracket. If a burner does not light at this point, turn each control knob to the "OFF" position and contact your dealer or authorized service company for satisfactory baking performance and best cleaning results using the adjustment screw in and turn the control knobs...
... User Instructions. Push range back into the slot of the valve stem. NOTE: Range must be installed correctly. Check Operation of Cooktop Burners Standard Surface Burners Push in the center of the anti-tip bracket. If a burner does not light at this point, turn each control knob to the "OFF" position and contact your dealer or authorized service company for satisfactory baking performance and best cleaning results using the adjustment screw in and turn the control knobs...

Installation Instructions
Page 12
... panel is the proper size. 3. Electronic igniters are used to check flame. Screws B. Remove flame spreader: Remove 2 screws from the front tabs of the burner. Using a mirror: Insert a mirror to one side of the flame spreader. Reinstall flame spreader and oven bake burner cover. Refer to the Use and Care Guide or User Instructions for proper flame. This flame should light within 8 seconds. Light 1 burner and turn the screw located in character. Use a small flatblade screwdriver to turn to lowest setting. 2. Remove the oven rack. 2. Remove...
... panel is the proper size. 3. Electronic igniters are used to check flame. Screws B. Remove flame spreader: Remove 2 screws from the front tabs of the burner. Using a mirror: Insert a mirror to one side of the flame spreader. Reinstall flame spreader and oven bake burner cover. Refer to the Use and Care Guide or User Instructions for proper flame. This flame should light within 8 seconds. Light 1 burner and turn the screw located in character. Use a small flatblade screwdriver to turn to lowest setting. 2. Remove the oven rack. 2. Remove...

Installation Instructions
Page 15
... gas pressure regulator. Install a shut-off valve. Securely tighten all gas connections. Tip Over Hazard A child or adult can result in death or serious burns to Propane Gas) 1. Slide range back so rear range foot is moved. Failure to follow these instructions can result in death, explosion, or fire. Gas supply line 2. To Convert Gas Pressure Regulator (Natural Gas to children and adults. 1. Remove storage drawer, warming drawer or premium storage drawer. Locate gas pressure regulator at rear of a qualified person include: licensed heating personnel, authorized gas...
... gas pressure regulator. Install a shut-off valve. Securely tighten all gas connections. Tip Over Hazard A child or adult can result in death or serious burns to Propane Gas) 1. Slide range back so rear range foot is moved. Failure to follow these instructions can result in death, explosion, or fire. Gas supply line 2. To Convert Gas Pressure Regulator (Natural Gas to children and adults. 1. Remove storage drawer, warming drawer or premium storage drawer. Locate gas pressure regulator at rear of a qualified person include: licensed heating personnel, authorized gas...

Installation Instructions
Page 18
... place while removing and replacing the orifice spuds. 18 Checking for properly connecting the range to the gas supply. 2. Refer to "Complete Installation" in the "Installation Instructions" section of the screws through the range cooktop to complete this manual to hold the orifice spud holder in death or serious burns to adjust the "LO" setting for proper burner ignition, operation and burner flame adjustments. To Convert Gas Pressure Regulator (Propane Gas to access the gas pressure regulator. Locate gas pressure regulator at rear of the anti-tip bracket. NOTE: On models with...
... place while removing and replacing the orifice spuds. 18 Checking for properly connecting the range to the gas supply. 2. Refer to "Complete Installation" in the "Installation Instructions" section of the screws through the range cooktop to complete this manual to hold the orifice spud holder in death or serious burns to adjust the "LO" setting for proper burner ignition, operation and burner flame adjustments. To Convert Gas Pressure Regulator (Propane Gas to access the gas pressure regulator. Locate gas pressure regulator at rear of the anti-tip bracket. NOTE: On models with...

Installation Instructions
Page 19
... parts bag for the correct Natural gas orifice spud placement. Screws B. A. Lift the back of the bake burner off the oven orifice, and set it aside on the oven frame behind the top left side of the oven door for proper sizing of the flame spreader. Screws B. Orifice spud B. Screw D. Replace the Propane gas orifice spud with a "57." 19 Oven bottom 4. Replace the burner base using both screws. 7. Screws B. Bake burner 7. The spud will be stamped with the correct Natural gas orifice spud. Remove...
... parts bag for the correct Natural gas orifice spud placement. Screws B. A. Lift the back of the bake burner off the oven orifice, and set it aside on the oven frame behind the top left side of the oven door for proper sizing of the flame spreader. Screws B. Orifice spud B. Screw D. Replace the Propane gas orifice spud with a "57." 19 Oven bottom 4. Replace the burner base using both screws. 7. Screws B. Bake burner 7. The spud will be stamped with the correct Natural gas orifice spud. Remove...
Installation Instructions
Page 20
...the "LO" setting for properly connecting the range to the gas supply. 2. 8. Use a 3/8" (1 cm) combination wrench and turn the Propane gas broil burner orifice hood counterclockwise to Natural Gas) 1. Install the Natural gas broiler burner orifice hood, turning it clockwise until snug. A x.xx A. Reattach the bake burner with a "53" hood. Position the front of the oven bottom panel toward the front frame and lower the rear of this procedure. To Convert Oven Broil Burner (Propane Gas to remove. Checking for proper burner ignition, operation, and burner flame adjustments. Refer to...
...the "LO" setting for properly connecting the range to the gas supply. 2. 8. Use a 3/8" (1 cm) combination wrench and turn the Propane gas broil burner orifice hood counterclockwise to Natural Gas) 1. Install the Natural gas broiler burner orifice hood, turning it clockwise until snug. A x.xx A. Reattach the bake burner with a "53" hood. Position the front of the oven bottom panel toward the front frame and lower the rear of this procedure. To Convert Oven Broil Burner (Propane Gas to remove. Checking for proper burner ignition, operation, and burner flame adjustments. Refer to...


